WOODY'S CAMPER - Lightweight Standie

...ask your questions in the appropriate forums BUT document your build here...preferably in a single thread...dates for updates, are appreciated....

Re: WOODY CAMPER - Lightweight Standie

Postby tony.latham » Thu Jun 25, 2015 8:19 pm

Great job! I sense a bit of a boat builder in this project, perhaps?

Tony
User avatar
tony.latham
Gold Donating Member
 
Posts: 6899
Images: 17
Joined: Mon Jul 08, 2013 4:03 pm
Location: Middle of Idaho on the edge of nowhere

Re: WOODY CAMPER - Lightweight Standie

Postby rebapuck » Thu Jun 25, 2015 8:57 pm

Is that a standard garage door opening?
Judy
1966 VW camper
1967 VW singlecab
Image
User avatar
rebapuck
.
 
Posts: 2243
Images: 1
Joined: Thu May 14, 2009 1:55 pm
Location: Chapel Hill NC

Re: WOODY'S CAMPER - Lightweight Standie

Postby TreeRog » Thu Jun 25, 2015 10:42 pm

Image
54.) Looking through rear door into rough interior and showing footwell.

Image
55.) Close up of rough bow interior. Cabinet layout lines are drawn on the floor.

Image
56.) Rough interior view of of left wall wheel well.

Image
57.) Rough interior view of trolly top ceiling and 2" x 4" beam.

Image
58.) I set up a fiberglass cloth cutting table on top of my table saw. The limitations of a one car garage.

Image
59.) View showing the exterior sealed with epoxy resin. It's been washed, and the first sheet of fiberglass
cloth has been temporarily tacked in place with short pieces of blue painters tape.
*See note in photo 62 for how I decided on this location.

Image
60.) Close up of fiberglass cloth being wet out.
*Note pot of epoxy resin on the floor with a squeegee on top.
*I started at the top and dragged the epoxy to the right and left and down until the cloth turned translucent.
*I box a box of latex gloves and tongue depressors online. I buy a bunch of small deli pots from the grocery
store Deli department. After each double squirt batch, I wipe them clean with paper towels. I can do this a
few times, but when they start getting sticky I swap them out for fresh ones. Otherwise I'd be pulling
fiberglass threads out and it becomes a real mess. Work clean.
*I removed the tape as I went. If you can find lower stick "drafting tape" use it; it's easier to peel off.

Image
61.) I had to secure the full width below the window before I could move up and around the window.
* I cut out the gross dry cloth inside and around the wheel well opening. I had to cut radius slits around the
edge so I could wet out the fiberglass cloth over the rounded edge of the wheel well opening.
* See the next photo for the finished result. I had to keep pushing the cloth around the edge as it cured sticky
enough to hold it in place.

Image
62.) The second sheet of 6 oz. fiberglass cloth hung and taped in place.
*The feathered edge of this sheet was hung to overlap the previously applied sheet so that the feathers interlace.
*Note the corner wrapped edge of this sheet. It set the location of the first sheet applied.
Last edited by TreeRog on Mon Jun 29, 2015 9:59 pm, edited 1 time in total.
And have fun out there, Rog
User avatar
TreeRog
Teardrop Inspector
 
Posts: 23
Images: 121
Joined: Sat Feb 01, 2014 8:53 am
Location: Pine Island, Florida
Top

Re: WOODY'S CAMPER - Lightweight Standie

Postby TreeRog » Fri Jun 26, 2015 8:35 pm

Image
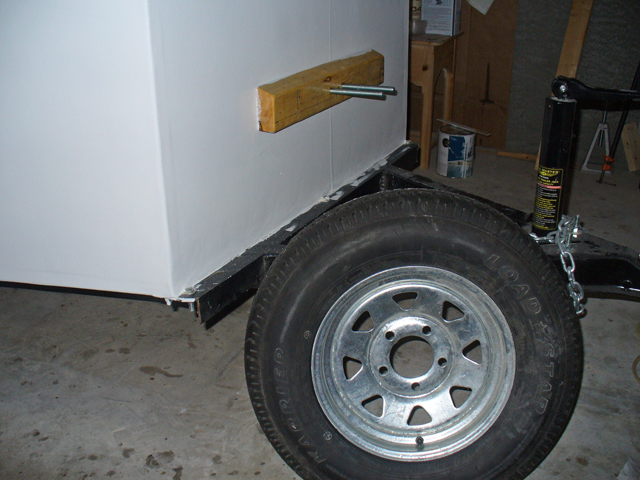
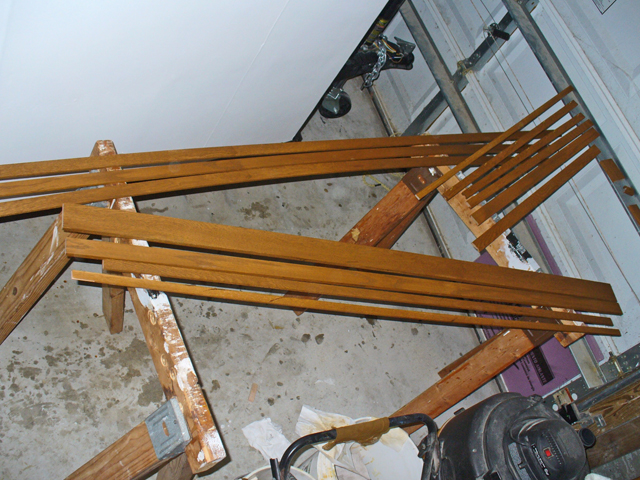
63.) The spare tire attachment I ended up with.
*I had intended to use a trailer spare attachment "U" bolt; secured with a clip to the wall.
*My steel angle dimension error of 1 1/2" caused me to make the 2" x 4" spacer support as shown.

Image
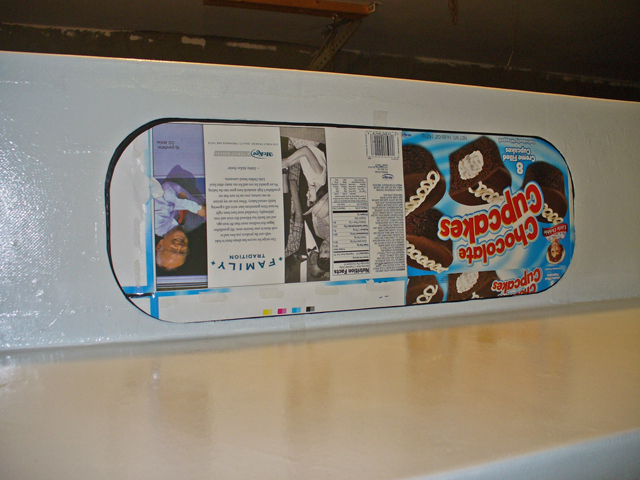
64.) I cut a cardboard template of the Plexiglass trolly window first.
*I allowed 1/8" space between the template and the 1/8" Luan for silicone caulking.

Image
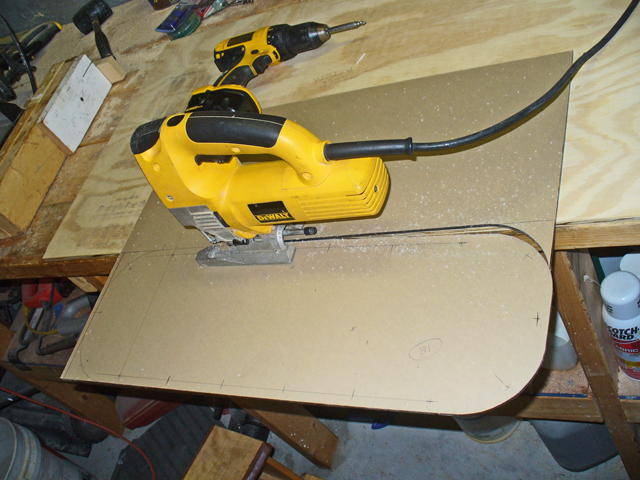
65.) Cutting out the 3/16" "smoke" Plexiglass from the template.
*Note the layout marks to drill holes for the stainless steel attachment screws.

Image
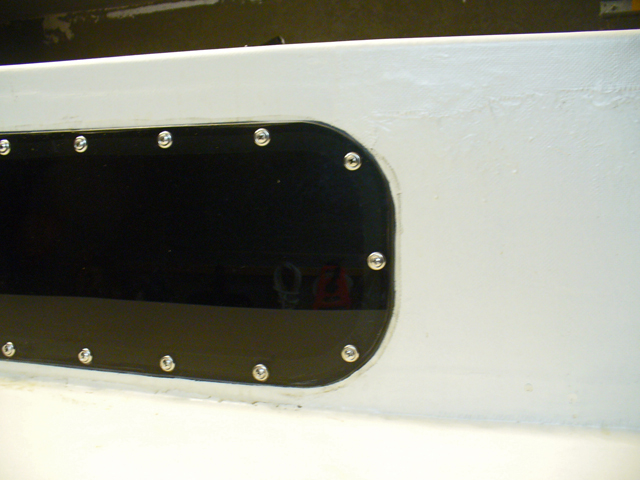
66.) Plexiglass window secured with oval head stainless steel screws set on stainless steel finish washers.
*I put rubber screen spline "Striping" between the plexiglass and the wall panel. I put a ring around the
perimeter; just out side the screw locations. The 2 ends meet at the bottom. I tightened the screws at
alternating ends and carefully; it's easy to crack the Plexi. I caulked the 1/8" edge gap.

Image
66a.) Window spacer trim cut to width and thickness on the table saw, and then stained.
*The narrow wall panel thicknesses (1 1/16") required trim to build up the wall thickness to match the
window and door manufacturers designed wall thickness using their finishing trim rings.
* I cut, glued and brad nailed the trim around the interior window perimeter. I cut 45 degree pieces for the corners.

Image
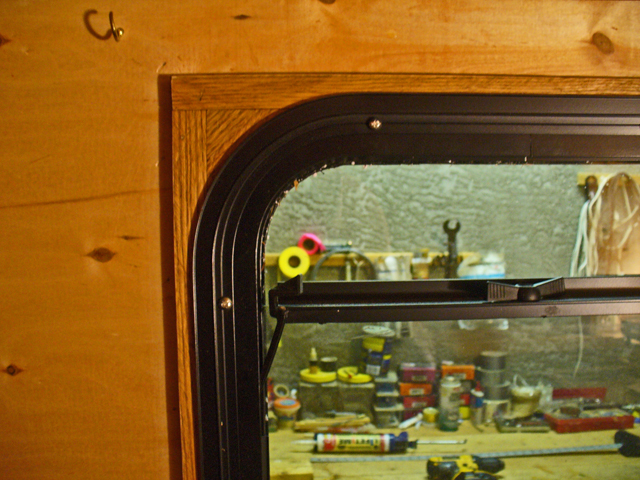
67.) Interior of installed window showing wood spacer trim and window trim ring.

Image
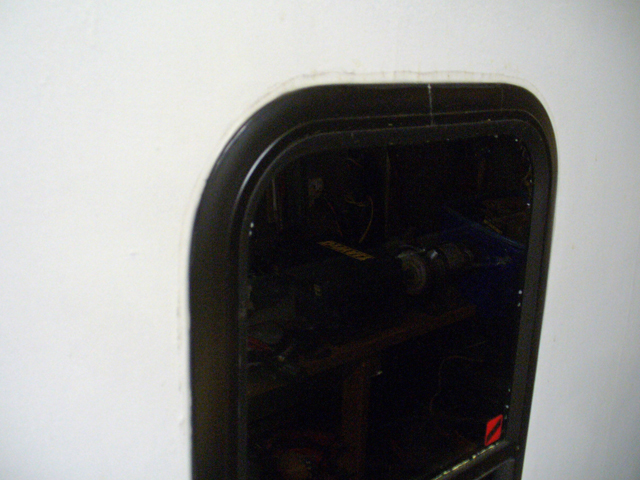
68.) Exterior of window.
*I applied sticky back foam tape around the wall panel window opening. Then I pushed the window in,
and held it in place while a helper screwed in the finish trim ring on the inside.
*It helped to dry fit the window in place and put pencil marks to insure the window flange equally
overlaps the opening, and the window is level.
*I silicone caulked the perimeter of the window flange.

Image
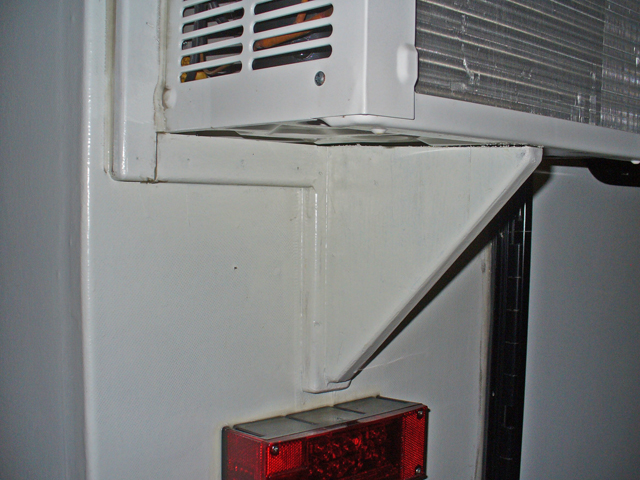
69.) Air conditioner support bracket.
*I assembled this and epoxy sealed it with 2 coats. Then I epoxy glued and screwed it on to the wall panel.
I epoxy glued and brad nailed the bottom and side trim in place.
*After the trailer was finished painted, I set the air conditioner and screwed in the loose top trim.
*Then I caulked all the trim to the air conditioner.

Image
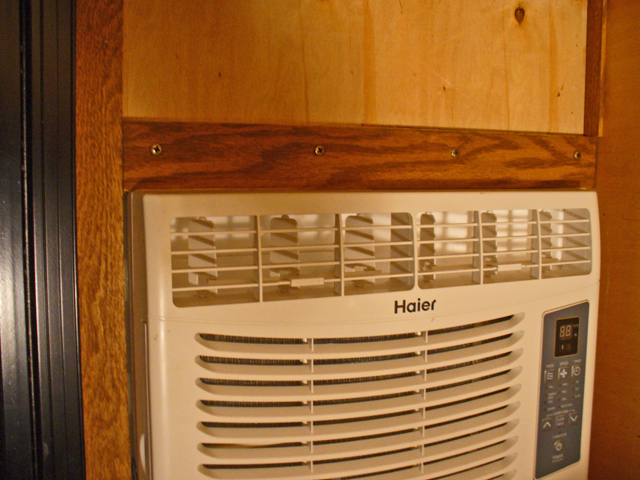
70.) The top and bottom trim was loose and was S.S. screwed in place.
* I didn't install the plastic accordion fillers to fit the unit into a window. I did install the rubber
feather weatherstripping on the right side for as tight a seal as possible.
Last edited by TreeRog on Mon Jun 29, 2015 10:01 pm, edited 2 times in total.
And have fun out there, Rog
User avatar
TreeRog
Teardrop Inspector
 
Posts: 23
Images: 121
Joined: Sat Feb 01, 2014 8:53 am
Location: Pine Island, Florida
Top

Re: WOODY'S CAMPER - Lightweight Standie

Postby TreeRog » Fri Jun 26, 2015 10:14 pm

Image
71.) Right side exterior view; finish painted.
*I didn't have time to fill and sand the fiberglass seams for a high quality finish. I just washed
the cured epoxy, and painted it with 2 coats of porch and deck enamel. I thinned the first coat a little.

Image
72.) Rear exterior view.

Image
73.) Front exterior view.
*The access hatch was from an online Marine discount store. It doesn't lock, and leaked in a downpour.
I think I calked the leak away, but to protect the camper I put 2 more coats of epoxy resin on the storage
area floor and up the walls 3 inches.
*I now wonder if I should have put the hinges on the bottom. The door wouldn't fall on my head.

Image
74.) The prepped interior of the camper.
*All the cabinet layout lines have been drawn in the floors. Then the floor under the table was sealed
with polyurethane. The floors under the galley cabinets were polyurethane sealed.
*All the cabinet layout lines have been drawn on the walls. Then all the walls ABOVE the cabinets
were sealed with polyurethane. All the ceilings were polyurethane sealed.
*The floor of the porta potty area and the footwell sides were epoxy sealed.

Image
75.) The blocking for the bow storage area has been installed. The bow plywood bulkhead has been
cut and fitted, and it's top cleat installed.

Image
76.) The 30 amp shore power plug has been installed and run to a two circuit breaker panel. I had to buy
a separate grounding bar to go in the box. One breaker was for the A/C, and the other handled the wall outlets.
*Note, because of the thin walls the wiring has to be surface run. Most of it is hidden in the cabinets, but I had
to rip a piece of trim and rabbet a grove in the back for the wiring to the 4 gang box in the bow.

Image
77.) All the wall and floor cleats have been installed on the left side.
*The plywood bow bulkhead has been installed and all the shelf cabinet cleats.
*The plywood shelf cabinet back has been installed in front of the wheel well.

Image
78.) All the wall and floor cleats have been installed on the right side.
*The plywood shelf cabinet back has been installed in front of the wheel well.
Last edited by TreeRog on Mon Jun 29, 2015 10:01 pm, edited 2 times in total.
And have fun out there, Rog
User avatar
TreeRog
Teardrop Inspector
 
Posts: 23
Images: 121
Joined: Sat Feb 01, 2014 8:53 am
Location: Pine Island, Florida
Top

Re: WOODY'S CAMPER - Lightweight Standie

Postby TreeRog » Fri Jun 26, 2015 10:50 pm

Image
79.) Left side 15/32" Sand Ply cabinet sides Titebond II glued and 18 ga. brad nailed in place.
*Note all cleat layout lines have been drawn, and notches have been cut around wiring.
* The footwell sides have been painted with a tan grey enamel. One of the last finish steps of the build will be
to put self adhesive vinyl planks on the floor of the footwell. Clear silicone caulk will seal the floor to the walls.

Image
80.) The left side 15/32" Sand Ply tops cut and LOOSE and test fitted in place.
*Note all the horizontal shelf cleats have been glued and 18 ga. brad nailed in place.

Image
81. Left side top cleats glued and nailed in place.
Last edited by TreeRog on Mon Jun 29, 2015 10:01 pm, edited 2 times in total.
And have fun out there, Rog
User avatar
TreeRog
Teardrop Inspector
 
Posts: 23
Images: 121
Joined: Sat Feb 01, 2014 8:53 am
Location: Pine Island, Florida
Top

Re: WOODY'S CAMPER - Lightweight Standie

Postby TreeRog » Fri Jun 26, 2015 11:40 pm

Image
82.) Front view with 15/32" Sand Ply cabinet sides glued and 18 ga. brad nailed in place.

Image
83.) Right side 15/32" Sand Ply cabinet sides glued and nailed in place with tops LOOSE fitted in place.
*Note horizontal shelf cleats are glued and 18 ga. brad nailed in place.

Image
84.) Right side view. Top cleats installed and pencil layout lines drawn.

Image
85.) 5mm - 3/16" shelf being test fitted in place. Layout lines have been drawn for notch for face frame.

Image
86.) Checking square and horizontal measurement, BEFORE cutting and building face frame. I used
alignment marks, and planned dimensions to have all square face frames, before I built the frames.
Last edited by TreeRog on Mon Jun 29, 2015 10:02 pm, edited 2 times in total.
And have fun out there, Rog
User avatar
TreeRog
Teardrop Inspector
 
Posts: 23
Images: 121
Joined: Sat Feb 01, 2014 8:53 am
Location: Pine Island, Florida
Top

Re: WOODY'S CAMPER - Lightweight Standie

Postby TreeRog » Sat Jun 27, 2015 6:09 pm

Image
87.) Typical cabinet face frame construction. PHOTOS 87. to 94.
*The pre-stained red oak has been cut to length. I measured and drew alignment lines for the middle shelf.
*I squared the frame, and then glued and 18 Ga. brad nailed the pieces together. I had a biscuit cutter, but
that was not necessary.

Image
88.) The back of the cabinet face frame.
*After the glue dried, I flipped the face frame and glued and brad nailed the top and side cleats with the
long width up. These are necessary to nail to the 15/32" Sand Ply sides and top.
*Note the shelf rabbet is down and to the back.

Image
89.) The completed face frame shown upside down.
*I glued and clamped the pre-fit 3/16" shelf in place. I then secured it with 18 ga. crown staples.
*If I had shaved a little off one side of the shelf to fit the cabinet side, I had to make sure that this was the bottom of the shelf.

Image
90.) The completed face frame with attached shelf was slid into place like a drawer.
*Note the big top cleats on the backs of the 15/32" Sand Ply cabinet sides. They were cut and overlapped at the corners. Then
they were brad nailed to hold the sides square.

Image
91.) The bottom face frame front being brad nailed to the floor cleat.

Image
92.) View of the face frame cleat being brad nailed to the cabinet side.

Image
93.) View of the shelf being brad nailed in place.

Image
94.) After the bottom cabinet was completed, I was able to brad nail the 15/32" Sand Ply top in place.
*Note the access panel support cleat on the left had to be glued to the plywood on the bottom and
screwed from the top.

Image
95.) I drilled holes in the cabinet side to run the 12 volt wiring for the Coleman thermo electric cooler.
*I ran the cigarette lighter male plug to the front location shown. There are two connection options:
1.) A 12 volt female cigarette lighter outlet. I wired that through the trailer and through the underside of
the car to the car battery. The 7 way plug and socket for the electric brakes had a 12v. accessory slot open.
2.) A 120 volt power converter that came with the cooler. I plugged that into the 120v. 4-plex receptacle,
and ran its 12v. wire and socket down to the cigarette plug.
*It's a lightweight system that uses just the car battery. I just have to remember to switch the sockets, and
not leave the cooler connected to the car battery overnight.
Last edited by TreeRog on Mon Jun 29, 2015 10:02 pm, edited 3 times in total.
And have fun out there, Rog
User avatar
TreeRog
Teardrop Inspector
 
Posts: 23
Images: 121
Joined: Sat Feb 01, 2014 8:53 am
Location: Pine Island, Florida
Top

Re: WOODY'S CAMPER - Lightweight Standie

Postby TreeRog » Sat Jun 27, 2015 7:31 pm

Image
96.) A 3/16" shelf with the glue spread and ready to be crown stapled into place.
*Note the pencil tic marks to match the location and fit from when the whole assembly was test fitted
in the cabinet. As shown here; I started from the bottom. There would have been more nail gun room
if I had started from the top and worked down.

Image
97.) View of completed tall shelf face front being slid into place.
*Note the pencil width spacing. With the multiple shelves, it was easier to slip the unit in place with a little space.

Image
98.) Note the tail light wiring in this view. Because of the side notches in these 2 shelves
for the wiring, a different assembly procedure was needed for the Galley face front.
That will be shown in the next two photos.

Image
99.) When the face front and shelves were test fitted; pencil layout lines were drawn on all the shelf bottoms as shown.
But also small holes were drilled, and small screws were installed in the dry fit. A shortie screwdriver was needed.
*The shelves were brad nailed into the cleats from the top, and the screws were then taken out.
*Then the face front was removed. Then glued was applied on the shelf edges to be screwed and the matching face front
rabbets. The unit was slid back in place, and the screws were put back in place.
*The face front was then brad nailed to the cleats in the normal manner.

Image
100.) The water jug shelf required two screws for extra support.
*I put a piece of 15/32" Sand Ply, cut to the size of the water jug shelf, on top of the 3/16" shelf.
*I put blocking on the left and back to keep the jug from sliding around. Then I epoxy glued and
sealed it all to eliminate water spill rot.
Last edited by TreeRog on Mon Jun 29, 2015 10:03 pm, edited 2 times in total.
And have fun out there, Rog
User avatar
TreeRog
Teardrop Inspector
 
Posts: 23
Images: 121
Joined: Sat Feb 01, 2014 8:53 am
Location: Pine Island, Florida
Top

Re: WOODY'S CAMPER - Lightweight Standie

Postby TreeRog » Sat Jun 27, 2015 10:07 pm

Image
101.) Rabbeted edge trim detail.
*It's turned down and flush with the top at the table/berth board.
*It's up as a raised edge at the counter top.

Image
102.) Small edge trim at counter top opening for air conditioner cord.
*This is to prevent any counter top spills from running into the cabinet below.

Image
103.) Detail of wood trim surround around surface mounted electrical receptacle box.

Image
104.) Swing top counter construction.
*I laminating 5mm Tri Ply on 15/32" B/C plywood with Titebond II glue and clamps.

Image
105.) Red oak raised edge detail on swing top counter.

Image
106.) Swing top counter piano hinge. A small latch bolt holds it in the up position if the head needs to be used.
*Note the rabbeted wood trim that covers the trailer light wiring that runs down through the floor.

Image
107.) LED tail light mounted on exterior rear.
*This was a puzzling leak. I had caulked the wiring in the hole through the wall, but I must have pushed the caulking
further in when I slid the light over the mounting screws. I had to take it off and really stuff the hole with caulk. After
I remounted the tail light, I caulked the top and sides of the light to the wall with silicone caulk.

Image
108.) Right side of camper loaded and ready to go on first trip. The table drops down, and when I put in a cushion
it's almost a queen size bed.
*This view was before I added a nylon webbing strap to tie down the microwave.

Image
109.) View of bow fully trimmed out. The left shelf has been installed and a flip down T.V. hung.
*Note the little puck lights are just stuck on battery lights for use if I'm in a campground that doesn't have electric.

Image
110.) Left side view of Galley storage and dish washing pan. I don't have a sink and water system.

Image
111.) THE END.
Last edited by TreeRog on Mon Jun 29, 2015 10:03 pm, edited 2 times in total.
And have fun out there, Rog
User avatar
TreeRog
Teardrop Inspector
 
Posts: 23
Images: 121
Joined: Sat Feb 01, 2014 8:53 am
Location: Pine Island, Florida
Top

Re: WOODY CAMPER - Lightweight Standie

Postby Atomic77 » Sat Jun 27, 2015 10:12 pm

I'm really enjoying your build. Nice work!
Michael

"The Strength is in the Sum of the Parts..."

The Astroliner

Follow The Astroliner Blog Here!

Check out our YouTube video
User avatar
Atomic77
1000 Club
1000 Club
 
Posts: 1463
Images: 309
Joined: Tue Oct 08, 2013 5:29 pm
Location: Fort Wayne Indiana
Top

Re: WOODY'S CAMPER - Lightweight Standie

Postby tsmyth » Wed Jul 01, 2015 6:15 pm

I would like to see your camper and take pictures, if you live near Hudson Fl ?
I am about 70% finished with my hi-lo standee.
User avatar
tsmyth
Teardrop Builder
 
Posts: 32
Images: 28
Joined: Thu Jun 21, 2012 8:20 am
Location: Port Richey, FL
Top

Re: WOODY'S CAMPER - Lightweight Standie

Postby S. Heisley » Thu Jul 02, 2015 8:45 pm

That is a very nice design! Good job! :thumbsup:
Congratulations on your build and your successful maiden voyage. :wine:

Thanks for sharing your build with us. :applause:
User avatar
S. Heisley
Super Lifetime Member
 
Posts: 8772
Images: 495
Joined: Mon Sep 17, 2007 10:02 am
Location: No. California
Top

Re: WOODY'S CAMPER - Lightweight Standie

Postby noseoil » Thu Jul 02, 2015 9:16 pm

Yep, simple & clean, a job well done!
Build log: viewtopic.php?f=50&t=60248
The time you spend planning is more important than the time you spend building.........

137905
User avatar
noseoil
1000 Club
1000 Club
 
Posts: 1820
Images: 669
Joined: Sun Apr 27, 2014 8:46 am
Location: Raton, New Mexico, living the good life!
Top

Re: WOODY'S CAMPER - Lightweight Standie

Postby pchast » Thu Jul 02, 2015 9:29 pm

Nicely done. :thumbsup:
Thanks for sharing.
:D
pchast
Platinum Donating Member
 
Posts: 2026
Images: 97
Joined: Mon Jan 28, 2013 5:47 pm
Location: Athens, NY
Top

PreviousNext

Return to Build Journals

Who is online

Users browsing this forum: TimC and 56 guests

cron