Our first build - a vardo

...ask your questions in the appropriate forums BUT document your build here...preferably in a single thread...dates for updates, are appreciated....

details, details, details....

Postby lgatlin » Sat Oct 10, 2015 1:52 pm

I've been busy with several work related things -- committee reports, I'm going up for tenure this year, so I had a lot of things keeping me away from working more on the vardo. But we did get several things done in the last week or so. First, I did make the windows for the mollycroft:
Image
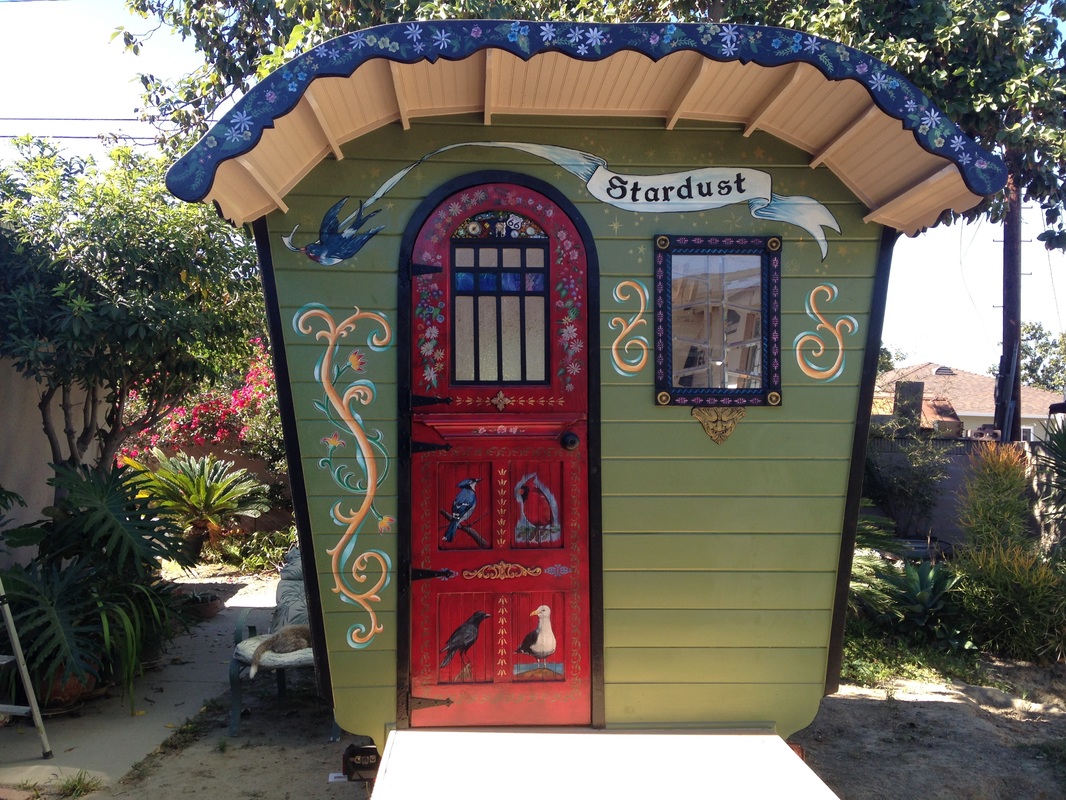
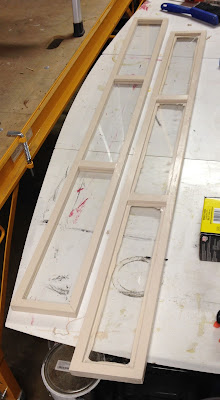
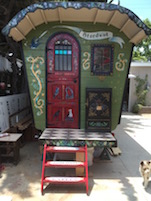
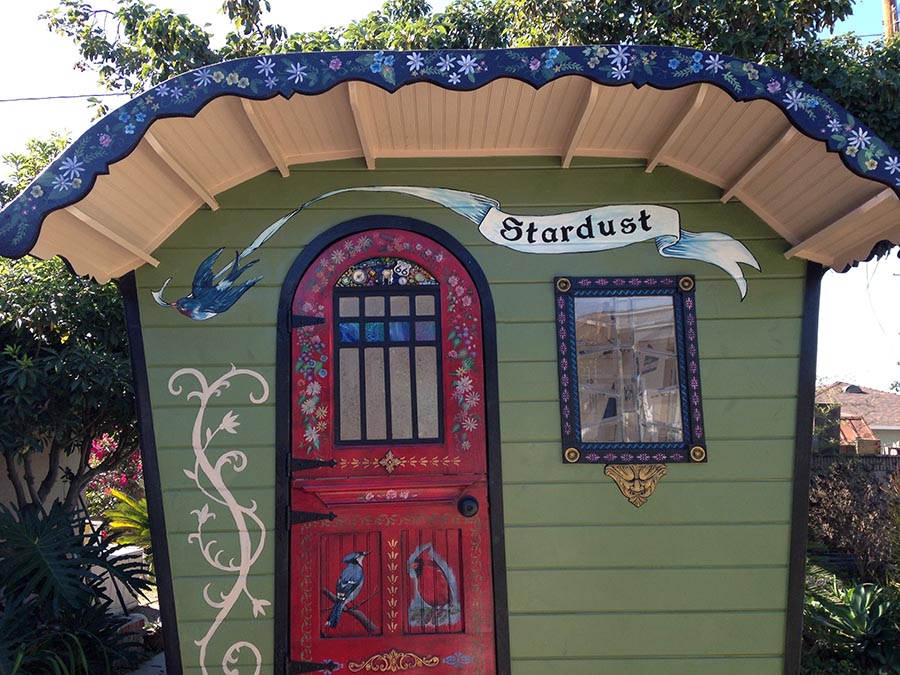
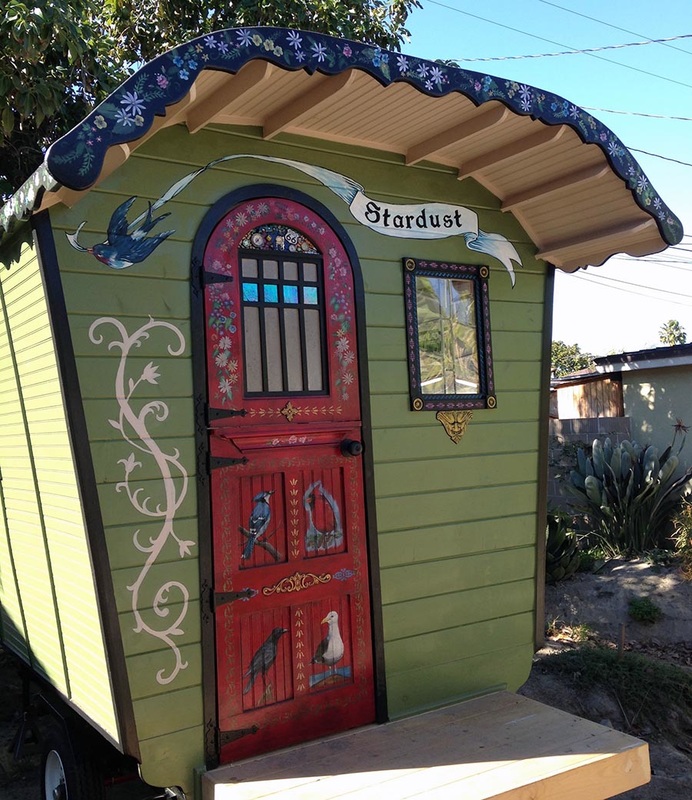
although I still need to clean up some paint and get them installed. They have plexi to keep them light. All of the windows need to have a bead of silicone run around the edges of the glass now that I have them all painted, so that's something I'll get done this week. We also installed the door:
Image
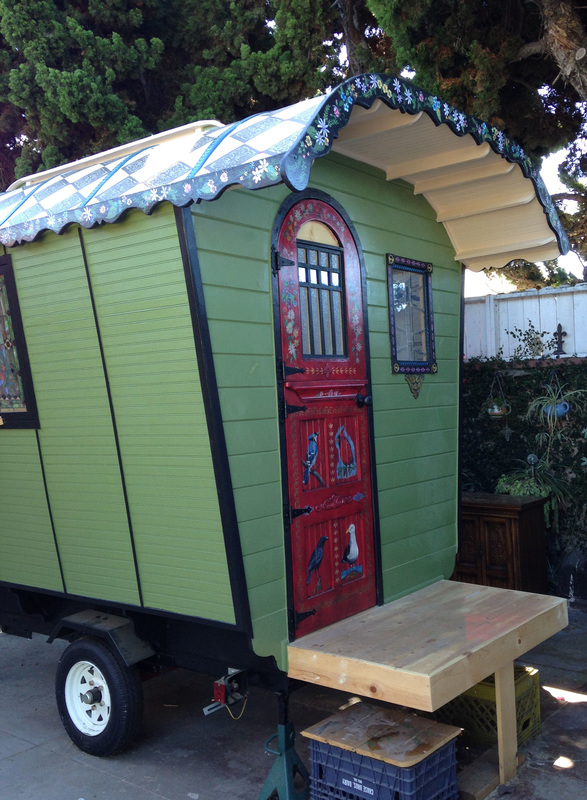
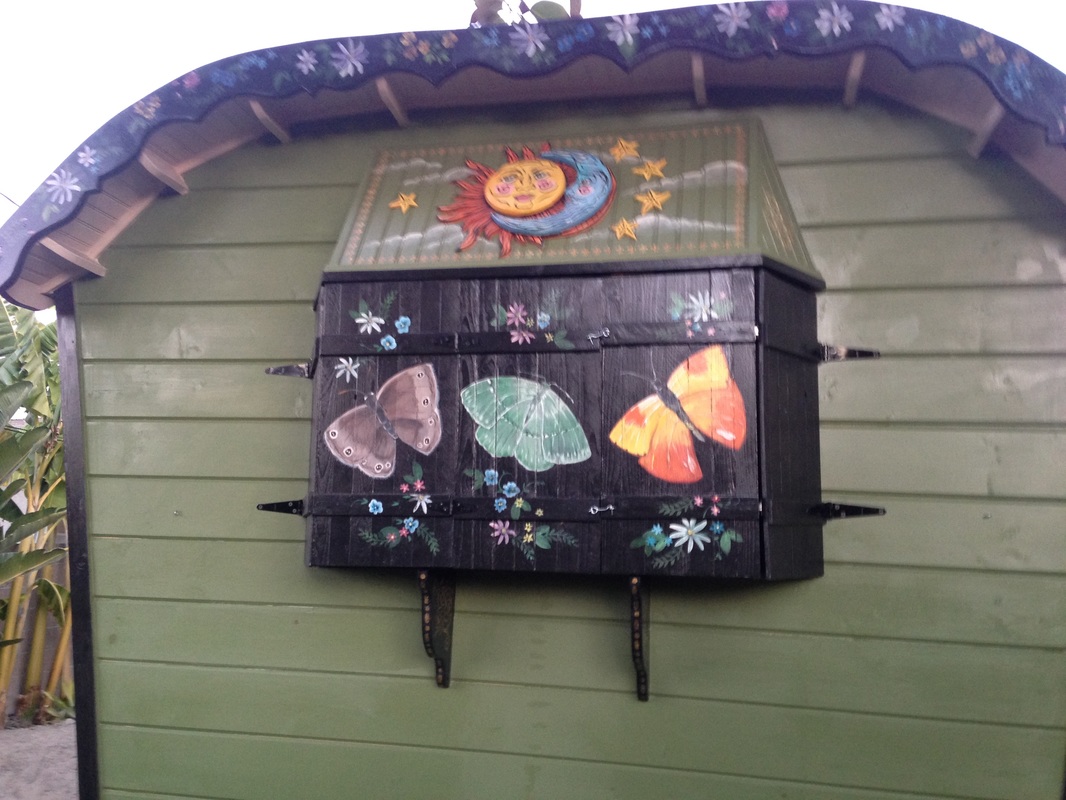
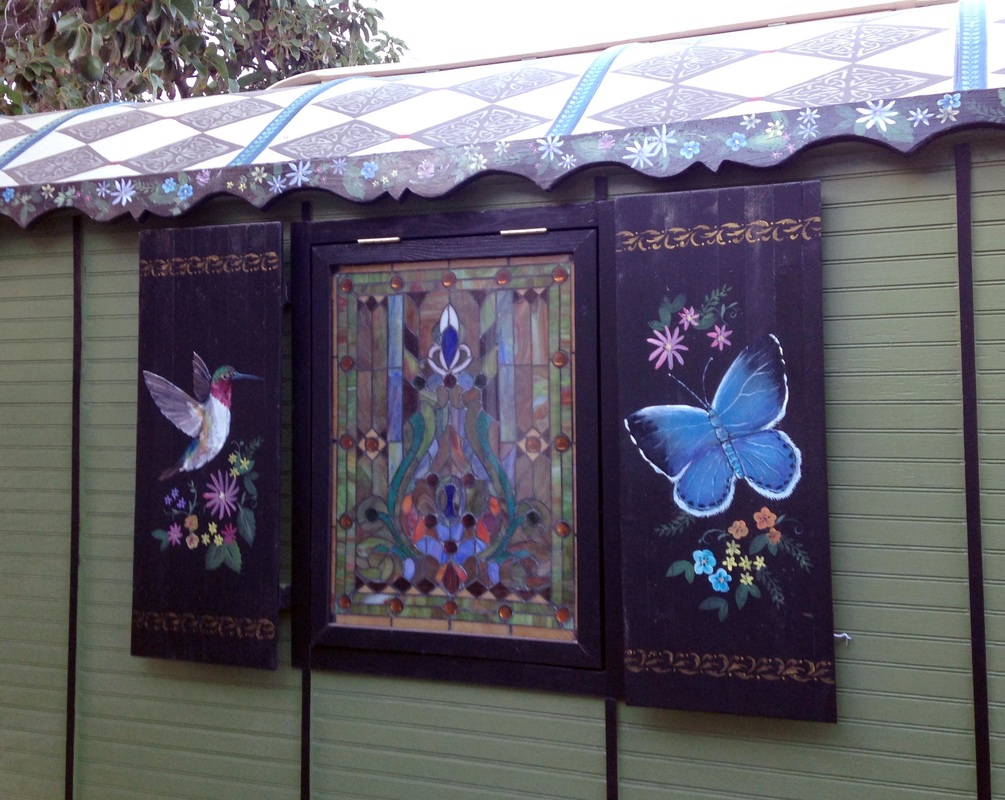
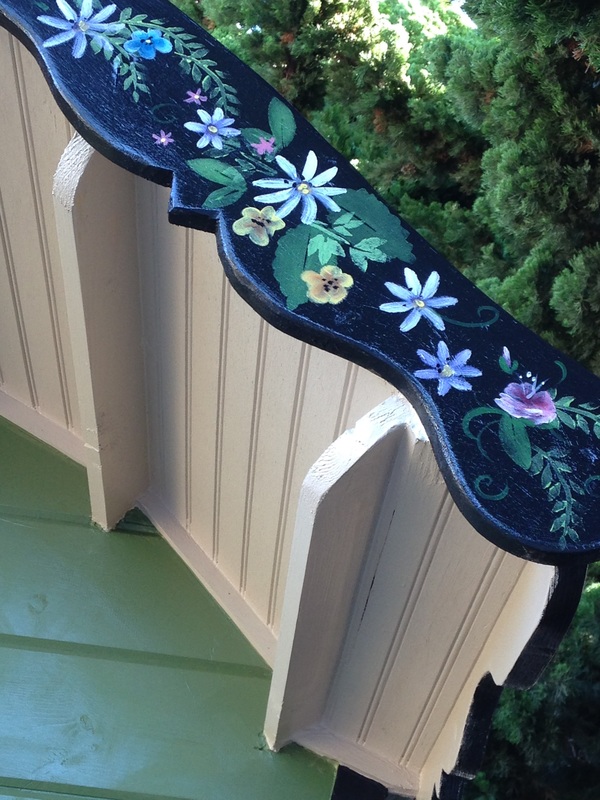
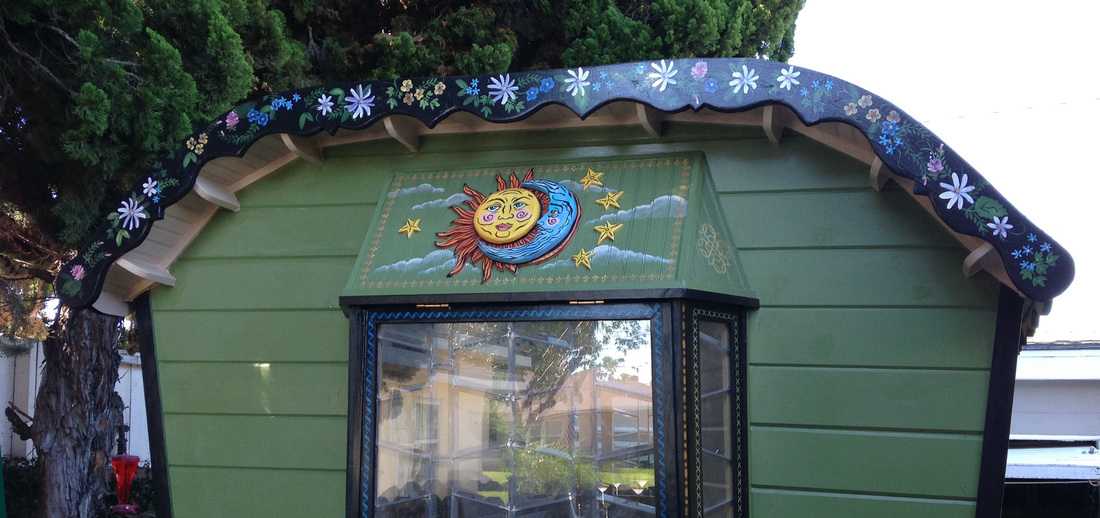
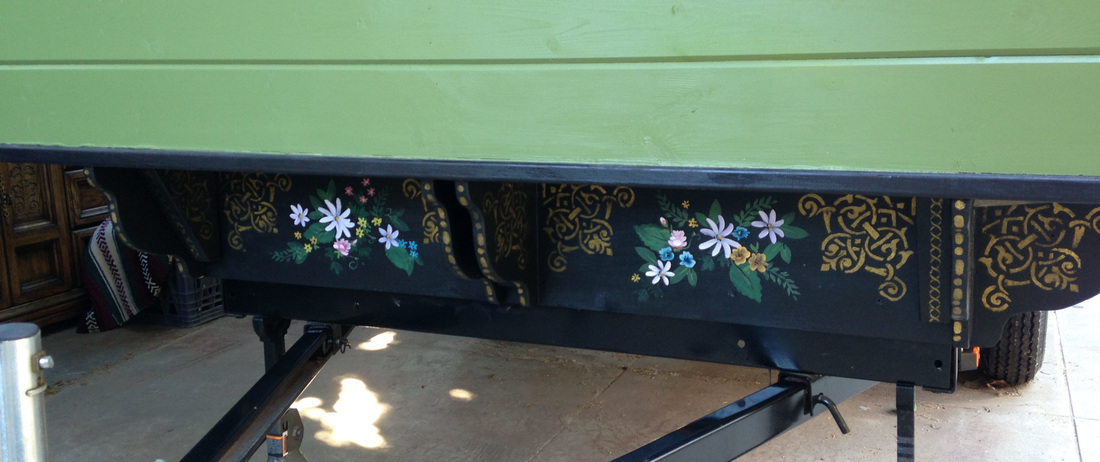
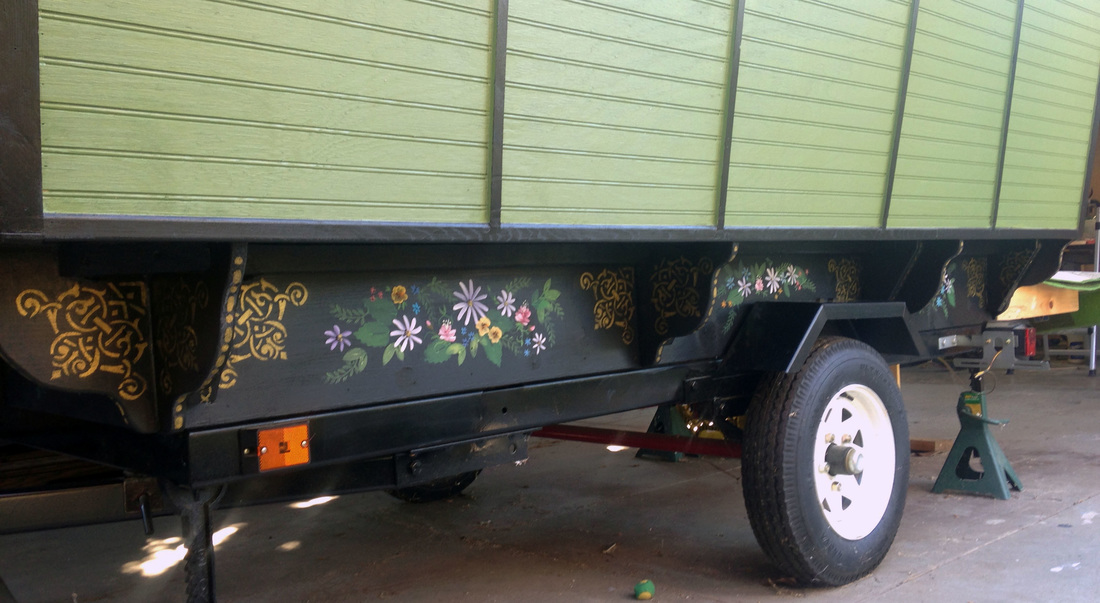
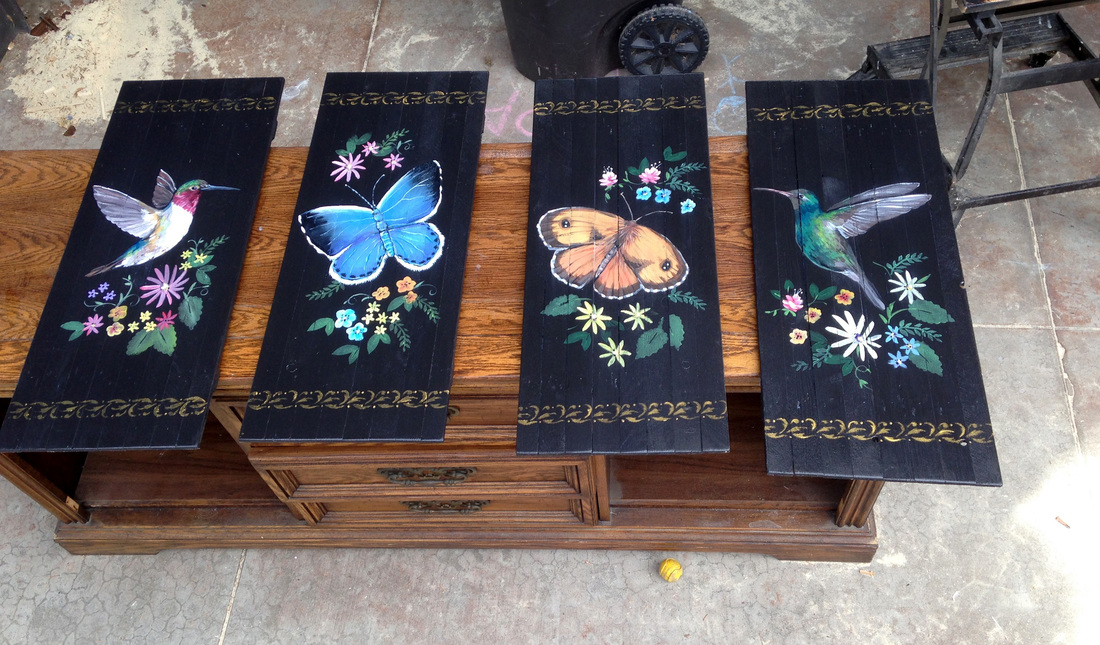
We had the door knob keyed to our house so we don't have to keep track of an additional key. Drilling for the lockset was fun - we bought a kit from Lowe's because it looked like all the templates and coordinating drill bits would make the job easier - except that one of the hole saws was so off center we coudln't use it --but other than that, it went easily enough. We had to cut down one of the hinges - the top one on the top half, so it would fit, but that went well enough. My husband doesn't like that the painting gets covered up somewhat, but it doesn't bother me, since I know there are a lot of other details that'll be added, so one or two covered up is no big deal. I got the soffits and trim painted, little at a time over the past week, then this morning, I got the flowers painted all along the top band. I created a set of stamps for the leaves:
Image
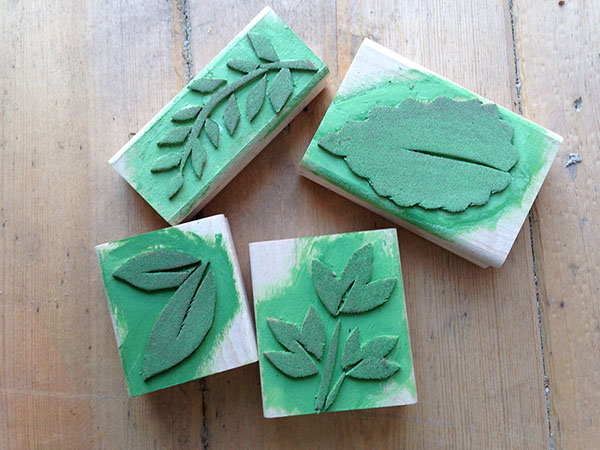
so I could just apply paint there with a brush, then press them on the board. I did all the leaves last night, then got the flowers done this morning, before it gets too hot. We're having yet another heat wave down here in Southern California, it was over 100 yesterday, so getting things down around the heat of the day is another challenge. After getting all these flowers painted, I put a coat of clear acrylic over them, and also over the entire roof.

Image
Image

So the other thing we've been doing this last couple of weeks is collect some free furniture by checking the "free" section of craigslist. We've picked up 3 pieces that we're going to cannibalize for our interior so far.

Image

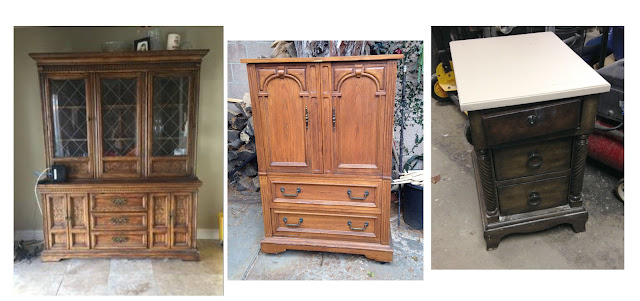
To keep costs down, we're going to issue ourselves a challenge to see how much of the interior we can create without spending any money. So these three pieces will provide a lot of the wood for any structure, although they are heavier than we need so we'll be taking lots of wood out of them. The first piece up there on the left, we're going to use the front of the bottom for the drawers and under bed storage - we'll just use the front face of the cabinet, and the drawers, then use the sides and tabletop to cut framing. We will use the top crown and trim and the back panel is a piece of 1/4" masonite that we'll use for walls under the bed. The piece in the middle I got for the top two doors, which will be the doors for a tall thin cabinet (I'll use the doors like this:)[code]
Image

The bottom half will be part of our galley cabinets. The small endtable on the far right will be a short cabinet on one side. Again, all these cabinets will be cut up to some extent, taking out additional wood to lighten them up, and then at the end, they'll be painted the same color to create a cohesive look. We look for some kind of interesting feature, like the carved posts on the endtable, or the cool doors.

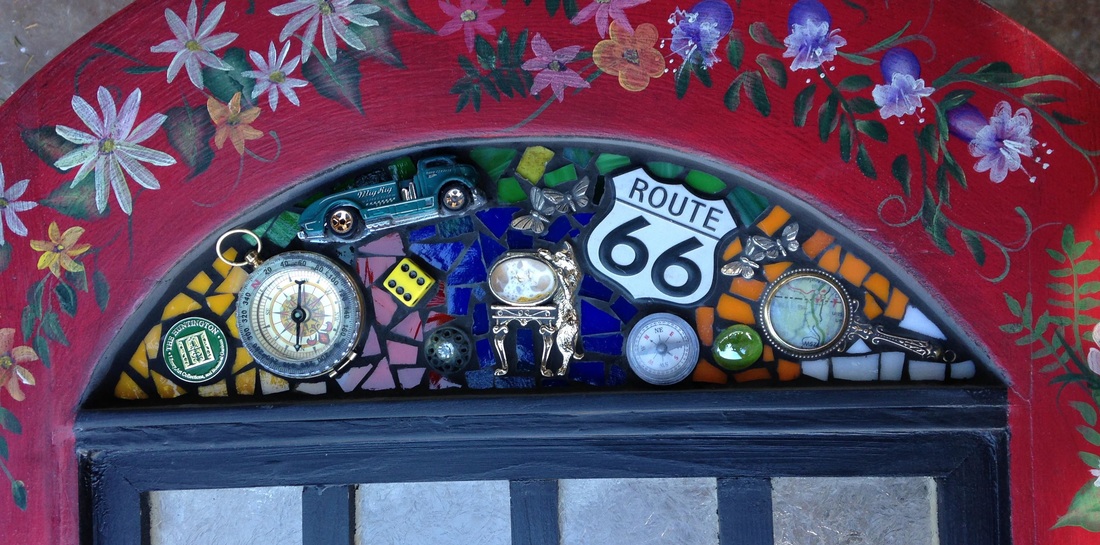
On the inside, the only thing we've gotten done is insulation and one coat of paint on the ceiling. This week my goal is to paint the ceiling again, and get the shutters made for the windows. I need to know what the shutters will cover so I can begin my exterior painting. We are also planning our electric so we can get that roughed in before we start on our interior -- we've been shopping for solar panels and figuring out where our lights and outlets, etc. will go so we can get that all placed before getting the interior walls on. We've been perusing the various resources on this site, which has helped a lot. I've also been checking out a lot of build journals to keep the ideas flowing ---
User avatar
lgatlin
Teardrop Advisor
 
Posts: 63
Images: 27
Joined: Mon Jun 29, 2015 3:29 pm
Location: Long Beach, CA

Re: Our first build - a vardo

Postby OP827 » Sat Oct 10, 2015 9:57 pm

It looks amazing, work of Art, like it is from a fantasy or a museum! :applause: :applause: :applause:
User avatar
OP827
Donating Member
 
Posts: 1555
Images: 405
Joined: Fri Apr 25, 2014 7:27 pm
Location: Bruce County Ontario

Re: Our first build - a vardo

Postby dales133 » Sat Oct 10, 2015 10:43 pm

Verry nice,love the cabinetts
User avatar
dales133
4000 Club
4000 Club
 
Posts: 4605
Images: 1
Joined: Mon Oct 13, 2014 5:26 pm
Top

Re: Our first build - a vardo

Postby S. Heisley » Sun Oct 11, 2015 7:30 pm

Knowing you're in So. California, I hope you come to next year's IRG gathering in July. (Exact date won't be known until sometime in January because that's when they can reserve it...via a sort of lottery phone system.) I'd really like to see this build up close. The IRG (International Redwoods Gathering) is held in an old growth forest in Pamplin Grove, along the Van Duson River, not very far from Eureka, CA.
User avatar
S. Heisley
Super Lifetime Member
 
Posts: 8772
Images: 495
Joined: Mon Sep 17, 2007 10:02 am
Location: No. California
Top

Re: Our first build - a vardo

Postby lgatlin » Mon Oct 12, 2015 1:44 am

S. Heisley wrote:Knowing you're in So. California, I hope you come to next year's IRG gathering in July. (Exact date won't be known until sometime in January because that's when they can reserve it...via a sort of lottery phone system.) I'd really like to see this build up close. The IRG (International Redwoods Gathering) is held in an old growth forest in Pamplin Grove, along the Van Duson River, not very far from Eureka, CA.


Oh, that sounds awesome. That's exactly why we're making this - for camping out in places like that. I'll keep my eye out for the dates. Let's see....that gives me about 8 months to finish. It'll probably take us that long, but we should have something liveable by then!

I spent this morning painting the bottom, below the ledge. I stenciled gold edges and flowers to match the top. My husband says it needs more animals and scrolls, and that's what'll be on the main green parts. We also got the windows in up top, and we're working on the latches, which are coming along.
Image
Image
User avatar
lgatlin
Teardrop Advisor
 
Posts: 63
Images: 27
Joined: Mon Jun 29, 2015 3:29 pm
Location: Long Beach, CA
Top

Re: Our first build - a vardo

Postby robwormald » Fri Oct 16, 2015 5:19 pm

What an awesome creation you have made! Looks truly beautiful. I had been planning on building a teardrop until about a month ago. We need to sleep a family of four and my designs were getting bigger and bigger to the point where it was going to be easier to just buy a caravan. I wanted something with more character and started looking at Reading Gypsy Caravans as a style model, then stumbled on yours today. Unfortunately, we have a number of projects going on at the moment, so will have to remain a dream for now. But this is an inspiration! Well done!
robwormald
Teardrop Inspector
 
Posts: 1
Joined: Mon Apr 13, 2015 3:48 pm
Top

Re: Our first build - a vardo

Postby rebapuck » Fri Oct 16, 2015 7:52 pm

It's just beautiful. How many pounds of paint do you think you've added? :)

Where will solar panels go? I'd hate to see that roof covered.
Judy
1966 VW camper
1967 VW singlecab
Image
User avatar
rebapuck
.
 
Posts: 2243
Images: 1
Joined: Thu May 14, 2009 1:55 pm
Location: Chapel Hill NC
Top

Re: Our first build - a vardo

Postby lgatlin » Wed Oct 21, 2015 10:34 pm

rebapuck wrote:It's just beautiful. How many pounds of paint do you think you've added? :)

Where will solar panels go? I'd hate to see that roof covered.


So the plan is to put the solar panels on the very top of the mollycroft -- I left it painted solid brown. I'm starting to think we might have to add a fan as well, so we may have to cut through the roof a little over the bed, but we'll leave that for down the road. The paint -- it's just starting. My whole desire for this type of build was so that I could just paint all over it. It'll also be over the top ridiculous inside.

We had company for the past week or so, no progress on the build, but I hope to get back to work this weekend. I want to get the shutters built so I can see where I can start doing some paint on the sides and ends. I'm ready to do some big designs!
User avatar
lgatlin
Teardrop Advisor
 
Posts: 63
Images: 27
Joined: Mon Jun 29, 2015 3:29 pm
Location: Long Beach, CA
Top

Shutters

Postby lgatlin » Sun Oct 25, 2015 6:00 pm

We had a visit from my daughter, her husband and their little one - our grandson, so we had to stop working and move the vardo from it's spot on the driveway into the middle of the backyard, where Parker (our grandson) could use it as a playhouse while they were out. He approved - loved climbing in and locking us out This week, Dale got the interior all insulated, and I made shutters for our windows so they're protected while we're on the road. I have two sets for the side windows, and five pieces that run across the bay window. Before I put them up, I wanted to decorate them since it's easier painting while they're down. Dale suggested butterflies and hummingbirds, since we've been having plenty of those this week in the yard. In fact, one hummingbird kept visiting the feeder right where I was working this afternoon.

Image

I haven't started on the bay window set yet, but I'll get that done this week. We also spent the day yesterday taking apart all the furniture we picked up for the interior, breaking it down to the parts we are going to use, and taking off any extraneous wood to lighten it up. Once we have all these pieces pared down, we can make our interior plan.

Let me ask this: we picked up a smallish water storage tank -- 8 gallons -- for those times we want to go where water is not available. What advice do you have for water hookup -- I'm trying to think through faucets, running lines, etc -- should we anticipate filling the tank onsite and using it, or should we have a separate hookup for city water? What kind of faucet (pump or regular?)I anticipate we'll just drain straight down and into a bucket, but as far as getting water from the storage to the sink (which will be inside) - should we get a small electric pump or just use a pump faucet? I'm just thinking through options and thought I'd see what advise I get from others. We want this to be as versatile as we can as far as use - we'll have a solar panel, so we will have electricity from a pair of batteries, so a small electric pump would be OK, but if it's not necessary, I don't want to add anything I don't need to.
User avatar
lgatlin
Teardrop Advisor
 
Posts: 63
Images: 27
Joined: Mon Jun 29, 2015 3:29 pm
Location: Long Beach, CA
Top

It's got a name.

Postby lgatlin » Wed Nov 11, 2015 4:31 pm

Detail work because things at the job and home are busy. I am teaching mosaics this week in class, so I got the little mosaic over the door done.
Image

I also did some painting across the door arch, with a bird pulling a banner with the name of our little vardo: Stardust. I've still got gold stars to add on the green background. I also got a little start of some scroll work laid out -- this is just a base coat, it'll have lots of color added to it. I wanted to see how this would look from a few feet away, and I couldn't see my pencil marks.
Image

We're thinking of adding a storage box on the wall below the window, so I'm not adding any decorative paint there until we figure out what we're going to put there. It may be for a propane tank, or it may be just cooking storage, so we'll see how that goes.

Got all the shutters painted and varnished, but need to get those mounted on the vardo. I've got several conferences and presentations to attend, so our work on the vardo is slow, but continuing along. We watched a tiny house show on TV the other night, and saw an interesting slide out ladder idea that we're going to adapt for our steps to the back deck. We also have some Christmas presents to get started on, some wooden toys for the grandson, so work will continue to go pretty slow for a bit!

Image
User avatar
lgatlin
Teardrop Advisor
 
Posts: 63
Images: 27
Joined: Mon Jun 29, 2015 3:29 pm
Location: Long Beach, CA
Top

Re: Our first build - a vardo

Postby S. Heisley » Wed Nov 11, 2015 9:40 pm

Let me ask this: we picked up a smallish water storage tank -- 8 gallons -- for those times we want to go where water is not available. What advice do you have for water hookup -- I'm trying to think through faucets, running lines, etc -- should we anticipate filling the tank onsite and using it, or should we have a separate hookup for city water? What kind of faucet (pump or regular?)I anticipate we'll just drain straight down and into a bucket, but as far as getting water from the storage to the sink (which will be inside) - should we get a small electric pump or just use a pump faucet? I'm just thinking through options and thought I'd see what advise I get from others. We want this to be as versatile as we can as far as use - we'll have a solar panel, so we will have electricity from a pair of batteries, so a small electric pump would be OK, but if it's not necessary, I don't want to add anything I don't need to.


The kind of tank you have makes a big difference. Unless it is stated that it is made for city water pressure, don't use it as such. You can pick up a special faucet that switches over from tank to city water and then hook either or both up straight to the faucet. I've seen them but didn't buy one. I have a simple manual fill tank and a hand pump faucet. Be careful of hand pump faucets. Some of the newer ones allow water to leak out when the pump handle is in certain positions. Do your homework at the RV supply stores; be friendly and try to get known there. Then, you can pick up a fat free catalog that you can peruse at home for ideas and information. 8) If you're going to live long periods in this trailer, you may want some luxuries. (I consider an electric pump an unneeded luxury because I only camp once or twice a month.) Also, consider your weight. I don't know if your trailer has brakes or not. If it doesn't, you need to keep your weight down to 1500 lbs or less in California; and, as you get closer to completion every pound could begin to count.

PS. Your trailer just keeps getting better and better! ...Love it!
User avatar
S. Heisley
Super Lifetime Member
 
Posts: 8772
Images: 495
Joined: Mon Sep 17, 2007 10:02 am
Location: No. California
Top

Re: Our first build - a vardo

Postby OP827 » Thu Nov 12, 2015 6:08 pm

Love the art, Stardust! There are some choices with the water and plumbing trailer system. I will mention some electric pump systems here. Most trailers use one tap for both city and pumped water from the tank by installing check valve that will close and disconnect from atmospheric water tank and its pump while the city pressure is applied in the plumbing system, but some manufacturers I saw also place a manual valve instead of check valve.
While working from the trailer atmospheric water tank, electric water pumps are usually equipped with buit-in pressure sensor and switch on and off automatically with tap open or closed, some systems also have a bladder accumulator to reduce frequent on and off for pump when the tap is not fully open.
Some taps are designed to work only from atm. tank, they have a switch that controls the water pump and such system cannot be used together with the city pressure water as the tap does not close, it just has a switch with no closing valves in it. The choice is yours, I have previously bought a camping trailer with a single tap (city and tank) with check valve system and it worked for me, but I found it sometimes inconvenient to have a built-in water and gray water tanks that I need to refill and dump every two or so days which required trailer moves. In my home build trailer I plan on using smaller, portable tanks that I can put in my car and refill and dump while my trailer stays put in camping spot. It is a matter of preference.
User avatar
OP827
Donating Member
 
Posts: 1555
Images: 405
Joined: Fri Apr 25, 2014 7:27 pm
Location: Bruce County Ontario
Top

Nothing new, much -- just some minor bits

Postby lgatlin » Sat Nov 28, 2015 2:03 am

Had the week off from work, although I had work-related things to do. We spent a lot of time making wooden pull toys and a catapult truck and we're working on a small cannon for the grandson (won't mom and dad just love that) for Christmas, but I did get the shutters hung and the paint on the door end in better shape.

Image

Added color to the scrolls and have determined for sure that I will be adding a storage box on the back below the window, so no paint there. Also added some gold stars around the name.

Image

had to cut a variety of star stencils for that.

Got the shutters hung on the sides and the back, although we need to pick up some hooks to keep the back shutters flush with the walls when they're open -- they are multiple layers (three panels on the left, two on the right), and the hooks we used to keep the shutters closed when in transit don't quite reach to the hold them in place when they're folded back.

Image
Image

I don't have a picture of the last set -- we got the installed, and after standing back and looking, I realized I had them on the wrong sides (the birds/butterflies should be facing towards the window, I had one set the opposite). So we had to take them down, and reinstall (and fill a lot of holes from the hinges, etc). By the time I got that done, it was getting dark and I didn't get a picture. So now that I have the shutters up, I can tell where I have to decorate, and I have my sketches of what's going on some of the panels.

So - just small details, which sure take a lot longer than you plan for, don't they? The week off has kind of flown by, as always, I think I'm going to get a lot more done than I do, but I did manage to read a couple of novels and take a real break from work, which was much needed.
User avatar
lgatlin
Teardrop Advisor
 
Posts: 63
Images: 27
Joined: Mon Jun 29, 2015 3:29 pm
Location: Long Beach, CA
Top

Re: Our first build - a vardo

Postby OP827 » Sat Nov 28, 2015 2:23 am

It is just so beautiful, a masterpiece! :thumbsup: :applause:
User avatar
OP827
Donating Member
 
Posts: 1555
Images: 405
Joined: Fri Apr 25, 2014 7:27 pm
Location: Bruce County Ontario
Top

Re: Our first build - a vardo

Postby dales133 » Sat Nov 28, 2015 5:15 am

You realy have some amazing tallent.
Ive said before that isnt realy the style of trailer id build myself but ive loved the journey and the end results going to be spatacularr.
Its just beautiful.
Ask my mrs i never say that word to describe inanimate objects but your artworks fantastic.
User avatar
dales133
4000 Club
4000 Club
 
Posts: 4605
Images: 1
Joined: Mon Oct 13, 2014 5:26 pm
Top

PreviousNext

Return to Build Journals

Who is online

Users browsing this forum: No registered users and 25 guests