5' X 10' Grumman 2 Sort Of

...ask your questions in the appropriate forums BUT document your build here...preferably in a single thread...dates for updates, are appreciated....

Re: 5' X 10' Grumman 2 Sort Of

Postby Vedette » Mon Dec 14, 2015 2:20 am

Hi Ken
Check Dexter's site for the deflection specs and loaded and unloaded heights.
Then just do your math before you mount the fenders.
Your project is moving along just Great! :thumbsup: :thumbsup:
Good Roads
Brian & Sandi
Good Roads
Brian & Sandi
Here is a link to my Build Journal
viewtopic.php?f=50&t=50912
Image109106109111109110138766
User avatar
Vedette
Silver Donating Member
 
Posts: 5141
Images: 443
Joined: Thu Dec 01, 2011 4:28 am
Location: Westbank B.C.

Re: 5' X 10' Grumman 2 Sort Of

Postby Vedette » Sun Jan 24, 2016 12:52 pm

Hi Kenny
We miss you man!
How is your trailer coming? :thinking:
We are looking forward for you to be ready to camp with us in 2016
Good Roads
Brian & Sandi
Good Roads
Brian & Sandi
Here is a link to my Build Journal
viewtopic.php?f=50&t=50912
Image109106109111109110138766
User avatar
Vedette
Silver Donating Member
 
Posts: 5141
Images: 443
Joined: Thu Dec 01, 2011 4:28 am
Location: Westbank B.C.

Re: 5' X 10' Grumman 2 Sort Of

Postby RunnerDuck » Mon Jan 25, 2016 4:42 pm

Thanks for asking Brian. While it would appear that I've been doing nothing I've actually been slowly working away. I've been doing a lot of little things like locating and installing the "T"-nuts in my wall core for mounting my fenders along with adding attachment plates for light switches and other wiring. I've got holes drilled in the wall core for the wire routing and I'm getting close to putting on the inner 1/4" skin and the outer 1/4" skin, both plywood.

I did have one setback. I don't have a garage that I can work in so I put up a portable plastic garage I got from Harbor Freight. Unfortunately the weather we have with cold mornings and either sun warming the top or my kerosene heater heating things up it starts raining inside.

I'd been working in my woodshop for a couple of weeks and had not looked in the portable garage so didn't know it was raining in there. Sadly I had the 3/4" ply flooring laid down on the frame. It got wet, warped and grew some mold. I hate scrap :thumbdown:

To mitigate the problem I bought some 4 mil plastic sheeting and designed some clips to clamp it to the pipe frame of the garage. Next I printed my design on my 3D printer and they worked pretty good until the wind blew. A number of them popped off and the plastic was hanging down.

I redesigned the clip and reprinted a bunch of them and now it seems to be working. We just had some 20+ MPH winds come through and it's still up.

Once my confidence is high I'll start putting wood in there again and make some better process.

I'm still shooting to have it done by summer but I'm retired and sometimes I think in more ways than one :lol:

Thanks again and I'll do better in the future on my updates.

Stay tuned,
User avatar
RunnerDuck
Teardrop Master
 
Posts: 167
Joined: Sat Aug 22, 2015 4:26 am
Location: Coupeville, Whidbey Island, Washington
Top

Re: 5' X 10' Grumman 2 Sort Of

Postby Vedette » Sun Mar 13, 2016 11:37 am

Okay Ken
I am not nagging you here.......as I too am over thinking my Kermit project and slowing the build down.
Fortunately I have a Large dry shop and not effected by weather. But, I can feel your pain! :thinking:
This is just a "bump" to get your thread back to the top of the page.
We miss you here on the forum. :NC
But, do hope to meet you camping this season.
Only 40 more days until we start our season. :wine:
Good Roads
Brian & Sandi
Good Roads
Brian & Sandi
Here is a link to my Build Journal
viewtopic.php?f=50&t=50912
Image109106109111109110138766
User avatar
Vedette
Silver Donating Member
 
Posts: 5141
Images: 443
Joined: Thu Dec 01, 2011 4:28 am
Location: Westbank B.C.
Top

Re: 5' X 10' Grumman 2 Sort Of

Postby RunnerDuck » Sun Mar 13, 2016 9:18 pm

Thanks Brian, I'll be doing an update shortly. While things have slowed down I'm still doing little things and ordering small items that I'll need to complete my build.

Stay tuned,

Ken
User avatar
RunnerDuck
Teardrop Master
 
Posts: 167
Joined: Sat Aug 22, 2015 4:26 am
Location: Coupeville, Whidbey Island, Washington
Top

Re: 5' X 10' Grumman 2 Sort Of

Postby Vedette » Sun Mar 13, 2016 11:31 pm

Glad to hear! :thumbsup: :thumbsup:
Brian
Good Roads
Brian & Sandi
Here is a link to my Build Journal
viewtopic.php?f=50&t=50912
Image109106109111109110138766
User avatar
Vedette
Silver Donating Member
 
Posts: 5141
Images: 443
Joined: Thu Dec 01, 2011 4:28 am
Location: Westbank B.C.
Top

Re: 5' X 10' Grumman 2 Sort Of

Postby Vedette » Fri Mar 25, 2016 8:50 pm

Hi Ken
How is your new TD coming?
When do you think you will be camping with us??
Good Roads
Brian & Sandi
Good Roads
Brian & Sandi
Here is a link to my Build Journal
viewtopic.php?f=50&t=50912
Image109106109111109110138766
User avatar
Vedette
Silver Donating Member
 
Posts: 5141
Images: 443
Joined: Thu Dec 01, 2011 4:28 am
Location: Westbank B.C.
Top

Re: 5' X 10' Grumman 2 Sort Of Day 17

Postby RunnerDuck » Sun Mar 27, 2016 3:42 pm

OK, I know it's been a lot more days than 17 but this is my 17th day post.

While I haven't posted anything it doesn't mean I haven't been doing things with my TD. I keep refining my design and thinking about the build process which is a good thing. It always amazes me the things I come up with that I hadn't thought of before but hadn't incorporated yet which means fewer mistakes to correct later on :thinking:

One thing I can show you is my "foot-well". I have a foot well designed into my TD so I can sit at a small desk and fiddle with my computer in the wee small hours of the morning.

I made the box out of 3/4" plywood because it will be hanging down below the frame and I want it to be strong. I painted the top edges with epoxy resin and I covered all the outside edges with two layers of fiberglass and resin.

Once everything was dried I painted the exterior with bed liner paint.

Here are the results:

footwell-1.jpg
footwell-1.jpg (153 KiB) Viewed 2430 times


footwell-2.jpg
footwell-2.jpg (194.94 KiB) Viewed 2430 times


footwell-3.jpg
footwell-3.jpg (171.92 KiB) Viewed 2430 times


Next the floor!

Stay tuned!
User avatar
RunnerDuck
Teardrop Master
 
Posts: 167
Joined: Sat Aug 22, 2015 4:26 am
Location: Coupeville, Whidbey Island, Washington
Top

Re: 5' X 10' Grumman 2 Sort Of Day 18

Postby RunnerDuck » Sun Mar 27, 2016 3:54 pm

Today I built the floor. My frame is 5' X 10' so a sheet of plywood just won't fit. I cut down some 3/4" plywood and spliced it together.

I used my router with a 45 degree, Lock, Miter Bit. It provides a lot of surface to apply glue.

Here's an example of how it looks and how well the plywood fits together.
Floor-1.jpg
Floor-1.jpg (196.16 KiB) Viewed 2427 times


I made several passes along the edges as it's a 2" bit so slow and steady is the course.
Floor-2.jpg
Floor-2.jpg (219.98 KiB) Viewed 2427 times


To clamp them together I used strap clamps and squeeze clamps along the sides to keep it from buckling during the gluing and clamping process.
Floor-3.jpg
Floor-3.jpg (227.8 KiB) Viewed 2427 times


So far so good. I still have some smaller pieces to add to the length.

Next I'll seal the edges with a couple of coats of epoxy resin and coat the bottom with bed liner paint. Once I flip it over I'll put down the flooring which is a felt backed vinyl.

Stay tuned!
User avatar
RunnerDuck
Teardrop Master
 
Posts: 167
Joined: Sat Aug 22, 2015 4:26 am
Location: Coupeville, Whidbey Island, Washington
Top

Re: 5' X 10' Grumman 2 Sort Of

Postby Vedette » Sun Mar 27, 2016 4:20 pm

Great News Ken!
Floor looks Great!
I too am at the same stage with Kermit.....just finishing the aluminium doors (c/w gas rams) for access to our "basement"
But Remember, Do Not install that box until you have finished working on "Everything" in your cabin......or you will have very soar knees. :thinking:
With that hole open you can still stand up or sit comfortably to work inside.
My floor (external floor) is the last thing that goes on before paint!
Good Roads
Brian & Sandi
Good Roads
Brian & Sandi
Here is a link to my Build Journal
viewtopic.php?f=50&t=50912
Image109106109111109110138766
User avatar
Vedette
Silver Donating Member
 
Posts: 5141
Images: 443
Joined: Thu Dec 01, 2011 4:28 am
Location: Westbank B.C.
Top

Re: 5' X 10' Grumman 2 Sort Of

Postby RunnerDuck » Sun Mar 27, 2016 6:22 pm

Thanks for the tip Brian, that was the next thing I was going to do is install the foot-well. Maybe I need to rethink that a little. :thinking:
User avatar
RunnerDuck
Teardrop Master
 
Posts: 167
Joined: Sat Aug 22, 2015 4:26 am
Location: Coupeville, Whidbey Island, Washington
Top

Re: 5' X 10' Grumman 2 Sort Of

Postby Vedette » Sun Mar 27, 2016 11:00 pm

:thinking: ;)
Good Roads
Brian & Sandi
Here is a link to my Build Journal
viewtopic.php?f=50&t=50912
Image109106109111109110138766
User avatar
Vedette
Silver Donating Member
 
Posts: 5141
Images: 443
Joined: Thu Dec 01, 2011 4:28 am
Location: Westbank B.C.
Top

Re: 5' X 10' Grumman 2 Sort Of Day 19

Postby RunnerDuck » Mon Apr 04, 2016 2:02 pm

Making progress again. Today (three days later) I installed my footwell!

Despite suggestions on leaving it out until I'm done with the interior so I'd have a nice place to stand I went ahead. Because of the way I have my footwell is cut it was just easier to do it without the floor on.

I'll use the footwell for my feet when I sit sideways at the desk I'm going to have. You'll see that come together in a few months or sooner I hope.

Meanwhile here's how I installed my footwell.

I lowered it onto a jack stand and got it within a few inches of being in place. Then I applied silicone all the way around.
footwell install 2.jpg
footwell install 2.jpg (50.69 KiB) Viewed 2273 times

I put cauls on all four corners to hold it flush to the top of the frame. I jacked it up until it was snug.
footwell install 3.jpg
footwell install 3.jpg (52.43 KiB) Viewed 2273 times

I inserted the screws and smoothed out the silicone and I'm good to go!
footwell install 4.jpg
footwell install 4.jpg (46.13 KiB) Viewed 2273 times

Onward to installing the floor.
User avatar
RunnerDuck
Teardrop Master
 
Posts: 167
Joined: Sat Aug 22, 2015 4:26 am
Location: Coupeville, Whidbey Island, Washington
Top

Re: 5' X 10' Grumman 2 Sort Of 20

Postby RunnerDuck » Mon Apr 04, 2016 7:31 pm

Had a little progress today getting the bottom of the floor painted with bed-line paint. Two heavy coats should do the trick!
floor-4.jpg
floor-4.jpg (235.04 KiB) Viewed 2247 times

I also went to the lumber yard and ordered eight sheets of 1/4" birch plywood. I'll be starting on the wall sandwich's very soon.

Tomorrow I hope to get the countersink holes driledl in the floor, and glued and screwed to the frame.

Stay tuned!
User avatar
RunnerDuck
Teardrop Master
 
Posts: 167
Joined: Sat Aug 22, 2015 4:26 am
Location: Coupeville, Whidbey Island, Washington
Top

Re: 5' X 10' Grumman 2 Sort Of Day 20

Postby RunnerDuck » Fri Apr 08, 2016 9:42 am

I'm making good steady progress. I now have the floor glued and screwed to the frame. I used countersunk self drilling/taping screws. To get the countersink to the correct depth I dug out my really, really, old Black and Decker Drill Guide. It's kind of a lot to handle and sort of wobbly but by golly it worked.

I marked the shaft with a piece of tape to set the depth, held it flat to the floor and drilled away.
Drill hole.jpg
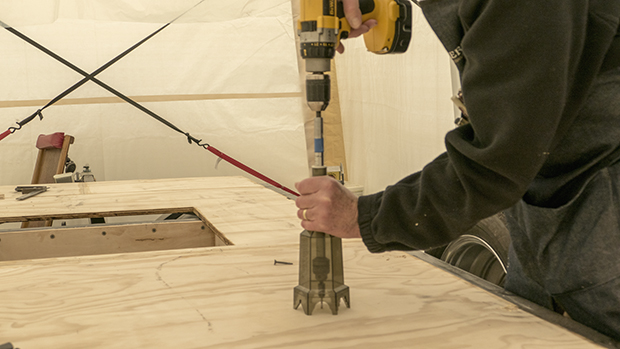
Drill hole.jpg (169.61 KiB) Viewed 2466 times


I pre-drilled the holes in the frame and then installed the screws. It worked perfectly and I now have a solid floor.

I put my pattern on a wall core and aligned it to the floor for a fit check. I had to make a couple of small tweaks but it will do the job.

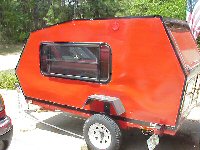
I mounted a fender and wheel to check the alignment and damn, it was not good.
fender1.jpg
fender1.jpg (27.77 KiB) Viewed 2466 times


I made an adjustment by moving the "T-nuts" for the fender 3" forward. Ahhhhh, much better.
fender2.jpg
fender2.jpg (27.8 KiB) Viewed 2466 times

Now I have to decide what to do next. I'm not really sure of what the sequencing should be going forward. Any suggestions? :thinking:

I need to build up the wall "sandwich" which will be rigid foam core in the holes of the wall core. 1/4" birch on the inside, 1/4" birch on the outside and aluminum siding on the outside.

What I'm struggling with the most is how to mark where things go like wall switches, tail light mounting holes and wiring, fender mounting holes, etc. If I put the inside wall on first I can cut the holes for wall switches but then the wall will be in the way for marking the outside wall for fender holes and tail light holes. I run into the same problem if I go the opposite way with marking the inside holes.

Also I'm wondering if I should put the outside aluminium siding on at the very end after the walls are up. If so how do I mark the fender holes and tail light holes?

They sound like silly questions but I'm perplexed. :?
User avatar
RunnerDuck
Teardrop Master
 
Posts: 167
Joined: Sat Aug 22, 2015 4:26 am
Location: Coupeville, Whidbey Island, Washington
Top

PreviousNext

Return to Build Journals

Who is online

Users browsing this forum: No registered users and 17 guests