Pikes Peak Woody Build

...ask your questions in the appropriate forums BUT document your build here...preferably in a single thread...dates for updates, are appreciated....

Re: Pikes Peak Woody Build

Postby daveesl77 » Tue Dec 15, 2015 9:11 am

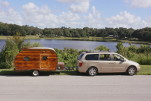
Just saw your thread and you are building a beautiful camper. Just be aware of the big downside to woodies, impossible to get out of campgrounds, gas stations, parking lots without giving tours. In addition, you will get lots of lookers while driving.

dave
*******
Dave and Regina - Enjoying old age, a LOT!

Build Journal - http://www.tnttt.com/viewtopic.php?f=50&t=62386
User avatar
daveesl77
Donating Member
 
Posts: 871
Images: 273
Joined: Tue Jan 27, 2015 4:33 pm
Location: Pocahontas County, West Virginia

Re: Pikes Peak Woody Build

Postby badschnauzer » Tue Jan 05, 2016 9:11 pm

I hear you Dave; looking forward to it.

I'm back from the holiday downtime. Took advantage of the great weather over the last few days to get some interior stain and poly applied. I've been lucky so far - weather has been warm enough to glue, stain, and poly when I needed it. I can heat my uninsulated garage with a propane heater, but getting it above 60* when it is cold outside is difficult.

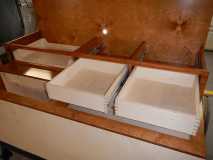
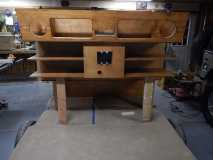
The kitchen is almost complete. I needed overextension slides for my large stove drawer. Found a nice set at Rockler but soon discovered it still wasn't enough extension and the Coleman gas stove lid can't open while the stove sits in the drawer. Ugh. :x I'll figure it out later. The drawers still need faces and there's some other trim in the works.
138227138661138662138663

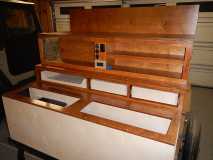
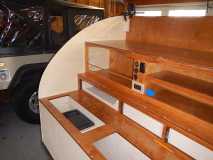
The TD sides got the majority of my attention over the last 2 days. Applying the "inside-out" method of construction. First, I propped the interior .25" pine plywood against the cabinets and outlined every shelf and bulkhead in pencil. I then pulled the plywood and drilled a hole through the ply about every 6". This showed me where I needed to glue the 1" X 3"X .75" spruce supports on the inside of the wall sandwich. Once the TBII dried, I drilled through the 1X3s at each hole. Finally, I placed the side back on the TD and countersunk screws into the cabinets. Bottom line, the walls and cabinetry are rock solid.
138664138665138666

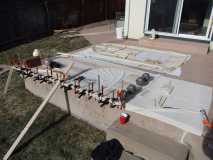
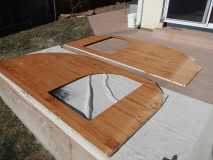
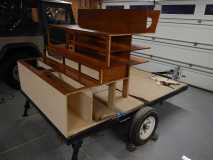
Today I pulled the walls off (again). While the sun was shining, I sanded with 220 grit, applied stain prep, sanded with 220, applied stain (mix of Golden Pecan and Golden Mahogany), then applied 3 coats of spar semi-gloss urethane. I recently purchased the HF HVLP multi-purpose sprayer and used it for the poly. Worked awesome! :) I wish I had used it on the cabinets instead of brushing but will certainly use it on the exterior sides.
138667138668138670

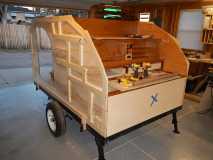
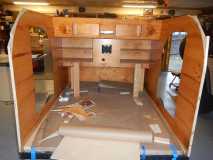
I'm excited the walls are up and they look good. With them temporarily installed, I can install insulation, run and test all my electrical, cut the spars, prep my interior skin (v-notch blue pine) and finish all the interior trim. Lots to do but I'm excited with the progress.

Question for my Colorado peeps: do I need a VIN verification when I go to register this trailer? I don't recall having to do that on my last trailer ~8 years ago but rules may have changed. Thanks!
Posted by: BadSchnauzer
Colorado Springs, CO

See my Pikes Peak Woody Build
Image Image Image
User avatar
badschnauzer
Teardrop Builder
 
Posts: 38
Images: 194
Joined: Tue Jul 07, 2015 4:00 pm
Location: Colorado Springs

Re: Pikes Peak Woody Build

Postby noseoil » Wed Jan 06, 2016 7:58 am

Great progress! Looks like you're moving along well on the sequencing & planning. I did my trailer vin stuff & registration before setting the build in place, but that's in Arizona not Colorado. Once the trailer is registered & licensed, you can pretty much do as you wish (my understanding of the law). Better to seek forgiveness than permission?
Build log: viewtopic.php?f=50&t=60248
The time you spend planning is more important than the time you spend building.........

137905
User avatar
noseoil
1000 Club
1000 Club
 
Posts: 1820
Images: 669
Joined: Sun Apr 27, 2014 8:46 am
Location: Raton, New Mexico, living the good life!
Top

Re: Pikes Peak Woody Build

Postby KCStudly » Wed Jan 06, 2016 1:58 pm

The build is looking really nice! :thumbsup: :applause:
KC
My Build: The Poet Creek Express Hybrid Foamie

Poet Creek Or Bust
Engineering the TLAR way - "That Looks About Right"
TnTTT ORIGINAL 200A LANTERN CLUB = "The 200A Gang"
Green Lantern Corpsmen
User avatar
KCStudly
Donating Member
 
Posts: 9613
Images: 8169
Joined: Mon Feb 06, 2012 10:18 pm
Location: Southeastern CT, USA
Top

Re: Pikes Peak Woody Build

Postby AaronRCTID » Wed Jan 06, 2016 9:46 pm

Looks gorgeous, I'm jealous! I'll be starting my build in the spring, looks like I'll be referencing your thread quite a bit.
AaronRCTID
Teardrop Inspector
 
Posts: 20
Joined: Wed Jun 18, 2014 4:24 pm
Top

Re: Pikes Peak Woody Build

Postby S. Heisley » Thu Jan 07, 2016 8:58 pm

You're making good progress and it's looking really nice! :thumbsup:
User avatar
S. Heisley
Super Lifetime Member
 
Posts: 8774
Images: 495
Joined: Mon Sep 17, 2007 10:02 am
Location: No. California
Top

Re: Pikes Peak Woody Build

Postby badschnauzer » Mon Feb 08, 2016 11:20 pm

Hello! Sorry it has been awhile. I took a last-minute cruise to the Eastern Caribbean to get out of the cold Colorado winter. I'm recharged and ready to get a bunch done this week. Tanks for the comments! Much appreciated!

Colorado Springs does not make it easy to register a home built trailer. I had to register my TV (2006 4-Runner) anyway, so I brought the trailer's Certificate of Origin with me to the local DMV. The lady behind the counter informed me that I need a VIN verification before I could register the trailer. Expected. So I took the side walls and kitchen cabinets off (again), installed the trailer lighting and moseyed down to my local garage. $10 later I had my verification paperwork and I headed back to the DMV. After waiting approximately 30 minutes, a different lady informed me that my VIN was not acceptable and I would have to go to the State Police and have them perform a Certified VIN Inspection so that they could issue me a new, Colorado acceptable VIN. WTF! :x I explained that I had already been here and it would have been nice to know that earlier. Also would have saved me $10. She was apologetic and made it almost right by giving me a 30 day temp tag gratis.

Since then, I've made progress. The kitchen cabinets and sides are now permanently installed. Glued and screwed. The outside sheet of plywood has not been affixed; I will complete wiring install before that goes on. Once the walls were up, I began installing the ceiling. I'm using prestained beetle-kill blue pine for the interior. I initially purchased the unstained version but decided that sanding, staining, polying would take too long in the cold weather. The tongue and groove went together very well and I'm happy with the way it looks. 14" cut-out for the fan. Progress is good.

139298139299139300139301139302

I installed one of my reading lights to see how it would look. I like it. Homey kind of feel.

139303139304

Tomorrow I hit the electrical hard. I've got it all planned out I just need to execute.

Question: Does the foil side of my styrofoam insulation face in or out? What makes more sense? :thinking:
Posted by: BadSchnauzer
Colorado Springs, CO

See my Pikes Peak Woody Build
Image Image Image
User avatar
badschnauzer
Teardrop Builder
 
Posts: 38
Images: 194
Joined: Tue Jul 07, 2015 4:00 pm
Location: Colorado Springs
Top

Re: Pikes Peak Woody Build

Postby KCStudly » Tue Feb 09, 2016 8:08 am

Looks very nice. :thumbsup:

I especially like the way you kicked that upper speaker/cubby panel out at the top; nice touch. :thumbsup:
KC
My Build: The Poet Creek Express Hybrid Foamie

Poet Creek Or Bust
Engineering the TLAR way - "That Looks About Right"
TnTTT ORIGINAL 200A LANTERN CLUB = "The 200A Gang"
Green Lantern Corpsmen
User avatar
KCStudly
Donating Member
 
Posts: 9613
Images: 8169
Joined: Mon Feb 06, 2012 10:18 pm
Location: Southeastern CT, USA
Top

Re: Pikes Peak Woody Build

Postby daveesl77 » Tue Feb 09, 2016 10:15 am

This is turning into just a stunning camper. I love the way you are doing your woodwork!!!

dave
*******
Dave and Regina - Enjoying old age, a LOT!

Build Journal - http://www.tnttt.com/viewtopic.php?f=50&t=62386
User avatar
daveesl77
Donating Member
 
Posts: 871
Images: 273
Joined: Tue Jan 27, 2015 4:33 pm
Location: Pocahontas County, West Virginia
Top

Re: Pikes Peak Woody Build

Postby Mushin » Tue Feb 09, 2016 1:57 pm

Wow! Beautiful build, that interior pine looks great!
User avatar
Mushin
Teardrop Master
 
Posts: 119
Joined: Tue Dec 15, 2015 2:21 pm
Top

Re: Pikes Peak Woody Build

Postby badschnauzer » Sat Feb 13, 2016 1:00 am

It's Alive! We have 12v DC and 120V AC power throughout the TD. Exciting couple of days. I completed all wire runs and tested for continuity. On the advice from others here on the board, I ran independent grounds to all powered devices. Provides extra security and flexibility in the future if I decide to add/fix anything. What it also adds is a crapload more wires. Ultimately they will all fit within the wall sandwich.

Here's what it looked like during the install. Pro tip - always cut the wire longer than you think you'll need. I wrapped every wire once around a 5" board to provide some margin; I needed it on 3 runs. It was messy.

139347139348139351

Once all the 12V supply and ground runs were complete, I tested for continuity. Complete success! The lights work well, fan spins, TV emits photons, and the stereo lights up (but sounds like crap. Something not right.) I'm using a small 12V motorcycle battery during the testing until I decide on my final battery solution. Once I tested the 12V side, I plugged in the PD4045 and tested the 120V side. No fireworks and the socket tested showed proper polarity. The 120V outlet in the bedroom is a GFCI and the galley outlet is on the same circuit. Both tripped appropriately. The PD4045 works like a champ. A shoutout to Noiseoil and others on this forum for posting great info on how to set it up. One lingering question: where should I connect my ground block? Currently I have a temp wire running from my neg post on the battery to the grounding block. I'm thinking of connecting it to the negative 12V lug in the PD4045. Make sense?

139349139350

After testing, I cut the wires to final length, zip tied the bundles (good idea?), and mounted the power and ground blocks. I left some extra wire in a loop in case I need to move my PD4045 from its bracket.

139354139353139352

Next steps are adding trailer wiring, insulation, and skinning the sides with 1/4" pine plywood. There's some nice weather predicted next week so I should move forward quickly.

Thanks all for the kind comments. Much appreciated! :thumbsup:
Posted by: BadSchnauzer
Colorado Springs, CO

See my Pikes Peak Woody Build
Image Image Image
User avatar
badschnauzer
Teardrop Builder
 
Posts: 38
Images: 194
Joined: Tue Jul 07, 2015 4:00 pm
Location: Colorado Springs
Top

Re: Pikes Peak Woody Build

Postby noseoil » Sat Feb 13, 2016 7:49 am

Nice job on the wiring, very clean! Amazing how much time it takes, isn't it?

Do you have all the blocking in place now? Are the blocks for the coat hooks there, switches, lights, everything? Just checking...
Build log: viewtopic.php?f=50&t=60248
The time you spend planning is more important than the time you spend building.........

137905
User avatar
noseoil
1000 Club
1000 Club
 
Posts: 1820
Images: 669
Joined: Sun Apr 27, 2014 8:46 am
Location: Raton, New Mexico, living the good life!
Top

Re: Pikes Peak Woody Build

Postby badschnauzer » Wed Feb 17, 2016 12:32 am

Thanks for the tip, Noiseoil. As I sit here writing this post, I realized I forgot to put a backing block for the pneumatic hatch struts. Ugh. An easy fix, I'm just tired of cutting insulation.

I've completed the wiring and insulation. My last chore was to run the trailer side marker light wiring. Easy enough, but my wire bundles are thicker than the 3/4" space between the inner/outer skins. I originally bundled the wires with zip ties. Then I moved to velcro straps for a little more flexibility. Once I started cutting foam, I realized that no cinching was necessary - the foam held the wires in channels and foil tape ensured they stayed there. I was originally worried about the wires rubbing over time and potentially shorting. I made sure all surfaces near the wires were smooth and the insulation channels held them snug.

139460139459139461139462

As a side project, I decided to make some spacers for my overhead cabin lights. I could have just cut 10mm deep holes in the ceiling with a forstner bit, but I wanted something with a little more style. To get the diameter I needed, I glued four 1.5" X 1.5" blocks together. Chucked them in the lathe to turn it round and gouge a 10mm deep depression. The oak I used is not the best for turning, but they came out looking good after sanding, staining, and applying 2 coats of poly. They add a nice touch to the interior and matches the switch plates.

139452139453139454139455139456139457139458

I left the garage this evening with the exterior skins (1/8" pine plywood) clamped into place with the exterior door lights and marker light wires pulled through. Tomorrow I will sand and stain the outside in preparation for applying spar poly the following day. Plenty of trim work to do also.

139464
Posted by: BadSchnauzer
Colorado Springs, CO

See my Pikes Peak Woody Build
Image Image Image
User avatar
badschnauzer
Teardrop Builder
 
Posts: 38
Images: 194
Joined: Tue Jul 07, 2015 4:00 pm
Location: Colorado Springs
Top

Re: Pikes Peak Woody Build

Postby KCStudly » Wed Feb 17, 2016 9:16 am

Looking good! :thumbsup:
KC
My Build: The Poet Creek Express Hybrid Foamie

Poet Creek Or Bust
Engineering the TLAR way - "That Looks About Right"
TnTTT ORIGINAL 200A LANTERN CLUB = "The 200A Gang"
Green Lantern Corpsmen
User avatar
KCStudly
Donating Member
 
Posts: 9613
Images: 8169
Joined: Mon Feb 06, 2012 10:18 pm
Location: Southeastern CT, USA
Top

Re: Pikes Peak Woody Build

Postby JmsCaverly » Wed Feb 17, 2016 12:43 pm

Your interior looks fantastic. Was it difficult to bend the planks around the radius? I have to admit I'm a bit jealous. Good work keep it up!
Come visit my build journal
139728 139588
viewtopic.php?f=50&t=63870
User avatar
JmsCaverly
Teardrop Master
 
Posts: 150
Images: 175
Joined: Mon Jul 20, 2015 4:32 pm
Location: Travis AFB
Top

PreviousNext

Return to Build Journals

Who is online

Users browsing this forum: No registered users and 54 guests