Kenskill style build in Delavan, WI (Now Cub Modern)

...ask your questions in the appropriate forums BUT document your build here...preferably in a single thread...dates for updates, are appreciated....

Re: Kenskill style build in Delavan, WI (Now Cub Modern)

Postby ojgrsoi » Wed Aug 29, 2018 7:59 am

I can relate to the staring and thinking. More than once my wife has checked in and asked, "Are you OK?" when I'm staring or laying under a project trying to plan my next move. :thinking:

You have to think because it's hard to back up once you take the next step. :shock:

Like your progress btw. :thumbsup:
Mark
Weatherford - True Texas

https://youtu.be/BKs6XfgAKKc
User avatar
ojgrsoi
Teardrop Advisor
 
Posts: 97
Joined: Sun Jun 25, 2017 3:59 am
Location: Weatherford, TX

Re: Kenskill style build in Delavan, WI (Now Cub Modern)

Postby Mr. Lahey » Wed Aug 29, 2018 7:59 pm

breb- As usual, nice looking work. Keep plugin. I got through half my hatch inside with the poly today after work.

Could not work much today. Had to make some emergency travel arraignments. 86 year old uncle not doing well at all. Basically going to say my good by to him. He lived a rich full life. Raised great kids. Retired early with his wife to a lakeside home, and enjoyed more than most. Still sad to see his time coming to an end. :(

Some photo's of the stain/finish work in progress.

DSCF3896a.jpg
Hatch interior side
DSCF3896a.jpg (98.73 KiB) Viewed 2878 times


DSCF3897.jpg
1st coat of poly on headboard and upper rear cabinets
DSCF3897.jpg (116.6 KiB) Viewed 2878 times


DSCF3901a.jpg
1st coat of poly on galley. Love the light honey color. 11 cabinet doors waiting for 1st coat of poly
DSCF3901a.jpg (117.75 KiB) Viewed 2878 times
My teardrop camper build journal: http://www.tnttt.com/viewtopic.php?f=50&t=64721
Mr. Lahey
The 300 Club
 
Posts: 336
Joined: Wed Oct 28, 2015 3:18 am
Location: Delavan WI

Re: Kenskill style build in Delavan, WI (Now Cub Modern)

Postby breb » Wed Aug 29, 2018 9:25 pm

Mr. Lahey It seems like we have come to a point in our lives were the ones we admire and love are aging and are being taken from us. I have had this in the last few yeas and some not so old. I will include you in my prayers for safe travels
and a opportunity to say that last good by. You have made good with the time you were able spend on TD . I'm sure it feels good to get that first coat of finish on. Some more hatch work for me and some of that detail work that hopefully allows me to seal the hatch the way I planned.
breb
Teardrop Master
 
Posts: 128
Images: 119
Joined: Sun Aug 24, 2014 8:06 am
Location: wisconsin
Top

Re: Kenskill style build in Delavan, WI (Now Cub Modern)

Postby Mr. Lahey » Mon Sep 03, 2018 10:14 am

I'm back from visiting my uncle. Round trip was 18hrs total of driving. We talked and laughed for hours, till we both almost went hoarse. Very bittersweet visit. Just so glad I went.

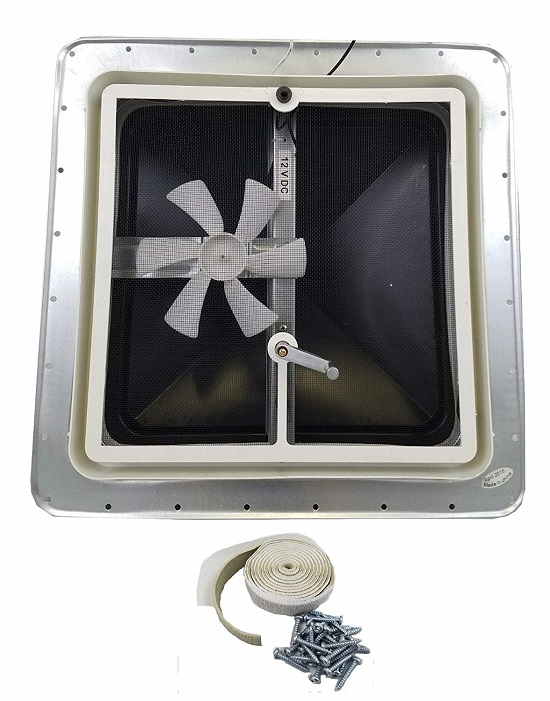
When I got home had a nice item I ordered waiting on the porch. Past few days of working in the hot/humid shop had me wondering if I made a mistake with my vent fan choice. I have two huge opening jalousie windows in my doors. So I thought a basic vent fan would be enough. After feeling the cooling difference between the two fans I use in the garage, I wasn't so sure about my vent fan choice anymore.

I was going to bite the bullet and pay the bucks for the high dollar popular vent fan. While surfing around for the best price for it, I stumble across and excellent alternate for me. Made by the same company that made my roof vent.

It's a direct bolt in upgrade for my existing fan. After reading customer reviews on the upgrade fan I also purchased an electronic speed controller with reverse switch. All total I'm about $35 less than the bare bones version of the big name brand fan. Plus mine will have infinite fan speed control and reverse able too. Big name is three fixed speeds and no reverse, or a lot more money for and upgrade model that has those features.

Vent fan I had:
venta.jpg
venta.jpg (113.46 KiB) Viewed 2845 times


Bolt in upgrade fan and controller I just bought:

fana1.jpg
fana1.jpg (48.07 KiB) Viewed 2845 times


speed1a.jpg
speed1a.jpg (84.32 KiB) Viewed 2845 times


Looking forward to getting it all wired up and installed. I think this will be the answer for those warm still nights when camping.

Got a few hours of sanding my first finish coat in on the camper yesterday evening. Still lot's more sanding to go before finish coat 2 can go on. Hope to get the sanding done and coat 2 applied tomorrow.
Last edited by Mr. Lahey on Sun Sep 09, 2018 6:58 am, edited 1 time in total.
My teardrop camper build journal: http://www.tnttt.com/viewtopic.php?f=50&t=64721
Mr. Lahey
The 300 Club
 
Posts: 336
Joined: Wed Oct 28, 2015 3:18 am
Location: Delavan WI
Top

Re: Kenskill style build in Delavan, WI (Now Cub Modern)

Postby breb » Mon Sep 03, 2018 2:05 pm

Glad to here your trip went well. This Vent/fan sounds like a good fit and at the right price. I just came inside from wiring a dome light in the interior . I was going to continue with trimming inside corners and some other areas but by the time I finished with the dome light I was pretty sweated up again. I still like to tackle something every day even if it has to be a small detail. Tomorrow I would like to put hinge in place and get that pre-drilled but there is an area for me that has to be spot on . I would set up with just piece's of stock to simulate roof material (ply) and aluminum skin under hinge to get proper height for drilling holes in hinge and into cross member. Last Friday I made my cuts and chamfer's to accommadate the trim on wall's and hatch than I sealed those areas with spar varnish and some areas in the hatch. I haven't skinned the hatch yet . That's another process I wonder if it will distort. :worship:

156082156083156084
breb
Teardrop Master
 
Posts: 128
Images: 119
Joined: Sun Aug 24, 2014 8:06 am
Location: wisconsin
Top

Re: Kenskill style build in Delavan, WI (Now Cub Modern)

Postby Mr. Lahey » Tue Sep 04, 2018 6:47 am

breb- Took me a minute to realize you can't skin your hatch in place. Since your galley is finished you couldn't free the hatch from inside once it was skinned. It looks like a mild curve so spring back or distortion might not be much of a problem. I would also think you could make some temp plywood braces to help hold the hatch frame in place. I vandalized one of your pics below.

breb1.jpg
breb1.jpg (83.1 KiB) Viewed 2848 times


You could also cross brace the temp plywood bracing and have a real square and true jig to build the hatch in. Might be overkill, but who knows. This is a first time deal for most of us.

Going to get an early start today. Lot of hand sanding to do. So I can work with the garage door open and not bother the neighbors with power tool noise early in the am.
My teardrop camper build journal: http://www.tnttt.com/viewtopic.php?f=50&t=64721
Mr. Lahey
The 300 Club
 
Posts: 336
Joined: Wed Oct 28, 2015 3:18 am
Location: Delavan WI
Top

Re: Kenskill style build in Delavan, WI (Now Cub Modern)

Postby breb » Tue Sep 04, 2018 7:53 am

I wasn't keyed in on temporary bracing. For some reason I was thinking of my ratchet straps for maintaining curve. Thank you . Sometimes I get fixated on one way and then block other ways to do something. There is a small amount of flex to the frame. I'm not sure I'm complete with beefing up the skeleton yet ( maybe some gusseting involved to help stiffen the structure ) I don't want to over kill this thing and make it twice as heavy. I'm waiting here also I have young children on either side of my house so I usually give it a little time before I run anything in garage. That's on my list also, I want to relocate once my wife is retired ( less than a year) but parents are involved in factoring that move. I would really like to mount the hatch in place with hinge to see how it lands on floor and along wall . Then do some gusseting in place. In my mind I think you could over stiffen the hatch and not get any flex to it and cause it not to seal. I'm guessing a little give is alright. I'm giving more thought to #2 lock down latches on both corners with the handle in middle just to help with the sealing part.
breb
Teardrop Master
 
Posts: 128
Images: 119
Joined: Sun Aug 24, 2014 8:06 am
Location: wisconsin
Top

Re: Kenskill style build in Delavan, WI (Now Cub Modern)

Postby Mr. Lahey » Tue Sep 04, 2018 1:14 pm

OH MAN!! Just in for a late lunch break. It's like working in a tropical rain forest out there today. Complete with insane humidity and dozens of biting mosquitoes. Had to soak myself in DEET to survive the onslaught. Toss some venomous snakes into the mix and the tropical forest effect would be complete.

Got all the hand sanding done. Then got a second coat of polyurethane on 90% of what was ready for coat 2. Got too hungry to keep on going and came in.

The A/C in the house is feeling realllll goood. Will I go back out there or not? :thinking:

breb- :thumbsup: to the diagonal corner bracing or gussets to the hatch frame. Best way to add strength and almost no weight penalty. Don't worry about making it too stiff. It will always have enough torsional flex so it can seal up.
What are you skinning with? 1/8" or 1/4" material?
My teardrop camper build journal: http://www.tnttt.com/viewtopic.php?f=50&t=64721
Mr. Lahey
The 300 Club
 
Posts: 336
Joined: Wed Oct 28, 2015 3:18 am
Location: Delavan WI
Top

Re: Kenskill style build in Delavan, WI (Now Cub Modern)

Postby breb » Tue Sep 04, 2018 6:29 pm

1/8 inch ply will be roof and hatch. This morning I surface planed down a piece of poplar to simulate the thickness of my roof ply and my .040 aluminum skin and slipped it under the upper hinge. Then I could only start the mating piece of hinge about 3/8 of an inch into the upper piece but plainly saw a big gap that I didn't wanted . I ended up calling in Vintage Technologies to confirm capping the face edge on the galley walls and that was a big affirmative. I have the caps on but I had to hall everything in the garage , shut the door and stop for the gully washer that came . I pulled the plug on it . The only thing I did before I went in house, was to check the plywood walls for mushroom growth.

:rainy:
breb
Teardrop Master
 
Posts: 128
Images: 119
Joined: Sun Aug 24, 2014 8:06 am
Location: wisconsin
Top

Re: Kenskill style build in Delavan, WI (Now Cub Modern)

Postby Mr. Lahey » Wed Sep 05, 2018 4:34 pm

Yahoo!
Just finished the last of all the cabinet, doors, and inside hatch polyurethane. Tomorrow I will be ready to start final assembly of the the doors and hinges. Then I can screw the head board front bulk head cabinet in place. Then it's time to get the inside ceiling panels in place.

Then on to the last details of the hatch. I have to get all the weather strip installed on it. Then the hatch will be ready to be re installed and wired up.

So it looks like I still may have a good bit of the season left before it gets cold. I can put a good dent in all the wiring work that needs to be done. Feels nice to be somewhat ahead of schedule for once with this project.
My teardrop camper build journal: http://www.tnttt.com/viewtopic.php?f=50&t=64721
Mr. Lahey
The 300 Club
 
Posts: 336
Joined: Wed Oct 28, 2015 3:18 am
Location: Delavan WI
Top

Re: Kenskill style build in Delavan, WI (Now Cub Modern)

Postby breb » Sat Sep 08, 2018 1:18 pm

Mr. Lahey from your last post you have quiet a line up and sounds like you have organized yourself with a sequence. When you can see the order and move onto it with diligence. In my vocabulary that adds up to ,light at the end of the tunnel. I need to share this with you.
I'm am no different then anyone else when it came to skinning the carcass of the hatch with plywood yesterday . Quiet a bit of time spent prepping and dry fitting then nailing down the order so i had all tools and clamps and glue and plywood snap lined and I was still holding my breath when I glued and stapled. I was anxious to take the clamps off 4 hours later but held off till this morning. So far it looks like it should and I got to the point the wife had to ask what I was doing. I was sitting on my swivel seat just looking at it and I told her this was a moment in the build that I earned a sit down and a bottle of beer. :beer: Oh and this is the first time the TD has been out of the garage.
156139156141156142
breb
Teardrop Master
 
Posts: 128
Images: 119
Joined: Sun Aug 24, 2014 8:06 am
Location: wisconsin
Top

Re: Kenskill style build in Delavan, WI (Now Cub Modern)

Postby Mr. Lahey » Sun Sep 09, 2018 6:56 am

breb- Congrats on the great looking hatch. Pulling it out of the shop into the sun for the first time is very cool. 8)

I've got several cabinet doors hung and the front headboard bulk head cabinet installed for good. Couple more cabinet doors inside to do. Then I'm going to put all the bedding in for one last test run. Last time I had the bedding in I was considering some type of ceiling mounted grab or monkey bar.

My door sits further forward than I'd like, due to the trailer I built on. So when exiting the tear I have to scoot way forward toward the head board, to swivel my legs out. I thought some type of ceiling grab bar would be a nice help. If I decide to use one, I would build it in. Ceilng would be done in 3 sections instead of 2. So going to do a test today on entering and exiting the bed. Then make my final decision on that grab bar.

The recent chill in the air keeps reminding me my shop time is very limited.
My teardrop camper build journal: http://www.tnttt.com/viewtopic.php?f=50&t=64721
Mr. Lahey
The 300 Club
 
Posts: 336
Joined: Wed Oct 28, 2015 3:18 am
Location: Delavan WI
Top

Re: Kenskill style build in Delavan, WI (Now Cub Modern)

Postby Mr. Lahey » Sun Sep 09, 2018 6:33 pm

Some current photo's with all the cabinet doors hung, and all stain and finish work completed. I tried out the bedding today too. Was not sure if I was going to get an inner spring mattress or stick with what I have. Going to stick with the bedding I have. It's 4" dense foam bottom and a 4" down topper. Decided against a built in ceiling grab bar. So now I'm ready to proceed with ceiling install.

DSCF3909a.jpg
Headboard cabinet
DSCF3909a.jpg (99.29 KiB) Viewed 2684 times


DSCF3911a.jpg
Foot cabinets
DSCF3911a.jpg (107.09 KiB) Viewed 2684 times


DSCF3907a.jpg
galley
DSCF3907a.jpg (118.47 KiB) Viewed 2684 times
My teardrop camper build journal: http://www.tnttt.com/viewtopic.php?f=50&t=64721
Mr. Lahey
The 300 Club
 
Posts: 336
Joined: Wed Oct 28, 2015 3:18 am
Location: Delavan WI
Top

Re: Kenskill style build in Delavan, WI (Now Cub Modern)

Postby Mr. Lahey » Sun Sep 09, 2018 6:35 pm

DSCF3908a.jpg
DSCF3908a.jpg (115.14 KiB) Viewed 2683 times
My teardrop camper build journal: http://www.tnttt.com/viewtopic.php?f=50&t=64721
Mr. Lahey
The 300 Club
 
Posts: 336
Joined: Wed Oct 28, 2015 3:18 am
Location: Delavan WI
Top

Re: Kenskill style build in Delavan, WI (Now Cub Modern)

Postby breb » Sun Sep 09, 2018 7:02 pm

It looks great ! It's a lot of work but worth all the time spent. Your cabinets inside and galley really shine with the finish coat on them. :thumbsup: I took the day off today . I was studying the hinge and where I need to make cuts on them to fit. I definitely feel the end of the season coming. Hopefully we get some nice temps to work out in the garage for awhile. Good luck with the start of your
ceiling.
breb
Teardrop Master
 
Posts: 128
Images: 119
Joined: Sun Aug 24, 2014 8:06 am
Location: wisconsin
Top

PreviousNext

Return to Build Journals

Who is online

Users browsing this forum: No registered users and 21 guests