Kenskill style build in Delavan, WI (Now Cub Modern)

...ask your questions in the appropriate forums BUT document your build here...preferably in a single thread...dates for updates, are appreciated....

Re: Kenskill style build in Delavan, WI (Now Cub Modern)

Postby Mr. Lahey » Tue Jun 18, 2019 7:12 pm

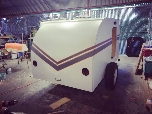
I've got most of the insulation done. I've had the 12v system hooked up to the battery all week. The battery has not lost an abnormal amount of charge. So I 've gained more confidence in my wiring. I also now have the camper plugged into 120v shore power now. Testing the on board battery charger/maintainer. That seems to be doing fine as well. A tad more insulation to go and I am ready to put the exterior plywood on. I have had almost no time to work on the camper. Just getting in a bit here and there and it's frustratingly slow progress.

insul2a.jpg
insul2a.jpg (57.95 KiB) Viewed 3697 times
My teardrop camper build journal: http://www.tnttt.com/viewtopic.php?f=50&t=64721
Mr. Lahey
The 300 Club
 
Posts: 336
Joined: Wed Oct 28, 2015 3:18 am
Location: Delavan WI

Re: Kenskill style build in Delavan, WI (Now Cub Modern)

Postby Mr. Lahey » Sat Jun 22, 2019 1:28 pm

Had some unexpected time to work on the camper. I've been working on a whole list of small detail jobs all around the camper. Have made good progress and crossed off the list lot's of fussy PITA type jobs.

My favorite part was tending to some details in the galley. Got my sheet metal countertop fit. Made the countertop edge cap and installed it too. When I did the stain/poly work in the galley last season I had decided the area needed something to spice it up. It was just all honey colored wood everywhere. Looked like it was missing something to me.

I wanted to have some kind of outdoor/natural decoration for the area. I also wanted to keep with the arts and crafts FLW prairie style theme I have going on in the sleep cabin area. I found these arts and crafts stencils online that would fit the bill for me. Just what I wanted to punch things up, yet stay on theme.

Each stencil is made of 3 separate sheets. They also use 4 paint colors. So it was no small job to get this done. Had to let each stage of the stencil design dry before adding the next stage. So I now have some FLW stylized Ginko tree leaves on my upper door, and some seed pods on my lower doors. I'm sure it's not everyone's style. I sure like it though! My phone camera sure isn't getting the colors right, but you get the idea. Done in 3 shades of green with some red/purpleish accent.

galleya.jpg
galleya.jpg (111.94 KiB) Viewed 3667 times


Ginkoa.jpg
Ginkoa.jpg (67.93 KiB) Viewed 3667 times


podsa.jpg
podsa.jpg (71.54 KiB) Viewed 3667 times
My teardrop camper build journal: http://www.tnttt.com/viewtopic.php?f=50&t=64721
Mr. Lahey
The 300 Club
 
Posts: 336
Joined: Wed Oct 28, 2015 3:18 am
Location: Delavan WI

Re: Kenskill style build in Delavan, WI (Now Cub Modern)

Postby breb » Sat Jun 22, 2019 8:17 pm

Nicely done Mr. Lahey. Your galley is looking great. Like the stenciling and your counter top. Keep this up and you may be camping with the TD this year. :thumbsup:
breb
Teardrop Master
 
Posts: 128
Images: 119
Joined: Sun Aug 24, 2014 8:06 am
Location: wisconsin
Top

Re: Kenskill style build in Delavan, WI (Now Cub Modern)

Postby clamlamp » Thu Jun 27, 2019 4:08 pm

Looking great! Well done!!! :applause:
User avatar
clamlamp
Teardrop Master
 
Posts: 218
Joined: Mon Oct 02, 2017 2:54 pm
Top

Re: Kenskill style build in Delavan, WI (Now Cub Modern)

Postby Mr. Lahey » Sat Jun 29, 2019 8:04 am

Well I found another minor stumbling block toward getting exterior plywood skin installed. It seems the 12v power outlets are a tad too long. I have them mounted to the interior ceiling panel.

The sockets are just long enough to pop up above the roof spars. The terminals and wiring stand tall of the spars. Cant use 90 degree terminals either. Won't gain enough clearance. So I have to make up some spacers for the panels. I have three 12v panels to space like this.

Another little fussy job to add to the list of things to do. So far only have one spacer made. Just have not had the time to work on this. I have a scheduled vacation time near the end of July and hope to be on the camper full time. Looking forward to it.


intera.jpg
Wire and terminals tall of roof spar
intera.jpg (54.43 KiB) Viewed 3588 times


spacera.jpg
12v panel spacer
spacera.jpg (27.02 KiB) Viewed 3588 times
My teardrop camper build journal: http://www.tnttt.com/viewtopic.php?f=50&t=64721
Mr. Lahey
The 300 Club
 
Posts: 336
Joined: Wed Oct 28, 2015 3:18 am
Location: Delavan WI
Top

Re: Kenskill style build in Delavan, WI (Now Cub Modern)

Postby Staryder61 » Sat Jun 29, 2019 8:49 am

" Those little stumbling blocks, so keep our minds working " :thinking:
:thumbsup: on the fix... All looking very good... :)
Stay safe, David


Our CTC
6' X 12' CTC = Texas Sized Tackle Box
http://www.tnttt.com/viewtopic.php?f=42&t=74704
User avatar
Staryder61
Silver Donating Member
 
Posts: 827
Images: 528
Joined: Mon Oct 30, 2017 5:11 pm
Location: In one of 254 Counties in Texas
Top

Re: Kenskill style build in Delavan, WI (Now Cub Modern)

Postby Mr. Lahey » Thu Jul 11, 2019 7:36 pm

I've made a tiny bit of progress. I have the 12v panel spacers all made and installed. They worked out great. The wires are now lower than the roof spars as they should be. I refit the driver side hatch to body gap with the belt sander. Also got my inside and outside door latches and locks fit and installed. Had some fun trial fitting my fenders. Have them clamped in place. Should be a very easy install. The fenders have a flat back panel that closes off the back of the fender. That panel will bolt/screw right to the side of the camper body. A couple pic's of the fender trial fit up.


fen3a.jpg
fen3a.jpg (83.78 KiB) Viewed 3489 times


fena.jpg
fena.jpg (101.36 KiB) Viewed 3489 times
My teardrop camper build journal: http://www.tnttt.com/viewtopic.php?f=50&t=64721
Mr. Lahey
The 300 Club
 
Posts: 336
Joined: Wed Oct 28, 2015 3:18 am
Location: Delavan WI
Top

Re: Kenskill style build in Delavan, WI (Now Cub Modern)

Postby Mr. Lahey » Mon Jul 15, 2019 3:20 pm

:beer: HooRay!!! Got the first 2 sheets of outer plywood skin installed today. I've been waiting a long time for this day. Too bad it was a 90 degree day with a ton of humidity too. I survived and hit an important to me milestone. :beer:

Also sporting a new haircut. Way shorter than I normally wear my hair. :roll:

Seems several blobs of adhesive dripped on the shop floor that I did not see.
When I was on the floor under the camper clamping the bottom edge I ended up rolling my hair around in the adhesive. The stuff was setting up so quick I just kept working. So it also set up in my hair. When I got the first sheet installed I took a break, and came home with a new short hair cut.

skina.jpg
skina.jpg (70.01 KiB) Viewed 3446 times
My teardrop camper build journal: http://www.tnttt.com/viewtopic.php?f=50&t=64721
Mr. Lahey
The 300 Club
 
Posts: 336
Joined: Wed Oct 28, 2015 3:18 am
Location: Delavan WI
Top

Re: Kenskill style build in Delavan, WI (Now Cub Modern)

Postby Staryder61 » Mon Jul 15, 2019 5:06 pm

:beer: :beer: on the milestone,, great to see it.
I've finally started insulation so I can start skinning shortly..
Oh and the hair cut, great stuff can cause the same problem with hair, :lol: just sayin.. ;)
Stay safe, David


Our CTC
6' X 12' CTC = Texas Sized Tackle Box
http://www.tnttt.com/viewtopic.php?f=42&t=74704
User avatar
Staryder61
Silver Donating Member
 
Posts: 827
Images: 528
Joined: Mon Oct 30, 2017 5:11 pm
Location: In one of 254 Counties in Texas
Top

Re: Kenskill style build in Delavan, WI (Now Cub Modern)

Postby Mr. Lahey » Mon Jul 22, 2019 12:07 pm

Got the last roof panel installed and trimmed. Now it's time to fill lot's of holes and sand.

Been plotting out how I'm going to glue the canvas on. I'm pretty much settled on doing it in sections.

First up is covering both doors and hatch. Then the body panels in sections. I won't have really large pieces of cloth to work with this way.

Should make the job more manageable.

rf1.jpg
rf1.jpg (83.96 KiB) Viewed 3362 times
My teardrop camper build journal: http://www.tnttt.com/viewtopic.php?f=50&t=64721
Mr. Lahey
The 300 Club
 
Posts: 336
Joined: Wed Oct 28, 2015 3:18 am
Location: Delavan WI
Top

Re: Kenskill style build in Delavan, WI (Now Cub Modern)

Postby Mr. Lahey » Mon Jul 29, 2019 1:02 pm

I started my vacation time 3 days ago. So I've been working on the tear for most of each day. That's the good news. The bad news is that 96% of the work has been filling holes and defects with wood filler. Then sanding away for hours. Just like working in a body shop with the noise and the dust. Facemask respirator is mandatory. So are long showers at the end of the day to wash off the dust.

Just amazing how many nail holes, staple holes, screw holes, plywood defects, gouges, and nicks there are. Really don't notice it much while you're building. When you're hunting them down for wood filler application, they seem to be everywhere. I'm getting the camper extra smooth and filled as I am going to be doing a PMF exterior. Don't want the fabric to show through the surface flaws. I've got a good 80% of the body work done and it looks real good.

Took a day off from sanding and started the PMF work. Decided I was going to use a thin fabric for the door edges, door jambs, and galley hatch wall water rails. I've cut an old 100% cotton bed sheet for the fabric. Then I started with the edges of my entry doors. Very happy with the thin fabric. It's gluing down flat and smooth. Took the mild curve at the top of the door without bunching up.

Once this is dried I will soak the material with a diluted water/glue mix and let that harden. Then I will come back and hit the edges of the interior wood door panel with my hand sander. That will flush trim the PMF to the interior door panel.

pmf1a.jpg
pmf1a.jpg (77.38 KiB) Viewed 3335 times


pmfa.jpg
pmfa.jpg (82.52 KiB) Viewed 3335 times
My teardrop camper build journal: http://www.tnttt.com/viewtopic.php?f=50&t=64721
Mr. Lahey
The 300 Club
 
Posts: 336
Joined: Wed Oct 28, 2015 3:18 am
Location: Delavan WI
Top

Re: Kenskill style build in Delavan, WI (Now Cub Modern)

Postby Staryder61 » Tue Jul 30, 2019 9:13 am

You're a little a head of me,,, not by much.. and it's looking great.. :thumbsup:
Will be watching how the PMF goes for you..
I have the canvas, though, still haven't committed to going PMF yet,, or to just mix seal , primer and paint, or bed liner... the top..
The sides will stay wood..
Will follow yours and see how it turns out.. :roll: ;)
Stay safe, David


Our CTC
6' X 12' CTC = Texas Sized Tackle Box
http://www.tnttt.com/viewtopic.php?f=42&t=74704
User avatar
Staryder61
Silver Donating Member
 
Posts: 827
Images: 528
Joined: Mon Oct 30, 2017 5:11 pm
Location: In one of 254 Counties in Texas
Top

Re: Kenskill style build in Delavan, WI (Now Cub Modern)

Postby Mr. Lahey » Tue Jul 30, 2019 4:39 pm

Some PMF work of a different kind. You truly can use this stuff just like fiberglass. Just much friendlier to work with from a chemical and irritant standpoint.

My camper has a lower skirt on it made from a 1x3 to hide the frame side rail. One rear corner of it for the last 20" or so was not flush with the wall surface. At the very rear it was a tad more than a 1/16" inset but less than and 1/8". Too much to ignore. Too big an area to try to belt sand flush. Gluing the canvas over it would have left a crease almost like a body line. So I had to deal with it.

I cut 2 strips of canvas of the approximate sizes. The bottom piece runs the full length of the low spot. There is a second piece about half way back on top of the lower piece. I glued the first strip in with straight tite bond. Then I mixed up a thinned glue/water mix to saturate the lower piece. When the dilute fully soaked in, I brushed straight tite bond on the piece of canvas where the top piece would go on. Once it was on I saturated it with the glue mix. I did this early morning.

Came back late afternoon and it had dried rock hard. Hit the bottom patch edge with my sander to cut off the extra cloth. Then I feathered it in with a thin coat of wood filler. Tomorrow it will take a light hand sand and be good to go to canvas over.

patcha.jpg
2 part patch glued in
patcha.jpg (66.02 KiB) Viewed 3279 times


put2a.jpg
patch feathered in with wood filler
put2a.jpg (83.72 KiB) Viewed 3279 times
My teardrop camper build journal: http://www.tnttt.com/viewtopic.php?f=50&t=64721
Mr. Lahey
The 300 Club
 
Posts: 336
Joined: Wed Oct 28, 2015 3:18 am
Location: Delavan WI
Top

Re: Kenskill style build in Delavan, WI (Now Cub Modern)

Postby Staryder61 » Tue Jul 30, 2019 5:57 pm

Nice patch job.. :applause: tite bond works great for a lot of things on these little campers..
I use it and sheetrock fiberglass tape to join sheets of plywood together at seams.. has worked for me for years . :thumbsup:
Stay safe, David


Our CTC
6' X 12' CTC = Texas Sized Tackle Box
http://www.tnttt.com/viewtopic.php?f=42&t=74704
User avatar
Staryder61
Silver Donating Member
 
Posts: 827
Images: 528
Joined: Mon Oct 30, 2017 5:11 pm
Location: In one of 254 Counties in Texas
Top

Re: Kenskill style build in Delavan, WI (Now Cub Modern)

Postby Mr. Lahey » Wed Jul 31, 2019 2:21 pm

Sanding of the body is all done finally. Even had some time to start the PMF work. So far I'm very happy with the bed sheet fabric. Going on very smooth and flat. Sticks down in the glue great. Even went around the tight curve of the galley water rail. That rail has a tight curve to it and I got almost zero bunching/wrinkles when rounding the curve.

I also decided to bring the sheet cloth out from the door frame onto the body. I trimmed for a 3/4" frame edge around the door. Going to do the same with the galley rail material and leave a 3/4" fabric frame on body. When I canvas cover the sides I will glue the canvas on top of the sheet fabric frame. Then flush cut the canvas to the opening. I think that getting the thin fabric around all the door jamb and water rail contours was easier than trying that with the thick canvas.

raila.jpg
raila.jpg (88.28 KiB) Viewed 3234 times


framea.jpg
framea.jpg (61.72 KiB) Viewed 3234 times
My teardrop camper build journal: http://www.tnttt.com/viewtopic.php?f=50&t=64721
Mr. Lahey
The 300 Club
 
Posts: 336
Joined: Wed Oct 28, 2015 3:18 am
Location: Delavan WI
Top

PreviousNext

Return to Build Journals

Who is online

Users browsing this forum: No registered users and 13 guests