Kenskill style build in Delavan, WI (Now Cub Modern)

...ask your questions in the appropriate forums BUT document your build here...preferably in a single thread...dates for updates, are appreciated....

Re: Kenskill style build in Delavan, WI (Now Cub Modern)

Postby Mr. Lahey » Tue Jul 31, 2018 6:57 am

Looks like all of us are early risers. Thanks to both you guys!

I've already been out there eye ballin it this morning.
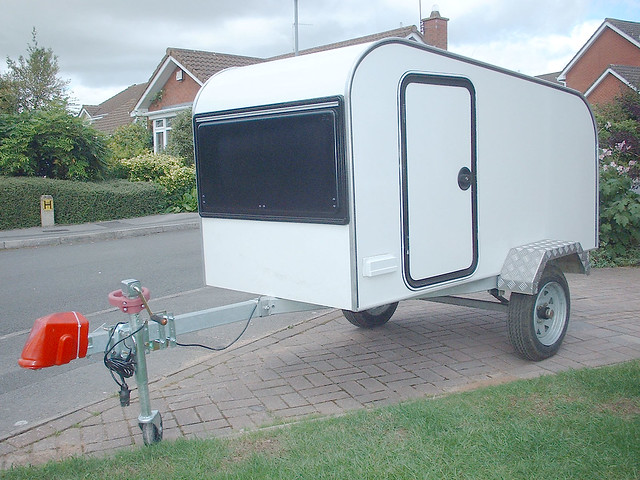
I too was wondering if getting it closer would do the trick too.
Now I'll be setting aside the current cabinet work, and trying some new bracket configurations today.
Fortunately since the roof or cabinets aren't in place I can still see whats going on in there.
So I'll get my spare tire in place too, and look at how big a practical bracket I can make and so forth.
Update on progress or lack thereof later............
My teardrop camper build journal: http://www.tnttt.com/viewtopic.php?f=50&t=64721
Mr. Lahey
The 300 Club
 
Posts: 336
Joined: Wed Oct 28, 2015 3:18 am
Location: Delavan WI

Re: Kenskill style build in Delavan, WI (Now Cub Modern)

Postby KCStudly » Tue Jul 31, 2018 7:21 am

Mr. Lahey wrote:Looks like all of us are early risers. Thanks to both you guys!

Thanks for the vote of confidence, but don't forget... I'm on the east coast (EDT), and the forum clock is based on the central time zone, so... I was still asleep when I wrote that!!! :lol: ;) :lol:
KC
My Build: The Poet Creek Express Hybrid Foamie

Poet Creek Or Bust
Engineering the TLAR way - "That Looks About Right"
TnTTT ORIGINAL 200A LANTERN CLUB = "The 200A Gang"
Green Lantern Corpsmen
User avatar
KCStudly
Donating Member
 
Posts: 9613
Images: 8169
Joined: Mon Feb 06, 2012 10:18 pm
Location: Southeastern CT, USA

Re: Kenskill style build in Delavan, WI (Now Cub Modern)

Postby Mr. Lahey » Tue Jul 31, 2018 1:16 pm

Lunch break update.

I took the struts and brackets off and have been making some cardboard patterns for new brackets. The big limiting factor to bracket size is my spare tire. Best I can do without causing other problems is lower the hatch mount point about 1.25" As Illustrated by the yellow line in Step A1 below. I kept the mount point the same 22.5" from hinge center line, as the original mount point, on the arc shown. That's all I can do on the hatch side of things.

Strut Layouta.jpg
Strut Layouta.jpg (86.11 KiB) Viewed 3009 times


On the wall mount I am very very limited as well. In Step C1 traveling the arc with the short green line I cant move mount in the direction the green line heads at all, or bind up the strut at closing. Right now the strut compresses to 3/4" from full stop closed. So I have almost zero fudge room to move the strut along the arc in the direction of the green line.

Last time when I lowered the hatch mount point 1" like we are talking about here above, I gained almost 3" of lift at the low point of the hatch. So doing this move we are considering above may well gain another 3" of lift. I think the hinge has enough travel to allow it, but I'll now be 6'6" to 6'7" off the ground with low point of the hatch. That's without moving the wall mount point.

In the diagram above If I try to move the wall mount point in Step C1 up the yellow arc, It's going to get too tall quickly.

However that's the only way to try and move the strut angle closer to the red shown line in below picture, that we are trying to close in on. So it boils down to at best 1.25" this way and maybe 1" that way as shown by the yellow line in picture below.

DSCF3857ac1.jpg
DSCF3857ac1.jpg (118.49 KiB) Viewed 3009 times


Am I doing anything for the cause here? Or just making some new jiffy brackets, and more holes in my galley wall, for most likely minimal difference in operation?
Is it time to start thinking of the current auto opening status of my hatch as a feature instead of a bug?

The only alternate path I see is a much shorter, and higher pressure strut to try and keep the mount points in the areas my layout will allow for, without interference with neighboring items.
My teardrop camper build journal: http://www.tnttt.com/viewtopic.php?f=50&t=64721
Mr. Lahey
The 300 Club
 
Posts: 336
Joined: Wed Oct 28, 2015 3:18 am
Location: Delavan WI
Top

Re: Kenskill style build in Delavan, WI (Now Cub Modern)

Postby breb » Tue Jul 31, 2018 3:21 pm

That is still quiet a bit off the line you are trying to achieve. this sounds like trying to chasing a fart in the wind. maybe balancing the load with a weaker strut. But it sounds like your already on to that game. Without the clearances to adjust you are back to the feature mode and not looking at it as a glitch.
breb
Teardrop Master
 
Posts: 128
Images: 119
Joined: Sun Aug 24, 2014 8:06 am
Location: wisconsin
Top

Re: Kenskill style build in Delavan, WI (Now Cub Modern)

Postby Mr. Lahey » Wed Aug 01, 2018 9:09 pm

Well that was the last look at the strut situation for now. Time to get moving on to other areas. My goal is to have the galley completed, stained, and finished. Same with the cabin ceiling, headboard and upper rear cabinets. All done.

I think I can get it to the point where it's ready to wire, and insulate, before the weather makes me shut down for another season. I might try wiring and insulating with some portable heat for the garage once it gets colder. I just want to have all the stain, gluing, or finish work done while weather permits. We shall see how that plan goes.

So back to work tomorrow on the upper rear cabinet face and doors. I have some shelves and partitions to make for those cabinets too. Then some stain and finish to all of it. Plus final mount the A/C slide out into it's cabinet.
My teardrop camper build journal: http://www.tnttt.com/viewtopic.php?f=50&t=64721
Mr. Lahey
The 300 Club
 
Posts: 336
Joined: Wed Oct 28, 2015 3:18 am
Location: Delavan WI
Top

Re: Kenskill style build in Delavan, WI (Now Cub Modern)

Postby breb » Thu Aug 02, 2018 7:05 am

It's funny I have the same thoughts about this summer. It's flying by and even though I feel like I'm getting things accomplished,
there's still a lot to do. If I could get the wiring done which I have mostly run through the roof and to it's termination points. Then I can start running to the distribution panel ( PD 4045) and that means I can get going on the insulation in the roof. I think that would be a good place to be for this season. I do have some decisions to make for myself on the DC source and I am leaning toward making the investment to Lithium. That's a big pill for me to swallow but there are definite advantages that I like. Glad to see you putting the strut thing to sleep . I know that's probably not the way you would want to leave it , but I'm finding there are compromises to be made in these builds. Yesterday I finish laminating the tops of counters and have not locked everything in place yet, I'm waiting for a sink I ordered and I want it to cut a hole in the countertop but with the countertop removed. So I looked at all the partitions and cleats for that area . Yep they needed to be finished sanded and coated with General finish HP . That was my afternoon.

155597
breb
Teardrop Master
 
Posts: 128
Images: 119
Joined: Sun Aug 24, 2014 8:06 am
Location: wisconsin
Top

Re: Kenskill style build in Delavan, WI (Now Cub Modern)

Postby Mr. Lahey » Thu Aug 02, 2018 8:53 pm

Well in automotive terms you have the Tesla of electrical systems. While I plan to run a Model T of 12v and 120v electrical systems in comparison. However I really thought about what I needed it to do, for how I plan to use the camper. It will do that just fine for my use.

Speaking of electrical systems that's what I worked on today. I started at the bottom. Meaning I took inventory of what I already had, plus what I have been slowly purchasing for the system. Already had a good stash of 100% copper wire leftover from past auto projects. No copper clad aluminum wire for me thank you.

What's nice is I also have some rebate type store credit at a local store. I have to use it in the next few days. So I made a list of what I was short. Looks like I can fill my list within $5 or so of the store credit. So that's good. I'll pick it up after work tomorrow and will be pretty well set.

I drew up my wiring plan. Figured out how to route it all. Wiring and routing plan/drawing took a bit of time alright. Should work out just right.
My teardrop camper build journal: http://www.tnttt.com/viewtopic.php?f=50&t=64721
Mr. Lahey
The 300 Club
 
Posts: 336
Joined: Wed Oct 28, 2015 3:18 am
Location: Delavan WI
Top

Re: Kenskill style build in Delavan, WI (Now Cub Modern)

Postby Mr. Lahey » Sat Aug 04, 2018 2:15 pm

Been working all kinds of tiny details today. The rear upper inside cabinet doors wanted to curl up too. The good of it was it was over their width not height. So I was able to combine a stiffener and hardware screw backer in one shot. So a strip glued across the top and bottom did the trick.

Plus I'm making all the cleats etc to hold all the cabinet dividers and shelf units in place. Also cut some 3/4 wide stock to follow the curve of the top of the cabinet dividers. That will give me a nice wide surface to support the inside ceiling and glue and staple it to.

Then I cut some pieces to replace some of the blocks in my FLW styled cabinet lower filler panel. I was lazy and was ripping some of the longer blocks on my pull out saw. Of course the did not come out dead square. So that showed when I tried to clamp it up. So that's all fixed up and "squared" away now.

Haven't posted a pic in a while. Here's a shot of the FLW cabinet filler panel before I corrected it. It looks a lot better now that I cut a few new parts for it. So pardon the in progress photo here. The parts are just placed in loose so the spacing etc. is a tad lopsided. But you get the idea here.

DSCF3865a.jpg
DSCF3865a.jpg (97.06 KiB) Viewed 2885 times
My teardrop camper build journal: http://www.tnttt.com/viewtopic.php?f=50&t=64721
Mr. Lahey
The 300 Club
 
Posts: 336
Joined: Wed Oct 28, 2015 3:18 am
Location: Delavan WI
Top

Re: Kenskill style build in Delavan, WI (Now Cub Modern)

Postby breb » Sat Aug 04, 2018 4:44 pm

Yesterday for me was building the middle pull out drawer . All parts built and have one or two coats of finish on those parts. It needs to be assembled but ran into a slight problem the wife said I would rather take down the dead tree in the back yard today . Oh boy was really looking forward to that one . We picked hottest day to. Finished about 3:30 and nothing left to give to that TD project. We picked out some cabinet handles and pulls last night, I also bought a 24" pack of drawer slides. Still waiting on the sink to arrive , then I can mount the hickory face frame to cabinet partitions and start fastening everything
else together. I like very much what you have going there . Your cabinets are looking great, I definitely like your incorporating the FLW design . I had a issue with the interior upper cabinet panel doors to, even though there made of hickory and joined with biscuits , I had them in basement then took outside and left in some very hot and humid weather for 2 days , that's all it took and they curled. I did not put any finish on them right away. My mistake. I to used some cleats on the back of the panels to straighten out . It worked pretty good.
breb
Teardrop Master
 
Posts: 128
Images: 119
Joined: Sun Aug 24, 2014 8:06 am
Location: wisconsin
Top

Re: Kenskill style build in Delavan, WI (Now Cub Modern)

Postby KCStudly » Mon Aug 06, 2018 6:54 am

Love the FLW influence. I have always been a fan of his style. :thumbsup:
KC
My Build: The Poet Creek Express Hybrid Foamie

Poet Creek Or Bust
Engineering the TLAR way - "That Looks About Right"
TnTTT ORIGINAL 200A LANTERN CLUB = "The 200A Gang"
Green Lantern Corpsmen
User avatar
KCStudly
Donating Member
 
Posts: 9613
Images: 8169
Joined: Mon Feb 06, 2012 10:18 pm
Location: Southeastern CT, USA
Top

Re: Kenskill style build in Delavan, WI (Now Cub Modern)

Postby Mr. Lahey » Tue Aug 07, 2018 4:15 am

Been a couple days since I've had time to work on the tear. So kind of pumped up to get back on it today. Should be able to get a good 3/4 of the day spent working on it. Hope to finish all the cabinet shelves and partitions today. Plus get the cabin side cabinet face fit up too. Should be a session or too more till I'm ready to stain/finish from the inside of the hatch to the face of the cabin rear cabinets, and everything in between. Once that's done I'll move up front to finish up the cabin front bulkhead cabinet. If I can keep the pace I should reach my goal of being ready to wire the tear, just as it starts to get pretty cold in the garage.

breb- That dead tree in the yard is the second time you've had to do lumberjack duty over the course of this thread. You're choppin em down. While I'm out planting em up. One reason I've been off the tear was a trip to the nursery. Picked out 3 new trees for my back yard. I am going to have to do some hole diggin duty pretty soon. Nursery guy said they are going to have a big sale in a few days. So I'll be ready to take advantage of that deal.
My teardrop camper build journal: http://www.tnttt.com/viewtopic.php?f=50&t=64721
Mr. Lahey
The 300 Club
 
Posts: 336
Joined: Wed Oct 28, 2015 3:18 am
Location: Delavan WI
Top

Re: Kenskill style build in Delavan, WI (Now Cub Modern)

Postby breb » Tue Aug 07, 2018 11:11 am

Yeah and I'm afraid I'll have 2 more in the back yard, they have all succumb to the emerald ash borer but at there own pace.
We have to get the stump ground and then think of new tree to plant. In the mean time I assembled those part's for the middle pull out three tier drawer and as soon as I'm done with lunch I will work on something out there . I do have a order of tasks to do but a lot of it still needs the sink ( on order) so I can cut the hole for it with counter top pulled out. Then I can move onto everything else. Just back from PT job and looks like this Thursday to . That's the first 3 day week in the last 6 weeks. I have spent the time well and do think I have knocked out quite a bit on the TD. This is Just a view of the drawer mocked up. Next thing would be a pull out tray for 12v fridge/cooler.


155638155639
breb
Teardrop Master
 
Posts: 128
Images: 119
Joined: Sun Aug 24, 2014 8:06 am
Location: wisconsin
Top

Re: Kenskill style build in Delavan, WI (Now Cub Modern)

Postby Mr. Lahey » Thu Aug 09, 2018 8:49 pm

Your galley is really starting to shape up. Looks real good.

Speaking of galley work I think I'm going to do a last minute change to mine. When I decided to stow the ice chest the narrow way, as it is now, for a variety of reasons a slide out drawer for it would not work. So I decided to sacrifice the slide out convenience for the extra storage space. Figured I'd just pull the cooler out and set it next to the camper when at camp.

I've been thinking about how often I'm in and out of the cooler. Factor in adding ice on the road, groceries at the store, and so forth. It's a lot of lifting a full heavy cooler in and out.

I just took a quick look tonight at the issue and think the below modification to my counter top will do the trick. I'm going to cut the counter top as shown by the yellow line in the photo below. Then hinge it at the very back of the counter by the bulk head. It will give me an access hatch to the cooler. The cooler lid opens in the same direction. So that will work out fine. The new hatch won't open a full 90 degrees, but it won't need to. I'll have plenty of room to get in the cooler to add ice or food or take things out, before the cooler hatch interferes with the lift struts for the main hatch. Plus I'll retain the full counter width when the hatch is closed. Sure will eliminate a lot of lifting the cooler in and out. Think I'm going to go for it.

DSCF3794.JPG
DSCF3794.JPG (121.54 KiB) Viewed 2756 times
My teardrop camper build journal: http://www.tnttt.com/viewtopic.php?f=50&t=64721
Mr. Lahey
The 300 Club
 
Posts: 336
Joined: Wed Oct 28, 2015 3:18 am
Location: Delavan WI
Top

Re: Kenskill style build in Delavan, WI (Now Cub Modern)

Postby lincolnlerner » Fri Aug 10, 2018 7:18 pm

Pretty smart idea. I still think you might be better off keeping the top whole. Build a little stand for the cooler that you can just slide it on to. That way you can access it without clearing the countertop. Other advantages are... well easier for others and the tear can be closed. You mighg get a different size cooler...

Well looking forward to the rest of the trailer getting done so you can use it! Let the hatch and the galley go for now?
lincolnlerner
Teardrop Advisor
 
Posts: 62
Images: 7
Joined: Tue Mar 04, 2014 4:24 pm
Top

Re: Kenskill style build in Delavan, WI (Now Cub Modern)

Postby breb » Fri Aug 10, 2018 10:39 pm

That's the type of thing that drove me nuts at the beginning of the build, trying to visualize all things without having a finished print/plan to work off of. After awhile I could resolve to the fact there would be change and some compromise in my design build as long as it wasn't a major step backward. Are you able to take your top off to cut and hinge? See for me I had a plan to have a slide out space for our camp stove but that has changed to a spot on top of the countertop. You have organized well, all things you want in your galley have a location and are coming together. It looks good! Yesterday I put in my half day at work and came back with enthusiasm to tackle some clearness issues on the pull out drawer. ( took longer than I expected )
and the heat and humidity were tough take. I popped backed in the house a few times , just for a break. I moved on to a sink drain witch I picked up earlier and the packing that came with wasn't going to work. the radius at the back side of the drain head had such a big swooping curve it made the drain stand tall and I was trying to improve that at the end of the day and was getting no where quick, so I packed it up and and headed in. This morning I start with a load for the dump. Tree branch's and that is the first of a few that I'll have to make In the up coming weeks. I can start on the TD after I get back. Well the hardware was finished today, some planning on the 12v fridge space and I picked up some items for the sink drain issue. Which is not resolved yet. I have a early activity tomorrow morning so maybe in the late afternoon I'll get a chance to work on the TD.

155703155704155705
breb
Teardrop Master
 
Posts: 128
Images: 119
Joined: Sun Aug 24, 2014 8:06 am
Location: wisconsin
Top

PreviousNext

Return to Build Journals

Who is online

Users browsing this forum: No registered users and 26 guests