First build 5x10 Rimple design

...ask your questions in the appropriate forums BUT document your build here...preferably in a single thread...dates for updates, are appreciated....

Re: First build Sacramento 5x10 Rimple design

Postby mariannf » Thu Dec 31, 2015 5:55 pm

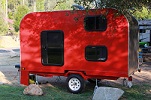
S. Heisley wrote::thinking: Something about the door placement bothered me; and, at first, I couldn't figure it out.
Then the light bulb went on. For the kids to get to their bunks, they will have to crawl over two thirds of your bed area.
Are you okay with that?

The other thing making me scratch my head is whether your axle placement is going to be correct. The reason that people move their axle further back from its original position is to achieve a proper 60/40 balance, with around 60% of the weight in front. If you haven't already done it, you can calculate your trailer's balance using Andrew's software program, here: http://www.angib.pwp.blueyonder.co.uk/t ... tear81.htm Because you won't have a galley in the back, you may not need to move your axle back. If you need or want to change your axle placement, it should probably be done now, before you attach the cabin sides.

Further food for thought is that you might be able to turn your floor plan around, putting the bunks in the front and the door in front of the axle. (I haven't tried it as I don't know where your axle is or should be....It's just a thought.) This might mean that the kids would climb in at the foot of your bed instead of the middle, which could be an advantage for everybody.

All of the above may be unimportant to you as you may already be totally secure in your design; but, one never knows when a thought or idea may hit that has merit.


Hi Sharon,
Good eye on the notation about axle placement it is in fact wrong as written!
The axle is at 54 inches from the back which makes it a 55/45 split.
Following the guidelines from the same link you shared; http://www.angib.pwp.blueyonder.co.uk/t ... tear81.htm

I edited the post with the notations corrected to reflect the actual location for anyone who may be looking in the future and getting ideas of their own.

About the door placement. i have been thinking about that too and will almost certainly move it to over about 4 inches. The main reason being that the fold up bed/sofa i am thinking of when folded is about 25 inches deep, and i don't want it to block the door. http://www.thefutonshop.com/Folding-Foa ... ull-Double or http://www.houzz.com/photos/42644242/Lu ... mattresses
I am used to the girls climbing over me, but they are little now. i am going to give some serious thought to reversing the layout as you offer as a suggestion. The only issue I for see with that though is: I want the bunks to be 32 wide, and the door I am ordering (one for each side) is 36 inches wide. This would mean the door would be partially placed over the tires. The tires extend beyond the frame by several inches (about 6 or 7 I believe).
Do you or anyone who may be tuning in see that as a problem?

Many thanks to each of you and a happy New Year!
Last edited by mariannf on Thu Dec 31, 2015 6:02 pm, edited 1 time in total.
User avatar
mariannf
Teardrop Master
 
Posts: 193
Joined: Wed Oct 28, 2015 3:13 am

Re: First build Sacramento 5x10 Rimple design

Postby KCStudly » Fri Jan 01, 2016 8:22 pm

Sharon made a great suggestion on another bunk builder's thread to snipe the corners off of the ends of the bunks in order to make clearance for door placement. I'm sure she will be able to provide a link.

Keep doing what you are doing. There is no substitute for good planning. :thumbsup:
KC
My Build: The Poet Creek Express Hybrid Foamie

Poet Creek Or Bust
Engineering the TLAR way - "That Looks About Right"
TnTTT ORIGINAL 200A LANTERN CLUB = "The 200A Gang"
Green Lantern Corpsmen
User avatar
KCStudly
Donating Member
 
Posts: 9616
Images: 8169
Joined: Mon Feb 06, 2012 10:18 pm
Location: Southeastern CT, USA

Re: First build Sacramento 5x10 Rimple design

Postby S. Heisley » Tue Jan 05, 2016 3:32 pm

KCStudly wrote:Sharon made a great suggestion on another bunk builder's thread to snipe the corners off of the ends of the bunks in order to make clearance for door placement. I'm sure she will be able to provide a link.

Keep doing what you are doing. There is no substitute for good planning. :thumbsup:


KC, with that build, the bunk corner was in the way of the door and what I advised was to eliminate the corner with a gradual, diagonal cut, which worked fine in that instance. While one could cut the corner off those cabinets, it would be more difficult and one would lose some storage space.

However, what could be done is to indent the cabinets into the bunk space a little bit, as the head and feet need less space than the torso and, chances are, this would cause little, if any discomfort to the sleeper. Bedding would be bunched ever so slightly in the foot area; but probably wouldn't be much, if at all, in the head area. Currently, the bunks are shown at 32" wide. A standard pillow takes up about 22" and a queen sized pillow takes up about 24". I have never found myself needing more space than that for either my head or feet. With the cabinets indented into the bunk area, it might give the room needed for the door opening, remembering that most fenders slope down as they slope out and away. The best way to find out if this would work and be comfortable for the kids is to use some painters tape to tape out an area of the floor, along a wall, with a couple boxes taped down at each end, to represent the cabinets. Then, try getting into and out of the remaining space. Move the boxes in/out, according to your findings, until you know what works best. Remember that, if you are going to have a light and/or shelf there, you will need to allow for that as well. You can tape a piece of cardboard, above the head/pillow area and extending into the bed space about 3", to the side of the box to represent that.

I measured the living room couch seat (21") and the den couch seat (22"), as people often sleep on those. The difference between a couch and a bunk is that the bunk is up against a wall instead of the cushy surface of a couch back. For camp cot sizes, look here: http://www.campetent.com/camp-cots.html FYI: While this particular size chart shows 24" as the smallest width cot, I have been told that submarine bunks are 22" wide.
User avatar
S. Heisley
Super Lifetime Member
 
Posts: 8774
Images: 495
Joined: Mon Sep 17, 2007 10:02 am
Location: No. California
Top

Re: First build Sacramento 5x10 Rimple design

Postby mariannf » Tue Jan 05, 2016 6:18 pm

S. Heisley wrote:
KCStudly wrote:Sharon made a great suggestion on another bunk builder's thread to snipe the corners off of the ends of the bunks in order to make clearance for door placement. I'm sure she will be able to provide a link.

Keep doing what you are doing. There is no substitute for good planning. :thumbsup:


KC, with that build, the bunk corner was in the way of the door and what I advised was to eliminate the corner with a gradual, diagonal cut, which worked fine in that instance. While one could cut the corner off those cabinets, it would be more difficult and one would lose some storage space.

However, what could be done is to indent the cabinets into the bunk space a little bit, as the head and feet need less space than the torso and, chances are, this would cause little, if any discomfort to the sleeper. Bedding would be bunched ever so slightly in the foot area; but probably wouldn't be much, if at all, in the head area. Currently, the bunks are shown at 32" wide. A standard pillow takes up about 22" and a queen sized pillow takes up about 24". I have never found myself needing more space than that for either my head or feet. With the cabinets indented into the bunk area, it might give the room needed for the door opening, remembering that most fenders slope down as they slope out and away. The best way to find out if this would work and be comfortable for the kids is to use some painters tape to tape out an area of the floor, along a wall, with a couple boxes taped down at each end, to represent the cabinets. Then, try getting into and out of the remaining space. Move the boxes in/out, according to your findings, until you know what works best. Remember that, if you are going to have a light and/or shelf there, you will need to allow for that as well. You can tape a piece of cardboard, above the head/pillow area and extending into the bed space about 3", to the side of the box to represent that.

I measured the living room couch seat (21") and the den couch seat (22"), as people often sleep on those. The difference between a couch and a bunk is that the bunk is up against a wall instead of the cushy surface of a couch back. For camp cot sizes, look here: http://www.campetent.com/camp-cots.html FYI: While this particular size chart shows 24" as the smallest width cot, I have been told that submarine bunks are 22" wide.


thanks as always Sharon!
This conversation has made me think of modifying the plan/layout: instead of having a cabinet on both sides of the TTT (at the head and foot of the bed) rather have one cabinet at the foot that is double the width. I will think and sketch and if the sketch makes any sense upload it. If I make the cabinet 24w x 58tall x 11 deep with the back to the bunks this will probably make the kids feel less boxed in. with these dimensions the main bed at 75 long will bump into the cabinet at one corner, but only be 1 inch of bump so the foam mattress can mange that.
User avatar
mariannf
Teardrop Master
 
Posts: 193
Joined: Wed Oct 28, 2015 3:13 am
Top

Re: First build Sacramento 5x10 Rimple design

Postby mariannf » Tue Jan 05, 2016 6:31 pm

bolted1.jpg
bolted1.jpg (29.63 KiB) Viewed 12660 times

subframe on1.jpg
subframe on1.jpg (39.86 KiB) Viewed 12660 times

here are pics of the subframe bolted to the trailer frame. I used 3/8 lag bolts with self-locking nuts. There are 6 bolts running the length of each 2x4.
again there are 1x4s glued and screwed (from the bottom up) to the 2x4s this gave the subframe enough height so that the floor (which i will attach next) cleared the fenders.
the wood frame and floor over hang the trailer frame by 1 foot at the front and back and 6 inches at each side.
Last edited by mariannf on Wed Jan 06, 2016 2:30 pm, edited 1 time in total.
User avatar
mariannf
Teardrop Master
 
Posts: 193
Joined: Wed Oct 28, 2015 3:13 am
Top

Re: First build Sacramento 5x10 Rimple design

Postby S. Heisley » Tue Jan 05, 2016 9:19 pm

I will think and sketch and if the sketch makes any sense upload it. If I make the cabinet 24w x 58tall x 11 deep with the back to the bunks this will probably make the kids feel less boxed in. with these dimensions the main bed at 75 long will bump into the cabinet at one corner, but only be 1 inch of bump so the foam mattress can mange that.


I like the idea of turning the cabinet and not making it as deep. If you find that you are comfortable with that, it would probably work. You may want to re-think the bunk lights again. I still think that both lights could be put in a direct line if you put them near either corner of the bed-head area. It would be better if they can be focused away from your bed area, too. You could give them a small curtain that they can pull across to block overhead light when they are sleeping.

Since you're thinking about cutting down on your cabinet space and turning that sideways, Another idea would be to keep the cabinets at the foot and the head of the bunks; but, turned sideways, 16Wx11Dx57or58" These two would give a little more storage space than the one*; and, I don't think it would be claustrophobic. If you look at where the head lays on the pillow (measure from the top of your pillow indent to the headboard or wall), you will see that there is typically at least 6" of unused space and the very top of the pillow. This means that the girls' cabinet wall would only cut off about 10" of their view. They might like that as that's less than the length of a piece of paper and not hard to see around.

24X11X58=15,312cubic inches for one larger cabinet
16X11X58=10208" x2=20,416 cubic inches for two smaller cabinets =~5,000 additional cubic storage inches*
* That's about 3 additional cubic feet; but, with our little trailers, every inch or fraction of an inch counts! :lol:

There are many ways to do what you want and you will find what is best for you and yours.
User avatar
S. Heisley
Super Lifetime Member
 
Posts: 8774
Images: 495
Joined: Mon Sep 17, 2007 10:02 am
Location: No. California
Top

Re: First build Sacramento 5x10 Rimple design

Postby S. Heisley » Tue Jan 05, 2016 9:46 pm

Mariann:

I had another related thought. You may have already thought of it. You can make foot holes or bracket steps on the side of the cabinet to help the girl in the top bunk to climb up/down to/from her bunk. Add a hand hold hole, drawer handle or window lift handle on the side frame of the bunk to give her something to hold on to and to balance with as she climbs. This assumes that the smallest, lightest girl will be in the top bunk.
User avatar
S. Heisley
Super Lifetime Member
 
Posts: 8774
Images: 495
Joined: Mon Sep 17, 2007 10:02 am
Location: No. California
Top

Re: First build Sacramento 5x10 Rimple design

Postby KCStudly » Wed Jan 06, 2016 12:23 pm

Which gave me the idea that you could enclose the opposite side of selective shelves that are at bunk level, providing an open cubbyhole for each of the bunk occupants, including the option of recessing their lights inside of the cubbies, while still having most of the shelves facing out to the main cabin. The blank space on the exposed side of the shelf could be used to hang other things, decorative and/or functional (a mirror, art, reading rack, etc.).

The foot and hand hold idea is a good one, too. For best results you will likely be better off making your own custom shelves, rather than trying to adapt something "off the shelf". I would be less trusting of the strength of materials from inexpensive kit shelves, as they would likely be made from lesser quality wood or veneered particle board ( :thumbdown: ).
KC
My Build: The Poet Creek Express Hybrid Foamie

Poet Creek Or Bust
Engineering the TLAR way - "That Looks About Right"
TnTTT ORIGINAL 200A LANTERN CLUB = "The 200A Gang"
Green Lantern Corpsmen
User avatar
KCStudly
Donating Member
 
Posts: 9616
Images: 8169
Joined: Mon Feb 06, 2012 10:18 pm
Location: Southeastern CT, USA
Top

Re: First build Sacramento 5x10 Rimple design

Postby mariannf » Wed Jan 06, 2016 2:36 pm

KCStudly wrote:Which gave me the idea that you could enclose the opposite side of selective shelves that are at bunk level, providing an open cubbyhole for each of the bunk occupants, including the option of recessing their lights inside of the cubbies, while still having most of the shelves facing out to the main cabin. The blank space on the exposed side of the shelf could be used to hang other things, decorative and/or functional (a mirror, art, reading rack, etc.).

The foot and hand hold idea is a good one, too. For best results you will likely be better off making your own custom shelves, rather than trying to adapt something "off the shelf". I would be less trusting of the strength of materials from inexpensive kit shelves, as they would likely be made from lesser quality wood or veneered particle board ( :thumbdown: ).


Thanks KC and Sharon!
I like the idea of steps on the side of the cabinet to get to the top bunk! I have been thinking about it more and will go with the 24 w x 11 deep x 58 tall cabinet at the foot of the bunk. I also plan a cabinet for above the head of the main bed that will be 57 w x 19 deep x 19 tall. so between the two cabinets it shouls be fine for us.
Yes, i am thinking I will build the cabinet since getting a pre-fab with exact specs might not work.

I have a separate question for you about trim ring size for the doors and windows;
The walls are constructed out of 3/4 ply exterior, 1x's for the skeleton, and 3mm birch for the interior skin. By my calculations that totals to 1.618 inches (or 1 and just short of 5/8). do I go with a 1 and a half trim ring or a 1 and 5/8 or does it not matter?
User avatar
mariannf
Teardrop Master
 
Posts: 193
Joined: Wed Oct 28, 2015 3:13 am
Top

Re: First build Sacramento 5x10 Rimple design

Postby S. Heisley » Wed Jan 06, 2016 8:25 pm

:thumbsup: We'll be looking forward to watching it come together.
User avatar
S. Heisley
Super Lifetime Member
 
Posts: 8774
Images: 495
Joined: Mon Sep 17, 2007 10:02 am
Location: No. California
Top

Re: First build 5x10 Rimple design

Postby mariannf » Sun Jan 10, 2016 5:34 pm

image.jpg
image.jpg (29.68 KiB) Viewed 12507 times

image.jpg
image.jpg (29.68 KiB) Viewed 12507 times

Pics of the floor attached to the sub-floor. Used used 1 1/4 construction screws and proline adhesive. Next will be work on exterior walls.
Attachments
image.jpg
image.jpg (23.09 KiB) Viewed 12507 times
User avatar
mariannf
Teardrop Master
 
Posts: 193
Joined: Wed Oct 28, 2015 3:13 am
Top

Re: First build 5x10 Rimple design

Postby mariannf » Wed Jan 13, 2016 12:15 am

I started work on the walls. began by making a simple compass to draw the curve of the wall. I used a 20 inch piece of 1x2 and marked out 19 inches and found the center at both ends. I put a screw through one center point and drilled a hole for a pencil at the center. it worked great. pics of compass and the drawn curve on the 5x10 which is probably hard to see. I haven't done much wood cutting and plan to cut the wall curves with a jig saw. i did a practice cutting a curve on a 1x4. It turned out Ok, but the wall cut is much longer. any advice for how to make a good clean cut? I noticed on my practice that the top and bottom of the cut have a slight angle.
photo 2.JPG
photo 2.JPG (36.49 KiB) Viewed 12453 times

photo 2.JPG
photo 2.JPG (36.49 KiB) Viewed 12453 times
Attachments
photo 1.JPG
photo 1.JPG (30.91 KiB) Viewed 12453 times
User avatar
mariannf
Teardrop Master
 
Posts: 193
Joined: Wed Oct 28, 2015 3:13 am
Top

Re: First build 5x10 Rimple design

Postby KCStudly » Wed Jan 13, 2016 11:37 am

Don't push the saw hard; just let it eat and take your time.

Don't try to cut the line; cut just outside the line a tad and sand up to it using a hard back/sanding block.
KC
My Build: The Poet Creek Express Hybrid Foamie

Poet Creek Or Bust
Engineering the TLAR way - "That Looks About Right"
TnTTT ORIGINAL 200A LANTERN CLUB = "The 200A Gang"
Green Lantern Corpsmen
User avatar
KCStudly
Donating Member
 
Posts: 9616
Images: 8169
Joined: Mon Feb 06, 2012 10:18 pm
Location: Southeastern CT, USA
Top

Re: First build 5x10 Rimple design

Postby mariannf » Wed Jan 13, 2016 1:02 pm

KCStudly wrote:Don't push the saw hard; just let it eat and take your time.

Don't try to cut the line; cut just outside the line a tad and sand up to it using a hard back/sanding block.


Thanks KC!
User avatar
mariannf
Teardrop Master
 
Posts: 193
Joined: Wed Oct 28, 2015 3:13 am
Top

Re: First build 5x10 Rimple design

Postby mariannf » Mon Jan 18, 2016 11:56 pm

image.jpg
image.jpg (89.65 KiB) Viewed 12341 times
Made the exterior wall curve cuts. They are at 19 inch radius. Used a jigsaw, and cut first wall first then laid second wall on it and traced curve. After all cuts I sanded each curve. They are not perfect curves, close but not perfect is this a problem? Should I do more sanding?
User avatar
mariannf
Teardrop Master
 
Posts: 193
Joined: Wed Oct 28, 2015 3:13 am
Top

PreviousNext

Return to Build Journals

Who is online

Users browsing this forum: TwilaR and 16 guests