Bear's Lair

...ask your questions in the appropriate forums BUT document your build here...preferably in a single thread...dates for updates, are appreciated....

Re: Bear's Lair West Texas

Postby KCStudly » Tue Mar 29, 2016 11:51 am

Nobes wrote:The good news is, if I can craft this thing with style & accuracy, it will be worth $10,000.

Yes, but can you get anyone to pay you that much for it? If you look at some of the asking prices on the for sale forum here, they usually start at less than that for a super nice TD and dwindle down quite a way before they actually sell. At least that is what I have seen fairly regularly. Maybe I'm wrong. An unused camper would bring a premium over a used. Fully kitted out would be more than bare, but most people will want a new mattress and bedding anyway.

I figure TPCE probably would never sell for more than the cost of materials, and it is worth way more than that to me. I've got way too much time into it to let it go for "free labor". The joke around my work shop is that it is "The Million Dollar Camper", just because of how much build time I have into it. :lol:
KC
My Build: The Poet Creek Express Hybrid Foamie

Poet Creek Or Bust
Engineering the TLAR way - "That Looks About Right"
TnTTT ORIGINAL 200A LANTERN CLUB = "The 200A Gang"
Green Lantern Corpsmen
User avatar
KCStudly
Donating Member
 
Posts: 9613
Images: 8169
Joined: Mon Feb 06, 2012 10:18 pm
Location: Southeastern CT, USA

Re: Bear's Lair West Texas

Postby Nobes » Wed Mar 30, 2016 9:06 am

Yeah, I was just spoutin' off. Trying to reassure myself that I haven't spent too much. It's not for sale--unless, of course, someone actually offers me $10,000, and then all bets are off.

When I was in Missouri a few weekends ago, every day I drove by half a dozen RV sales lots on my multiple trips to Lowes. One of them had some TDs front and center, so I stopped in. They had units ranging from 13,000 (a 4' wide 'mypod' with no galley) to 17,000 (about the size of mine). So, that's why I stuck 10,000 in there.

I wouldn't pay $10,000 for a TD. Apparently, however, I will spend $4000 and build it myself.

Before I started my build I read all the threads that said "double your estimate." Not me, I thought. No way, no how. Ha! My original plan was $2000. So, if you're looking at building a teardrop, double your estimate!

Took the night off last night. Taught my small group from church and afterwards, the new season of Deadliest Catch began. Tonight it's back to work.
Last edited by Nobes on Wed Mar 30, 2016 1:47 pm, edited 1 time in total.
Nobes
Teardrop Master
 
Posts: 214
Images: 508
Joined: Sun Dec 20, 2015 5:01 am

Re: Bear's Lair West Texas

Postby Vedette » Wed Mar 30, 2016 10:01 am

Great Job! Keep up the good work and steady progress! :thumbsup: :thumbsup:
Oh, and lets not talk "Budget"........I am one of those that always say to double or triple your estimated budget.
And time (as related to labour cost)....my builds have put my TDs in the Budget stratosphere. :cry:
Good Roads
Brian & Sandi
Good Roads
Brian & Sandi
Here is a link to my Build Journal
viewtopic.php?f=50&t=50912
Image109106109111109110138766
User avatar
Vedette
Silver Donating Member
 
Posts: 5141
Images: 443
Joined: Thu Dec 01, 2011 4:28 am
Location: Westbank B.C.
Top

Re: Bear's Lair West Texas

Postby Nobes » Fri Apr 01, 2016 1:22 pm

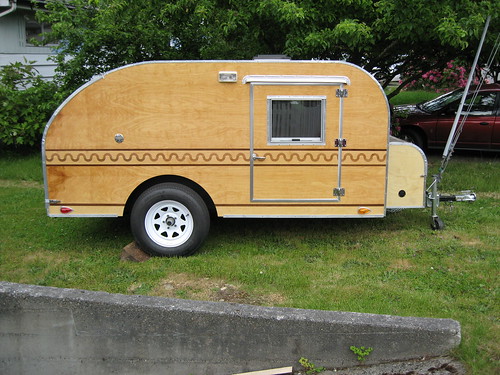
I haven't posted in a few days but I have been working. I have completed my 2 1x4 skeletons, except for framing around the doors. I will do that when the doors arrive.

Several observations: if I did this again, I would use skeletonized plywood instead of stick framing. This job has taken me at least 16 hours. I'm slow, I admit, but dang that's a lot of time. So, I have 4 things I will change on my next buIld: 1/4 ply top and bottom on the floor sandwich, stick with a 5 wide but get a 5 wide trailer, use a 4x8 wall design, and skeletonized ply not sticks. I'm sure there will be other choices to add to this list later.

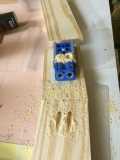
Also, crap tools are crap. I have the nefarious Chicago electric brand biscuit joiner. I haven't used it in years. I got everything ready, picked it up, plugged it in, and zip zero nada. I took it apart and determined that a 1/8" long piece of metal was missing (it goes here and holds this rectangular piece of metal down--the one on the other side is still attached):
140689
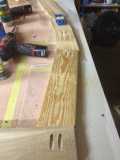
Holding that down manually, it worked. I tried to figure out some way to fix it and just broke the housing more. So, I found a new housing for the entire unit:
140692
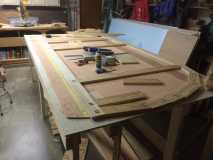
Then of course I needed a new plan. Lowes wanted $199 for a dewalt plate joiner. Home depot would sell me a ryobi for $99. Fortunately, I found the HD guy who actually knows tools. Long story short, I bought a double kreg jig for $39. I have a single and have never been terribly impressed. He said, "you're doing it wrong." And he was right. With the new jig, using their screws, doing it right, I got the skeletons done.
140690140691
140693140694
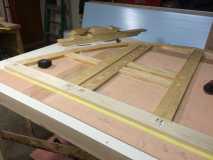
Tonight I rout the profile on the skeletons and hopefully cut a rabbet for my roof sandwich to sit in.

Then, I'm off for 2 weeks. Saturday is yard work and adding a gate in my fence to get the TD in the back yard where I will build my TD Garage, then the grandkids are here a few days, then I go to MO where my dad is having some pretty serious surgery next Thursday. Assuming all goes well, I'll be back at it on the 17th.
Nobes
Teardrop Master
 
Posts: 214
Images: 508
Joined: Sun Dec 20, 2015 5:01 am
Top

Re: Bear's Lair West Texas

Postby KCStudly » Fri Apr 01, 2016 2:51 pm

Best wishes for your dad. Family comes first. :thumbsup:
KC
My Build: The Poet Creek Express Hybrid Foamie

Poet Creek Or Bust
Engineering the TLAR way - "That Looks About Right"
TnTTT ORIGINAL 200A LANTERN CLUB = "The 200A Gang"
Green Lantern Corpsmen
User avatar
KCStudly
Donating Member
 
Posts: 9613
Images: 8169
Joined: Mon Feb 06, 2012 10:18 pm
Location: Southeastern CT, USA
Top

Re: Bear's Lair West Texas

Postby Nobes » Fri Apr 01, 2016 10:47 pm

Thanks KC. I'm praying for good things.

Tonight I bought a new, longer pattern bit and successfully routed the frames to match the template.

140702140701

The next step is creating a ledge for the headliner to rest on, and setting the frame profile to accept the hatch. There are numerous ways to do this and I'm not certain which is best for me. I've been trying to follow the Frederick manual, and frankly I don't understand his instructions at this point. I know what the goal is but I have to figure out how to get that ledge set for headliner and hatch. It's likely I will study that over the next 2 weeks, and hopefully have the process/steps clear in my head when I return to the build. After that it's time to fiberglass my panels--all those materials will be here waiting on me when I get back from MO.

Tomorrow it's yard work, including moving about 4' of a 3" deep rock garden so I can make a new gate in the fence along the alley so I can park the TD in my to-be-created TD Garage. Should be a full day.
Nobes
Teardrop Master
 
Posts: 214
Images: 508
Joined: Sun Dec 20, 2015 5:01 am
Top

Re: Bear's Lair West Texas

Postby Nobes » Wed Apr 06, 2016 9:23 pm

Made it to Missouri. It's an early start tomorrow but I had a few minutes so I wanted to ctch up on status:

I did get a few things done last Saturday--
I doubled the size of the alley gate and moved the TD into the back yard, so. Now we can get 2 cars in the driveway again. Still no cars in the garage, of course, but they are not in the street.

140783
Opening for the new gate

140784140785
Rock garden shortened by about 4 feet--I thought that would be a lot harder.

140786
The best place to mix concrete is in the hole. 40 pounds is too much...but what do you do with half a bag of concrete?

140788140787
New gate in & out--not a work of art but it opens & closes. I was surprised that I had to remove so much dirt in front of the new side of the gate.

140789140790
Couldn't resist clamping a side to the trailer, just to see!

140792140791
And new toys have arrived! Glass & epoxy, doors, cooler, fantastic fan, side marker lights, trailer stabilizer jacks. Still waiting on tail lights & a few more things, hopefully they will be there when I get home.

Making progress on hatch construction decisions thanks to tnttt. Many thanks to all who have posted thoughts, ideas, problems, etc.
Nobes
Teardrop Master
 
Posts: 214
Images: 508
Joined: Sun Dec 20, 2015 5:01 am
Top

Re: Bear's Lair West Texas

Postby Nobes » Sun Apr 10, 2016 4:33 pm

My dad came through the surgery well. He's been in ICU a couple of days, the plan is to move on tomorrow. We are very grateful about how well he has done. I will be able to leave on Saturday knowing he is doing well & in good hands.

I keep getting those emails from harbor freight. I know I just tossed a crap tool from there, but they had a (normally $60!!) paint gun for $10, so I got it. We'll see if I can operate it & if it sprays as it should when I get home. If it is also a crap tool, hey it was just ten bucks.

Still studying hatch construction. Making some progress I think.
Nobes
Teardrop Master
 
Posts: 214
Images: 508
Joined: Sun Dec 20, 2015 5:01 am
Top

Re: Bear's Lair West Texas

Postby Nobes » Mon Apr 25, 2016 9:31 pm

Dad made it out of ICU ahead of schedule, out of the hospital ahead of schedule, and out of the rehab facility ahead of schedule. As my sister said, My Dad is one tough old bird. He is home and doing great. He still has much recovery ahead, but to be home this quickly is incredible. Way to go Pops.

So I am back in TX and building again. While away I did make all my roof & hatch construction decisions, now we will see if they were the right decisions.

As of right now it is starting to look like a TD--walls, bulkhead, and 4 temporary spars are up. They will all come down again later for skinning, but I am ready to start building cabinets,

Here is how I got to this point:
141173
I previously spray painted the outside of the wheels and the trailer. I bought more paint and did the inside of the wheels and touched up the trailer. There is still red on it, but you have to lay under it to see it.

141174
I attached the black fenders under the deck with SS nuts, bolts, & fender washers. The round head of the bolt is above the tire and the other end stuck up just a bit too high, so I used my roto-zip tool to snip off the end.

141176
Then I filled the hole with TB3 to waterproof the assembly.

141177
Next I started on the vinyl floor. I am likely out of order here, but it was something I could do.

141178
I trimmed the edges with the router. It came out good. The problem is, 2 days later there were gaps between the strips. The box said to wait 2 days after you bring the vinyl home before installation, but that sort of rule doesn't apply to me, right? One more thing to figure out as I go.
Last edited by Nobes on Mon Apr 25, 2016 10:25 pm, edited 1 time in total.
Nobes
Teardrop Master
 
Posts: 214
Images: 508
Joined: Sun Dec 20, 2015 5:01 am
Top

Re: Bear's Lair West Texas

Postby Nobes » Mon Apr 25, 2016 9:38 pm

Well I finally HAVE to rout the rabbets for the walls to sit on the deck and the spars/roof to sit on top of the walls and for the hatch. I know what dimensions I want but I am nervous. If I screw this up I have to start over building walls. Lots of time, lots of money. But I got started and sure enough my stupid ryobi router's depth adjustment is slipping. Again. As usual. I tried several things to fix it, and finally gave up. The problem is the quick release lever will pop up while routing and the bit changes height.

141179

So I decided the best thing to do is upgrade. I am now the proud owner of a hitachi router.
141180

I gave that hitachi a huge workout and it did great.
141184141183

The sides fit on the deck just like I planned. Woo hoo!
141181141182
Last edited by Nobes on Mon Apr 25, 2016 11:01 pm, edited 2 times in total.
Nobes
Teardrop Master
 
Posts: 214
Images: 508
Joined: Sun Dec 20, 2015 5:01 am
Top

Re: Bear's Lair West Texas

Postby Nobes » Mon Apr 25, 2016 10:03 pm

Then I got ready to cut the rabbet for the roof. The plan was to clamp the template on top of the wall and rout away with a straight bit. However, the template was the right distance from the spot to be routed only for about 6". That's no good. I don't want to reset the template 50 times.

What I need is an edge guide. I had one with the ryobi, but not the hitachi. No problem, I'll just buy one...except I live in the boonies of west texas and I would have to drive 5 hours to ft worth to get one. Ok, I don't want to stop, but I will order one and have Amazon deliver it. Except...they are back ordered and every web site that says they will sell me one says they don't know when the part will be available.

That stinks.

So I will have to build one. A steel rod, t-nuts, knobs and scrap wood will do it. THIS is why I hate to throw away scraps of wood and my garage looks like it does.
141186
141187
141188
And there it is. This was the third one--design flaws in the first 2 doomed them. I had to have the edge fit under the router base so I could get the job done. My guide wasn't perfect but it did the trick.

141189
I forgot to mention: when I put the walls together with pocket screws, I failed to think ahead. When it was time to do all this routing, I had to move all the screws in the areas to be routed. Fortunately, this went faster than I thought it would. The only down side is now I just have one screw in each joint. The good news is the skins will make up The loss of screws.

141190
141191
I am very pleased with how it all came out.

Routing, however, is extremely messy. I had to get my dust control system back online.
141192
Love that big red broom.
Nobes
Teardrop Master
 
Posts: 214
Images: 508
Joined: Sun Dec 20, 2015 5:01 am
Top

Re: Bear's Lair West Texas

Postby Nobes » Mon Apr 25, 2016 10:18 pm

I cut down 3/8" for the hatch lid to sit on. I used a rabbet bit on each face of the wall frame, then a pattern bit to remove the middle. And a chisel for the ends. It came out great.
141202

Last Friday night a friend called and said his wife had a night with some friends, and he wanted to help on my TD. He's a great guy but, well, he got no skillz. He is a computer whiz--my personal IT department, as I like to say--but I'm not sure he know which is the business end of a hammer.

However, I had been in quite a funk about this build and he was able to talk me off the ledge. He offered some suggestions about my balky router, which ultimately didn't work but were very much worth trying. He ate the burgers I cooked. And he helped me set up this big canopy tent thing, which means I can put stuff on the trailer and still have room in my garage to work, which is huge. Here are a coule of pics:

141194141193

Tonight I got the walls up, some spars, and the bulkhead. The dang thing is actually plumb! The bulkhead sits at 90 degrees on both walls. It's starting to look like a teardrop!

Now I get to start working on cabinets, finally something I have done before. Can't wait till tomorrow night!
141196
141195
Nobes
Teardrop Master
 
Posts: 214
Images: 508
Joined: Sun Dec 20, 2015 5:01 am
Top

Re: Bear's Lair West Texas

Postby KCStudly » Tue Apr 26, 2016 7:45 am

Way to go! Milestone achieved. :thumbsup:
KC
My Build: The Poet Creek Express Hybrid Foamie

Poet Creek Or Bust
Engineering the TLAR way - "That Looks About Right"
TnTTT ORIGINAL 200A LANTERN CLUB = "The 200A Gang"
Green Lantern Corpsmen
User avatar
KCStudly
Donating Member
 
Posts: 9613
Images: 8169
Joined: Mon Feb 06, 2012 10:18 pm
Location: Southeastern CT, USA
Top

Re: Bear's Lair West Texas

Postby Nobes » Wed Apr 27, 2016 9:21 pm

Thanks KC! The walls are not up for good, they have to come down for skinning, but to know that they fit exactly as planned is HUGE. They will stay up until all the wiring is planned, cabinets are built, outside skins are glassed, and basically I'm ready for final assembly then installing and glassing the roof.

A little progress today. I got the support jacks on the front. I am going to buy 2 more for the rear so while camping we will be all on jacks.
141205

Then I added some 2x4 supports in the tongue. I trimmed them to fit in the C-channel and put a #12 lag bolt through the steel. I had a wheel jack bolted to the tongue, but the weight of the trailer was twisting the tongue. Hopefully I will be able to attach the wheel Jack to one of the new supports.
141206

Finally I made my first hatch rib. The other day I mis-cut a piece of 3/4 ply which was supposed to be my bulkhead. I had to buy a new sheet and got the bulkhead installed last weekend. Now I have 3 pieces of nice 3/4 ply and it looks like I will be able to cut all the ribs as well as the support pieces between the roof spars. The rib is 3". I set a piece of wood in the galley area, traced the outline of the wall edge, cut that close with a jig saw, clamped it back in the galley and routed the profile with a flush trim bit. I then used a tri-square set at 3" to mark the line for the back of the rib, cut it close with the jig saw, then used the band saw to cut to the line. A little sanding cleaned up the line and it looks great. I left space at the bottom for a thicker board to ensure rigidity of the hatch and to give me plenty of room to make sure I have the exact length for solid closure.
141207

Now I have my template for the other ribs. I know how to dimension my galley cabinets. And tomorrow I get to start the cabinets.
Nobes
Teardrop Master
 
Posts: 214
Images: 508
Joined: Sun Dec 20, 2015 5:01 am
Top

Re: Bear's Lair West Texas

Postby plectrudis » Thu Apr 28, 2016 9:15 pm

I'm glad to hear that your dad's doing well, Nobes, and also that you're making good progress. It doesn't look to me like you have anything to be in a funk about--you've assembled a lot of big components, and they look great! You've got a floor, you got your fiddly rabbet join to fit, and the outline of the walls is in place--that's awesome. In any case, I'm glad your buddy was able to help with the funk situation. And congrats on the new router :-)
User avatar
plectrudis
Teardrop Master
 
Posts: 117
Images: 98
Joined: Tue Mar 10, 2015 3:12 pm
Location: central Texas
Top

PreviousNext

Return to Build Journals

Who is online

Users browsing this forum: No registered users and 25 guests