Kansas City Home Built Teardrop

...ask your questions in the appropriate forums BUT document your build here...preferably in a single thread...dates for updates, are appreciated....

Re: Kansas City Home Built Teardrop

Postby finleycraft » Wed Mar 02, 2016 9:44 am

Yup that is mine, Thank you! We have taken it to the PNW once already its a lot of fun to go camping out there. If you guys build that one fast enough there are plenty of places within a couple hours to go on a test camp this spring. :twisted:


RustyFenderBrewer wrote:
I'm in Prairie Village. My brother is next door in Fairway. Thanks for the response. I think I saw the trailer in your avatar on Craigslist?? If so, very nice!

Yes, I've actually wanted to build one for years. When I mention the interest, my sister in law got really excited about the idea. They were just back from camping trip in the Pacific NW and had seen several teardrops. Looked like an opportunity to get on the learning curve.
User avatar
finleycraft
Teardrop Advisor
 
Posts: 80
Images: 87
Joined: Thu May 17, 2012 9:53 pm
Location: Kansas City Missouri

Re: Kansas City Home Built Teardrop

Postby RustyFenderBrewer » Wed Mar 02, 2016 11:33 pm

be_a_jayhawk wrote:Be sure to check out my build thread so if you see me around you can say hi. If mine is around it's hard to miss!


I checked it out. Very cool. I've never heard of a "foamy" before. That's really neat. Always more to learn out there.
RustyFenderBrewer
Teardrop Inspector
 
Posts: 22
Images: 62
Joined: Sun Feb 28, 2016 8:40 am
Location: Kansas City

Re: Kansas City Home Built Teardrop

Postby RustyFenderBrewer » Wed Mar 02, 2016 11:36 pm

finleycraft wrote:Yup that is mine, Thank you! We have taken it to the PNW once already its a lot of fun to go camping out there. If you guys build that one fast enough there are plenty of places within a couple hours to go on a test camp this spring. :twisted:


RustyFenderBrewer wrote:
I'm in Prairie Village. My brother is next door in Fairway. Thanks for the response. I think I saw the trailer in your avatar on Craigslist?? If so, very nice!

Yes, I've actually wanted to build one for years. When I mention the interest, my sister in law got really excited about the idea. They were just back from camping trip in the Pacific NW and had seen several teardrops. Looked like an opportunity to get on the learning curve.


We're jamming on it. Have a men's trip planned for 4/29. Don't think his wife will want that to be the first outing though so probably be tenting it then.
RustyFenderBrewer
Teardrop Inspector
 
Posts: 22
Images: 62
Joined: Sun Feb 28, 2016 8:40 am
Location: Kansas City
Top

Re: Kansas City Home Built Teardrop

Postby be_a_jayhawk » Thu Mar 03, 2016 8:05 am

RustyFenderBrewer wrote:
be_a_jayhawk wrote:Be sure to check out my build thread so if you see me around you can say hi. If mine is around it's hard to miss!


I checked it out. Very cool. I've never heard of a "foamy" before. That's really neat. Always more to learn out there.

There is a whole foamy section here on TNTT. I liked the light weight and a bit of cost savings, especially since here in KS under 2000 lbs doesn't need tags/taxes. Those guys in the foamy section are definitely hardcore.
User avatar
be_a_jayhawk
Teardrop Master
 
Posts: 214
Images: 2
Joined: Wed Jun 19, 2013 6:32 pm
Top

Re: Kansas City Home Built Teardrop

Postby KCStudly » Thu Mar 03, 2016 11:54 am

be_a_jayhawk wrote:Those guys in the foamy section are definitely hardcore.

:cigar: :laughter: 8)
KC
My Build: The Poet Creek Express Hybrid Foamie

Poet Creek Or Bust
Engineering the TLAR way - "That Looks About Right"
TnTTT ORIGINAL 200A LANTERN CLUB = "The 200A Gang"
Green Lantern Corpsmen
User avatar
KCStudly
Donating Member
 
Posts: 9611
Images: 8169
Joined: Mon Feb 06, 2012 10:18 pm
Location: Southeastern CT, USA
Top

Re: Kansas City Home Built Teardrop

Postby RustyFenderBrewer » Sat Mar 05, 2016 7:40 pm

More progress today! We got the sides rough-cut, still need to sand them up to the line drawn on them from tracing the template. We them painted the trailer floor which will be covered with a removable carpet. Finally we stained/sealed the walls. It seemed like it would be easier to accomplish this task now rather than later. We plan to apply the outer skin to the walls last. Here are the pics which is all we ever really want to see, right?
139874
The seam in the plywood in the picture above will be concealed by the rear bulkhead panel.
139875
I put on two coats of exterior house paint on the floor to better seal it up.
139876
RustyFenderBrewer
Teardrop Inspector
 
Posts: 22
Images: 62
Joined: Sun Feb 28, 2016 8:40 am
Location: Kansas City
Top

Re: Kansas City Home Built Teardrop

Postby RustyFenderBrewer » Mon Mar 14, 2016 6:38 am

Another weekend, another step forward! Saturday was spent sanding and routing the two side walls until they matched and had a smooth, pleasing profile. We also mapped out the cabinetry using painters' tape.
140136

We the stood up and braced the side walls and installed the ceiling joists. You can also see the framing for the roof vent/fan.
140137
140134
140135

Here is the jailbird trying it on for size.
140133

Finally we built and installed the lower portion of the rear bulkhead. The galley is designed to hold an aluminized commercial-grade Coleman cooler which takes up slightly more than 1/2 of the lower galley. Also one that the cooler is on the left instead of the right (where I've always seen it before). This is because Lisa and Bill are both southpaws so we're flipping it all around.
140125
140132
RustyFenderBrewer
Teardrop Inspector
 
Posts: 22
Images: 62
Joined: Sun Feb 28, 2016 8:40 am
Location: Kansas City
Top

Re: Kansas City Home Built Teardrop

Postby RustyFenderBrewer » Mon Mar 14, 2016 6:49 am

We hit it hard again on Sunday and we installed the first piece of the ceiling plywood.
140121

Note: all the visible plywood we're using is Birch which we are pre-staining prior to installation.

We then pre-curved the next piece and wet down the back. This one will have to sit overnight :( so on to galley framing!
140122

We cut, ripped, and drilled like madmen and got most of the framing ready. We assembled the upper portion of the rear bulkhead and test fit it with the plywood galley counter (neither is permanently attached yet.
140124
140123

And a view from the inside with better lighting.
140120

And this is where we had to leave it. Until next time. Thanks for reading!
RustyFenderBrewer
Teardrop Inspector
 
Posts: 22
Images: 62
Joined: Sun Feb 28, 2016 8:40 am
Location: Kansas City
Top

Re: Kansas City Home Built Teardrop

Postby KCStudly » Mon Mar 14, 2016 7:02 am

Nice build you have going. :thumbsup:
KC
My Build: The Poet Creek Express Hybrid Foamie

Poet Creek Or Bust
Engineering the TLAR way - "That Looks About Right"
TnTTT ORIGINAL 200A LANTERN CLUB = "The 200A Gang"
Green Lantern Corpsmen
User avatar
KCStudly
Donating Member
 
Posts: 9611
Images: 8169
Joined: Mon Feb 06, 2012 10:18 pm
Location: Southeastern CT, USA
Top

Re: Kansas City Home Built Teardrop

Postby RustyFenderBrewer » Mon Mar 14, 2016 4:29 pm

KCStudly wrote:Nice build you have going. :thumbsup:


Thanks! So far we feel like we're making good progress and are happy with the results.
RustyFenderBrewer
Teardrop Inspector
 
Posts: 22
Images: 62
Joined: Sun Feb 28, 2016 8:40 am
Location: Kansas City
Top

Re: Kansas City Home Built Teardrop

Postby RustyFenderBrewer » Wed Mar 16, 2016 5:09 pm

Tuesday night we installed the second piece of ceiling plywood. This is the piece we attempted to pre-curve by wetting the back and using straps. Very little of the curve was retained when we removed the straps. :NC It was quite a wrestling match getting that 2nd piece in and tight to the "joists" but we managed it. Here's the proof:
140198
140199

Hope to work Saturday on it as well but until then, thanks for following along!
RustyFenderBrewer
Teardrop Inspector
 
Posts: 22
Images: 62
Joined: Sun Feb 28, 2016 8:40 am
Location: Kansas City
Top

Re: Kansas City Home Built Teardrop

Postby RustyFenderBrewer » Thu Mar 31, 2016 6:44 am

Well, I'm back. Had to go out of town for a while. Before I left we rolled the trailer out and I took the opportunity to get an overall picture of it. (The cooler actually slides further in.)
140655

And we installed the final pieces of the interior plywood/ceiling.
140656

The seam in the center will be covered and the entire piece will be inside the headboard cabinet.

For those following who have yet to start their own build, I want to share with you the experience of installing the plywood. We are using plain-Jane 1/4" birch from Lowes. We attempted to pre-curve the ply with minimal success by wetting and strapping it over couple of days. Our design does not have interior ribs (which I think was a design flaw) and the plywood, especially the last two pieces where the wall meets the floor, caused the "joists" to bow outward. I think one or two central ribs and short joists between would have managed that force better. We resolved it by running a strap around the trailer to counter act the bowing while the glue dried.
140654

This reduced it substantially but we will need to trim back one joist to get a flat surface for the exterior sheathing or the aluminum skin will not lay flat. Hope this info helps out someone else down the road.
RustyFenderBrewer
Teardrop Inspector
 
Posts: 22
Images: 62
Joined: Sun Feb 28, 2016 8:40 am
Location: Kansas City
Top

Re: Kansas City Home Built Teardrop

Postby Vedette » Thu Mar 31, 2016 7:48 am

You are making great headway! :applause:
Keep up the good work! :thumbsup: :thumbsup:
Good Roads
Brian & Sandi
Good Roads
Brian & Sandi
Here is a link to my Build Journal
viewtopic.php?f=50&t=50912
Image109106109111109110138766
User avatar
Vedette
Silver Donating Member
 
Posts: 5141
Images: 443
Joined: Thu Dec 01, 2011 4:28 am
Location: Westbank B.C.
Top

Re: Kansas City Home Built Teardrop

Postby RustyFenderBrewer » Thu Apr 14, 2016 7:07 pm

Vedette wrote:You are making great headway! :applause:
Keep up the good work! :thumbsup: :thumbsup:
Good Roads
Brian & Sandi


Thanks! I've had a goal of "the end of May" since the project started. I think we're on track. :worship:
RustyFenderBrewer
Teardrop Inspector
 
Posts: 22
Images: 62
Joined: Sun Feb 28, 2016 8:40 am
Location: Kansas City
Top

Re: Kansas City Home Built Teardrop

Postby RustyFenderBrewer » Thu Apr 14, 2016 8:02 pm

Well we've been busy but I've been slacking on posting our progress. We (mostly Bill if I'm being honest) have finished the cabinets but still need to make all the doors. We've (again, mostly Bill) also installed all the wiring but I only have post install pics of that. The decision was made to use stained plywood with natural finish solids on the interior and galley.

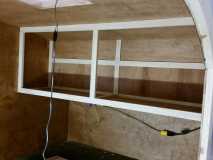
Here is the inside cabinet that is above your feet when you're sleeping. You can see the shore line hanging down still at this point.
140907

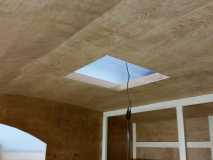
Here is the LED lights that will be installed just behind the vent/fan as well as the hole for said fan.
140908

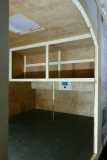
Here's a second pic now showing the panel that covers all the electrical connections. This panel also supports a 110v AC outlet (protected by an upstream mounted GFCI) and a 12v DC USB port.
140909

Sorry that this one is a little blurry. You can just make out the wire coming through the plywood above the headboard cabinet. This wire will power a 12v dome light with LED swivel reading lights.
140912

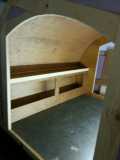
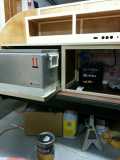
And at the rear we have a rollout tray for an oversized "I have human body parts in here" Coleman cooler next to a cabinet which houses the battery and trickle charger. Bill had the idea to wire the trailer as three separate electrical systems: 1) The basic trailer lights (brakes, blinkers, running lights). 2) 12v DC connected to a deep cycle marine battery. 3) Shore line with three outlets: inside, galley, battery tender. You may be able to make out that 3rd outlet and the tender in the 2nd pic below.
140913
140910

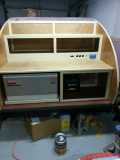
The galley counter back splash hosts a 12v DC outlet, a 12v USB dual port outlet, and a battery monitor in the three round holes. The 110v AC GFCI outlet is on the far right. A battery shutoff goes to the left of the 12v stuff.

Not pictured, there will be LED porch lights installed above each side door and (when we finally build it) there will be a strip of LEDs on the inside of the hatch to light the galley area.

That's our current status. We're having fun figuring out each step. There are so many ways those who have gone before us have used so sometimes it's hard to know what the "right" way might be. Time will tell though. Until next time, thanks for following along!
RustyFenderBrewer
Teardrop Inspector
 
Posts: 22
Images: 62
Joined: Sun Feb 28, 2016 8:40 am
Location: Kansas City
Top

PreviousNext

Return to Build Journals

Who is online

Users browsing this forum: No registered users and 12 guests