Falcongirl's Foamie (standy)

...ask your questions in the appropriate forums BUT document your build here...preferably in a single thread...dates for updates, are appreciated....

Falcongirl's Foamie (standy)

Postby Falcongirl » Wed Jun 01, 2016 11:53 am

Mostly a placeholder, because the stripdown of the utility trailer doesn't begin until June 11. Thought I'd document what I've planned so far, on the off chance someone spots a massive mistake or overlook. Trailer size is going to be roughly 6'wx10'lx6'h. I'll try to get :pictures: of the utility trailer tonight, if :rainy: doesn't happen.

Frame: 4'x10' welded frame heavy duty trailer, 15" wheels. Currently a utility trailer, plan is to strip all the wood off it the weekend of June 11. We'll be building the floor of the trailer out over the wheel wells, so ultimately it'll be ~6'x10'. Purchased frame on Craigslist, ~$600. Came with a stand jack, went to Harbor Freight and picked up a wheelie jack for ~$30 so I can move it by myself.
Walls: Will be 2" 250 rigid foam with some wood hard points built in. Estimating 8 sheet minimum of 4'x8' sheets, planning on 10 sheets in case of oops. ~$265. Not sure whether we'll be going with 2x4 or 1x2 uprights/crossbeams. No cost estimate for wood or ingredients for "The Mix" yet. The current plan is for every piece of wood involved in this build to be saturated with "The Mix".
Skin: #12 (11.5oz) cotton canvas duck, 144" width. I REALLY didn't want a seam on the roof if I could avoid it. Purchased 13 yards of it for ~$9/yd from CanvasETC. Total plus shipping came to $150.56 #12 has about an 8% shrinkage rate, but even with a 10% shrinkage rate, it should still wash up to over 120" width, so should allow me to cover the roof and walls with a single sheet.
Glue: Titebond II. In theory, 1 gallon of TBT covers 250sq ft to a depth of 6mm. Right now, I estimate a minimum of 3gal, so ~$54.
Paint: Gripper, at least 5gal. ~$100. Not sure we'll get anything other than the primer coat on it before the deadline.
Access points: The plan is to go with a commercial 68" RV door. ~$200, unless I have to buy one new, in which case the price doubles. There'll also be at least one window, also probably commercial, but we're not sure where or how big it will be just yet.
Electric: The plan is to run a 3 breaker box of 120v, for standard RV campground power. Might do a small solar panel to run fans and small lights.
Sundries: AC standalone unit, $100 from Craigslist. Eventually the camper will have a toilet, but there's some discussion whether we're going with a canister unit or Luggable Loo style composting toilet. Won't be needed until winter camping happens.

The requirements of the camper were thus:
Must be able to be towed by my Isuzu Rodeo, #3500 gvw limit on vehicle/tow package.
Must be able to fit a queen, or near queen, mattress without having to perform feats of gymnastics to enter/exit the camper.
Must be able to exit/enter the vehicle without bending or crouching.
Must be large enough to handle an AC unit.
Must have wheels and tires capable of handling highway speeds.
Druthers:
I'd like an indoor potty for winter camping. Preferably with enough space to make walls around it for some sort of privacy.
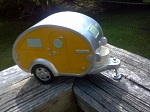
Trailer shape should eventually be similar to this.
User avatar
Falcongirl
Teardrop Builder
 
Posts: 38
Images: 61
Joined: Wed May 25, 2016 5:41 pm

Re: Falcongirl's Foamie (standy)

Postby Talia62 » Wed Jun 01, 2016 11:59 am

More experienced people can chime in, but if the frame is only 4' wide and you're doing 6' wide and 6' tall in a foamy, you may be courting the same fate as the Penguino.
Talia62
Teardrop Master
 
Posts: 123
Joined: Thu Sep 17, 2015 5:55 pm

Re: Falcongirl's Foamie (standy)

Postby Falcongirl » Wed Jun 01, 2016 12:47 pm

Talia62 wrote:More experienced people can chime in, but if the frame is only 4' wide and you're doing 6' wide and 6' tall in a foamy, you may be courting the same fate as the Penguino.


Reading that build was what convinced me to go with a heavy duty frame with regular wheels instead of a lightweight frame. Lower center of gravity, heavier frame, should be harder to blow over. We do get some windy days up here, but nothing like New Mexico gets, which should help. Right now, it's the factor we're using to determine whether or not we rip up the board floor - on one hand, it'd reduce the weight considerably of the base trailer. OTOH.. it'd reduce the weight considerably of the base trailer. The plan is, once we get the sides off, to haul it to a truck stop and get a weight on it. Himself will at that point determine whether or not we strip off the board floor or whether we saturate it with The Mix and build right over it.

Do think it's neat, though, that in 5 years there's only been one foamie blowover :) That's pretty impressive.

I'll see about getting pictures of the base trailer tonight.
User avatar
Falcongirl
Teardrop Builder
 
Posts: 38
Images: 61
Joined: Wed May 25, 2016 5:41 pm
Top

Re: Falcongirl's Foamie (standy)

Postby KCStudly » Wed Jun 01, 2016 3:19 pm

Welcome to the forums.

I was going to say that you might have trouble with a single sheet of canvas covering both roof and sides all in one, what with bunching up along curves, etc., but then your inspiration link shows a relatively boxy profile. Still, you will have to slit the vertical corners and lap those seams anyway. It's not anything to worry about and is easier than it seems (seams?). Still, you got a good price on the canvas. :thumbsup:
KC
My Build: The Poet Creek Express Hybrid Foamie

Poet Creek Or Bust
Engineering the TLAR way - "That Looks About Right"
TnTTT ORIGINAL 200A LANTERN CLUB = "The 200A Gang"
Green Lantern Corpsmen
User avatar
KCStudly
Donating Member
 
Posts: 9615
Images: 8169
Joined: Mon Feb 06, 2012 10:18 pm
Location: Southeastern CT, USA
Top

Re: Falcongirl's Foamie (standy)

Postby tac422 » Wed Jun 01, 2016 4:17 pm

You might to consider using plastic molding on your corners. It worked great for me.
Here's a picture with Gripper on a curve:
109429
and here a different type :
109917
I used several different types to cover every exposed corner.
109916
Last edited by tac422 on Wed Jun 01, 2016 4:20 pm, edited 1 time in total.
User avatar
tac422
500 Club
 
Posts: 639
Images: 224
Joined: Sun Mar 17, 2013 11:39 am
Top

Re: Falcongirl's Foamie (standy)

Postby Falcongirl » Wed Jun 01, 2016 4:20 pm

KCStudly wrote:Welcome to the forums.

I was going to say that you might have trouble with a single sheet of canvas covering both roof and sides all in one, what with bunching up along curves, etc., but then your inspiration link shows a relatively boxy profile. Still, you will have to slit the vertical corners and lap those seams anyway. It's not anything to worry about and is easier than it seems (seams?). Still, you got a good price on the canvas. :thumbsup:


Howdy! The canvas won't cover the entire thing all in one go, that's just too much yardage to manhandle successfully (or: it is for me!). It'll be cut into five pieces of approx 2-and-a-bit yards each, one for the top, one for each side, so there'll still be seams but they'll be on the sides and not on the top if we skin the roof last. Hadn't even thought of doing it all in one drape, because I can't imagine being able to fit that much canvas into even an industrial washing machine at once to force the shrinkage. Though it'd be lovely if it could be done all in one drape, if for no other reason than the tensile strength it'd bring. I should mention that to Himself just to watch his head explode :lol:

The canvas price made me happy. Locally, I can get 72" wide 10oz for $7.50/yd and online it was even cheaper, but when you factor in the shrinkage, there was just no way to use not have at least one seam on the roof. Since that's the main water intrusion point of any camper, I'm doing what I can to make sure it's as waterproof as possible. The 144" width even shrunk should give me more than 10', so I *should* be able to skin the roof all of a piece with enough overlap to stick it down to the walls. Won't know for certain until it's here and has been washed and dried, but as long as it doesn't have too much more than a 10% shrinkage, it should work. And if it has more than a 10% shrinkage, boy howdy will I leave a bad review about that fabric, since the weave shouldn't even allow more than that.
User avatar
Falcongirl
Teardrop Builder
 
Posts: 38
Images: 61
Joined: Wed May 25, 2016 5:41 pm
Top

Re: Falcongirl's Foamie (standy)

Postby retep » Sun Jun 05, 2016 9:46 am

Hi Falcon Girl

Looking forward to read about your build. Sounds like it is something I would like as well.

Good Luck!!
Peter
retep
Teardrop Master
 
Posts: 106
Joined: Wed Mar 16, 2016 3:55 pm
Top

Re: Falcongirl's Foamie (standy)

Postby Falcongirl » Wed Jun 08, 2016 10:52 am

tac422 wrote:You might to consider using plastic molding on your corners. It worked great for me.
Here's a picture with Gripper on a curve:
109429
and here a different type :
109917
I used several different types to cover every exposed corner.
109916


Hi Tac! We're probably going to do that. I saw it on the Big Pink build journal and thought it was a great idea. Especially if there are bumps and dings on the corners of the foam, and don't there just always seem to be?? Big box stores just cannot keep their foam in decent condition.

Heading out tonight to talk to a roofing company and a lumberyard with factory seconds for foam, to see if I can get it cheaper than $26/board.

The canvas arrived yesterday. The box it arrived in is about 4'x4'x5" and weighs about 50lbs. Glad I have a covered porch, since we also had some rain yesterday.

Saturday, I clear out the mudroom so I have a staging area, and then I pick up foam. Sunday morning, I begin stripping the wood off the trailer. Would've started sooner but we needed it to stay utility trailer shaped long enough to haul the foam.
User avatar
Falcongirl
Teardrop Builder
 
Posts: 38
Images: 61
Joined: Wed May 25, 2016 5:41 pm
Top

Re: Falcongirl's Foamie (standy)

Postby alchemist77 » Sun Jun 12, 2016 8:37 pm

Falcongirl wrote:
Talia62 wrote:More experienced people can chime in, but if the frame is only 4' wide and you're doing 6' wide and 6' tall in a foamy, you may be courting the same fate as the Penguino.


Reading that build was what convinced me to go with a heavy duty frame with regular wheels instead of a lightweight frame. Lower center of gravity, heavier frame, should be harder to blow over. We do get some windy days up here, but nothing like New Mexico gets, which should help. Right now, it's the factor we're using to determine whether or not we rip up the board floor - on one hand, it'd reduce the weight considerably of the base trailer. OTOH.. it'd reduce the weight considerably of the base trailer. The plan is, once we get the sides off, to haul it to a truck stop and get a weight on it. Himself will at that point determine whether or not we strip off the board floor or whether we saturate it with The Mix and build right over it.

Do think it's neat, though, that in 5 years there's only been one foamie blowover :) That's pretty impressive.

I'll see about getting pictures of the base trailer tonight.

How tall will the interior and exterior be?
tac422 wrote:You might to consider using plastic molding on your corners. It worked great for me.
Here's a picture with Gripper on a curve:
109429
and here a different type :
109917
I used several different types to cover every exposed corner.
109916


Sent from my Lenovo TAB 2 A10-70F using Tapatalk
David Campbell
KF7SFU
RaDAR
SOTA
alchemist77
Teardrop Advisor
 
Posts: 63
Images: 10
Joined: Sun Feb 26, 2012 5:16 pm
Location: Middleton Idaho
Top

Re: Falcongirl's Foamie (standy)

Postby Falcongirl » Sat Jun 18, 2016 10:29 pm

alchemist77 wrote:How tall will the interior and exterior be?


Interior height will be ~6', so Himself can stand up in it.

Camper build, Day 1 (or: It's not a project unless you go to at least three hardware stores three or more times in a day):
First lesson: Neither Menards website or employees have any idea what they have in stock. Went to pick up foam, was told they didn't have it. Looked online, "special order only". Went to Home Depot, they only had scored, called 2 other local Menards, was told they didn't have it, special order only, so I bought the scored and hauled it home. Also bought ingredients for "The Mix". Himself was dismayed by the scored board, because it was scored on both sides, and even though the 2" had at least 1" solid in the center, the risk of snappage was higher than either of us wanted. Not good, but it was the only option, so we unloaded it. We strip the sides off the trailer and turn it into a flatbed. Find out that the post holding the spare was welded, not bolted on. Himself decided it was in his way and must be cut off.

Himself made all the measurements (again) and made a shopping list, and back to Menards we went - one of the ones I called, I add, because it's relevant. To the lumber warehouse we go, on a hunt for decent 2x4 and 2x8's. My truck and trailer were blocking the aisle so people couldn't exit, so I turned down the next aisle and promptly dropped so many F-bombs I'm surprised things around me didn't start to spontaneously combust, because right in front of my truck is at least SIX PALLETS of 2" 250 unscored rigid foam. So I buy 10 more sheets of the foam I wanted in the first place.

The cutting disks for the drill barely made a dent in the weld of the post Himself wanted to cut off, and he decided to use the reciprocating saw but needed metal-cutting blades, so we zoomed to the local hardware store three minutes before they closed and buy blades. Of course they don't fit his saw, but hey, tin stnips and sheer stubbornness MAKE them fit, and away he goes cutting off the post. I am buying the man an angle grinder for the next gift-giving holiday, and nothing in the world can stop me. Eventually, the post is gone. Hooray!

Measuring and cutting of the 1/4" plywood happens, and we finish that just as we lose daylight. Tomorrow, building the wheel wells and cutting the 2x4's, and finishing the floor.

List of things we bought today:
3 sheets 1/4" plywood ACX
1 sheet 1/2" plywood (forgot to look at letters, Himself will know)
10 - 2x4x8
2 - 2x8x8
10 - 4x8 sheets 2" Foamular 250 rigid foam board (technically I bought 20 sheets but we returned the bad 10)
2 boxes 1.5" Spacks stainless steel screws
1 gal oil-based poly
2 gal paint thinner
2 cans Great Stuff foam (for when I thought I would be filling in all those annoying score lines, but we'll use it, I'm sure.)
5 grind-off discs for the drill (used 3, didn't work well at all.)
7 (1-5pk heavy, 1 medium, 1 thin) metal-cutting reciprocating blades
Rollers and deck sponges to apply "The Mix" with
A tarp to cover everything with

Stuff I already had:
13 yards of 144" #12 canvas, which still needs to be washed.

Tomorrow, we finish the floor. I HOPE!

I have photos, but am about to fall into a shower and then into bed. :)
User avatar
Falcongirl
Teardrop Builder
 
Posts: 38
Images: 61
Joined: Wed May 25, 2016 5:41 pm
Top

Re: Falcongirl's Foamie (standy)

Postby Falcongirl » Sun Jun 19, 2016 7:03 am

Day 2: The day begins at 6am and at 7am, I am off to begin applying The Mix to all wooden pieces because that was really my one huge takeaway from reading the forum - that the wood is going to be my main point of failure, and The Mix will help stave this point off. Himself will probably not be awake or active for another few hours, so it's a race to see how many layers I can get on before he shows up to start cutting.

It's supposed to get to 91F here today.
:hammer: :sweaty: :fan:

9am: Side 1 of the floor has 3 coats of The Mix. All the 2x's have two coats, Side 1 of the 1/2" has 2 coats. Side 2 of the floor has 1 coat, as does Side 2 of the 1/2". Had to get off my feet for a bit, so I'm indoors sucking up some AC. The 1/2" and 2x's are all getting cut up today as wheel wells and floor joists, but I wanted to get at least a base coat of The Mix on everything before it gets to hot to live. Will head out in a bit and get the floor as saturated as I can, at least 2 more coats on Side 2. Using a deck pad as a hand tool instead of on a pole for the 'slop and spread' method of Mix application. Hitting all the edges really well - the edges of the floor probably have 5 coats because I keep going over them every chance I get. The little tubes in the wood just suck everything up like a sponge. The sun is drying everything really fast - you can see it drying on the wood, and I'm not being parsimonious with The Mix.
User avatar
Falcongirl
Teardrop Builder
 
Posts: 38
Images: 61
Joined: Wed May 25, 2016 5:41 pm
Top

Re: Falcongirl's Foamie (standy)

Postby kudzu » Sun Jun 19, 2016 9:49 am

My goodness. You've been busy. Gotta beat the heat though.
kudzu
Donating Member
 
Posts: 439
Images: 16
Joined: Wed Mar 27, 2013 3:20 pm
Top

Re: Falcongirl's Foamie (standy)

Postby Falcongirl » Sun Jun 19, 2016 10:32 am

kudzu wrote:My goodness. You've been busy. Gotta beat the heat though.


Yup. At this point, everything has at least 3, and sometimes 5, coats of The Mix. I still have about half a gallon left out of roughly 2.5 gals. Everything gets to sit in the sun and dry until Himself gets here, while I'm inside with the AC
8)
User avatar
Falcongirl
Teardrop Builder
 
Posts: 38
Images: 61
Joined: Wed May 25, 2016 5:41 pm
Top

Re: Falcongirl's Foamie (standy)

Postby Falcongirl » Sun Jun 19, 2016 8:29 pm

Day 2, con't:
Himself showed up at noon, and he:
Installed the 1/4" plywood subfloor & tacked it down.
Installed the floor frame.
Built 1 of the wheel boxes. I had thought we were just building a box out of 1/2" plywood. Nope. Apparently that was just the exterior part. There is 2x4 board framing around that box, so it is now very much a load bearing (bearable?) box. Every time I thought he was done, nope, something else had to be done.

He goes climbing tomorrow, so we will resume work on Tuesday. Tuesday's plan, barring weather: Build the second wheelbox, then un-tack the floor and flip it over so he can properly attach the frame to the subfloor. While he's doing that, I'm going to hit the trailer bed boards with a shot of The Mix, and then hit everything else with another shot of The Mix because now there are screw holes and cut edges. Wednesday is another climbing night. Thursday, again barring weather, we cut the curved side foam boards.

My current dilemna: Do I really want to wash 13 yards of 144" canvas to pre-shrink it, or do I want to just let it shrink on the foam once it's glued? It would be far, far less hassle to not wash it.

I tried uploading pictures a bit ago, but I think they're way too big, because none of them loaded. Will resize and load again.
User avatar
Falcongirl
Teardrop Builder
 
Posts: 38
Images: 61
Joined: Wed May 25, 2016 5:41 pm
Top

Re: Falcongirl's Foamie (standy)

Postby tac422 » Sun Jun 19, 2016 9:10 pm

I didn't wash the canvas when I did the Big Pink...
it came out great.
I used plastic scrapers and my hands to smooth it out, and work the glue through.
User avatar
tac422
500 Club
 
Posts: 639
Images: 224
Joined: Sun Mar 17, 2013 11:39 am
Top

Next

Return to Build Journals

Who is online

Users browsing this forum: No registered users and 25 guests