Building our 5x10 thoughts *progress pics added 11/28

...ask your questions in the appropriate forums BUT document your build here...preferably in a single thread...dates for updates, are appreciated....

Building our 5x10 thoughts *progress pics added 11/28

Postby Steve D » Sat Jul 02, 2016 5:00 pm

I have been researching build options for a while now.. This is how I think i'll build ours

2x2x3/16 steel tube frame
2200lb torsion axle at 22.5 deg down
stick build walls using 1x3's or 4's sandwiched between a 1/4" outside wall and a 1/8 or a 1/4 inside wall.
1/2 plywood for the bottom of the floor, 3/4" framing with insulation, 1/2 plywood for the top of the floor. (may change my mind later)
I was thinking Flex-Seal for waterproofing?

I visited a friend at a salvage yard and got some freebees.
Image

From the same place I got some info on alloy wheels on the cheap. $35 each. 5x4.5 bolt pattern with a .47 positive offset.
Image

Probably will visit the lumber yard tomorrow for plywood for the floor.

Do you see any issues with these thoughts so far?

Thanks
Steve
Last edited by Steve D on Mon Nov 28, 2016 1:59 pm, edited 2 times in total.
Steve D
Teardrop Inspector
 
Posts: 20
Images: 35
Joined: Thu Jun 23, 2016 3:23 pm
Location: Central Wi

Re: Building our 5x10 thoughts

Postby tony.latham » Sat Jul 02, 2016 5:59 pm

Steve:

Do you see any issues with these thoughts so far?


I think 1/8" tubing for your chassis frame is fine. 3/16" for the tongue, you bet.

2200 lb axle... I'm big on torsion axles but I think the axle should reflect the trailer weight or it's going to bounce. The two 5x10's I've built with sandwiched walls have come in at 1300 lbs. (If you order directly from Dexter, they'll ask you what your trailer is going to weigh, and they'll build the axle for that weight.)

stick build walls using 1x3's or 4's sandwiched between a 1/4" outside wall and a 1/8 or a 1/4 inside wall.


I've built sandwiched walls using sticks and plywood for the skeleton. I much prefer 3/4" AC plywood for the skeleton. Building from 3/4" pine is much more labor intensive. I think Gunguy05 mentioned something about this in his latest build log: viewtopic.php?f=50&t=64835

Here's pics of skeletons that I've done:

Image

Image

Image

Image

When you shop for that 1/4" ply, see if they've got 1/4" plywood subflooring. The stuff I get here is cheaper and significantly better than 1/4" AC.

Happy building and happy camping!

Image

Tony
User avatar
tony.latham
Gold Donating Member
 
Posts: 6899
Images: 17
Joined: Mon Jul 08, 2013 4:03 pm
Location: Middle of Idaho on the edge of nowhere

Re: Building our 5x10 thoughts

Postby Gunguy05 » Sat Jul 02, 2016 9:21 pm

yes, I agree with everything that Tony said. Go-ahead and use the plywood. The stick framing takes a while and probably doesn't save any money and definitely takes much longer. Good luck and keep is posted!

Sent from my Nexus 6 using Tapatalk
Brian


Checkout my buildThe Regal Eagle Bow front for 4
Image
Also my teardrop updates from blog on Dad Rambles
User avatar
Gunguy05
The 300 Club
 
Posts: 385
Images: 6
Joined: Mon Dec 02, 2013 4:45 pm
Location: South GA
Top

Re: Building our 5x10 thoughts

Postby KCStudly » Sat Jul 02, 2016 10:44 pm

I agree as well, Tony has lots of experience with this kind of construction. The only thing that I will add is that in a built up floor, 1/2 inch ply top and bottom is hugely overkill. Mine are 5mm top and bottom on 1-1/2 inch foam and it is plenty for a sleeper (non-standy).
KC
My Build: The Poet Creek Express Hybrid Foamie

Poet Creek Or Bust
Engineering the TLAR way - "That Looks About Right"
TnTTT ORIGINAL 200A LANTERN CLUB = "The 200A Gang"
Green Lantern Corpsmen
User avatar
KCStudly
Donating Member
 
Posts: 9611
Images: 8169
Joined: Mon Feb 06, 2012 10:18 pm
Location: Southeastern CT, USA
Top

Re: Building our 5x10 thoughts

Postby Steve D » Sun Jul 03, 2016 1:14 pm

Thanks a lot for the tips! I really appreciate it.

Each time I read about someones build I change my plans. :? Before you I'll be building a standy lol

We went to a local state park to find a teardrop to look over. 130+ sites and not one teardrop!?

Thanks
Steve
Steve D
Teardrop Inspector
 
Posts: 20
Images: 35
Joined: Thu Jun 23, 2016 3:23 pm
Location: Central Wi
Top

Re: Building our 5x10 thoughts

Postby aggie79 » Tue Jul 05, 2016 10:10 am

I'm late to the party, but I used 3/4" plywood framing for the sidewalls. My floor is 1/4" ply top and bottom with 1x framing laid flat. Plywood will save you a ton of time.


Sent from my iPhone using Tapatalk
Tom (& Linda)
For build info on our former Silver Beatle teardrop:
Build Thread

93503
User avatar
aggie79
Super Duper Lifetime Member
 
Posts: 5405
Images: 686
Joined: Tue Aug 07, 2007 5:42 pm
Location: Watauga, Texas
Top

Re: Building our 5x10 thoughts

Postby 3GKnight » Tue Jul 05, 2016 10:54 am

I second the axle rating suggestion. 2200 is a lot. I have a heavy TD and it still takes loading a dirt bike on the back to get the 1,500 lb torsions to work very hard.
User avatar
3GKnight
Donating Member
 
Posts: 174
Images: 0
Joined: Wed May 28, 2014 3:43 pm
Location: Cheyenne, WY
Top

Re: Building our 5x10 thoughts

Postby daveesl77 » Tue Jul 05, 2016 4:28 pm

Conch Fritter is 5.5 x 5.5 x 10 (exterior). It weighs 1,340 pounds loaded. I way overbuilt my floor, so it would probably be another 75# lighter.

dave
*******
Dave and Regina - Enjoying old age, a LOT!

Build Journal - http://www.tnttt.com/viewtopic.php?f=50&t=62386
User avatar
daveesl77
Donating Member
 
Posts: 871
Images: 273
Joined: Tue Jan 27, 2015 4:33 pm
Location: Pocahontas County, West Virginia
Top

Re: Building our 5x10 thoughts

Postby Steve D » Sun Jul 10, 2016 11:12 am

Thanks for the reply's! I guess I'm stuck with 2x2x3/16 tubing as a buddy of mine already ordered and received it. All I did was call and ask the "how much" question and he helped my by ordering it right away. lol

I didn't order my axle yet so I have time to guesstamate the weight of my tear. I was also thinking that maybe I can build it and load it on my Fathers flat bed, then run it across a feed mill scale. This would give me a much better idea of what weight axle to order.

I did score 3 windows for this build. A star gazer and two crankout door windows.******$52.00 for all three and a roll of caulk*******

143441

I'm glad I didn't start laying out the walls because these windows are 32" or so across. I'll need to adjust my door location and size to make them fit.

Thanks
Steve
Last edited by Steve D on Sun Jul 10, 2016 11:51 am, edited 1 time in total.
Steve D
Teardrop Inspector
 
Posts: 20
Images: 35
Joined: Thu Jun 23, 2016 3:23 pm
Location: Central Wi
Top

Re: Building our 5x10 thoughts

Postby KCStudly » Sun Jul 10, 2016 11:34 am

That's exactly what I did. The very first purchase was the windows, and then I knew that they would fit!
KC
My Build: The Poet Creek Express Hybrid Foamie

Poet Creek Or Bust
Engineering the TLAR way - "That Looks About Right"
TnTTT ORIGINAL 200A LANTERN CLUB = "The 200A Gang"
Green Lantern Corpsmen
User avatar
KCStudly
Donating Member
 
Posts: 9611
Images: 8169
Joined: Mon Feb 06, 2012 10:18 pm
Location: Southeastern CT, USA
Top

Re: Building our 5x10 thoughts

Postby Steve D » Mon Nov 28, 2016 1:52 pm

Well here we go. I didn't post updates as I went so with it nearly done here's some pictures for you enjoyment.

I did go with stick build walls. I needed to go this route because I didn't know where all the framing needed to be. As you can see I added several cross pieces as needed.

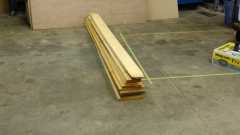
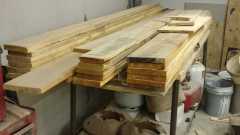
I started out with a pile of rough cut lumber.

146034

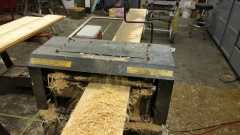
I knew there was going to be alot of shavings. But this was nearly overwhelming. Lucky for me I have some chicken raising friends that took it all off my hands.

146035

After a little trial and error these were ready.

146036

It sure was nice seeing them on the unfinished floor. It gave me some inspiration.

146037

Another pile of lumber. I decided to use rustic birch for the cabinets.

146040

I got to buy a new tool!! This one is way better than my 20 year old crafstman!

146042

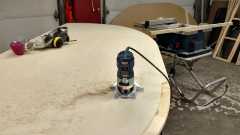
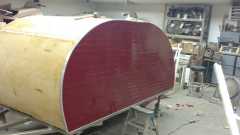
Man does it take pressure to bend 3ply birch plywood!

146043

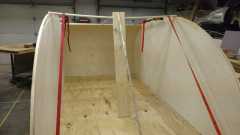
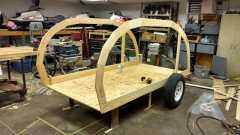
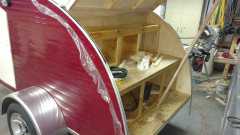
I needed to add the cross framing for the doors. It's starting to take shape!

146044

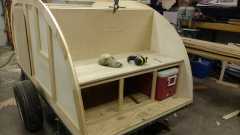
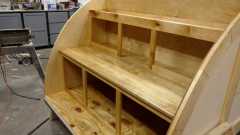
Getting started on the galley

146045

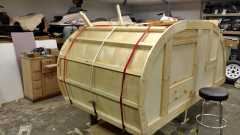
Pushing down with straps and pushing up with sticks! The wood sure makes some noise when you bend it

146046

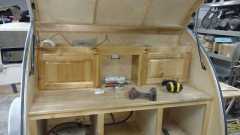
Interior cabinet frames are in!

146048

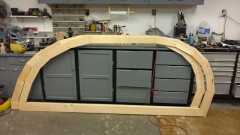
Galley pictures. I decided to use Maple for the countertop. The rest is Rustic Birch

146049

I dont like heavy traffic AT ALL! I managed to make a wrong turn coming home from Franks. We hit traffic at a good time. We only stopped dead once for about 15 min. I really dislike driving in Chicago.

146050

:D :D :D 
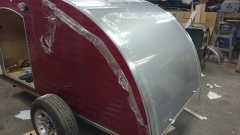
Siding installed. Talk about nervous....I did not want to make another trip to Michigan.

146051

No matter how many times I measured or how I measured it. I still cut the trim short. Finally I just cut a little off at a time, check and repeat.

146052

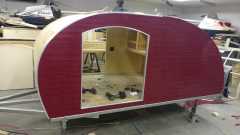
Fitting the door was challenging. I used piano hinges from my local hardware store.

146054

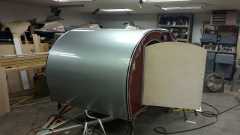
Because I built the walls using full 1/4" inside and outside plywood and 3/4" framing to make the offset T molding work I needed to keep the hatch clearance to the sidewalls at a minimum.

146055

It fits! I need to pull up in the center or is will bind against the walls.

146056

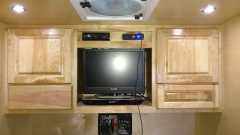
Upper cabinet doors done. I really like the look of rustic birch

146057

I planned on just leaving the drawers flat. My wife asked if I could do them in a raised panel version... even with pushsticks it's a little sketchy pushing the small panels through the router table. But I have my hand yet and they look nice.

146058

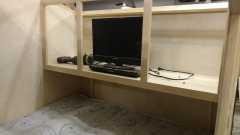
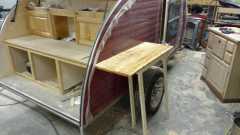
Mocked up side table. I sized it so it will ride on top of the countertop while we are traveling. I'll get the aluminum mounting bracket sometime before spring

146059

From the prior pictures you can see that I changed the layout. I was going to have 3 large drawers. After more thought I changed to 4 small drawers and one cooler drawer.

146060

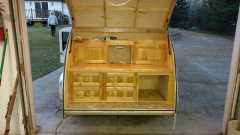
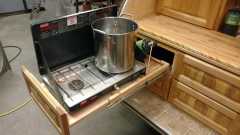
As it would be my camp stove wouldn't work in a 22"deep drawer. I need to make a double slide drawer so I could pull it out far enough to hook up a LP bottle.

146062

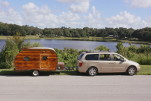
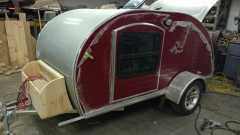
This is how it sits now. After I didn't get it road ready for CICO I slowed down and took a few weekends off.

146061

Thanks
Steve
Steve D
Teardrop Inspector
 
Posts: 20
Images: 35
Joined: Thu Jun 23, 2016 3:23 pm
Location: Central Wi
Top

Re: Building our 5x10 thoughts *progress pics added 11/28

Postby tony.latham » Mon Nov 28, 2016 6:49 pm

Looks sweeeeeeet!

Tony
User avatar
tony.latham
Gold Donating Member
 
Posts: 6899
Images: 17
Joined: Mon Jul 08, 2013 4:03 pm
Location: Middle of Idaho on the edge of nowhere
Top

Re: Building our 5x10 thoughts *progress pics added 11/28

Postby Steve D » Mon Nov 28, 2016 8:42 pm

Thanks Tony! Building it has been alot of fun.

Thanks Steve
Steve D
Teardrop Inspector
 
Posts: 20
Images: 35
Joined: Thu Jun 23, 2016 3:23 pm
Location: Central Wi
Top

Re: Building our 5x10 thoughts *progress pics added 11/28

Postby Steve D » Sun Dec 04, 2016 7:49 pm

It took alot of thought on how to do this and make it look good.

DOORS TRIMMED!!

146149

146148

Thanks
Steve
Steve D
Teardrop Inspector
 
Posts: 20
Images: 35
Joined: Thu Jun 23, 2016 3:23 pm
Location: Central Wi
Top

Re: Building our 5x10 thoughts *progress pics added 11/28

Postby jonb8 » Sun Dec 04, 2016 8:02 pm

Awesome......you gotta a cool gallery,,,,might have to rework mine alittle.
jonb8
Teardrop Advisor
 
Posts: 95
Images: 0
Joined: Sat Mar 26, 2016 3:54 am
Top

Next

Return to Build Journals

Who is online

Users browsing this forum: No registered users and 26 guests