Adam's Offroad Camper

...ask your questions in the appropriate forums BUT document your build here...preferably in a single thread...dates for updates, are appreciated....

Adam's Offroad Camper

Postby somneguy1 » Mon Aug 29, 2016 7:21 am

Here's the beginning of what will hopefully a completed build. I will say early on to please excuse my Metric measurements. I will try add inch equivalents if I can.

I thought i'd use this Journal to keep track of my planning stage aswell as my build stage if I make it that far :lol:

I have always wanted a teardrop, and have finally decided it's about time to have a crack at designing and building one.

Specs/Requiremnts
- Profile: Similar to the Sawtooth build on here with some changes.
- Box for dogs up front so they have somewhere to sleep at night.
- Matching wheel base to our Ford Ranger ute.
- Off road capable.
- Light and Simple
- Suitable for camping in when we go to the snow (well insulated)
- Look good.

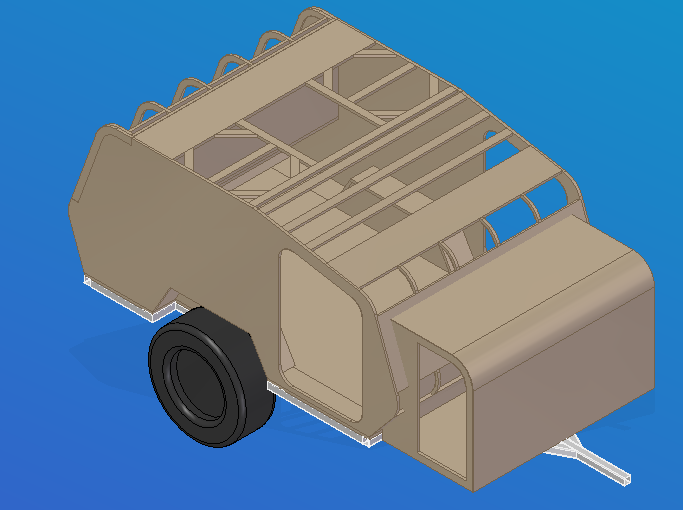
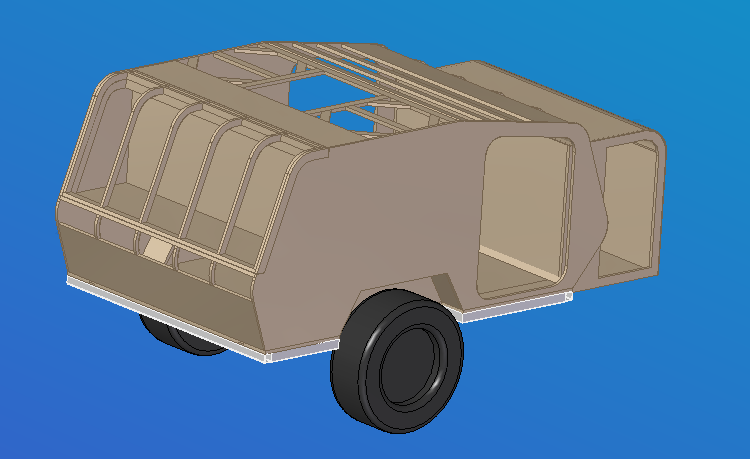
I have started by drawing up the profile, sizing and build method based on the Sawtooth trailer. This is to get my head around how these things actually go together. Since then I have decided to change the way I build it, using the methods that were used in the ATMA Travelear trailer shown in attached images. I haven't yet updated the CAD model to reflect these changes as I want to research materials next up to make sure they are available. I have also given myself a bit more length because I want more features in the galley section and also added a box in the front for the dogs.

Below are a couple of images to get started:

Image

Image

Image
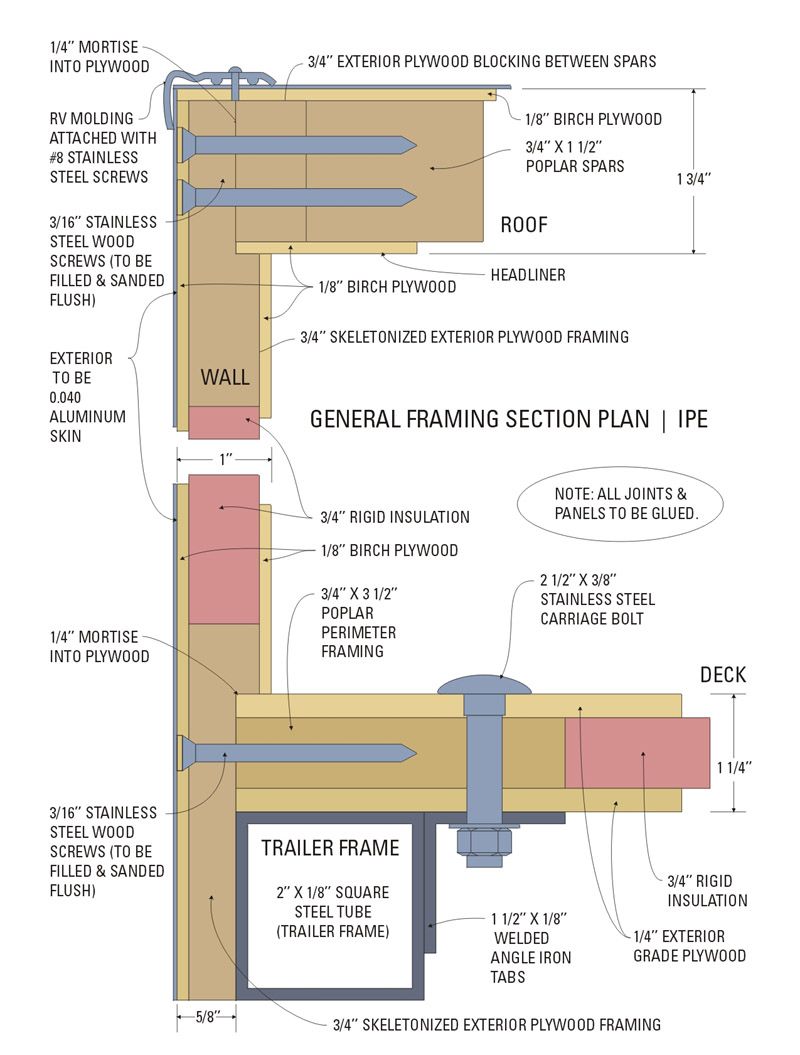
(THIS ONE TAKEN FROM THE TRAVELEAR BUILD JOURNAL)


Thanks,

Adam
somneguy1
Teardrop Inspector
 
Posts: 5
Joined: Wed Aug 17, 2016 3:12 am

Re: Adam's Offroad Camper

Postby noseoil » Mon Aug 29, 2016 10:47 am

Adam, very nice design & well thought out for a build. Remember to include provisions for your electrical system (lights, charging ports, etc.) & some simple galley stuff. Are you going to include a battery & solar panel? If so, remember to do your layout for the correct spacing of hard points for the mounting brackets, hardware for the solar panel, battery box, light fixtures, drink holders, clothes hooks & curtains.

If you skin the inside panels first & pre-finish them on the bench, access is available for the wiring & any blocking you may have forgotten to include when framing from the outside (don't ask)....
Build log: viewtopic.php?f=50&t=60248
The time you spend planning is more important than the time you spend building.........

137905
User avatar
noseoil
1000 Club
1000 Club
 
Posts: 1820
Images: 669
Joined: Sun Apr 27, 2014 8:46 am
Location: Raton, New Mexico, living the good life!

Re: Adam's Offroad Camper

Postby somneguy1 » Mon Aug 29, 2016 5:02 pm

G day! Thanks for the tips.

I was planning to do the inside skin first because I will no doubt forget something electrical wise. I think I am going to do a full size mock up of the internal area to make sure I'm happy with lighting choices and layouts of switches e.t.c.

I will have a battery but am unsure about solar. I want to charge it by the car when on the road but want solar as a backup so may go portable panels on that front.

I'm quickly learning there's alot more in this than first thought. But I've told myself that I have to try and plan and budget everything I can before I spend a cent on materials as I have a habit of not finishing projects :)
somneguy1
Teardrop Inspector
 
Posts: 5
Joined: Wed Aug 17, 2016 3:12 am
Top

Re: Adam's Offroad Camper

Postby noseoil » Tue Aug 30, 2016 9:59 am

I was going to use a "charge while towing" setup, but the more I looked at solar, the better it seemed. With the solar option, you will always have a charged battery. Even in cloudy weather, we never run out of power. Granted, we live in Tucson & don't see many cloudy days, but while travelling in July we had a fair amount of rain & clouds & were never without power when we needed it.

We use a 100 amp-hour battery & 100 watt panel & it's good for everything we need. Could have actually used a smaller setup now that it's up & running, but we calculated for the worst case scenario & there are no problems. The solar system we got went for about $160 (US) & I'm pleased with it. Just something to ponder on your list of things to add & subtract from the build.

A full scale layout (I use a "layout stick" as a former cabinet maker) is a very good idea, since it lets you make measurements in advance & see problems before they happen.
Build log: viewtopic.php?f=50&t=60248
The time you spend planning is more important than the time you spend building.........

137905
User avatar
noseoil
1000 Club
1000 Club
 
Posts: 1820
Images: 669
Joined: Sun Apr 27, 2014 8:46 am
Location: Raton, New Mexico, living the good life!
Top


Return to Build Journals

Who is online

Users browsing this forum: No registered users and 10 guests

cron