Project Garden Shed

...ask your questions in the appropriate forums BUT document your build here...preferably in a single thread...dates for updates, are appreciated....

Project Garden Shed

Postby ThinkLibertarian » Fri Sep 23, 2016 9:32 pm

Based on the Sketchup design I posted here

http://tnttt.com/viewtopic.php?f=62&t=66603

I started with a 4x8 Harbor Freight Trailer.

http://t.harborfreight.com/1195-lb-capa ... 62648.html

I also picked up a swing back trailer jack and a spare tire.

Putting it together was no problem. The instructions were clear enough.

image.jpeg
image.jpeg (37.52 KiB) Viewed 3108 times
Last edited by ThinkLibertarian on Fri Oct 14, 2016 7:20 pm, edited 1 time in total.
ThinkLibertarian
Teardrop Builder
 
Posts: 37
Joined: Sat Feb 20, 2016 5:18 am

Re: Project Garden Shed

Postby ThinkLibertarian » Fri Sep 23, 2016 9:47 pm

I added a 4x8x3/4" plywood board to the trailer to act as a subfloor.

Because the 4' wide cross members tuck inside the long side rails, there was a 3/16" gap. I worried about the subfloor sagging, so I bought a 3/16" thick plywood board (2'x4'), cut it into 2" strips, and glued them to the underside of the subfloor over the cross members. No more sag worries.

I laid the plywood on the trailer and crawled under it with a pencil to mark my holes to drill for the bolts.

I took it back off and drilled 3/8" holes for the 3/8" bolts I had.

I also had to paint the underside before I affixed it to the trailer. One layer of Killz 2 primer and two layers of Glidden Premium outdoor semi gloss white.

9 lag bolts later the subfloor is installed.

image.jpeg
image.jpeg (34.28 KiB) Viewed 3107 times
ThinkLibertarian
Teardrop Builder
 
Posts: 37
Joined: Sat Feb 20, 2016 5:18 am

Re: Project Garden Shed

Postby ThinkLibertarian » Fri Sep 23, 2016 9:58 pm

Now the real work begins.

A couple of friends came over to help me build the floor frame. This will raise the floor up 6" and expand the width of the camper floor to 5'. We added pullout panels in the floor to access the "basement".

Happily, my local lumber supplier carries 5x5x1/2" baltic birch plywood. This makes building much easier since the camper is basically a 5x5x8' box with a rounded front edge.

http://www.peachstatelumber.com/

image.jpeg
image.jpeg (70.2 KiB) Viewed 3065 times


image.jpeg
image.jpeg (32.24 KiB) Viewed 3102 times
Last edited by ThinkLibertarian on Fri Sep 23, 2016 10:46 pm, edited 1 time in total.
ThinkLibertarian
Teardrop Builder
 
Posts: 37
Joined: Sat Feb 20, 2016 5:18 am
Top

Re: Project Garden Shed

Postby ThinkLibertarian » Fri Sep 23, 2016 10:10 pm

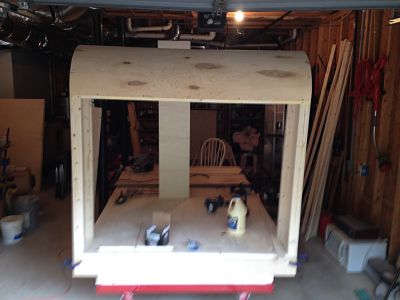
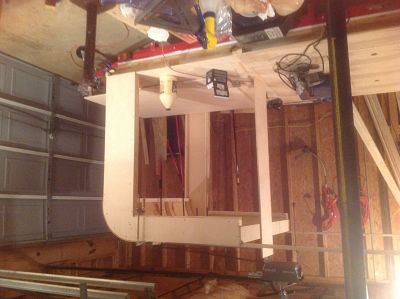
The hardest part of the construction was the front end. It has a 12" radius roundover, and the side panels have to incorporate the doors.

When we went to pick up ten sheets of 5x5x1/2" plywood, Peach State had to open a new crate for us. My friend noticed that the crate was wrapped in 5x5 thin plywood, and he asked if we could have the lid. Free bendy plywood! True, it is a crappy grade, but it is going to be painted anyway. It is around 3/16" thick, so we used two layers.

The doors are 36" wide and 40" tall.

We noticed during the build that the camper would have been too tall to leave the garage unless we reduced the height by a few inches. The basement went from 8" to 6", and the camper height went from 5' to 4'6".

Plans never survive first contact with reality!

image.jpeg
image.jpeg (31.35 KiB) Viewed 3099 times


image.jpeg
image.jpeg (33.83 KiB) Viewed 3099 times
Last edited by ThinkLibertarian on Fri Sep 23, 2016 10:26 pm, edited 1 time in total.
ThinkLibertarian
Teardrop Builder
 
Posts: 37
Joined: Sat Feb 20, 2016 5:18 am
Top

Re: Project Garden Shed

Postby ThinkLibertarian » Fri Sep 23, 2016 10:23 pm

Here is the inside of the curve. It has a 12" radius on the outer and 10" on the inner. We used a 12" wide cutoff of one of the side walls and marked out as many of these quarter-round pieces as we could. Then I took a jigsaw and cut out each one by hand. We laminated them in pairs so they would be about an inch thick, set a frame above and below to mount them to, then bent the first layer around them. We used a lot of glue and screws to hold it until it was dry. Then we removed most of the screws because we did not to hit them when we attached the second layer, which was also copiously glued and screwed.

In case you were curious, we used 1 5/8" deck screws, a few 1" stainkess steel screws I already had, and Titebond II wood glue.

Note the double thick frame around the door opening on the left. Yet another last minute design change.

Though you can't see it in my crappy photo, the outer layer of the roundover sticks out a half inch over the inner layer. This created a rabbet for the first flat roof panel to mate into, helping create a better seal. I alsomadded a frame piece under the seam to screw down into.

image.jpeg
image.jpeg (82.74 KiB) Viewed 3087 times
ThinkLibertarian
Teardrop Builder
 
Posts: 37
Joined: Sat Feb 20, 2016 5:18 am
Top

Re: Project Garden Shed

Postby ThinkLibertarian » Fri Sep 23, 2016 10:41 pm

Back on my own again, I started installing the side panels.

Before my friends had left, we had cut these panels to size on my friend's table saw. From here on out I would be using my circular saw, some saw horses, and a straight edged plywood cutoff clamped to the panel.

My other friend lent me his chop saw, which makes cutting frame pieces to length a snap. Otherwise I would have cut them by hand or with a jig saw.

image.jpeg
image.jpeg (83.85 KiB) Viewed 3080 times


image.jpeg
image.jpeg (99.34 KiB) Viewed 3080 times
ThinkLibertarian
Teardrop Builder
 
Posts: 37
Joined: Sat Feb 20, 2016 5:18 am
Top

Re: Project Garden Shed

Postby ThinkLibertarian » Fri Sep 23, 2016 10:53 pm

With the sides up it is on to the roof.

Two panels are needed. The frontmost panel has a rabbet cut in with a router to match the rabbet firmed by the two layers of roundover. It also has a rabbet on the orher end to mate with the rearmost roof panel.

I got the frontmost panel cut and installed today.

I switched from Titebond to Liquid Nails Heavy Duty because I was running out of the former.

image.jpeg
image.jpeg (97.6 KiB) Viewed 3066 times
ThinkLibertarian
Teardrop Builder
 
Posts: 37
Joined: Sat Feb 20, 2016 5:18 am
Top

Re: Project Garden Shed

Postby ThinkLibertarian » Sat Sep 24, 2016 3:28 pm

Today I installed the second roof panel.

The only tricky part was routing in the rabbet on the front facing edge. This will made up with the corresponding rabbet on the first roof panel.

A liberal amount of liquid nails (and wood glue when that ran out), some gentle persuasion with a rubber mallet (tight fit!) and presto, the roof is in.

image.jpeg
image.jpeg (105.07 KiB) Viewed 2999 times
ThinkLibertarian
Teardrop Builder
 
Posts: 37
Joined: Sat Feb 20, 2016 5:18 am
Top

Re: Project Garden Shed: Painting Prep

Postby ThinkLibertarian » Wed Oct 05, 2016 4:20 pm

I am preparing to paint the exterior shell.

To do so I am filling in the screw holes with spackle. It goes on pink and dries white. How did I spread it? By hand! I used a nitrile glove and slathered it on.

When it dried, I sanded it. Then I applied more where needed, as the stuff shrinks a bit as it dries.

Then I did it again. Third time is the charm.

Now I have to wipe off the majority of the dust.

I will take some painters blue tape and cut up some garbage bags to protect the trailer from drips. I will probably have to remove the fenders while I paint.

image.jpeg
image.jpeg (111.99 KiB) Viewed 2901 times
ThinkLibertarian
Teardrop Builder
 
Posts: 37
Joined: Sat Feb 20, 2016 5:18 am
Top

Re: Project Garden Shed

Postby ThinkLibertarian » Fri Oct 14, 2016 7:16 pm

This week I painted the shell.

I applied two coats of Killz 2 Latex Primer.

Then four coats of Glidden Premium Semi-Gloss Exterior grade White. It was thick, like painting with Elmer's glue.

I used a roller on a pole for the sides and roof. I had to stand on a chair to reach the roof.

I used a brush on the floor frame, while I sat on the driveway.

Next up: Doors. That should make the structure weather resistant, at least until I chop holes in it for windows and the roof vent.

image.jpeg
image.jpeg (407.63 KiB) Viewed 2831 times
ThinkLibertarian
Teardrop Builder
 
Posts: 37
Joined: Sat Feb 20, 2016 5:18 am
Top

Re: Project Garden Shed

Postby ThinkLibertarian » Mon Oct 31, 2016 10:21 pm

For the last few weeks, I worked on the doors.

Like the wals, they are a sandwich of 1/2" plywood for the exterior skin, insulation and framing, and 1/4" plywood for the interior skin. Unlike the walks, I only put 1" of insulation in the doors, not 2" like the walls. This is because most door hardware is designed around a 1 3/8" to 1 3/4" thick door.

Here is a picture of one of the side doors. I added the extra wood blocks where the latches will go and a double thick frame on the side where the piano hinge will attach.

I also painted the exterior skin so I would not have to detach the doors to do it later.

image.jpeg
image.jpeg (110.99 KiB) Viewed 2753 times
ThinkLibertarian
Teardrop Builder
 
Posts: 37
Joined: Sat Feb 20, 2016 5:18 am
Top

Re: Project Garden Shed

Postby ThinkLibertarian » Mon Oct 31, 2016 10:38 pm

With some assistance, I hung the doors on the camper. Unfortunately I forgot to take pictures, so I will describe the process as best I can.

First, I used a door lock installation kit I git at home depot to drill out the locations of the door knobs and deadbolts. I figured it would be easier before the doors were hung.

http://www.homedepot.com/p/Ryobi-Wood-M ... /205209873

I used shims (wooden wedges) to prop each door in its opening, making sure I had enough of a gap all around to ensure the door woukd open and close properly once the hinges were attached. The side doors used piano (aka continuous) hinges, and the rear doors had two huge truck door hinges I found on etrailer.com. To trim the piano hinge to the right length I used a metal cutting blade in my jig saw. Because of the large rear door, I used bolts to attach the hinges rather than screws.

http://www.homedepot.com/p/Everbilt-1-1 ... /202034038

https://www.etrailer.com/Enclosed-Trail ... R2216.html

Because of the wear I expect on the bottom of the entry doirs, I added a hardwood threshold. That is the red stripe under the door. It should last longer than the plywood floor.

And this is the result:

image.jpeg
image.jpeg (131.24 KiB) Viewed 2749 times
ThinkLibertarian
Teardrop Builder
 
Posts: 37
Joined: Sat Feb 20, 2016 5:18 am
Top

Re: Project Garden Shed

Postby ThinkLibertarian » Mon Oct 31, 2016 10:45 pm

Installing the door knobs and deadbolts was next. I had already drilled out where they hardware would mount, but I still had to chisel out the locations of the strike plates in the door frame.

I did the two side doors by hand with a mallet and 1" chisel.

Later, a friend showed up with his dremel tool, which sped things up.

But all was not well. Do you see the wooden shim on the bottom of the rear door? The door was so heavy that it was rubbing the bottom of the door frame, throwing the locks out of alignment. Apoarently the doir frame itself is being pulled out of square by the weight of the door. I think I will just cut and glue in a piece of that wood in that corner to prop square it up. True, it will rub each time I open and close the door, but it is better than not being abke to lock it.

image.jpeg
image.jpeg (131.4 KiB) Viewed 2748 times
ThinkLibertarian
Teardrop Builder
 
Posts: 37
Joined: Sat Feb 20, 2016 5:18 am
Top

Re: Project Garden Shed

Postby Dan242 » Tue Nov 01, 2016 11:24 pm

Thanks for posting, Always nice to see a project come together
User avatar
Dan242
Teardrop Master
 
Posts: 141
Images: 25
Joined: Mon Jul 27, 2015 3:47 pm
Top

Re: Project Garden Shed

Postby ThinkLibertarian » Sun Nov 27, 2016 5:44 pm

Over the last few weeks, weather permitting, I have been painting the interior of the doors and this past weekend my friends and I installed the windows.

Each window mounted in a side door. Since the doors were fully assembled, painted, and hung, I had to cut carefully. I dud it this way on purpose because I did not purchase the windows ahead of time.

First I took the measurements for the cutout I needed from the windows themselves. I had to deal with the fact that these windows were for a door 1 1/2" thick, and my door is 1 3/4" thick. I superglued a 1/4" strip of wood around the inside of the clamp ring (the mounting ring that faces the inside of the camper.

image.jpeg
image.jpeg (77.65 KiB) Viewed 2539 times
ThinkLibertarian
Teardrop Builder
 
Posts: 37
Joined: Sat Feb 20, 2016 5:18 am
Top

Next

Return to Build Journals

Who is online

Users browsing this forum: No registered users and 20 guests