Build Journal: All Aluminum Bare Bones Tiny Travel Trailer

...ask your questions in the appropriate forums BUT document your build here...preferably in a single thread...dates for updates, are appreciated....

Re: Build Journal: All Aluminum Bare Bones Tiny Travel Trail

Postby ssuuki19 » Thu Aug 03, 2017 9:15 pm

Today the butyl tape was cut back with a dull cutter, and a bead of sikka was laid down and pressed. Mostly it went pretty well, I'm still learning how to work with the tubes.. for the RV door I put down masking lines of green tape so after the tape was peeled off it made a really clean line. Prob go back and do a second bead on all the windows using tape to clean up the lines. And I'll add some thin aluminum angle to the existing doors drain well at the top to beef it up and clean it up.
After this the rain-gutters were installed and I did a pretty good job they aren't perfectly level but I realize they are pretty flexible I can probably hide the error or at least split it. So all in all a good day. Thinking about the approach to the clamshell, securing it with some bolt action type connections.. have not found the solution yet, but no prob the door needs more hot days to get warped to square. Here are the pics:
tnttt_65.jpg
raingutters! probably really useful in winter.
tnttt_65.jpg (116.45 KiB) Viewed 2599 times
tnttt_66.jpg
current state of affairs on the machine.. with finishing beads and drip caps.
tnttt_66.jpg (115.87 KiB) Viewed 2599 times
Last edited by ssuuki19 on Sat Nov 11, 2017 2:22 am, edited 3 times in total.

How does sealant get on my triceps and then my car seat?? more than once??
Aluminum is almost as fascinating as wood.
Link to my build thread: 4 1/2 x 9
User avatar
ssuuki19
Teardrop Master
 
Posts: 170
Images: 51
Joined: Fri Sep 02, 2016 5:18 am
Location: Brampton, ON

Re: Build Journal: All Aluminum Bare Bones Tiny Travel Trail

Postby dancam » Thu Aug 03, 2017 11:46 pm

Looking good!

Sent from my SM-G920W8 using Tapatalk
dancam
500 Club
 
Posts: 586
Joined: Wed Jun 01, 2016 3:27 am
Location: Edmonton Alberta Canada

Re: Build Journal: All Aluminum Bare Bones Tiny Travel Trail

Postby ssuuki19 » Fri Aug 04, 2017 6:20 pm

Finished the sikka beads on the windows today, and did the moon window at the front too. Saved it for last because it had curves. Also tried using foaming glass cleaner to do final swipe on the beads and it works like a charm. Better as I go! So the first pic shows the finished window sikka beads, and the clamshell raised up to umbrella mode. There is a lot of clearance under it! I'm sure I'll find ways to hang a mosquito net around it.. the second pic shows the moon window bead that I used green and electrical tape to mask out.
Third pic is the insulation.. each panel is a sandwich with the shiny side on the left, so its shiny layer, then 1" open cell foam, then really thin mass loaded vinyl layer, then 1/2" open cell foam. They are flexible panels and just strong enough to stand on their end at full size of 72" x 54". I'm still working on an equivalent R-value for these panels, but I'm going to initial guess it at R-8, but I'll have to back that up with a proper U-value calculation in the next weeks when I get a round tuit. In the picture you are looking at 4 panels stacked vertically at the side of the house, each panel being around 1 1/2" thick.
tnttt_67.jpg
window trim beads done, clamshell raised to tailgate mode (bbq not included)
tnttt_67.jpg (118.55 KiB) Viewed 2536 times
tnttt_68.jpg
finish sikka bead on the moon window
tnttt_68.jpg (92.48 KiB) Viewed 2536 times
tnttt_69.jpg
4 staggered acoustic insulation panels with alumized film layer (shiny)
tnttt_69.jpg (112.45 KiB) Viewed 2536 times

How does sealant get on my triceps and then my car seat?? more than once??
Aluminum is almost as fascinating as wood.
Link to my build thread: 4 1/2 x 9
User avatar
ssuuki19
Teardrop Master
 
Posts: 170
Images: 51
Joined: Fri Sep 02, 2016 5:18 am
Location: Brampton, ON
Top

Re: Build Journal: All Aluminum Bare Bones Tiny Travel Trail

Postby dancam » Fri Aug 04, 2017 6:31 pm

What i find works well for most caulking to wipe the bead is 99% isopropyl alcohol. But i have never tried window cleaner or sikka seal with alcohol :)

Sent from my SM-G920W8 using Tapatalk
dancam
500 Club
 
Posts: 586
Joined: Wed Jun 01, 2016 3:27 am
Location: Edmonton Alberta Canada
Top

Re: Build Journal: All Aluminum Bare Bones Tiny Travel Trail

Postby ssuuki19 » Thu Aug 10, 2017 11:32 am

Interesting comment, Dancam, I wonder if the window cleaner is alcohol based too, as it really worked better than spit.. so this update is actually from a few days ago but with the long wknd here and a bit of time off and then some work that came up I'm back at it.
Tried cutting the acoustic insulation with an exacto blade, a miter saw, an angle grinder with the 90 degree cutting disk for aluminum. The angle grinder is clearly the winner! Waay faster, more precise, super cleanly cuts through the shiny alumized layer, cuts the foam like hot butter (perhaps its heat helps to leave such a clean edge??), and goes through the mass loaded vinyl with just the slightest bit of gravity on the blade.
I wonder if other teardrop folks are using angle grinders to cut their eps and xps foam [Edit: this stuff is grey polyether fire retardant foam, trying to get an MSDS sheet or some U values for it], I assume it would work just as good! A jigsaw would have been tried if I had one, but I don't, and intuitively its unlikely to cut as clean as the cutting disk as its attack angle is too sharp. The angle grinder method cuts the end-laps into the insulation really accurately too.
So the first pic shows the first two insulation panels cut and test fitted in the trailer.. bottom panel half lapping [Edit: correction, its an end lap still earning the jargon] over the 1" framing and shoring up to the top panel definitely within 1/8"! I'm super stoked as it was my first try so logic dictates I should be able to get this snug all around. Its actually pretty fun work, and since none of my panels will be that large the insulation will be easy to manage when I have to remove panels in the future for future wiring, moisture inspection, etc (remember the walls and insulation are both removable by design). Boy, when you lay out a panel of this insulation on a table in the bright sunlight, it reflects the sun at you thus directing a lot of heat, but also the glare is so bright from the sun it blinds your eyes! Fun, fun, fun, I may have to make a parabolic dish with the leftovers for a solar cooker!
Second pic shows the L-track! Really impressed with this stuff, its 0.71lbs per foot. My decisions to up the ante on the insulation and the L-track will add significant weight to the cabin, but my gut tells me I won't regret these two decisions in the long run. When the final weigh-in is carried out, some adjusted values will be estimated for xps foam and no L-track.
In the picture you can see the 8 ratchet straps, 40 threaded fasteners (the tiny ones that are blurred its just a threaded stud), 20 single point ring fasteners and 10 double point fasteners. Like I said, everything in the cabin is connected to the L-track, so in spite of it weighing in at 57 lbs (80lbs with the accessories) its unlikely less will be used. Well kindof a long post, but an important one.. I think test haul for weigh-in in about two weeks is a feasible goal.. here are the pics:
tnttt_70.jpg
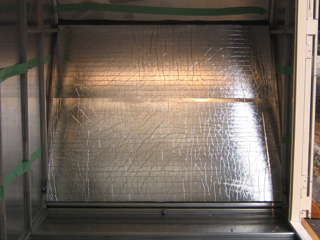
first 2 insulation panels test fitted
tnttt_70.jpg (108.39 KiB) Viewed 2460 times
tnttt_71.jpg
L-track and accessories to help one understand its amazing possibilities of securement
tnttt_71.jpg (99.65 KiB) Viewed 2460 times
Last edited by ssuuki19 on Wed Aug 30, 2017 10:08 pm, edited 8 times in total.

How does sealant get on my triceps and then my car seat?? more than once??
Aluminum is almost as fascinating as wood.
Link to my build thread: 4 1/2 x 9
User avatar
ssuuki19
Teardrop Master
 
Posts: 170
Images: 51
Joined: Fri Sep 02, 2016 5:18 am
Location: Brampton, ON
Top

Re: Build Journal: All Aluminum Bare Bones Tiny Travel Trail

Postby ssuuki19 » Fri Aug 11, 2017 8:26 pm

Last night I saw the trailer build that inspired part of the design work on this trailer. I will post a link to it here.. its called the Squidget and I had no idea that the build was on this site.. until I saw a picture of it in the top left corner! This aluminum trailer is based off a hypothetical improvement of those plans and was definitely inspired from the shape because I saw the inherent aerodynamic abilities it has, as well as rejecting rocks that fly off the rear tires of the tv. Plus the upper flat plane of the nose wedge allows for a flat moon window install. So kudos to Dale, he made the trailer that inspired the shape of this one! He knows me, I emailed him before I even started and told him so.
Today the L-track was installed into the front wall of the trailer. Cutting, grinding and lots of drilling. Two pieces were installed vertically because it just worked out better to minimize scrap. For the track install, 1/4" 20 aluminum rivnuts were used. I never even knew rivnuts existed until I was researching L-track in the camper van community and it was mentioned several times. Rivnuts are pretty awesome I'd say this way the L-track install didn't penetrate the shell making it simpler and with no worry about introducing leaks! So the rivnut tool I bought yesterday is just the simple manual one, and I can pull it just fine, it takes a bit of practise to not get the end jammed up in threads, but overall its pretty easy. Perhaps in the future if I use rivnuts more often I'll get a pneumatic solution for installing them, but for now the manual method works just fine.
A good day, today, it was. Small wall done, two more to go. I'm faster too so gonna say two day job for the rest of the track. For the pics I put in a bunch of fasteners to show an example of the possibilities with the connectors purchased. Here they are:
tnttt_72.jpg
L-track install on front wall complete with some fasteners
tnttt_72.jpg (99.49 KiB) Viewed 2477 times
tnttt_73.jpg
a little closer view of the flanged L-track
tnttt_73.jpg (102.19 KiB) Viewed 2477 times
tnttt_74.jpg
view from the door for a different perspective
tnttt_74.jpg (98.41 KiB) Viewed 2477 times
Last edited by ssuuki19 on Fri Nov 23, 2018 1:56 am, edited 7 times in total.

How does sealant get on my triceps and then my car seat?? more than once??
Aluminum is almost as fascinating as wood.
Link to my build thread: 4 1/2 x 9
User avatar
ssuuki19
Teardrop Master
 
Posts: 170
Images: 51
Joined: Fri Sep 02, 2016 5:18 am
Location: Brampton, ON
Top

Re: Build Journal: All Aluminum Bare Bones Tiny Travel Trail

Postby ssuuki19 » Sun Aug 13, 2017 8:44 pm

Today, I test fitted my 11' 2" stand up paddleboard in the cabin. Fits just fine, with some space to spare on a 2D diagonal. I'm sure it will be easy to suspend it in space with enough bungee cords when I'm on the road. :)
To those astute observers, it can be discerned that the l-track is aligned to split each of the panels in the front wall. This is done on purpose ie. each piece of l-track holds a piece of insulation in place. For the ceiling panels I was thinking hardwood battens to do same duty. Currently the floor is planned to be done with Wicanders Hydrocork over the same acoustic insulation which to some may seem ludicrous if not impossible. We will all soon see, the stuff looks quite well designed. Yes the acoustic insulation is compressible to a medium extent but I think it will be firm enough with the 5mm or so layer of flooring spreading the load around to the closest floor spars. Yes the shiny layer R-value will be obsoleted by touching the flooring but it still acts as a moisture/vapor barrier, notwithstanding the fact that the hydrocork is already supposed to be waterproof. On the walls, eventually there will be a small air gap (1/4" - it'll work just fine) between the acoustic insulation and the 1/8" birch-ply but thats next year. For this seasons work the walls will simply be the shiny alumized layer from the insulation. Throw in some dry propane heat this fall and this baby should get really toasty (at least I'm hoping).
The inside of the trailer will look .. shall we say space-age industrial what with the glare and the l-track all over... But here is the thing folks - I want to learn how to do the foamie/skin method of constructing say some shelves, some bins, maybe a make-shift cooler or two or three (that fit in each other???), and then all I have to do is bolt the stuff I make to one or two of the l-track threaded fasteners, and put it wherever its useful for that particular road trip. The foamie/skin method of constructing shelving and cabinetry fascinates me from what I've researched on the forum and the yewe tube. Its a simple method, its inexpensive, and foam is easy to cut and contour to curves. So its light, its cheap, and its pretty strong for what its made of.. I saw a video demonstrating how strong different hand made foam panel composites are, when you get to kevlar and carbon fibre and I think just using canvas and some easy to apply glue is all I'd need.
The reason why I wanted to call this build 'Bare Bones' was that aside from the l-track, the acoustic insulation, and the cork composite flooring, all this was supposed to be is the completed shell with insulation and legal lighting. I liked that term as it is used in computer building, where a bare bones pc setup is usually just the case, a power supply, motherboard, but still requires customized components to complete the build.
I just can't stray from the thought of how awesome it would be to have 1/8" birch plywood interior on this shell, maybe lightly oiled or stained.. and then compliment that with the cork composite flooring and the exposed shiny insulation & hardwood battens on the ceiling.. we'll have to see.
Living in the shiny shell may be hilarious for a bit, maybe it will give me a headache.. at least I won't need very many led's to read at night :?
Last edited by ssuuki19 on Wed Aug 16, 2017 12:00 am, edited 3 times in total.

How does sealant get on my triceps and then my car seat?? more than once??
Aluminum is almost as fascinating as wood.
Link to my build thread: 4 1/2 x 9
User avatar
ssuuki19
Teardrop Master
 
Posts: 170
Images: 51
Joined: Fri Sep 02, 2016 5:18 am
Location: Brampton, ON
Top

Re: Build Journal: All Aluminum Bare Bones Tiny Travel Trail

Postby ssuuki19 » Tue Aug 15, 2017 9:29 pm

5 more pieces of l-track to install. Same process... cutting, grinding, drilling, countersinking, drilling, rivnutting, then screwing. I'm not sure how much to torque the 1" long 1/4 20 #3 robby countersinking machine screws, but I bet theres no need to overdo it, so I'm not pushing the screws to their limits. Man do I ever love the aluminum 1/4 20 rivnuts. The #3 Robertson which I rarely used before is just great for this setup because you can pre-load the screwdriver, and the screw stays there on its own.. very useful to be able to wave the screw driver around and the screw stays in there! Very helpful, since again this l-track install had a lot of 'firsts' in it - rivnuts, countersinking, stepping up from 3/32nds to 23/64th to get accurate rivnut placement.
Soo many ideas I have using rivets and rivnuts! Inside of cabin starting to look like a bad science project, or a climbers dream :) I was so close on scrap that the last piece, 18" has to be made from 14" and 4" pieces, tig welded together.
Once those 5 last pieces are installed its on to sealing and securing the cargo door.. insulation is now in a safe place thats rain proof, just in case it rains in the next weeks. Here are the pics:
tnttt_75.jpg
two long pieces to go in where the green tape is
tnttt_75.jpg (102.64 KiB) Viewed 2395 times
tnttt_76.jpg
two long pieces and one 18" piece to go
tnttt_76.jpg (105.7 KiB) Viewed 2395 times
tnttt_77.jpg
view from the side door entrance
tnttt_77.jpg (102.99 KiB) Viewed 2395 times

How does sealant get on my triceps and then my car seat?? more than once??
Aluminum is almost as fascinating as wood.
Link to my build thread: 4 1/2 x 9
User avatar
ssuuki19
Teardrop Master
 
Posts: 170
Images: 51
Joined: Fri Sep 02, 2016 5:18 am
Location: Brampton, ON
Top

Re: Build Journal: All Aluminum Bare Bones Tiny Travel Trail

Postby ssuuki19 » Thu Aug 17, 2017 9:15 pm

All the l-track is installed except for the two pieces to be tig welded together to make the 18" piece. I just realized that the two leftover 7" scrap pieces will go on the clamshell. This way even if it isn't bolted and latched yet, I can still run two diagonal ratchet straps and ratchet the door shut from the interior to take the setup for a test run, and weigh in, which absolutely must happen soon. The track install definitely beefs up the strength of the trailer - think of it as 57lbs of bracing. Now at the back of the cabin with the clamshell raised, with some effort I can get the cabin to flex and bounce the door around a bit if I hang on and jostle the trailer left and right, but this is without the clamshell secured. Once it is properly accessorized for closing, it will serve as the 'cross bracing' to make the rear of the cabin solid.
So next up on deck is sealing and latching the clamshell, and in the hole is insulation puzzle piece making. Now that the track is in I can visualize where I need to do extra cutouts and laps so that each piece of insulation fits in 'toight'. Not too tight to balloon out too much, but still just snug enough to make sure theres no air gaps. The tough part about the puzzle pieces is that those walls in the pics are 1" wide, but the insulation is 1 1/2" wide, so in all the corner lines I have to match up the lap up or something else I've never done as of yet.. Just a few more pics to show the l-track and to help one imagine how many uses it has... for example when I was hanging those 4 last pieces of tracking, I used the tracks above to suspend two of the ratchet straps looped to the exact height to make the install easier. I've starting hanging tools on it, still very excited to overdo the securement part of this trailer!
tnttt_78.jpg
port side of interior.. ahhh so much aluminum its delicious
tnttt_78.jpg (101.63 KiB) Viewed 2328 times
tnttt_79.jpg
starboard long rails, five 1" machine screws per rail
tnttt_79.jpg (98.5 KiB) Viewed 2328 times
tnttt_80.jpg
port side long rails - they each have five 1" machine screws along them
tnttt_80.jpg (104.97 KiB) Viewed 2328 times

How does sealant get on my triceps and then my car seat?? more than once??
Aluminum is almost as fascinating as wood.
Link to my build thread: 4 1/2 x 9
User avatar
ssuuki19
Teardrop Master
 
Posts: 170
Images: 51
Joined: Fri Sep 02, 2016 5:18 am
Location: Brampton, ON
Top

Re: Build Journal: All Aluminum Bare Bones Tiny Travel Trail

Postby ssuuki19 » Sun Aug 20, 2017 4:47 pm

Ok I have a method for doing the panel puzzle pieces now - angle grinder, hacksaw blade, exacto blade, small roofing square, small angle-scribe tool, small 6" metal ruler, and 0.9mm sharpie. I'm happy with my accuracy and precision, but not my speed... I'm far too slow right now and have to learn to do this faster. After trying out these 2 panels I am confident with the rest of the install being successful! As these insulation pieces go in I think the cabin is really going to start feeling like a space - it already is to some degree now that I have logged some hours inside it, getting used to its geometry.
Currently without thermal break gaskets (might put 1/8" ones in [Edit: putting 1/4" ones in]) the insulation gets compressed 7/16" where the braces are.. its held in pretty tight! Having tested these two panels I am confident the roof panels will be held in fine too as they aren't very wide, and I was thinking about doubling them anyways. So here are the three proof of concept pics for having the bracing hold the insulation in place:
tnttt_78.jpg
first time doing the side cutout for the bracing
tnttt_78.jpg (97.71 KiB) Viewed 2279 times
tnttt_79.jpg
proof of concept: bracing can snugly hold insulation in place
tnttt_79.jpg (94.03 KiB) Viewed 2279 times
tnttt_80.jpg
starboard side of first two panels being held in place
tnttt_80.jpg (99.37 KiB) Viewed 2279 times
Last edited by ssuuki19 on Wed Aug 23, 2017 1:26 am, edited 1 time in total.

How does sealant get on my triceps and then my car seat?? more than once??
Aluminum is almost as fascinating as wood.
Link to my build thread: 4 1/2 x 9
User avatar
ssuuki19
Teardrop Master
 
Posts: 170
Images: 51
Joined: Fri Sep 02, 2016 5:18 am
Location: Brampton, ON
Top

Re: Build Journal: All Aluminum Bare Bones Tiny Travel Trail

Postby ssuuki19 » Wed Aug 23, 2017 12:39 am

So the puzzle piece method is working. Decided to buy tracing paper from the art store today, because for me, its just faster. No need for measuring tape. Now I need a drafting table! Wonder why I don't do my work on a 'drafters plane' instead of relying on makeshift tables. Anyways, the panels are working out and still happy with the accuracy and precision on the pieces. Theres always going to be errors, its just the outliers I'm concerned with.
Today I thought to talk about thermal bridges. Its been stated, but plainly obvious there is a lot of 5052 and 6061 aluminum in this project, and the largest thermal bridge categories in my opinion are:
-the aluminum door frame say 19ft of 1" strip
-the aluminum window frames and the door window say 27 feet of 1/2" strip
-the l-track connections and the hardwood ceiling battens 100 1"x1" point source bridges
-currently the floor has no thermal bridges (floating floor on foam)
-the cargo door will be weather gasketted so its already thermally bridged from the cabin

So I've located companies that produce thermal break material suitable for this setup. Basically a material thats structural enough to put in-between aluminum/aluminum or aluminum/wood. The idea would be to use 1" strips of the material for the door frame and the window frames, and use 1"x1" pieces of the material for all the point source bridges.

Heres why I thought to write.. as I asked myself, are these thermal bridges really significant?
Well lets total it up:
door frame 1.6ft2
window frames 1.125ft2
l-track connections 0.7ft2

Thats about 3 1/2 square feet of aluminum thermal bridge! Thats darn significant 'aint it?! Aka an unwanted giant aluminum heat sink! Aka in the winter that 3 1/2 square feet of aluminum bridge will suck the heat out of the cabin and in the summer it'll suck heat into the cabin, neither of which I want! Also cold aluminum spots in the cabin will condense water if the dew point conditions are met locally, and those aggregating water droplets will then follow capillary and gravity motion and go wherever they go. Thats one reason why this prototype is using open cell foam and why the seams will not be taped.
Ok ok I've calmed down a bit, its just the math doesn't lie, does it? A hidden giant 3.5ft2 heat sink in my darn trailer.. well, were gonna see about that. So I've decided to go with the 1/4" thick thermal break material. What it does is blocks the amazing heat transfer that aluminum has, so it basically 'dams up the heat' so its gets all piled up at the thermal break material, even at 1/4" thick. So the 'heat dam' stops the 'easy flow of heat out of the cabin' in the winter, and the 'easy flow of heat into the cabin in the summer'. If the thermal break material were removed, all that heat would flow freely with no resistance. Because with contact to heat, thats one thing aluminum does really, really well.

Since I'm going all out on the design, I can't skip these thermal bridges and so they will all be dealt with. In the hole is ordering the thermal break material.
Done for today.

How does sealant get on my triceps and then my car seat?? more than once??
Aluminum is almost as fascinating as wood.
Link to my build thread: 4 1/2 x 9
User avatar
ssuuki19
Teardrop Master
 
Posts: 170
Images: 51
Joined: Fri Sep 02, 2016 5:18 am
Location: Brampton, ON
Top

Re: Build Journal: All Aluminum Bare Bones Tiny Travel Trail

Postby ssuuki19 » Sun Aug 27, 2017 11:06 pm

Today stage 1 of the insulation install was completed so I thought to take some pics! If you look at the third picture at the top right panel at the bottom, you can see the huge gap there because of poor technique, essentially. That was my worst panel, and it was also my first time trying to freehand a curved panel using just a tape measure and some guessing, and un-fortunately it shows. So I decided to go the tracing paper route...
After using tracing paper I'm able to speed up the process enough to be tolerable, but still keeping better accuracy and precision with little effort. I might re-make those first two panels (when I do the final audit for outliers..), as now that I'm at panel 15 my technique is way better (and thus I think those two panels will be the outliers).
Its gonna take another week to get this job done, I just can't seem to do it much faster without a lot more practice, or losing precision. By the way for this picture session all the l-track bracing was removed to demonstrate how all the panels are held in by their own snugness, gravity, and 1" and 1/2" laps that strategically tuck in here and there. Here are the pics:
tnttt_81.jpg
more aluminum cladded acoustic insulation, wow nice pieces here
tnttt_81.jpg (115.28 KiB) Viewed 2165 times
tnttt_82.jpg
view to the front, don't really know whats going on with the window trim frame yet
tnttt_82.jpg (130.1 KiB) Viewed 2165 times
tnttt_83.jpg
the right top front piece was the first, and my worst (it was done freehand instead of using tracing paper)
tnttt_83.jpg (125.19 KiB) Viewed 2165 times

How does sealant get on my triceps and then my car seat?? more than once??
Aluminum is almost as fascinating as wood.
Link to my build thread: 4 1/2 x 9
User avatar
ssuuki19
Teardrop Master
 
Posts: 170
Images: 51
Joined: Fri Sep 02, 2016 5:18 am
Location: Brampton, ON
Top

Re: Build Journal: All Aluminum Bare Bones Tiny Travel Trail

Postby ssuuki19 » Wed Aug 30, 2017 10:43 pm

A few thoughts today, thought about the storm of course. I am still plugging away at the pieces, after 15 pieces I thought about how the kerf of the angle grinder disk removes a width, so I added back 1/8" to the panels. They fit like really, really well. When I look back at my first 5 panels I am now so much faster, if there is enough leftover insulation, I think I will re-do the 5 worst panels, and put the rejects under the floor with all the other leftover pieces. It is working out really, really well, I can't wait to see how it feels on a sunny day!

How does sealant get on my triceps and then my car seat?? more than once??
Aluminum is almost as fascinating as wood.
Link to my build thread: 4 1/2 x 9
User avatar
ssuuki19
Teardrop Master
 
Posts: 170
Images: 51
Joined: Fri Sep 02, 2016 5:18 am
Location: Brampton, ON
Top

Re: Build Journal: All Aluminum Bare Bones Tiny Travel Trail

Postby ssuuki19 » Wed Sep 06, 2017 8:56 pm

Got all the insulation panels pieced out except the ceiling, and then the leftovers go in the floor 'just for now'. I'll take some photos once its all installed.
So to change things up I started skinning the clamshell. Same method as on the cabin, but with 3/16" .375" grip alum alum rivets as they are going through the 1/4" flat-bar this time. Got two panels done today - here are the pics:
tnttt_84.jpg
clamshell view from rear with two panels installed
tnttt_84.jpg (93.07 KiB) Viewed 2054 times
tnttt_85.jpg
clamshell view from port side
tnttt_85.jpg (114.77 KiB) Viewed 2054 times
tnttt_86.jpg
clamshell view from starboard side
tnttt_86.jpg (105.48 KiB) Viewed 2054 times

How does sealant get on my triceps and then my car seat?? more than once??
Aluminum is almost as fascinating as wood.
Link to my build thread: 4 1/2 x 9
User avatar
ssuuki19
Teardrop Master
 
Posts: 170
Images: 51
Joined: Fri Sep 02, 2016 5:18 am
Location: Brampton, ON
Top

Re: Build Journal: All Aluminum Bare Bones Tiny Travel Trail

Postby KCStudly » Thu Sep 07, 2017 9:21 am

I just had to Google image search "steam punk dirigible".

Quite the task you have going on there! :applause:
KC
My Build: The Poet Creek Express Hybrid Foamie

Poet Creek Or Bust
Engineering the TLAR way - "That Looks About Right"
TnTTT ORIGINAL 200A LANTERN CLUB = "The 200A Gang"
Green Lantern Corpsmen
User avatar
KCStudly
Donating Member
 
Posts: 9611
Images: 8169
Joined: Mon Feb 06, 2012 10:18 pm
Location: Southeastern CT, USA
Top

PreviousNext

Return to Build Journals

Who is online

Users browsing this forum: No registered users and 16 guests