First time build - The Hoppy Camper

...ask your questions in the appropriate forums BUT document your build here...preferably in a single thread...dates for updates, are appreciated....

First time build - The Hoppy Camper

Postby Philthy » Thu Mar 02, 2017 3:34 pm

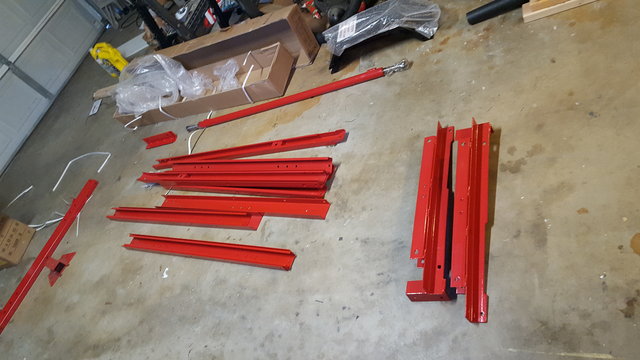
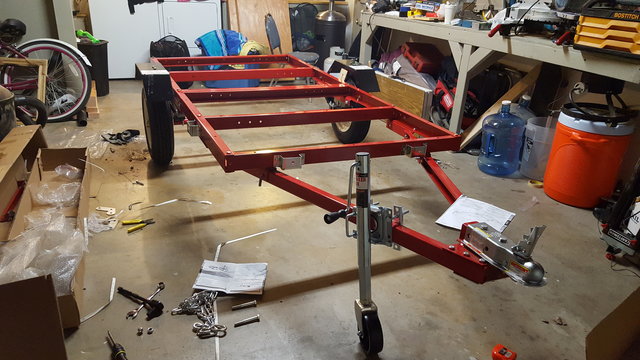
Hey all, long time lurker, first time builder. Finally took the plunge, bought a trailer and officially started my build. I'm looking at building a 5'x9' (maybe 8.5') on the super duty HF trailer.

Days one and two - 2/26/2017

Image
Image
Image
- Phil
User avatar
Philthy
Teardrop Inspector
 
Posts: 21
Images: 11
Joined: Thu Nov 03, 2016 3:41 pm
Location: Sacramento, CA

Re: First time build - The Hoppy Camper

Postby Philthy » Thu Mar 02, 2017 3:39 pm

I'm thinking about rasing the floor using 2x4's and 1x4's to minimize the wheel wells sticking up into the sleeping area. This is roughly what I'm planning on doing:

Image


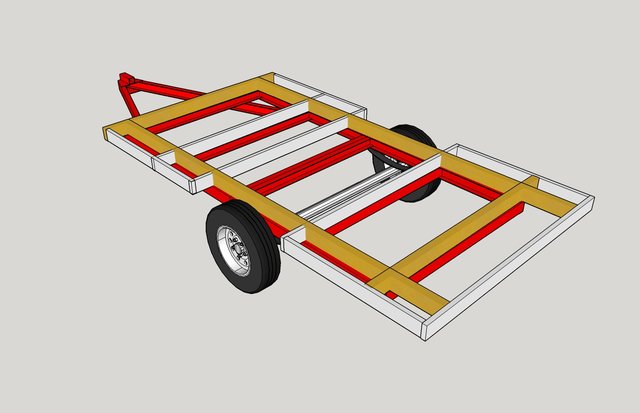
The brown beams are 2x4s and white are 1x4s. Then I'll cover it with 1/2" ply or underlayment. I think that should be good. I'm just a little worried about extend the floor in both directions and supporting 3/4 ply sandwich walls. If anyone sees any issues please let me know.
- Phil
User avatar
Philthy
Teardrop Inspector
 
Posts: 21
Images: 11
Joined: Thu Nov 03, 2016 3:41 pm
Location: Sacramento, CA

Re: First time build - The Hoppy Camper

Postby greygoos » Thu Mar 02, 2017 4:21 pm

You should probably extend the 1 X 4 out to the width of the trailer. Dont add a short length of wood where you are hanging over the frame. As you are using a sandwich method 2 X 4's could probably be eliminated. There are different schools of thought on this so its your decision.
greygoos
Silver Donating Member
 
Posts: 630
Joined: Sun Sep 27, 2015 6:15 am
Location: Syracuse NY
Top

Re: First time build - The Hoppy Camper

Postby QueticoBill » Thu Mar 02, 2017 4:26 pm

Study your wheel location and consider mounting them further back at least relative to the mass of the cabin. Better tracking and balance, easier backing, and better door placement. You might accomplish similar goals by only building forward, not rearward on the frame, and then extending tongue.

I don't like the moment connections of the short 1 x 4s fore and aft of each wheel. That but joint is prone to sag. No one way to solve. I'd probably try to get a member all the way across and piece the front to back members, but not only way.
QB
A tear with no name: viewtopic.php?f=50&t=67624
QueticoBill
Silver Donating Member
 
Posts: 1184
Images: 22
Joined: Sun Apr 14, 2013 7:22 am
Location: Clayton NY
Top

Re: First time build - The Hoppy Camper

Postby Philthy » Thu Mar 02, 2017 6:35 pm

QueticoBill wrote:Study your wheel location and consider mounting them further back at least relative to the mass of the cabin. Better tracking and balance, easier backing, and better door placement. You might accomplish similar goals by only building forward, not rearward on the frame, and then extending tongue.

I don't like the moment connections of the short 1 x 4s fore and aft of each wheel. That but joint is prone to sag. No one way to solve. I'd probably try to get a member all the way across and piece the front to back members, but not only way.


I do plan on mounting the axle a little further back to compensate.

My sketchup skills are severely lacking, but I tried to modify it a little bit to explain my plan in a little better detail. Rectangles were just much easier for me to get things laid out. I plan for all of the 1x4s to span the entire width, and those on the outer edge to be supported by the ones overhanging the 2x4s with a sort of mortise or whatever it may be called. I only modified the closes corner in this new sketch. Let me know what you think.

Image
- Phil
User avatar
Philthy
Teardrop Inspector
 
Posts: 21
Images: 11
Joined: Thu Nov 03, 2016 3:41 pm
Location: Sacramento, CA
Top

Re: First time build - The Hoppy Camper

Postby QueticoBill » Thu Mar 02, 2017 9:00 pm

Makes sense. I do think a simpler joint at edges would be OK.
QB
A tear with no name: viewtopic.php?f=50&t=67624
QueticoBill
Silver Donating Member
 
Posts: 1184
Images: 22
Joined: Sun Apr 14, 2013 7:22 am
Location: Clayton NY
Top

Re: First time build - The Hoppy Camper

Postby swoody126 » Fri Mar 03, 2017 8:56 am

for structural reasons i would run the 2x's across, not lengthwise, the entire width to the outer edges

the outer edges will be holding a substantial portion of the weight of the house and IMHO the 1x's wouldn't be sufficient bracing

also, 1x's will be harder to hit/screw into when securing the floor

if i were building this deck i would use 2x's all the way around, butt that's just me and my TV's are a Cherokee(2k# towing cap) and an F-350(11k# towing cap) which wouldn't be affected by the additional weight

just this old man's 2¢ worth this morning

sw
"we are the people our parents warned us about" jb
swoody126
500 Club
 
Posts: 769
Joined: Mon Feb 22, 2016 6:11 pm
Location: north of Ft Worth
Top

Re: First time build - The Hoppy Camper

Postby QueticoBill » Fri Mar 03, 2017 9:25 am

There's a lot of options. The fact you want "thicker" to minimize wheel wells makes it simpler, bit do account for the leaf spring compressing and tire rising in relation to frame.

You could build it all as a stressed skin with ply top and bottom; just run two bys across as suggested, or others. As a rule of thumb, a cantilever should be at most half the backspan for basic framing. Stressed skins change that.
QB
A tear with no name: viewtopic.php?f=50&t=67624
QueticoBill
Silver Donating Member
 
Posts: 1184
Images: 22
Joined: Sun Apr 14, 2013 7:22 am
Location: Clayton NY
Top

Re: First time build - The Hoppy Camper

Postby Philthy » Fri Mar 03, 2017 10:37 am

Thanks for the input. Maybe I'll compromise and run 2x2s everywhere and live with a couple inches of wheel well inside. My TV is an outback with 2500# max, but I'd like to keep this thing as light as possible (without going full foamie).

Sent from my SAMSUNG-SM-G920A using Tapatalk
- Phil
User avatar
Philthy
Teardrop Inspector
 
Posts: 21
Images: 11
Joined: Thu Nov 03, 2016 3:41 pm
Location: Sacramento, CA
Top

Re: First time build - The Hoppy Camper

Postby KCStudly » Fri Mar 03, 2017 10:50 am

I would do all 1x4's. One each full width at the hatch "bumper", under the galley bulkhead, fore and aft of the fender wheel, and at the front wall. No need for 2x4's.

Then just add more 1x4's to block in and add stability to the xmbr's. Get a Kregg pocket hole jig if you don't have one already (or my preference is a biscuit/plate joiner... cuz then you don't have to worry about driving screws into screws later); no need for the fancy, complex, time consuming box joints.

The structural logic should not be like the building of the pyramids where you have to pile more weight on top of a solid base to hold the whole thing up. The structural logic should be that you are building a unit where the sum of the parts make up the total strength, more like building a wing or truss structure.

Think of it this way, your front wall and bulkhead span the trailer crosswise bearing (resting) on the solid trailer frame, and holding up the walls, These panels are all very deep cross section "beams" and can support a great deal of weight. Attach your floor with a solid joint and glue to the edge of your wall and the wall holds up the floor, not the other way around. Now the floor only needs to be strong enough to support its own weight and what little weight might land in that short span between the wall and the blocking over the main rail.

Think of the cabin as a monocoque structure, not a brick house.

Check out jseyfert3's build.
KC
My Build: The Poet Creek Express Hybrid Foamie

Poet Creek Or Bust
Engineering the TLAR way - "That Looks About Right"
TnTTT ORIGINAL 200A LANTERN CLUB = "The 200A Gang"
Green Lantern Corpsmen
User avatar
KCStudly
Donating Member
 
Posts: 9612
Images: 8169
Joined: Mon Feb 06, 2012 10:18 pm
Location: Southeastern CT, USA
Top

Re: First time build - The Hoppy Camper

Postby Philthy » Fri Mar 03, 2017 1:46 pm

KCStudly wrote:I would do all 1x4's. One each full width at the hatch "bumper", under the galley bulkhead, fore and aft of the fender wheel, and at the front wall. No need for 2x4's.

Then just add more 1x4's to block in and add stability to the xmbr's. Get a Kregg pocket hole jig if you don't have one already (or my preference is a biscuit/plate joiner... cuz then you don't have to worry about driving screws into screws later); no need for the fancy, complex, time consuming box joints.

The structural logic should not be like the building of the pyramids where you have to pile more weight on top of a solid base to hold the whole thing up. The structural logic should be that you are building a unit where the sum of the parts make up the total strength, more like building a wing or truss structure.

Think of it this way, your front wall and bulkhead span the trailer crosswise bearing (resting) on the solid trailer frame, and holding up the walls, These panels are all very deep cross section "beams" and can support a great deal of weight. Attach your floor with a solid joint and glue to the edge of your wall and the wall holds up the floor, not the other way around. Now the floor only needs to be strong enough to support its own weight and what little weight might land in that short span between the wall and the blocking over the main rail.

Think of the cabin as a monocoque structure, not a brick house.

Check out jseyfert3's build.

That makes sense and was kind of what I had envisioned happening. I was more thinking of using the 2x4s I have pictured as anchor points so I can attach those to the frame with carriage bolts instead of using that guys modified tie method.

Sent from my SAMSUNG-SM-G920A using Tapatalk
- Phil
User avatar
Philthy
Teardrop Inspector
 
Posts: 21
Images: 11
Joined: Thu Nov 03, 2016 3:41 pm
Location: Sacramento, CA
Top

Re: First time build - The Hoppy Camper

Postby KCStudly » Fri Mar 03, 2017 2:24 pm

I guess it all depends on how sensitive you and your TV will be to making a heavy TD, vs. how "hard" you are willing to work to make it lighter. If it is the width of the board you seek to allow a fastener to pass thru the long way, you don't have to make the board the whole thickness the whole way; that just adds extra weight where it isn't needed. It may be a little more work, but you can still use 1x4's and just scab on a smaller piece at each bolt location to double it up locally.

These little efforts, right from the beginning, do save weight, and they set a tone for the whole build. Sure, each little detail takes a bit of thinking, a little design effort, maybe a bit more work, but it all adds up in the end. Pick your poison: build fast with cheap framing lumber and get it done so you can go camping; or build light with tight joints in milled boards, spend a little more time and get a little something more out of it.

My working goal is not so much to build a super light weight camper going over the road, but rather to get more or equal strength from less material so that I can have some extra features and carry more "stuff" (in the George Carlin sense of the word) w/o ending up that 200 to 500 lbs heavier than my initial estimate. It happens to builders more often than you would think, some even surpass the load capacity of their axles and end up having to swap it out after a failure! There is not one single item on a TD that weighs 500 lbs that you can just say, "well, I guess I'll leave that off so I can meet my design weight goal". That 500 lbs of extra weight comes from an extra lb here and an extra lb there, 500 times. Everything you touch on your build should weigh a little less if it can. In my whole build I probably have a total of 2 ft of 2x4; several short chunks built into my floor as crush blocks where the attachment bolts to the trailer frame go, and the blocking around my door latches (the latter of which were mostly pocketed out to fit the latch. That's it, everything else is either 1x (various species) or 2x2 cedar (light)... well, except for the hatch spars that are 2x2 oak for screw holding power.

I'm not trying to convince you to build it my way, you'd be hitting your head against the wall most of the time just like I am. :? I'm just saying with a little thought :thinking: you don't need to start off with a bunch of heavy wood. :thumbsup: :D

If you haven't already, I would suggest that you look at Sharon's finished camper weight spreadsheet thread. Look for campers in your size category and see the range of weights. Pick the ones that fall into your desired weight range and review those build threads to see what techniques were used to achieve those weights. Then you can build it to you satisfaction and own specification, but still have a good idea what is plenty enough, and what is extra.
Last edited by KCStudly on Fri Mar 03, 2017 3:02 pm, edited 1 time in total.
KC
My Build: The Poet Creek Express Hybrid Foamie

Poet Creek Or Bust
Engineering the TLAR way - "That Looks About Right"
TnTTT ORIGINAL 200A LANTERN CLUB = "The 200A Gang"
Green Lantern Corpsmen
User avatar
KCStudly
Donating Member
 
Posts: 9612
Images: 8169
Joined: Mon Feb 06, 2012 10:18 pm
Location: Southeastern CT, USA
Top

Re: First time build - The Hoppy Camper

Postby Philthy » Fri Mar 03, 2017 2:58 pm

Well said KC. I'm trying to find a balance between being light and easy to build. I would really like to be able to use it this year, but I won't cut any corners to get there. I have looked at that spreadsheet but haven't gone through all the builds yet.

Sent from my SAMSUNG-SM-G920A using Tapatalk
- Phil
User avatar
Philthy
Teardrop Inspector
 
Posts: 21
Images: 11
Joined: Thu Nov 03, 2016 3:41 pm
Location: Sacramento, CA
Top

Re: First time build - The Hoppy Camper

Postby Philthy » Tue Mar 07, 2017 11:15 am

Just a quick update, I wasn't able to get any real work done on the trailer this weekend, but I did get it registered and got my California Permanent Trailer license plate. 4 hours at the DMV wasn't my ideal Friday, but it needed to be done. In the meantime, got a little woodworking practice building a new bathroom counter and installing new sinks for my mom for her birthday.

Image

That was fun and I'm happy with how it turned out, but I'm ready to get some work done on my project! Hoping for sawdust this weekend.
- Phil
User avatar
Philthy
Teardrop Inspector
 
Posts: 21
Images: 11
Joined: Thu Nov 03, 2016 3:41 pm
Location: Sacramento, CA
Top

Re: First time build - The Hoppy Camper

Postby pchast » Tue Mar 07, 2017 9:36 pm

:thumbsup:
pchast
Platinum Donating Member
 
Posts: 2026
Images: 97
Joined: Mon Jan 28, 2013 5:47 pm
Location: Athens, NY
Top

Next

Return to Build Journals

Who is online

Users browsing this forum: No registered users and 30 guests