Newbie Build in NC

...ask your questions in the appropriate forums BUT document your build here...preferably in a single thread...dates for updates, are appreciated....

Newbie Build in NC

Postby JackieK » Wed Aug 23, 2017 7:24 pm

Hi all! So after lurking here on the site for what seems like forever gathering info and ideas, I have finally started on my own build! My plans are to build a somewhat un-traditional teardrop that will be semi-offroad worthy. I'm trying to do it as cheap as I can, and not cheap as in cutting corners. But I'm scavenging for anything that I can use or repurpose locally before buying new.

My initial plan was for a 5x8 trailer to start with, but my scavenging brought me across a 4x8 a friend had. It was in pretty terrible shape but it was mostly there and a decent place to start. Not to mention the price was right, only $20! I quickly paid him without hesitating and my 5x8 plan was out the window, but I'm happy with the 4x8. Here's where I started....

rsz_120170728_124514.jpg
rsz_120170728_124514.jpg (260.83 KiB) Viewed 2500 times


rsz_20170728_124530.jpg
rsz_20170728_124530.jpg (260.55 KiB) Viewed 2500 times
User avatar
JackieK
Teardrop Inspector
 
Posts: 18
Images: 0
Joined: Mon Aug 21, 2017 5:05 pm
Location: Kannapolis, NC

Re: Newbie Build in NC

Postby JackieK » Wed Aug 23, 2017 7:27 pm

It's not pretty but the potential was there. It's an old homebuilt trailer, all the welds look professional. Whoever built it knew what they were doing, the axle is out of an old 70's oldsmobile. My main problem with it was that the axle was welded right to the frame. Not ideal for a smooth ride, so it had to be cut out. Which was easier said than done. But after hours with a angle grinder, saw zaw, hacksaw, die grinder.... it finally fell! I also had to cut of all the side supports as they will not be needed. I decided to go with 2000 lb leaf springs so the hangers had to be welded. It also needed a little more bracing on the back half so a new piece of angle was also welded in to help.

rsz_20170731_130905.jpg
rsz_20170731_130905.jpg (308.05 KiB) Viewed 2498 times


20170804_193701.jpg
20170804_193701.jpg (448.07 KiB) Viewed 2498 times


20170804_193741.jpg
20170804_193741.jpg (483.74 KiB) Viewed 2498 times
User avatar
JackieK
Teardrop Inspector
 
Posts: 18
Images: 0
Joined: Mon Aug 21, 2017 5:05 pm
Location: Kannapolis, NC

Re: Newbie Build in NC

Postby JackieK » Wed Aug 23, 2017 7:37 pm

My next step was to sandblast everything. The whole trailer had several coats of paint on it with the top layer being some kind of latex house paint...yuk. So after blasting everything was etch primed and painted black with durable 2k urethane(I work in the coatings industry so most of my paint and what not is freebie stuff!).

20170810_180132.jpg
20170810_180132.jpg (234.97 KiB) Viewed 2496 times


20170810_192301.jpg
20170810_192301.jpg (191.41 KiB) Viewed 2496 times


20170811_074921.jpg
20170811_074921.jpg (234.21 KiB) Viewed 2496 times
User avatar
JackieK
Teardrop Inspector
 
Posts: 18
Images: 0
Joined: Mon Aug 21, 2017 5:05 pm
Location: Kannapolis, NC
Top

Re: Newbie Build in NC

Postby JackieK » Wed Aug 23, 2017 7:46 pm

Then it was time to reassemble! The hubs got new bearings and wheel studs, also got a free trailer jack from a friend. Came across some cheap used cooper tires the size I was looking for. All in all it turned into a pretty sweet deal, I spent $100 at northern tool for the springs and all the hardware, about $120 for the tires, and with other odds and ends the total cost is around $300. I'm currently in the process of getting a title, registration, and tag. I don't want to go much further before I do that but I'm on my way!

20170819_161844.jpg
20170819_161844.jpg (417.38 KiB) Viewed 2495 times


20170819_161936.jpg
20170819_161936.jpg (447.86 KiB) Viewed 2495 times


20170819_161920.jpg
20170819_161920.jpg (460.01 KiB) Viewed 2495 times
User avatar
JackieK
Teardrop Inspector
 
Posts: 18
Images: 0
Joined: Mon Aug 21, 2017 5:05 pm
Location: Kannapolis, NC
Top

Re: Newbie Build in NC

Postby pchast » Wed Aug 23, 2017 9:03 pm

Good Start! :thumbsup:
pchast
Platinum Donating Member
 
Posts: 2026
Images: 97
Joined: Mon Jan 28, 2013 5:47 pm
Location: Athens, NY
Top

Re: Newbie Build in NC

Postby greygoos » Wed Aug 23, 2017 9:46 pm

Nice work. I love seeing old trailers redone and not sent to the scrap heap.
greygoos
Silver Donating Member
 
Posts: 630
Joined: Sun Sep 27, 2015 6:15 am
Location: Syracuse NY
Top

Re: Newbie Build in NC

Postby working on it » Wed Aug 23, 2017 10:52 pm

JackieK wrote:Hi all! So after lurking here on the site for what seems like forever gathering info and ideas, I have finally started on my own build! My plans are to build a somewhat un-traditional teardrop that will be semi-offroad worthy. I'm trying to do it as cheap as I can, and not cheap as in cutting corners. But I'm scavenging for anything that I can use or repurpose locally before buying new....
  • Your statement quoted above sounds like what I could've said myself, almost 6 years ago. I started with a junk trailer (bought for $50 at a swap meet-sat unused in my tall grass/swampy rear yard for nearly 20 years-was too small and had a bent/broken tongue), that had to be radically enlarged and re-worked to even become a 4x8, so you're perhaps a step or three ahead of where I began.
  • 869278693396776 trailer progress away from home (at friend's race shop. at his home)
  • I also tried to go cheap, but the only "cutting corners" I did, and regretted later, was trying to use the original spindly/undersized axle, as a short-term solution until I could get a stronger axle capable of eventual off-roading (minor). I had to convert a 50"x 60" frame with 8" wheels, to a 4'x 8' with 14" wheels (chosen because I could grab the spare tire from my wife's business trailer). I hid my spending, and hid the trailer 50 miles away, so I could build what I wanted for the cost of $500 (ostensibly building it for my wife, she set a low budget figure, figuring I would give up on it); but, I had built my Chevelle 10-second drag car the same way, out of sight and using hidden spending. Some corners were cut, like the axle which got bigger hubs/bearings, and adapter/spacers to make the 14" wheels fit, and the tires were two Carlisle ST bias-ply tires, that had nail holes in them, and were sitting in a friend's scrap pile (I used them nearly six years, until recently, when I replaced them, now 12 years old, with General Grabber AT2 27x8.5-14 LT tires.
  • After building it covertly, away from home, for 11 months, I finally brought it home to finish it (only the exterior had been done, no interior or electrical); at that point, the cat was out of the bag, and she could see how much effort and expenditure I had devoted to the build. I hadn't kept a total cost record, but I said it was indeed over $500 already, and the the items I needed to finish would be even more than already spent. Fortunately, we had weathered a budgetary crisis (the reason why I had to hide the spending), and I openly and with her grudging support, finished the trailer in another 11 months (actually...they're never finished).
  • 9733897337104346 trailer moved home as a sealed box; windows,A/C, & interior done here
  • Over the last four years, since it became camp-able, I upgraded the axle and suspension parts to what it should've been all along, and modified it for my "sole" use (she spent ten minutes in the cabin, and her claustrophobia drove her out...it was now "my" trailer!). What a long, strange trip it's been (so far), but I enjoyed the building as much or more than the actual camping (my name has been "working on it" on many forums for the last 20+ years for a reason). I hope you will enjoy both sides of the TnTTT experience like I have.
  • 121636120568147402 among later upgrades (for off-road?): 3500 lb. axle/springs/compression bumpstop, extended-run tank for generator, all-terrain tires/fender flares/mudflaps
2013 HHRv "squareback/squaredrop", rugged, 4x8 TTT, 2225 lbs
  • *3500 lb Dexter EZ-Lube braked axle, 3000 lb.springs, active-progressive bumpstop suspension
  • *27 x 8.5-14LT AT tires (x 3) *Weight Distribution system for single-beam tongue
  • *100% LED's & GFCI outlets, 3x fans, AM/FM/CD/Aux. *A/C & heat, Optima AGM, inverter & charger(s)
  • *extended-run, on-board, 2500w generator *Coleman dual-fuel stove & lantern, Ikea grill, vintage skillet
  • *zinc/stainless front & side racks *98"L x 6" diameter rod & reel carrier tube on roof
173193172890148599
User avatar
working on it
2000 Club
2000 Club
 
Posts: 2176
Images: 457
Joined: Tue Oct 04, 2011 9:05 pm
Location: DFW Texas
Top

Re: Newbie Build in NC

Postby JackieK » Thu Apr 12, 2018 6:53 pm

Hi all! So after a long winter of working on the trailer I've made a ton of progress and nearly have the thing done, I've just been too busy to post. But I'm going to walk you through my progress as best as I can.

So first was to build the floor, not a very complicated task but with the angle iron frame it did require a little thought as to how the floor and walls would be attached. I decided that the floor would lay inside the angle and walls would attach to the outside. I made a simple diagram to illustrate the idea. I also made a quick simple drawing to scale for the shape I was going for. I installed the floor after I gave it a few coats of asphalt paint to seal the bottom.

20170905_131208_HDR (800x450).jpg
20170905_131208_HDR (800x450).jpg (276.63 KiB) Viewed 2286 times


20180412_185025 (800x599).jpg
20180412_185025 (800x599).jpg (146.6 KiB) Viewed 2286 times


wall%20section.jpg
wall%20section.jpg (19.33 KiB) Viewed 2286 times
User avatar
JackieK
Teardrop Inspector
 
Posts: 18
Images: 0
Joined: Mon Aug 21, 2017 5:05 pm
Location: Kannapolis, NC
Top

Re: Newbie Build in NC

Postby JackieK » Thu Apr 12, 2018 7:10 pm

Next was on to cutting out the wall profiles, I used 1/2" plywood for the walls. I got a free window out of a truck camper top to use for one wall. Its a little longer than I would have hoped for but I can make it work. I revised my side profile just a little to match the window shape. I also bit the bullet and bought a vintage technologies door. I just figured it would save me a lot of time and hassle, and in the end I'm glad I did. I also plan on adding some access doors at the back for a storage area where the galley might usually be on a traditional teardrop.

20180214_200247 (800x600).jpg
20180214_200247 (800x600).jpg (224.77 KiB) Viewed 2283 times


20180213_205743 (800x600).jpg
20180213_205743 (800x600).jpg (200.52 KiB) Viewed 2283 times
User avatar
JackieK
Teardrop Inspector
 
Posts: 18
Images: 0
Joined: Mon Aug 21, 2017 5:05 pm
Location: Kannapolis, NC
Top

Re: Newbie Build in NC

Postby JackieK » Thu Apr 12, 2018 7:16 pm

After the walls were cut then I moved on to framing, I used 1"x3" boards for that. Then I attached the walls to the frame with carriage bolts like in my diagram. I used wide fender washers with the carriage bolts and ran some sealant on the back side so no water would seep in.

20180221_120809_Film3 (800x600).jpg
20180221_120809_Film3 (800x600).jpg (285.28 KiB) Viewed 2282 times


20180224_180058 (800x600).jpg
20180224_180058 (800x600).jpg (259.48 KiB) Viewed 2282 times
User avatar
JackieK
Teardrop Inspector
 
Posts: 18
Images: 0
Joined: Mon Aug 21, 2017 5:05 pm
Location: Kannapolis, NC
Top

Re: Newbie Build in NC

Postby JackieK » Thu Apr 12, 2018 7:29 pm

After I got all the walls in place I insulated them. The floor got 1.5" insulation and the walls and roof got 3/4". Then once the insulation I moved on to skinning the inside walls with 5mm plywood. It's real thin stuff sort of like paneling. My galley area will not be used as the standard kitchen setup, it's main purpose will be storage. The top section of the galley is accessed from the outside of the trailer(more on that later) and the bottom is accessed from inside the trailer. I rigged up some sliding doors on the inside to close off the storage area, it will mainly be used as a place to store your shoes, bags, etc... Here's a pic of the inside so far.

20180313_210359 (800x600).jpg
20180313_210359 (800x600).jpg (187.31 KiB) Viewed 2301 times
User avatar
JackieK
Teardrop Inspector
 
Posts: 18
Images: 0
Joined: Mon Aug 21, 2017 5:05 pm
Location: Kannapolis, NC
Top

Re: Newbie Build in NC

Postby greygoos » Thu Apr 12, 2018 7:39 pm

Looking good. Thanks for the update and the pics
greygoos
Silver Donating Member
 
Posts: 630
Joined: Sun Sep 27, 2015 6:15 am
Location: Syracuse NY
Top

Re: Newbie Build in NC

Postby JackieK » Thu Apr 12, 2018 7:40 pm

Finally starting to look like something! I decided to coat the outside with a spray on bedliner, like I said before I work in the coatings field and I've seen this stuff sprayed on all kinds of stuff. It made perfect sense to me to spray my trailer with it, it's a super durable coating that seals up the wood nicely. It means that I could also just round over all the corners and not have to worry about any trim at all. So I started to prep it by filling in all my screw holes and seams in the wood with a little bondo just to smooth it out. Here it is ready to be sprayed...

20180317_185101 (800x600).jpg
20180317_185101 (800x600).jpg (288.36 KiB) Viewed 2293 times

20180317_185049 (800x600).jpg
20180317_185049 (800x600).jpg (282.75 KiB) Viewed 2293 times

20180317_185113 (800x600).jpg
20180317_185113 (800x600).jpg (288.72 KiB) Viewed 2293 times
User avatar
JackieK
Teardrop Inspector
 
Posts: 18
Images: 0
Joined: Mon Aug 21, 2017 5:05 pm
Location: Kannapolis, NC
Top

Re: Newbie Build in NC

Postby JackieK » Thu Apr 12, 2018 7:50 pm

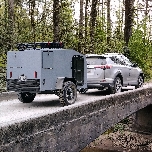
And here it is after spraying! The bedliner can be tinted any color you want, I went with a bluish gray almost like a battleship gray. I thought it would look decent with my silver Toyota. At this point everything has been fitted and should go together smoothly.

20180318_185737 (600x800).jpg
20180318_185737 (600x800).jpg (278.8 KiB) Viewed 2290 times


20180318_143824 (800x600).jpg
20180318_143824 (800x600).jpg (314.54 KiB) Viewed 2290 times


20180318_143836 (800x600).jpg
20180318_143836 (800x600).jpg (285.68 KiB) Viewed 2290 times
User avatar
JackieK
Teardrop Inspector
 
Posts: 18
Images: 0
Joined: Mon Aug 21, 2017 5:05 pm
Location: Kannapolis, NC
Top

Re: Newbie Build in NC

Postby JackieK » Thu Apr 12, 2018 8:06 pm

The first drive around town!!! I know this looks like a big step forward from the last post but I was so excited and busy with the progress I forgot to take pictures. So I'll try to talk you through what I did. Of course the door and window were screwed in, the rear access doors were installed. I bought some jeep style fenders along with some diamond plate(just to give it some class) both had to be painted black. I bought a roof rack, vent, and lighting kit on ebay. Also mounted a spare tire at the tongue, it was mounted using a scraped bracket I found laying around and a 6" bolt. I also added a power plug in on the side along with a input for cable tv. I'm going to take some more detailed pics soon and more on the interior also. But I'm super pleased with the results so far!

20180331_171636 (800x600).jpg
20180331_171636 (800x600).jpg (299 KiB) Viewed 2285 times

20180331_171649 (800x600).jpg
20180331_171649 (800x600).jpg (267.44 KiB) Viewed 2285 times

20180331_172711 (800x600).jpg
20180331_172711 (800x600).jpg (260.39 KiB) Viewed 2285 times
User avatar
JackieK
Teardrop Inspector
 
Posts: 18
Images: 0
Joined: Mon Aug 21, 2017 5:05 pm
Location: Kannapolis, NC
Top

Next

Return to Build Journals

Who is online

Users browsing this forum: No registered users and 17 guests