Tom & Shelly's build

...ask your questions in the appropriate forums BUT document your build here...preferably in a single thread...dates for updates, are appreciated....

Re: Tom & Shelly's build

Postby Tom&Shelly » Mon Jun 10, 2019 9:54 pm

twisted lines wrote:
Tom&Shelly wrote:
swoody126 wrote:Tom, you can get stainless steel T-nuts too

sw


Thank you SW. Found them on Amazon. Buying either 50 or 100 (can't remember), along with a similar number of stainless 10-32 screws, when I need four, so I'll have a lifetime supply!

Tom


While using stainless to stainless its a good Idea to use a tiny bit of anti seize so the thread don't gaul it is very common and can make for a bad day if you want to take thing's apart.

My day job use to be working with very specialised stainless stuff, one of them had a thousand dollar bolt. :shock:


Good idea! Thanks!

Tom
172912 170466
Tom&Shelly
Palladium Donating Member
 
Posts: 2202
Images: 1946
Joined: Tue Sep 05, 2017 3:27 pm
Location: Upstate New York/New Mexico

Re: Tom & Shelly's build

Postby Tom&Shelly » Wed Jun 12, 2019 5:36 pm

Put several coats of varnish on the inside of the hatch, before we put on the outer skin. I won't varnish the inside of the outer skin, since I'd have to do it before attaching, and can't be that certain where the ribs will end up. In any case, if a little water does end up inside the hatch somehow, the inside of the inner skin will be on the bottom and this varnish should protect it some.

158480 158479

Also varnished the inside of the hatch panel, on the right in the 2nd photo.

I used a gallon can of Helmsman exterior spar varnish that I suspect: I used it on my walls last Fall, and it didn't smooth out as nicely as it should. Seems to be doing the same here, which is why I used it in the places that won't show. I've used other (quart sized) cans of this product and never had any trouble. Not sure if the can went bad, or what.

Obviously, I'll use a different can when varnishing the outside of the inner skin.

This afternoon, the Tekonsha 2 wire to 3 wire tail light converter arrived, and I immediately wired it to a test board. The purpose is to separate the brake lights and turn signal lights so one can use a 3rd brake light, and also use amber turn signals.

They say it is for incandescent lights only, but it seems to work fine on LED lights as well, except the amber lights do flash briefly as the red lights are coming on, Difficult to capture with a non-synchronized camera, but I took a lot of shots and the last one shown here captured it:

158475 158477 158476 158473 158478

The "black box" does have relays in it (we could hear them), and so I presume the drive current for the lights does not go through the logic circuits (if any). Since there are mechanical parts, there is some sort of limited lifetime involved. I will build the box into the hatch where we can take the panel off to access it.

Tom
172912 170466
Tom&Shelly
Palladium Donating Member
 
Posts: 2202
Images: 1946
Joined: Tue Sep 05, 2017 3:27 pm
Location: Upstate New York/New Mexico

Re: Tom & Shelly's build

Postby Tom&Shelly » Wed Jun 19, 2019 12:38 pm

Spent the past day and a half on the outer skin for the hatch. Decided to do it in two parts. First the bottom:

158557 158558

We clamped everything over, then figured out we needed to secure some inboard places, where clamps won't reach, a little better than the 23 gauge nails would do, so I drilled holes and used dry wall screws (and finishing washers). The holes will get filled with epoxy before we put the fiber glass down.

Took everything apart, glued along the ribs and sides, clamped and screwed, and Shelly put in some 23 gauge nails for good measure. We did the flat lower part of the hatch, up to the first rib.

Here's a shot from underneath. We built an access panel that will screw on from the inside. It allows us to work on most of the light wiring easily:

158559

This morning I took off the clamps--glue seems to be holding!

With the skin partly attached, I was able to drill the hole for the third brake light in the right place, and fish the wire through before we glued the upper part down

158562

The wire (actually a "cable"--it has six 18 gauge wires) is inside some latex(?) tubing I found in the hardware store. The tube is slippery, and so if I ever needed to replace a bad cable, I MAY be able to fish a new one in without cutting open the hatch.

This morning we glued the upper part of the skin

158560

The glue will really hold that together once it dries and the clamps are removed? :thinking: I hope so! :worship:

I'm also glad we invested in all the clamps over the years!

One "near miss". I'd intended about a half inch of overlap all the way around, which I'll remove with the router later this week. Somehow, though, the upper edge of the skin only just makes it to the hinge rib (under the forest of clamps)

158561

With the fiber glass and epoxy, and then covering it with the hinge, it'll never show.

One thing we won't know until the clamps come off: Before putting the skin on, I noticed the structure was not rigid and I could easily warp (or rack) it by lifting one corner. We were careful to make sure the two 4 x 4's we used to balance the edge we were gluing were really the same height, so the hatch would stay true as we glued this skin on. I sure hope it still fits our tear drop!

Tom
172912 170466
Tom&Shelly
Palladium Donating Member
 
Posts: 2202
Images: 1946
Joined: Tue Sep 05, 2017 3:27 pm
Location: Upstate New York/New Mexico
Top

Re: Tom & Shelly's build

Postby Tom&Shelly » Wed Jun 19, 2019 3:47 pm

In between working on the hatch, I've been experimenting with ideas for the dresser frame and doors. The shelves look like this:

158569 158568

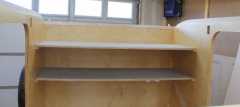
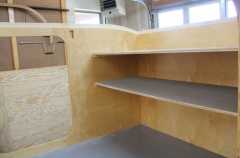
They are made out of a sandwich of 1/8" and 1/4" Baltic birch scrap around 1/4" AC plywood. I left a quarter inch lip on the front, with the thought that I may try and attach a frame that way. (Or, if not, worst case, I could cut the lip off.)

158579

With the frame attached that way, it would add to the rigidity of the shelves.

Shelly originally wanted doors that opened up, but I thought that was a recipe for a bonked nose, and said I wanted sliding doors. She doesn't like those because she can only get to half her wardrobe at once, but I assured her she'll be able take the doors off as easily as she'll be able to slide them.

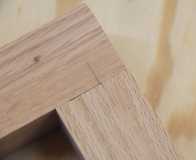
The idea will be to cut 3/16" wide notches for doors made of 1/8" Baltic birch scrap. The notches will be 1/8" deep at the bottom and 3/16" deep at the top, so one could lift a door and ease it out.

So I experimented with making notches for sliding doors using a spiral upcut bit with the router in the table. Quickly realized I'd need thicker material than 3/4"

158576

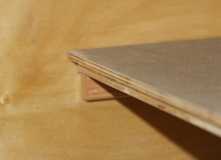
That's an example of 3/16" inch notches, 3/16" deep. Leaves a little less than 1/8" of material on the edges and between the notches: Not enough! (The quarter inch notch in the side would slip into the 1/4" lip in a shelf.)

Incidentally, I chose oak because pine or cedar would, I believe, be too warpy and also would tend to splinter as I notched them. Without a special trip to a real lumber yard (and not the chain lumberyard in Edgewood) my hardwood choices are oak and poplar.

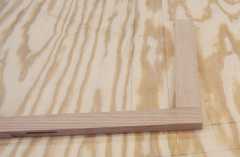
Okay, so we can buy 1 1/2" by 1 1/2" inch oak in three foot long pieces, but it's really 3/4" stock glued together. I can do that too, and get widths larger than 1 1/2 inches. So I did.

Here is what the frame looks like

158575 158577

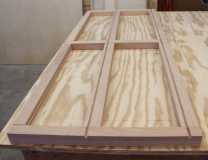
Once I square it up and join it, I will probably have to widen the quarter inch notches to fit the shelves. (Too many degrees of freedom to manage for this beginner!) I'll use PL Premium to glue to the shelves since it should expand to fill the imperfect fit. I'll also use some blocks and screws to help hold the frame to the shelves and cabin walls.

So, how to join? The pieces are too narrow for biscuits. (I didn't want to make them too wide, since the shelves are already deep for the size apertures we'll have.) Kreg poke-jiggery joints look fine, but the pieces are really too narrow for two Kreg screws as well. Worked great on some wider scrap though

158571 158570

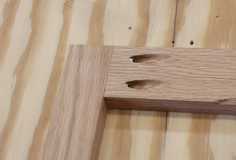
One thing though: The oak splits if you try and use a Kreg self tapping screw. The solution is to carefully drill through the Kreg jig hole into the second piece.

So, I started to think about using dowls, when I remembered Shelly's Dad, before passing away, gave us a dowling jig he'd bought, for some reason, and never used.

158565

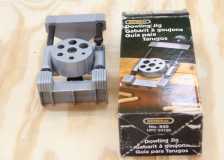
I experimented, and discovered it is junk!

158564 158566

The problem here is due to that cast alignment sight. From where I read center, it is about 1/32" off, which doubles when aligning the pieces. Reading on-line reviews, I found other problems with stability, etc. with this jig that I'd also sort of noticed. So I decided to buy a better jig

https://www.rockler.com/self-centering- ... gJGA_D_BwE

It should be here next week, and I'll see if I can make it work well enough. Assuming we can live with the results, I'll use a 1/8" roundover bit on the exposed sharp edges of the frame, attach it, and use some trim to hide the imperfect fit around the cabin walls and ceiling. Since we'll want to wax the insides of the notches anyway (or Shelly really will be able to remove the doors as easily as sliding them), I'm thinking of simply waxing the entire frame, rather than varnishing.

If we like the result, we'll probably do something similar in the galley.

Tom
172912 170466
Tom&Shelly
Palladium Donating Member
 
Posts: 2202
Images: 1946
Joined: Tue Sep 05, 2017 3:27 pm
Location: Upstate New York/New Mexico
Top

Re: Tom & Shelly's build

Postby tony.latham » Wed Jun 19, 2019 4:57 pm

I might have to borrow that new jig. A lot of times, I'll glue up a joint, let it cure and then hand drill and thump in a glue-slathered dowel.

So I experimented with making notches for sliding doors using a spiral upcut bit with the router in the table. Quickly realized I'd need thicker material than 3/4"...


Here's my slider detail:

Image

I'll cut those grooves on my table saw.

;)

Tony
User avatar
tony.latham
Gold Donating Member
 
Posts: 6899
Images: 17
Joined: Mon Jul 08, 2013 4:03 pm
Location: Middle of Idaho on the edge of nowhere
Top

Re: Tom & Shelly's build

Postby Tom&Shelly » Thu Jun 20, 2019 8:53 am

tony.latham wrote:I might have to borrow that new jig. A lot of times, I'll glue up a joint, let it cure and then hand drill and thump in a glue-slathered dowel.


It's an investment. If it works for me, I'd like to be able to make something closer to cabinet grade joints. :) I'll report on the results in a few weeks.

tony.latham wrote:
Here's my slider detail:

Image

I'll cut those grooves on my table saw.

;)

Tony


Nice! I'll try the narrower/shallower notches. In theory, I'll need the frame to be square to 1/16 inch for the doors to pop out on demand, but I could fudge a little if I cut the Baltic birch so it bends a little up and down.

I looked at our (borrowed) Craftsman portable table saw with aluminum table, and the router table, and decided to cut ours with the router. Someday, we'll buy a nice Sawstop. (Turned down a $100 heavier duty Craftsman with iron table, at an estate sale two weeks ago, on that premise.)

We may take the doors and glue some maps on them one day, partly for decoration, partly so we can see where we are heading on longer trips. Perhaps one with National Parks and another with major roads. (We can glue Canada on the other side and flip them over when we're up there.)

Tom
172912 170466
Tom&Shelly
Palladium Donating Member
 
Posts: 2202
Images: 1946
Joined: Tue Sep 05, 2017 3:27 pm
Location: Upstate New York/New Mexico
Top

Re: Tom & Shelly's build

Postby tony.latham » Thu Jun 20, 2019 2:39 pm

Someday, we'll buy a nice Sawstop.


I about wore out a Dewalt contractor's saw. The biggest project I built with it was a cedar strip canoe. Sweet.

When I ended up with a six week-traveling teaching contract, I needed a carrot.

Two of my friends have lost fingers. One of them twice. I feared that little Dewalt saw. "Come closer, they all float." I swear I heard that blade singing that song.

The carrot was a Sawstop. :thumbsup: :thumbsup: :thumbsup:

Tony
User avatar
tony.latham
Gold Donating Member
 
Posts: 6899
Images: 17
Joined: Mon Jul 08, 2013 4:03 pm
Location: Middle of Idaho on the edge of nowhere
Top

Re: Tom & Shelly's build

Postby Tom&Shelly » Sat Jun 22, 2019 2:15 pm

tony.latham wrote:
Someday, we'll buy a nice Sawstop.


I about wore out a Dewalt contractor's saw. The biggest project I built with it was a cedar strip canoe. Sweet.

When I ended up with a six week-traveling teaching contract, I needed a carrot.

Two of my friends have lost fingers. One of them twice. I feared that little Dewalt saw. "Come closer, they all float." I swear I heard that blade singing that song.

The carrot was a Sawstop. :thumbsup: :thumbsup: :thumbsup:

Tony


Grizzly now has the Sawstop line in their catalog, along with their own table saws. Wouldn't buy one that way, as they are slightly more expensive than buying from Sawstop direct. But what has us puzzled is Grizzly's suggestion to buy several cartridges! Our understanding is that they only trip when another saw would cause injury. One accident like that, and I'd have some serious thinking to do. Probably wouldn't go near the saw until, at least, I understood what I'd done wrong. I imagine I'd have nightmares about it. (Won't ask about the friend who lost fingers twice!)

(Also, last I heard, Sawstop sends a new cartridge free if you send a tripped one in so they can analyze the incident, making Grizzly's suggestion even more strange.)

I certainly respect the Craftsman saw, if not exactly fear it. Definitely a Sawstop in our future.

Tom
172912 170466
Tom&Shelly
Palladium Donating Member
 
Posts: 2202
Images: 1946
Joined: Tue Sep 05, 2017 3:27 pm
Location: Upstate New York/New Mexico
Top

Re: Tom & Shelly's build

Postby Tom&Shelly » Sat Jun 22, 2019 2:39 pm

I rounded the edges on our hatch this afternoon

158595 158594 158593

Blocked the hatch on the bench, so it wouldn't move, and made three passes (for each side) with a 3/8 inch round-over bit, each time setting the bit a little "lower" on the router. Used the router sideways, with the plate vertical against the side of the hatch. Held the motor cradled in my right hand, and guided with my left on the handle, going from right to left, as the business end of the bit was on the lower side. Another case where I worried more before hand than the event rated! (That's Shelly in the background, btw, working on another project.)

Made a mess of dust, glass, and epoxy, and threw it in my face, because of the orientation of the router. The epoxy and fiberglass came off in little shreds. Think they get charged with static electricity and stick to the router (and me)

158592

I am happy with the results.

Honesty dictates we report another minor mistake. Back when we glued the skin down, I clearly wrote "NO STAPLES" over the area where the wires run. Briefed Shelly, but in the excitement of glue-up she put a 23 gauge nail right into a cable. (OK, technically I should have written NO 23 ga NAILS.) I noticed it as I was getting ready to route. She carefully chiseled around it and got the nail out with a pair of long nosed pliers. Luckily, we were able to pull the wire down through the rubber hose and have enough on the ends that I can cut off the damage with little to no problems.

158591

Our experience with epoxy gave Shelly the confidence to know we can fill that hole (as well as the screw holes from the drywall screws I used to help hold the skin down while the glue dried), without it showing.

We are close to the point where we can finish varnishing and then epoxy and fiber glass the hatch. May set it aside for now, however, while we do other things for the tear drop that will create sawdust.

Tom
172912 170466
Tom&Shelly
Palladium Donating Member
 
Posts: 2202
Images: 1946
Joined: Tue Sep 05, 2017 3:27 pm
Location: Upstate New York/New Mexico
Top

Re: Tom & Shelly's build

Postby swoody126 » Sat Jun 22, 2019 2:44 pm

for folks w/ a lot on their minds the SawStop isn't a wrong idea

there is a lot to be said for ABSOLUTE CONCENTRATION too

it is a shame our education system considers training in the manual arts along with home economics no longer necessary to the development of our youth

the youngsters take to these types of classes quite well and when taught how to do... the correct way they usually grow up to be more complete/capable adults having less fears though maintaining a healthy respect for the tools materials and processes in life

safety practices learned at early ages stay with individuals forever

as i read this and so many threads in forums the subject of safety rears it's head regularly and more often than not i also read a huge amount of fear instead of respect in the words that are written

at least there is discussion here surrounding safety issues/solutions whereas on some forums there is a total disregard to the subject

sw
"we are the people our parents warned us about" jb
swoody126
500 Club
 
Posts: 769
Joined: Mon Feb 22, 2016 6:11 pm
Location: north of Ft Worth
Top

Re: Tom & Shelly's build

Postby tony.latham » Sat Jun 22, 2019 8:45 pm

But what has us puzzled is Grizzly's suggestion to buy several cartridges!


I've popped mine twice in nearly a decade. It gets your attention.

One was a nail and the other time I couldn't determine causation. I sent the cartridge into Sawstop and they said it was metal.

Tony
User avatar
tony.latham
Gold Donating Member
 
Posts: 6899
Images: 17
Joined: Mon Jul 08, 2013 4:03 pm
Location: Middle of Idaho on the edge of nowhere
Top

Re: Tom & Shelly's build

Postby Tom&Shelly » Sat Jun 22, 2019 10:56 pm

tony.latham wrote:
But what has us puzzled is Grizzly's suggestion to buy several cartridges!


I've popped mine twice in nearly a decade. It gets your attention.

One was a nail and the other time I couldn't determine causation. I sent the cartridge into Sawstop and they said it was metal.

Tony


Ah! Okay, that makes sense. Hadn't thought about nails, or other conductive material.

I ruined a bandsaw blade once cutting a nail. Used to make a lot of "rustic" furniture, which included re-used wood.

Tom
172912 170466
Tom&Shelly
Palladium Donating Member
 
Posts: 2202
Images: 1946
Joined: Tue Sep 05, 2017 3:27 pm
Location: Upstate New York/New Mexico
Top

Re: Tom & Shelly's build

Postby Tom&Shelly » Mon Jul 01, 2019 3:34 pm

So, despite being on Summer vacation, I haven't worked on the tear drop in more than a week! :cry:

No excuses, but a friend in the South Valley offered us some free fire wood. Turned out to be about two cords, which is more than a Winter's worth for our cabin (full time residence)! The only problem is that it takes multiple trips with a Taco and HF trailer to retrieve it all, and it's more than an hour each way through Albuquerque with the trailer, since we can't take it on the interstate. Then there is the problem of getting my HF log splitter to work. Took a day hunting and we never found an adequate fix. May need to spend >$100 to get the local garage to manufacture a copper hydraulic fluid pipe to replace one that HF no longer carries. The mechanic is a friend of ours and is looking for a less expensive alternative (flexible hydraulic pipe?) But anyway, free firewood, even if it needs to be hauled, split, and stacked, is a bargain. And it means I won't have to go out this Fall and cut my own. :applause:

Sad thing is, with the holiday this week, and plans with friends, it'll be another week before I can get back to the tear drop full time.

However, the dowel jig came in:

158662

So this morning I drilled the holes, and this afternoon began gluing up our dresser frame


158663158661

I'll let the glue dry for a few hours, and then glue on the other half.

It seems to come out square, so I think it will work. Not ashamed of the look for my first time. So far, the only edge that doesn't look great is one where there was a knot--the cut seems to be slightly rounded. I'm looking at the professionally made cabinets in our cabin and see one or two like that too--though maybe not quite as apparent as mine.

After it is all glued up, (And after next weekend), I'll put a 1/8" round over in most of the edges, and do what it takes to get it to fit right in the tear drop. By the way, I think I mis-stated the depths of the notches, and resulting tolerance required for the sliding doors: Bottom notches are 3/16", top are 3/8". So my doors should be about 5/16 to 3/8 inches wider than the apertures. Shouldn't be a problem.

After the dresser frame, I need to build a computer shelf for under the lower shelf.

Also plan to add a little detail to the space behind the head board: We want to see if we can make a small bookshelf that will hold a few nature books, camp cookbooks, and the like. The bookshelf is inspired by ones on sailing ships--we'll see if our idea works.

After that, we should be ready to install the ceiling!

Tom
172912 170466
Tom&Shelly
Palladium Donating Member
 
Posts: 2202
Images: 1946
Joined: Tue Sep 05, 2017 3:27 pm
Location: Upstate New York/New Mexico
Top

Re: Tom & Shelly's build

Postby pchast » Mon Jul 01, 2019 7:49 pm

Tom,

Do you know what the pressure is on the splitter
in operation.

I have used high pressure copper and compression
fittings in other situations. Its a simple conversion,
if you have the right thread for the machine.
pchast
Platinum Donating Member
 
Posts: 2026
Images: 97
Joined: Mon Jan 28, 2013 5:47 pm
Location: Athens, NY
Top

Re: Tom & Shelly's build

Postby Tom&Shelly » Mon Jul 01, 2019 9:17 pm

pchast wrote:Tom,

Do you know what the pressure is on the splitter
in operation.

I have used high pressure copper and compression
fittings in other situations. Its a simple conversion,
if you have the right thread for the machine.


Hi Pete,

Short answer is that I don't. They call it a "7 ton" log splitter.

As it happens, my mechanic called right after I posted that, and he had a friend in the business make us a flexible pipe that looks like it will work. Unfortunately, it'll be a few days before we can test it.

Think I need to learn a little about practical hydraulic systems (not just the Physics 1 that--I think--I know now) one of these days. Another thing to work on after retirement!

Tom
172912 170466
Tom&Shelly
Palladium Donating Member
 
Posts: 2202
Images: 1946
Joined: Tue Sep 05, 2017 3:27 pm
Location: Upstate New York/New Mexico
Top

PreviousNext

Return to Build Journals

Who is online

Users browsing this forum: No registered users and 22 guests