Tom & Shelly's build

...ask your questions in the appropriate forums BUT document your build here...preferably in a single thread...dates for updates, are appreciated....

Re: Tom & Shelly's build

Postby Louisd75 » Wed Jul 17, 2019 5:05 pm

Tom&Shelly wrote:Thank you both for the suggestions.

Sharon, maybe I can use the binder clips as springs to make "oversized clothes pins".

Tom


Another idea, along Fishboat's line of thought. Instead of a wing nut I would use a cam lever. It's the same action as a quick release on a bicycle seatpost or wheel:

https://www.mcmaster.com/standard-clamping-handles

The cam lever would have a nice low profile and be less likely to snag.
Louisd75
Teardrop Master
 
Posts: 106
Images: 209
Joined: Wed Jul 17, 2013 4:27 am
Location: Bellingham WA

Re: Tom & Shelly's build

Postby Tom&Shelly » Wed Jul 17, 2019 5:29 pm

We originally planned on simply waxing the oak woodwork in our cabin. But darkening the oak slightly better complements the varnished Baltic birch, and Johnson Wax didn't change the appearance of the oak much at all. Then, in the course of researching whether there is such a thing as tinted wax for wood, Shelly learned wax offers no protection to the wood. (Something directly contradicting what I was told in Jr High School shop, and what is stated explicitly on the Johnson Wax can, but oh well.)

She had this can of danish oil since before we'd met,

158824

and since neither of us like her homemade danishes cooked that way (except for the venerable fry bread, pastries should be baked!) we decided to try it on some scrap wood, and like the result. So, we used it on the book case and dresser frame

158823 158830 158831 158826

So easy to use it is fool proof, although a sufficiently foolish person can tip the can over. Empirical evidence suggests that when Mr Fool does that, and explains to his spouse the unfortunate packaging choice of a container meant to live out its useful life in a meta-stable condition, the spouse is more likely to laugh than exhibit the sympathetic response the Fool expects and possibly even deserves. Incidentally, as far as I know the only company that came to understand this problem, and remedy it in a thoughtful and forthright manner, was Log Cabin Syrup. But that was several generations ago and, alas, the lesson was not passed on. But I digress.

Only lost a portion of the oil, and there was no significant damage done. (The layout table looks so nice I may have to oil the rest of it.)

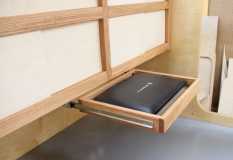
Wanted to mostly finish the interior before starting on the headliner, and the last thing was a slide-out shelf for a computer. A design issue here is that we plan (at least initially) to use an 8 inch tall modified futon mattress, and are getting short of vertical foot room. With that in mind, as I measured the laptop computer we intended to use, I realized the DVD player, when open, extends the required width by five inches. So Shelly suggested we just go out and buy a DVD player. We lose the possibility of logging onto the interwebs to research areas of interest, but we can (when in cell or wi-fi range) do that with her telephone. (Mine is one of those antique flip-phones. So old it has a hand crank to reach the operator.)

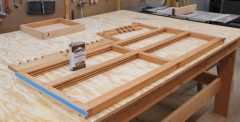
I made the sides of the slide-out shelf (really a shallow drawer) out of oak, and joined the corners using dowel joints.

158825

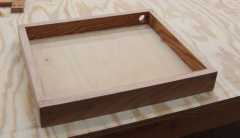
Can't use my particular doweling jig on the front or back for this application, so I drilled the ends and attempted to use some doweling points to mark where to drill the sides. I bought the points in the same package that included the 1/4" bit for drilling the dowel holes, but the points didn't fit, and I had to drill out the holes to 5/16". That made the whole thing a little wiggly, but it turned out okay. I notched the oak with a 1/4" router up-cut bit (in a router table) and used a piece of scrap 1/4" Baltic birch, with one side already fiber glassed, as the floor. (The piece was cut from one of the sides for a cargo door.)

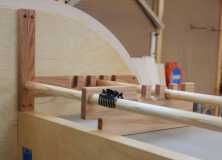
We won't paint the top of the floor, but will likely put a rubber mat in there to mitigate damage if the DVD player bounces around. I varnished the bottom of the floor for protection.

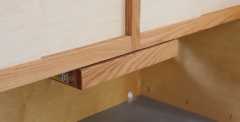
Think I might have designed this better, as one can see the sliders from the sides and front. Might be an improvement down the road, after we start using the teardrop.

158827 158828

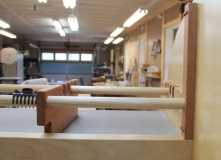
The DVD player just fits. Perhaps I should have made the drawer deeper--there would have been room behind the player for small items, like a rubber snake in case we ever get to go camping in Idaho.

158829

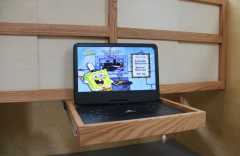
The player will offer us the opportunity to watch DVDs of places of interest we plan to go, and to catch up on superior programs of high intellectual content

158832

Tom
172912 170466
Tom&Shelly
Palladium Donating Member
 
Posts: 2202
Images: 1946
Joined: Tue Sep 05, 2017 3:27 pm
Location: Upstate New York/New Mexico

Re: Tom & Shelly's build

Postby S. Heisley » Wed Jul 17, 2019 6:16 pm

Tom&Shelly wrote:Thank you both for the suggestions.

Sharon, maybe I can use the binder clips as springs to make "oversized clothes pins".

Tom


:thinking: Most binder clips are metal; so, please watch for rusting. But, there is a lot you can do with those little devils, clip potato chip bags, hold folded data wires, etc.
User avatar
S. Heisley
Super Lifetime Member
 
Posts: 8774
Images: 495
Joined: Mon Sep 17, 2007 10:02 am
Location: No. California
Top

Re: Tom & Shelly's build

Postby Tom&Shelly » Fri Jul 19, 2019 5:27 pm

Haven't done much the past few days: Took care of some minor detail work, thought a lot about how I'll run the wiring (which I'll do after putting on the ceiling liner), etc.

Previously, I'd ripped some 1 1/2" pieces of 3/4" poplar to use as spars, so I glued them together to make 1 1/2" by 1 1/2" pieces. I'll cut them to length as I install them after the liner is on. I also glued the pieces of 1/8" Baltic birch together for the liner

158833

Don't have enough ammo to weigh the joint down, so had to resort to our shop standby. The cat is worth her weight in gold to keep the cabin rid of vermin, but if I had the gold I could use that for weight.

The factory edges of the two sheets of BB didn't align to my satisfaction, so I clamped them above the table with scrap 3/4" ply spacers, with the BB edges 1/4" apart, set up a straight edge guide, and ran the router with 1/2" trim bit taking off about 1/8" from each sheet. Now the edges match nicely. The join line will be above our heads, but will probably be broken up by the fan.

Tom
172912 170466
Tom&Shelly
Palladium Donating Member
 
Posts: 2202
Images: 1946
Joined: Tue Sep 05, 2017 3:27 pm
Location: Upstate New York/New Mexico
Top

Re: Tom & Shelly's build

Postby Tom&Shelly » Tue Jul 30, 2019 5:57 pm

We've been distracted by non-teardrop and peripherally teardrop related activities the past two weeks, but finally finished the headliner, and installed it this afternoon

158914 158915 158916

158917 158918 158919 158920.

We used TB 3 for glue, with staples and the blocks and clamps you see to hold it in place.

We got a little sloppy with the glue, and I'm afraid we left a little film on the galley side of the bulkhead. Not sure off hand what we'll do about it. It doesn't show in the picture, so may not be too noticeable. One theme of this build is that if I'd known how well this would come out, I would have done a much better job! :)

Next step is to cut the struts to size and install them. Then run the electrical cables, and then install the foam insulation. I go back to work on Monday and hope to have most of that in hand by then.

The roof comes after that. We decided 1/8 inch Baltic birch is enough, and we'll fiber glass it in place after the temperatures cool this Fall. I'll finish the hatch and work on the galley in parallel.

So, that's my teardrop build news; only read on if you are interested. The peripherally teardrop related activity involves where we plan to store it. We live on the side of a hill, with a cabin size pad carved out about 12 years ago. Last week we invited our builder to come out and see what it would take to carve another pad for a three car garage. (Then we take the garage under the cabin and use all of it for a wood shop.) However, the cost of cutting another pad makes that idea a non-starter.

However, our builder did offer us some scrap trim he wanted to get rid of! Free wood! :P Some of it is oak, so we'll probably cut and route it for the cabin and galley trim in the teardrop.

The negative result of our garage idea then led me to call a realtor who has been trying to sell a flatter lot below us for many years. To our surprise, she lowered her price, so now we're in the process of buying that for a garage.

However, right after we put down the earnest money, we found out the county won't permit a garage alone on a lot. So our solution to that (we hope) will be to re-plat and commit "lot line removal". Luckily, some of the worthless land I own between the cabin and the flat lot adjoins, so we can make it all one lot. (Incidentally making the amalgam worth more--I think.) Thought this would be a BIG bureaucratic headache, but the initial response from the zoning folks seems positive.

Anyway, we bought a Taco to tow the teardrop, a lot to garage it, but this project isn't taking over our lives, or anything like that. One of these days, we'll even get it finished and, hopefully, use it! :beer:

Tom
172912 170466
Tom&Shelly
Palladium Donating Member
 
Posts: 2202
Images: 1946
Joined: Tue Sep 05, 2017 3:27 pm
Location: Upstate New York/New Mexico
Top

Re: Tom & Shelly's build

Postby Tom&Shelly » Fri Aug 02, 2019 3:32 pm

Cut the spars to size and have them screwed (temporarily--except for three right now) to the teardrop

158940 158937 158939

Glued the one right above the front bulkhead in (with TB 3) the other day to help hold the head liner down.

I glued the next spar above that using PL Premium. Wanted to use the tube left over from putting up the walls last February, but it appears to have dried. Found an unopened tube that we bought last Summer, so it should be near the end of its life. Came out a little stiff but usable. (Is it supposed to have such low viscosity? The stuff we used in February also was pretty stiff. We'd just bought it, but who knows how long it sat at Lowes. My caulk gun is pretty cheap and makes using low viscosity glues and caulks a chore.)

I like the PL Premium for vertical applications; on vertical surfaces TB 3 runs. But PL Premium expands as it dries, and we're a little afraid it will push the surfaces apart even against nails, so we'll probably use TB 3 for the struts higher on the roof. We plan to glue and then pin the headliner using the 23 ga nailer. I'm going to wait until Shelly has time this weekend to help with that operation.

Thank you, Tony, for the idea to use a trouble light to see the spars in the cabin--works great!

I also finished the oak spar--the last one that shows in the galley and holds the hatch hinge. It's two pieces of oak glued together with a step for the edge of the head liner.

One trick there was cutting the notches for the electrical cables. If I'd thought about it more, I would have designed this differently, but I drilled half inch holes partway into each side and finished with chisels

158936

Seems like cutting into the support beams in a house, but I suppose it'll still be strong enough.

Eight cables back there: AC power to the air conditioner in the front, Two 10 AWG cables for the two USB ports in the headboard, an 18/6 cable for the trailer lights, a 10 AWG cable for the brakes, and another for charging the battery from the tow vehicle, a 14 AWG cable for the fan and one more for the dome and porch lights. (Rustic camping!)

After cutting the notches and verifying that the cables can be pushed through, I oiled the parts of the spar that show and glued it down using PL Premium. There is a gap between the headliner and spar on the forward side due to the angle of the spar, so I put more PL Premium at that gap and pushed it in using an old credit card. In the third picture, above, you can see the glue expanding and pushing back out. With that glue job and the roof, the spar should be stiff enough for the hatch hinge, even with the notches for cables. :worship:

158938

Tom
172912 170466
Tom&Shelly
Palladium Donating Member
 
Posts: 2202
Images: 1946
Joined: Tue Sep 05, 2017 3:27 pm
Location: Upstate New York/New Mexico
Top

Re: Tom & Shelly's build

Postby tony.latham » Fri Aug 02, 2019 4:08 pm

One trick there was cutting the notches for the electrical cables.


Holy-smolly! That was a deed, fer sure.

I'm a dado guy, myself.

Image

Three spars at a whack! :thumbsup:

Tony

Me? I'm working on my third brake light base.
User avatar
tony.latham
Gold Donating Member
 
Posts: 6900
Images: 17
Joined: Mon Jul 08, 2013 4:03 pm
Location: Middle of Idaho on the edge of nowhere
Top

Re: Tom & Shelly's build

Postby Tom&Shelly » Sat Aug 03, 2019 7:07 pm

tony.latham wrote:
One trick there was cutting the notches for the electrical cables.


Holy-smolly! That was a deed, fer sure.

I'm a dado guy, myself.

...

Three spars at a whack! :thumbsup:

Tony

Me? I'm working on my third brake light base.


For the poplar spars, I just drilled holes. It was the desired 90 degree turn in the middle of the oak spar that took the work. If I owned a dado blade, I probably would have done the poplar spars your way. :thumbsup:

Tom
172912 170466
Tom&Shelly
Palladium Donating Member
 
Posts: 2202
Images: 1946
Joined: Tue Sep 05, 2017 3:27 pm
Location: Upstate New York/New Mexico
Top

Re: Tom & Shelly's build

Postby Tom&Shelly » Sat Aug 03, 2019 7:38 pm

Framed the overhead fan/vent this morning, then debated where to put the blocking for the dome light. Shelly thought closer to the dresser, I thought maybe a bit further away. Decided it was time for a practical experiment. Needed darkened conditions:

158949 158951

While I was at it, it seemed like a good time to test the Climate Right. (It was in the 90's outside, and in the 80's in the garage. Have I ever mentioned we have no air conditioning in our house?)

Gotta admit, it reminded me of 50 years ago when I went to the Moon with Armstrong and Aldrin (at age 7)! Shelly was out when I started, and I thought about a (joking) "no grils allowed" sign; but when she got home I let her join me. Here is the control panel

158954

The main instrument read

158953

at the start. It went up to 88 before going down, partly due to astronaut exertion taping the light to the ceiling, and partly because I had the Climate Right in heat mode, before Mission Control notified me of the error and I took proper corrective action.

At 40 minutes into the experiment, with two astronauts, we had reached a comfortable

158956

when the Climate Right shut itself off with an E-3 error. A quick check of the in-flight manual revealed this to be a compressor freeze warning. Perceiving no way to correct this without an EVA, we terminated the experiment.

It isn't quite a realistic experiment since we don't have the fan installed, nor the window vents in the doors. We'll try again after those are installed.

At the time, we were recirculating the cabin air (note the hoses)

158952

so a quick solution may be to take in air from the utility closet (with access door open). We could also experiment with the air hoses. With the air recirculated from the cabin, our intake and output are pretty close, which likely contributed to the problem.

158958

One other thing we noted is that the Climate Right controls are nearly impossible to read where they are located, but we should be able to use the remote, as there is a sensor on those controls.

Upon leaving the capsule, er..teardrop, we noted the AC waste water drainage system worked as planned

158957

interesting that it was humid enough to generate that much. We did have a thunderstorm approaching.

In the other experiment, we found the lights work fine, and are bright enough it won't make too much difference

158955

(Ya, okay, how do you take a picture of a lit light?) Moving them a little away from the dresser actually improves the lighting for the lower shelf.

Tom
172912 170466
Tom&Shelly
Palladium Donating Member
 
Posts: 2202
Images: 1946
Joined: Tue Sep 05, 2017 3:27 pm
Location: Upstate New York/New Mexico
Top

Re: Tom & Shelly's build

Postby Tom&Shelly » Sun Aug 04, 2019 8:12 pm

Today I cut the holes in the ceiling for the fan and for a "junction box" behind the dome light. (I'll run power to the dome light and will use that same circuit for the two porch lights.)

158964 158963

At first, I tried cutting from the bottom up, using a cutter bit and a Dremel Tool freehand. Worked (slowly) for about an inch before the wood started smoking! Decided the jig saw from the top, while perched on a ladder, with some of my weight supported by the spars, was a better solution.

Found out later I may have used the bit intended for drywall. As I thought back, the last time I used that stupid tool was to cut a hole for an outlet box in drywall. Then, the bit cut right through the plastic electrical box behind the drywall. Got me thinking :thinking: Both times, Shelly handed me the bit and I didn't question. So I asked how she could tell the general cutting bit and drywall cutting bit apart. She did it by compared them against nearly identical drawings in the instructions. But, I noticed, both drawings were mirror images of the correct corkscrew, so I suspect the instructions screwed up the drawings pretty badly. The bits came together in some sort of kit with no labeling. Dremel really should have thought that through a lot better.

Anyway the jigsaw worked fine. Glad Shelly convinced me to cut the holes before we glued the spars to the headliner. I was ready to do it the other way around and use the router with a pattern bit against the spars to cut the holes. This way, we were able to use the holes to clamp the headliner. The cuts aren't quite as neat as they would have been, but the dome light will cover one, and the fan bezel will cover the other.

Incidentally, if you look closely at the fan frame, I notched the cross pieces to match the wood joining the headliner seam. Did that with the bandsaw free hand. Still my favorite tool, though the blade may need replacing after I used it last week to (unsuccessfully) convert a role of 1 inch masking tape into two rolls of 1/2 inch tape. Blue tape dust and masking tape glue all over the blade and innards of the machine! But, not all experiments will be successful :roll:

So after cutting the holes, we glued the spars to the headliner using TB 3. Where the clamps didn't reach, we used the 23 gauge pin nailer, but the nails tended to pull out in some places. That's another tool I was disappointed with. Some Youtube reviewers said the nails had miniature barbs, which is simply not true. Anyway, there are a few areas where the spars aren't attached to the headliner. We will glue foam to the headliner and then cut it all flush and glue on the roof. Hopefully that will make the structure strong enough.

Back to work tomorrow after Summer break. :disappointed: Can't wait for full retirement (end of the year!) :relaxing:

Tom
172912 170466
Tom&Shelly
Palladium Donating Member
 
Posts: 2202
Images: 1946
Joined: Tue Sep 05, 2017 3:27 pm
Location: Upstate New York/New Mexico
Top

Re: Tom & Shelly's build

Postby tony.latham » Sun Aug 04, 2019 9:20 pm

Fine work.

I used a bottom bearing router bit for that dirty deed. From inside looking up.

When I was done I had to step outside and shake like a wet dog.

T


Sent from my iPad using Tapatalk
User avatar
tony.latham
Gold Donating Member
 
Posts: 6900
Images: 17
Joined: Mon Jul 08, 2013 4:03 pm
Location: Middle of Idaho on the edge of nowhere
Top

Re: Tom & Shelly's build

Postby Tom&Shelly » Mon Aug 05, 2019 7:31 pm

tony.latham wrote:Fine work.

I used a bottom bearing router bit for that dirty deed. From inside looking up.

When I was done I had to step outside and shake like a wet dog.

T


Sent from my iPad using Tapatalk


Thank you Tony!

I thought about doing it that way, but the idea of holding a heavy, running, router over my head didn't appeal. That's what made me think of the light Dremel tool. In hind sight, I should have made sure I had the right bit, and I think it would have worked just fine. With the jig saw, I did have a little tear out, but fortunately not enough to show around the fan bezel.

When we cut the fan hole in the roof (and I have to remember NOT to cut a hole in the roof for the junction box!) I'll probably do it from the top with the router and bottom bearing bit.

Tom
172912 170466
Tom&Shelly
Palladium Donating Member
 
Posts: 2202
Images: 1946
Joined: Tue Sep 05, 2017 3:27 pm
Location: Upstate New York/New Mexico
Top

Re: Tom & Shelly's build

Postby nicoleandkyle » Wed Aug 07, 2019 1:30 pm

I really love your build! I wanted to say thank you for all of the details you wrote here about your hatch. You answered a lot of my questions as we're working on our hatch currently

Sent from my SM-N950U using Tapatalk
nicoleandkyle
Teardrop Advisor
 
Posts: 88
Joined: Sun Dec 23, 2018 6:45 am
Top

Re: Tom & Shelly's build

Postby KTM_Guy » Wed Aug 07, 2019 5:37 pm

I’m going to let you in on a little Secret. You tell the better half that the “ best way to cut the fan opening is from the inside with a flush trim bit. (Like Tony said) But my router is to big and it wouldn’t be safe. But a small router or laminate trimmer would work perfect, and be so much safer. And it would really come in handy for other things”.

Works going the other way too. “Remember that big router bit I bought for X project? I don’t think it is safe to use in my router. Think I might need a 3 HP router to run it safe.”

I have more routers than my wife has pairs of shoes. :lol:

Todd

PS keep up the good work. Looking great.
User avatar
KTM_Guy
500 Club
 
Posts: 571
Images: 193
Joined: Sun Mar 05, 2017 7:50 am
Location: Mesa, AZ near Usery
Top

Re: Tom & Shelly's build

Postby Tom&Shelly » Wed Aug 07, 2019 7:18 pm

nicoleandkyle wrote:I really love your build! I wanted to say thank you for all of the details you wrote here about your hatch. You answered a lot of my questions as we're working on our hatch currently

Sent from my SM-N950U using Tapatalk


Thank you! Glad our posts helped!

Enjoying watching your build as well.

Tom
172912 170466
Tom&Shelly
Palladium Donating Member
 
Posts: 2202
Images: 1946
Joined: Tue Sep 05, 2017 3:27 pm
Location: Upstate New York/New Mexico
Top

PreviousNext

Return to Build Journals

Who is online

Users browsing this forum: Exabot [Bot] and 40 guests