Tom & Shelly's build

...ask your questions in the appropriate forums BUT document your build here...preferably in a single thread...dates for updates, are appreciated....

Re: Tom & Shelly's build

Postby Tom&Shelly » Tue Jun 30, 2020 3:44 pm

The rubber rain guard showed up last week, and we think it might have worked as a rain guard above our doors, except it didn't come out far enough, and rain would have gotten on top of the doors' seals and ran in when we opened them. So we went back to the aluminum rain caps from Challenger door. (We'll still use the rubber rain guard on the bottom of our hatch. I'll show that when we apply it.)

162346 162347 162348 162349

I filed the ends a little rounder so, hopefully, they won't catch on our clothes or tear our skin. If necessary, we'll put a dab of sealant on them.

If you look close you'll notice two types of screws on there. The smaller are number 6 stainless (painted black) machine screws that I used to fill the pre-drilled holes, which were nearly right on top of the pre-drilled holes Challenger put in to hold the door to the teardrop. The larger screws are stainless wood screws (also painted black) in holes I carefully drilled to avoid the holes that hold the door on the teardrop.

The problem (did I mention there was a problem?) is that I picked the locations for these holes about a week after I installed the bezel that goes around the doors on the inside. "8 inches from the center seems about right," I said to myself, two weekends in a row. (See Tony, I also occasionally write dialog--or is it monologue?) One problem with talking to myself is that about half the time I know what I'm going to say next. The other problem is that I don't always listen! "shi*!!" I said next. :x (That's one of the times when I knew what I was going to say.)

Actually, I got away with it on three of the four screws. On the fourth one, I drilled right into a screw going the other way, holding the bezel in. My solution was to cut the bezel screw short with a hack saw. Soon, we will seal the doors with butyl tape, and so no rain should get in the screw hole. If it does, instead of eventually rotting the wood, it may run right into the teardrop and drip on Shelly. (It's on her side of the cabin.) Then she will encourage me to find a better solution!

Tom
172912 170466 173366
Tom&Shelly
Palladium Donating Member
 
Posts: 2219
Images: 2021
Joined: Tue Sep 05, 2017 3:27 pm
Location: Upstate New York/New Mexico

Re: Tom & Shelly's build

Postby Tom&Shelly » Tue Jun 30, 2020 4:01 pm

Yesterday I applied some trim around the clothes cabinet in the cabin

162344 162343

Back when I built the cabinet frame, I carefully left a quarter inch on the sides un-oiled so I could glue trim on. Why I didn't do that for the top, I don't remember. Shelly suggested a solution from someone on a doll house forum: I carefully drilled 1/32" holes into the cabinet frame along the top edge where the trim was to go. I then cut off the heads on some wire nails and glued them into the holes, pointy side out, with 5 minute epoxy.

That piece of trim had to be bent slightly, to match the small bend in the ceiling. I did that and pressed to make impressions of the nails on the back of the trim. I then drilled 1/32" holes, 1/8" deep into the (1/4" thick) trim. Glued it on with 5 minute epoxy and it's now doing fine. Then I held some more of the trim stock I'd made up to each corner, marked it, and cut them by eye, using the bandsaw. Came out okay, if I do say so myself. Anyway, I'm satisfied

162345 162342

I oiled them and glued them on with Raka epoxy left over from the fiber glass work. Hope they hold up to the bouncing and flexing. If not though, that's the least critical thing on the teardrop.

This morning, I added the coat hooks. Next step is to take off the doors, and muscle in the mattress. (Modified by Shelly from my bachelor's guest bed/futon.) Then, except for the maps on the cabinet doors, the cabin will be finished!

On to the hatch and galley!

At least Cabin Fever is mitigating it's name-sake by giving me something to do over the 4th of July! First time since 2008 I haven't been up in Gunnison helping our friends at the balloon rally (canceled this year).

Tom
172912 170466 173366
Tom&Shelly
Palladium Donating Member
 
Posts: 2219
Images: 2021
Joined: Tue Sep 05, 2017 3:27 pm
Location: Upstate New York/New Mexico

Re: Tom & Shelly's build

Postby Tom&Shelly » Tue Jun 30, 2020 4:11 pm

Shelly was playing around with the cabin doors, trying to get them to close a little more quietly, when she noticed these wedges round the door, lightly glued on. We think they were just there for shipping. (Now that I think of it, I seem to remember something someone said about removing them....)

162351

Anyway, they are neat wedges. I need about a thousand drawer small parts bin for my shop, to hold these, the other 73 stainless screws I bought because I needed two, and so forth!

Tom
172912 170466 173366
Tom&Shelly
Palladium Donating Member
 
Posts: 2219
Images: 2021
Joined: Tue Sep 05, 2017 3:27 pm
Location: Upstate New York/New Mexico
Top

Re: Tom & Shelly's build

Postby tony.latham » Tue Jun 30, 2020 7:27 pm

On to the hatch and galley!


Oh! The suspense is killing me! :thumbsup:

Tony
User avatar
tony.latham
Gold Donating Member
 
Posts: 6904
Images: 17
Joined: Mon Jul 08, 2013 4:03 pm
Location: Middle of Idaho on the edge of nowhere
Top

Re: Tom & Shelly's build

Postby Tom&Shelly » Wed Jul 01, 2020 12:45 pm

We put the mattress in this morning

162353 162354

162355 162356 162357

Oh! This is dangerous! Now, I won't even have to walk upstairs from the shop to take a nap! :shock:

I should spend this afternoon sealing the doors and re-attaching them, but instead will probably have to spend it cleaning that room where we stored the futon. We had it under that bed we rolled it up on, and I had to take a lot out of that rather small bedroom to make room to do it. It was pretty dusty in there. (BTW, that bed is an example of the woodworking I did before we decided to build a teardrop.)

Anyway, it rolled right up, and we had no trouble getting it in. Would have gone in fine even with the doors on. I left the bezel ring on, and just put a piece of masking tape around the sharp gap. Once in, we had no trouble taking the straps off, and it fits perfectly. (Shelly thought through and supervised this operation.)

We took off our shoes, and had plenty of foot room. I think we could have even put two more drawers in on either side of the DVD drawer, but Shelly likes it as is. Someday I may add a shallow drawer to my side for wallet and other stuff from my pockets at night.

Three or four inches of head room when sitting up on the mattress. It's still thick enough that we don't hurt our thighs while getting in and out.

Shelly plans on making curtains, and we'll need some sort of curtain rods on the doors. She also plans on sewing a top sheet to a bottom fitted sheet to make bed making easier. Then she also has ideas for a back rest so we can sit up more comfortably.

Someday I may take the air conditioner panel, put it on a hinged board, and turn it around, so we can flip it up to make it easier to see. May not be a problem anyway since it also has an electric eye for the remote.

Tom
172912 170466 173366
Tom&Shelly
Palladium Donating Member
 
Posts: 2219
Images: 2021
Joined: Tue Sep 05, 2017 3:27 pm
Location: Upstate New York/New Mexico
Top

Re: Tom & Shelly's build

Postby ricky herbold » Thu Jul 02, 2020 10:10 pm

Graniterich wrote:I had the same problem, redrilled holes, but was disappointing. How are yours closing? The last ones I got you have to lean your shoulder into to close all the way, barely doable from the inside. Had to remove striker plate. Any issues on your end?

Sent from my KFKAWI using Tapatalk


I had the same problem. I took the strike plates off and flattened them getting rid of the small offsets. Now they shut so nice. I used a vice with smoothie face jaws to squeeze them flat.
ricky herbold
Teardrop Master
 
Posts: 124
Images: 0
Joined: Sat Jul 27, 2019 6:14 am
Location: Spring Valley Lake CA.
Top

Re: Tom & Shelly's build

Postby Tom&Shelly » Wed Jul 08, 2020 6:26 pm

ricky herbold wrote:
Graniterich wrote:I had the same problem, redrilled holes, but was disappointing. How are yours closing? The last ones I got you have to lean your shoulder into to close all the way, barely doable from the inside. Had to remove striker plate. Any issues on your end?

Sent from my KFKAWI using Tapatalk


I had the same problem. I took the strike plates off and flattened them getting rid of the small offsets. Now they shut so nice. I used a vice with smoothie face jaws to squeeze them flat.


Thank you Ricky. Shelly wasn't entirely happy with the way the doors shut, so we may try that.

Tom
172912 170466 173366
Tom&Shelly
Palladium Donating Member
 
Posts: 2219
Images: 2021
Joined: Tue Sep 05, 2017 3:27 pm
Location: Upstate New York/New Mexico
Top

Re: Tom & Shelly's build

Postby lfhoward » Wed Jul 08, 2020 6:44 pm

Really like your trailer design. It's exciting to get the mattress in! It just gets that much more real. You'll be camping in no time! :thumbsup:

One thought on the curtains: You don't necessarily need a curtain rod. My wife made us curtains with velcro stitched into their edges so they can be applied right to the window frame. It's pretty foolproof.
My off-road camper build on an M116A3 military chassis:
http://www.tnttt.com/viewtopic.php?f=50&t=62581
Tow vehicle: 2008 Jeep Liberty with a 4 inch lift.
User avatar
lfhoward
1000 Club
1000 Club
 
Posts: 1370
Joined: Wed Jan 22, 2014 6:10 pm
Location: Philadelphia, PA
Top

Re: Tom & Shelly's build

Postby Tom&Shelly » Wed Jul 08, 2020 7:14 pm

Finished the hatch wiring this afternoon (except for a few details).

Here are what the lights on the hatch look like

161918

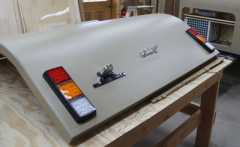
Note there are essentially nine lights: left running light, left brake light, left turn light, left backup light, license plate light, right... you get the idea. Oh wait, then there is the center brake light and center running light, and, on the other side of the hatch, a dome light (on an entirely different electrical system). Once I finally sat down and thought about this, I realized the wiring could be a real mess! :o

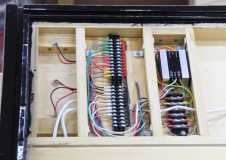
I could have just soldiered the wires together, or crimped them, but all of the grounds have to go together, and there are four wires connected together for running lights, etc. So I chose to use terminal blocks. Here is the result. Looks like some of the comm closets in buildings I've worked in

162448

A bit complicated looking, but I'm pleased with how neat it came out. I'll have a Baltic birch panel that hides it all.

162446 162447

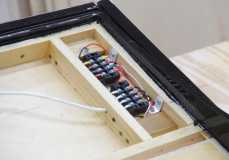
The color coding was a slight challenge. I'm using 6-18 gauge cable that has one less wire and different color wires than the trailer standard. Then, the lights have red and black leads, where black is ground, except the running light which shares a black ground and has a white +12 lead. The license plate light, on the other hand has a white ground and a black +12 volt lead. So I color coded the heat shrink on each ring stud instead. Mostly I tried to keep the shrink colors the same as the trailer standard. However, the little box on the left of the picture (and left of the hatch) converts the left turn/brake and right turn/brake inputs into separate outputs for the amber left and right turn and the brake lights. I decided to use burnt orange shrink for one of the turn signals, and yellow with green stripes for the other, because those are the colors I had left. I used red again for the brake light.

For the trailer fan and lights that run off of the battery, I generally use black for ground and red for +12 volts, but for this dome light, since it shares the ground with all the other hatch lighting, I just used white heat shrink for ground. Actually I didn't mean to, but it was late and I was a little confused! :?

In fact, re-reading the last two paragraphs, I realize it was probably very confusing, and unnecessarily detailed for you, the reader. Tell you what, just skip over those and let's move on. :thumbsup:

I mounted the terminal strips and turn signal/brake converter box on scraps of 1/4 inch plywood that I'd varnished for waterproofing. I cut the aluminum angles from some scrap--they hold the plywood in place. I also made the aluminum straps that hold the converter box. It came with no ears for screwing in, but just some double sided tape.

The terminal strips on the left came with black and red buss bars with spade lugs. I used one for ground (black bar). The other I used where I needed multiple lights connected together, and to separate the groups I simply cut the red bar with dikes.

I used ring lugs for the wires. I couldn't find a suitable set for soldiering, so instead used crimp style, cut the plastic off, and pinched and soldiered. Dad taught me to soldier when I was 4 years old, and I would hate to have that training go to waste!

I'm hoping these terminal connections hold up to some hard travel. I'd hate it if we were, say, on the middle of the trans-Labrador highway and have a turn signal go out!

The dome light in the hatch is the same style as the one in the cabin, so I used the same connector, a T-30. In the unlikely event one did fail, we could swap them out so the more useful position had light.

162449

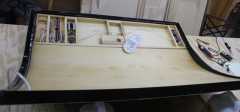
The only other potential issue is whether all this is so heavy we'll need heavier struts on the hatch. Fortunately, I do have a secret weapon

162450

I hate working with upsidasium. you can make it heavier by filing it down, but the dust tends to get into the eyes, and it makes a mess on the ceiling!

Tom
172912 170466 173366
Tom&Shelly
Palladium Donating Member
 
Posts: 2219
Images: 2021
Joined: Tue Sep 05, 2017 3:27 pm
Location: Upstate New York/New Mexico
Top

Re: Tom & Shelly's build

Postby lfhoward » Wed Jul 08, 2020 7:18 pm

That is the neatest wiring job I've ever seen! :applause:

If a turn signal goes out, it's definitely just the bulb.
My off-road camper build on an M116A3 military chassis:
http://www.tnttt.com/viewtopic.php?f=50&t=62581
Tow vehicle: 2008 Jeep Liberty with a 4 inch lift.
User avatar
lfhoward
1000 Club
1000 Club
 
Posts: 1370
Joined: Wed Jan 22, 2014 6:10 pm
Location: Philadelphia, PA
Top

Re: Tom & Shelly's build

Postby pchast » Wed Jul 08, 2020 9:25 pm

That's a nice clean job Tom. It makes it much easier to
trouble shoot and trace.

Well Done :thumbsup:
pchast
Platinum Donating Member
 
Posts: 2029
Images: 97
Joined: Mon Jan 28, 2013 5:47 pm
Location: Athens, NY
Top

Re: Tom & Shelly's build

Postby noseoil » Thu Jul 09, 2020 7:28 am

Nicely done & the proverbial 10# of $hit in a 5# bag, but hey, it works! It's amazing how much thought, patience, time & work it takes to make a hatch that works & looks deceptively simple when it's done. What type of conduit are you using for the hatch/galley hinge point?

I had a similar situation with my hatch & made a small copper plate as a grounding buss for the lights, etc. There were 4 more wires (for the speakers on the hatch underside) but at that point it's in for a dime, in for a dollar.

You guys are doing a great job on this build, can't wait to see it rolling down the road & truckin' to a campsite!
Build log: viewtopic.php?f=50&t=60248
The time you spend planning is more important than the time you spend building.........

137905
User avatar
noseoil
1000 Club
1000 Club
 
Posts: 1820
Images: 669
Joined: Sun Apr 27, 2014 8:46 am
Location: Raton, New Mexico, living the good life!
Top

Re: Tom & Shelly's build

Postby Tom&Shelly » Thu Jul 09, 2020 9:33 am

Thanks all! My Dad always did things as neatly as possible on his projects. Think he would have appreciated how well this one came out. Shelly and I are pleased with it.

Tom
172912 170466 173366
Tom&Shelly
Palladium Donating Member
 
Posts: 2219
Images: 2021
Joined: Tue Sep 05, 2017 3:27 pm
Location: Upstate New York/New Mexico
Top

Re: Tom & Shelly's build

Postby Tom&Shelly » Thu Jul 09, 2020 10:00 am

noseoil wrote:Nicely done & the proverbial 10# of $hit in a 5# bag, but hey, it works! It's amazing how much thought, patience, time & work it takes to make a hatch that works & looks deceptively simple when it's done. What type of conduit are you using for the hatch/galley hinge point?


Thanks Tim! The hatch/galley interface was going to be my project this morning, except I had to take a break, on orders from higher authority, to help clean the cabin. (There is a fire in the Manzanos uncomfortably close to some friends, and if they evacuate we have house guests for a few days.)

I have the same 6-18 cable going through a rubber tube to a point near the hatch hinge, on the left side. I plan to attach a female TRW connector (from a surplus store) which will connect to a panel mounted male side, which I plan to mount on the electrical cabinet in our galley.

I plan to build that cabinet on top of the galley counter, out of 1/4" and 1/8" Baltic birch. It will hold the PD 4045 AC/DC converter, the battery monitor, and some AC and DC outlets for use in the galley. That'll be another wiring challenge, since there will be three electrical systems converging in there. That'll probably be the last big job before we're finished.

noseoil wrote:You guys are doing a great job on this build, can't wait to see it rolling down the road & truckin' to a campsite!


Neither can we! :)

Tom
172912 170466 173366
Tom&Shelly
Palladium Donating Member
 
Posts: 2219
Images: 2021
Joined: Tue Sep 05, 2017 3:27 pm
Location: Upstate New York/New Mexico
Top

Re: Tom & Shelly's build

Postby Tom&Shelly » Thu Jul 09, 2020 4:01 pm

Finished that little job

162452 162453

When I tested it out, I put voltage on the running lights and the backup lights came on, put voltage on the turn signal, and the brake lights started flashing, and when I put voltage on the backup lights, the utility sink in the back of the shop started running! :thinking:

Nah, just kidding, of course. Actually, that's a joke from a Red Skelton skit circa 1954. He wrote a skit in which he put together a small camper kit, and I'm actually a little surprised that fact never seemed to make it into the small camper histories here, or elsewhere on the web.

Wanted to mention: I used some of the Masterseal NP-1 to seal up the holes where the wires come in, for waterproofing. Seems to work real well, and it sticks to varnished wood! Therefore, I'm planning to use it as a strain relief for some of the cables in the hatch, that run through the vertical struts.

Tom
172912 170466 173366
Tom&Shelly
Palladium Donating Member
 
Posts: 2219
Images: 2021
Joined: Tue Sep 05, 2017 3:27 pm
Location: Upstate New York/New Mexico
Top

PreviousNext

Return to Build Journals

Who is online

Users browsing this forum: No registered users and 5 guests