Building lil' Woody

...ask your questions in the appropriate forums BUT document your build here...preferably in a single thread...dates for updates, are appreciated....

Re: Building lil' Woody

Postby Tukanu » Sun Sep 22, 2019 8:43 am

tony.latham wrote:
The trim pieces for one of the sides are fitted.


Looking great. Did you mill ribs into the horizontal pieces?

Tony

No, I came across those pieces at our local specialty wood store. I went there to buy some plain 1x4's and found these nice pieces for less than the cost of the plain pieces....go figure.
Building lil' Woody: viewtopic.php?f=50&t=71953
User avatar
Tukanu
Teardrop Advisor
 
Posts: 81
Images: 0
Joined: Thu Jun 27, 2019 2:45 pm

Re: Building lil' Woody

Postby tony.latham » Sun Sep 22, 2019 10:35 am

[quote]...at our local specialty wood store..[/quote

It should make for a nice touch. :beer:

T
User avatar
tony.latham
Gold Donating Member
 
Posts: 6899
Images: 17
Joined: Mon Jul 08, 2013 4:03 pm
Location: Middle of Idaho on the edge of nowhere

Re: Building lil' Woody

Postby Tukanu » Tue Sep 24, 2019 8:35 am

The side has been stained with red/brown aniline dye. The store where bought the dye suggested sealing the plywood with shellac before staining in order to avoid blotchiness. I contacted WEST epoxy to see if this was a good idea. They said CERTAINLY NOT ! The shellac will prevent the saturation coats of epoxy from sinking into the plywood and maple. Glad I called them first. The red color will deepen when the saturation coats of epoxy are applied. WEST also suggested a tinted spar varnish to give a vintage look.

In the photo you can see the maple has been masked off as the pieces are epoxied into place…I count 25 clamps in this photo!
Attachments
Red dye.JPG
Red dye.JPG (40.86 KiB) Viewed 3476 times
Building lil' Woody: viewtopic.php?f=50&t=71953
User avatar
Tukanu
Teardrop Advisor
 
Posts: 81
Images: 0
Joined: Thu Jun 27, 2019 2:45 pm
Top

Re: Building lil' Woody

Postby Tukanu » Fri Sep 27, 2019 12:41 pm

All the maple has been epoxied into place. I’m waiting on the saturation epoxy. In the meantime I couldn’t resist a one sided mockup.
Attachments
onesided.JPG
onesided.JPG (708.89 KiB) Viewed 3437 times
Building lil' Woody: viewtopic.php?f=50&t=71953
User avatar
Tukanu
Teardrop Advisor
 
Posts: 81
Images: 0
Joined: Thu Jun 27, 2019 2:45 pm
Top

Re: Building lil' Woody

Postby Pmullen503 » Fri Sep 27, 2019 2:01 pm

Very Nice!
Pmullen503
1000 Club
1000 Club
 
Posts: 1108
Images: 67
Joined: Sun Nov 23, 2014 1:33 pm
Location: Fond du Lac, WI
Top

Re: Building lil' Woody

Postby tony.latham » Fri Sep 27, 2019 3:48 pm

I couldn’t resist ...


She looks fast!

:thumbsup:

Tony
User avatar
tony.latham
Gold Donating Member
 
Posts: 6899
Images: 17
Joined: Mon Jul 08, 2013 4:03 pm
Location: Middle of Idaho on the edge of nowhere
Top

Re: Building lil' Woody

Postby Staryder61 » Fri Sep 27, 2019 3:53 pm

tony.latham wrote:
I couldn’t resist ...


She looks fast!

:thumbsup:

Tony


And very light.......... :lol:
Stay safe, David


Our CTC
6' X 12' CTC = Texas Sized Tackle Box
http://www.tnttt.com/viewtopic.php?f=42&t=74704
User avatar
Staryder61
Silver Donating Member
 
Posts: 827
Images: 528
Joined: Mon Oct 30, 2017 5:11 pm
Location: In one of 254 Counties in Texas
Top

Re: Building lil' Woody

Postby Tukanu » Fri Sep 27, 2019 4:20 pm

Staryder61 wrote:
tony.latham wrote:
I couldn’t resist ...


She looks fast!

:thumbsup:

Tony


And very light.......... :lol:

Aerodynamically speaking, she should be able to leave the ground at about 42 mph. I may need a rear stabilizer!
The side is coming in at 35 lbs. with the maple, so it will be around 50 lbs. with the door....might be on track for a 700 lbs. build???
Building lil' Woody: viewtopic.php?f=50&t=71953
User avatar
Tukanu
Teardrop Advisor
 
Posts: 81
Images: 0
Joined: Thu Jun 27, 2019 2:45 pm
Top

Re: Building lil' Woody

Postby pchast » Fri Sep 27, 2019 9:44 pm

looks good for staying light...
:thumbsup:
Like anything else it depends
on what sneaks inside....
pchast
Platinum Donating Member
 
Posts: 2025
Images: 97
Joined: Mon Jan 28, 2013 5:47 pm
Location: Athens, NY
Top

Re: Building lil' Woody

Postby Tukanu » Mon Sep 30, 2019 9:25 am

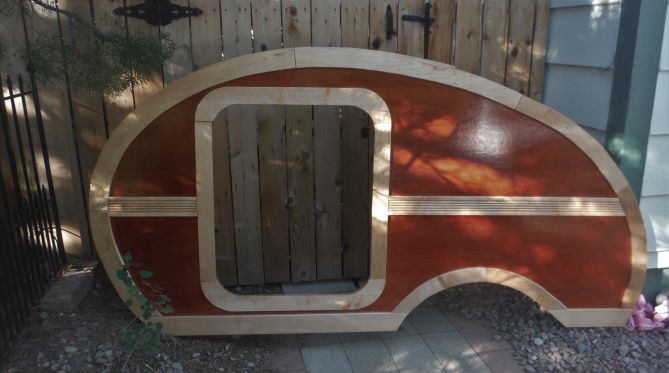
The first side is now finished. Here are the steps:
My local specialty wood store has a nice selection of ½” maple S4S. I used 4” on the straight bottom pieces and 6” for the curves.

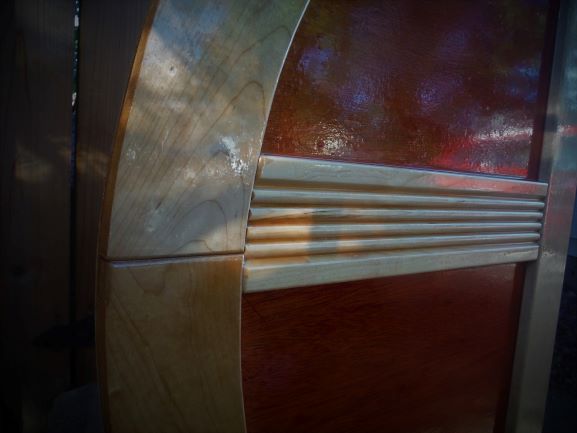
I shaped all the segments of the maple trim in successive order starting at the bottom and dry clamped them in place so that each fit perfectly to the next. I rounded over all for edges of the pieces so that the joints would be very visible. I did not try to hide the joints (see close-up photo).

Next, I stained the plywood with water based dye. I misted the ply first to raise the grain. Then I lightly sanded before staining. You need to work very carefully not to mess with the stained plywood because it is difficult to retouch.

I decided on WEST epoxy because I had used in the past. I like it because it cures with a slight bit of flexibility. I think that is important because a trailer is always flexing as it bounces down the road. I masked off the plywood and each piece to keep the messy epoxy under control. I made small batches of epoxy with a little bit of thickening. I glued the door trim first, then moved on to the top piece where the hatch will meet the top. This is the most crucial fit. I worked my way around the perimeter and finished with the decorative lateral pieces.

The whole exterior needs to be sealed with 2 coats of a penetrating epoxy. I used the Total Boat epoxy designed for deep penetration. It can be thinned with an equal amount of acetone for a deep penetration. I made small batches: two ounces of resin, one ounce of hardener, and two ounces of acetone.

I began by turning the panel upside-down so that I could get a good coat on the bottom edge of the plywood. Then I laid it flat on my sawhorses and finished all the exterior surfaces. After about four hours, when the first coat was still tacky, I applied the second coat of thinned epoxy. It was pretty well cured by the next morning. The epoxy deepened the red color to a deep burgundy, and the maple has a nice amber hue.
Attachments
joints.JPG
joints.JPG (27.85 KiB) Viewed 3374 times
saturation.JPG
saturation.JPG (38.73 KiB) Viewed 3374 times
Building lil' Woody: viewtopic.php?f=50&t=71953
User avatar
Tukanu
Teardrop Advisor
 
Posts: 81
Images: 0
Joined: Thu Jun 27, 2019 2:45 pm
Top

Re: Building lil' Woody

Postby Az Pete » Tue Oct 01, 2019 8:25 am

Looks great!
Az Pete
Teardrop Builder
 
Posts: 36
Joined: Mon Mar 04, 2019 5:23 pm
Top

Re: Building lil' Woody

Postby Tukanu » Wed Oct 16, 2019 9:00 pm

Episode 7: Installing the sidewalls:

The right side went a lot faster since I had the left side as a pattern for all the maple segments. The sides were attached with Heavy Duty Liquid Nails adhesive. I used a whole tube on the bottom 4” of the sides where they attach to the floor. I troweled the adhesive nice and thick for maximum coverage and squeeze out. 10 deck screws were counter sink along each side. The holes will be plugged with maple buttons and sealed with epoxy.

The bulkhead that separates the cabin from the galley was also installed at this time. It holds the sides perfectly vertical and provides most of the lateral stiffness. The inside was painted with a color that kind-of matches the varnished maple.

Next, I will be adding the foot board and galley counter top which will also add to the lateral stiffness.
The weather is turning cooler, so with the main structure pieces in place I will be able to work on some of the smaller components indoors this winter.
Attachments
DSCF0333.JPG
DSCF0333.JPG (31.27 KiB) Viewed 3247 times
DSCF0331.JPG
DSCF0331.JPG (30.57 KiB) Viewed 3247 times
Building lil' Woody: viewtopic.php?f=50&t=71953
User avatar
Tukanu
Teardrop Advisor
 
Posts: 81
Images: 0
Joined: Thu Jun 27, 2019 2:45 pm
Top

Re: Building lil' Woody

Postby Tukanu » Sat Oct 19, 2019 8:22 am

OPTICAL ILLUSION:

Photo taken at a 45 degree angle to the trailer with a circle superimposed.
Attachments
round woody.JPG
round woody.JPG (32.73 KiB) Viewed 3208 times
Building lil' Woody: viewtopic.php?f=50&t=71953
User avatar
Tukanu
Teardrop Advisor
 
Posts: 81
Images: 0
Joined: Thu Jun 27, 2019 2:45 pm
Top

Re: Building lil' Woody

Postby Tukanu » Wed Nov 06, 2019 3:32 pm

Episode 8: The Bulkheads

The lateral stiffness comes from the three bulkheads: The main divider between the cabin and galley, the foot board, and the countertop. The first two were rather simple, but the countertop was a bit more challenging.

I decided to use laminate on the countertop. This was a pretty easy job. There are two cutouts for the under-counter storage. Plan “A” was to rout a simple oval with an 1/8th bit. A slip of the router, and it was necessary to go to plan”B”, which was for an oval metal trim. I couldn’t get any manufacturer to respond to my request for trim pieces, so it was on to plan”C”, which was some aluminum C=channel to dress the edges. The end of the countertop had to be cut at a 70degree angle to match the slope of the sides. Next project is the tailgate which will be made of up curved pieces of ply and maple.
Attachments
DSCF0353.JPG
DSCF0353.JPG (22.87 KiB) Viewed 2982 times
DSCF0352.JPG
DSCF0352.JPG (32.55 KiB) Viewed 2982 times
DSCF0354.JPG
DSCF0354.JPG (30.87 KiB) Viewed 2982 times
Building lil' Woody: viewtopic.php?f=50&t=71953
User avatar
Tukanu
Teardrop Advisor
 
Posts: 81
Images: 0
Joined: Thu Jun 27, 2019 2:45 pm
Top

Re: Building lil' Woody

Postby Tukanu » Sun Nov 10, 2019 5:37 pm

New doors arrived this week. In for a trial fit:
Attachments
DSCF0361.JPG
DSCF0361.JPG (38.19 KiB) Viewed 2907 times
Building lil' Woody: viewtopic.php?f=50&t=71953
User avatar
Tukanu
Teardrop Advisor
 
Posts: 81
Images: 0
Joined: Thu Jun 27, 2019 2:45 pm
Top

PreviousNext

Return to Build Journals

Who is online

Users browsing this forum: No registered users and 12 guests