Slow Build in Oz

...ask your questions in the appropriate forums BUT document your build here...preferably in a single thread...dates for updates, are appreciated....

Re: Slow Build in Oz

Postby MickinOz » Fri Sep 04, 2020 6:19 pm

P.S. The missus is happy. The centre step still being there, she has somewhere to park her morning coffee cup.
MickinOz
1000 Club
1000 Club
 
Posts: 1254
Images: 3
Joined: Mon Feb 04, 2019 3:54 pm
Location: Somewhere, in 379,725 square miles of South Australia

Re: Slow Build in Oz

Postby edgeau » Sat Sep 05, 2020 3:08 am

MickinOz wrote:P.S. The missus is happy. The centre step still being there, she has somewhere to park her morning coffee cup.
That is the most important thing in a build

Sent from my Pixel 3 using Tapatalk
User avatar
edgeau
500 Club
 
Posts: 509
Images: 2
Joined: Sun Nov 13, 2016 8:21 am
Location: Gold Coast Australia

Re: Slow Build in Oz

Postby MickinOz » Sat Sep 05, 2020 11:15 pm

It's father's Day. Once upon a time that would have meant that the day was not mine to do with as I wished.
But the boys are grown up (in another month the eldest will be a father himself), and both my father and father-in-law passed away years ago. So today was an opportunity to indulge myself.
So I fitted the fridge slide.
Again it's just a piece of ply with a couple of cleats nailed and glued to it, and all screwed to a couple of 90 Kg drawer slides from Bunnings. Works.
The slides have to be mounted vertically.
The 50mm x 50mm x 2mm angle I considered too light for spring mounts when I bought the trailer, has been cut up for mounting brackets.
Slides in 6.9.2020.JPG
Slides in 6.9.2020.JPG (97.76 KiB) Viewed 2313 times

Slides out 6.9.2020.JPG
Slides out 6.9.2020.JPG (100.77 KiB) Viewed 2313 times
MickinOz
1000 Club
1000 Club
 
Posts: 1254
Images: 3
Joined: Mon Feb 04, 2019 3:54 pm
Location: Somewhere, in 379,725 square miles of South Australia
Top

Re: Slow Build in Oz

Postby MickinOz » Tue Sep 08, 2020 2:09 am

Wanted to do some spotlighting tonight, but at the late afternoon conference we decided it was too windy for accurate shooting.
At least the dog had a good time at the conference. He tried to bash the other boy dog there and had a darned good attempt at ravishing the girl dog before I dragged him off and threw him back in the truck. :oops:
I didn't know whether to kick his arse or be proud our fur baby is turning into a proper Aussie larrikan.
Thassamaboy :laughter:

So this arvo, I did a little more on the teardrop.
A certain water skier who seems to know me better than I know myself :thinking: predicted that I would end up adding another slide so I could run a two burner stove.
I think I will eventually, but in the meantime I decided to see how I would make room for it.
I realised that, without changing the fridge slide which has been made to exactly fit my heritage listed genuine antique Engel, I can still make enough space for another pull out if the 25 litre water container is laying on its back. That'd allow me to run two single burner butane stoves.

All I needed was one of those caps that has the spigot in it.
So off I went to the One Stop Water Shop. Nope. Of to the Caravan and Camping Shop - nope. The Pool and Party hire shop - nope.
Though at the Pool and Party shop I made an interesting discovery. The big places are killing them on the camping gear - so they are getting out of camping gear and have everything on clearance.
Everything. I wish I'd known that before they sold every stove they had in stock. Still rocking heaps of spares for Coleman and Companion Stoves though.
Good for the consumer right now, but ultimately a community tragedy.
So I went and saw my good buddy Wally at Autopro. He had nothing either, which I wish I'd know before I wasted a couple of bad taste but funny jokes on him.
( I get discount if I make him laugh)
The conversation went - Can't you get it online? Yes, but I'd rather you had the money. Well thank you, but can't help ya.
So I found a cap at one shop that had a thread on the inside, and a plastic tap/spigot at another shop.

I cut out the cap carefully and managed to start the tap from the outside. Now I have 25 litres of storage (6.6 US gallons) that lays down and is close to the same height as the battery box. Lots of lovely space above that I will eventually find a use for.
At the moment I have, from the right, fridge (15 Kg full?) water (25 Kg), and battery (25 Kg). The battery is slightly left of the centre line. By the time I add cooking gear, pots pans, spare gas, etc, and the electrical distribution centre on the left, I hope to come in roughly even.

If there is say, 30 kg difference right to left, it will help me decide where to hang the spare wheel.

The other thing I did was coat a test piece with the Zinsser Cover Stain primer.
I'll report back on that.
water tank 8.9.2020.JPG
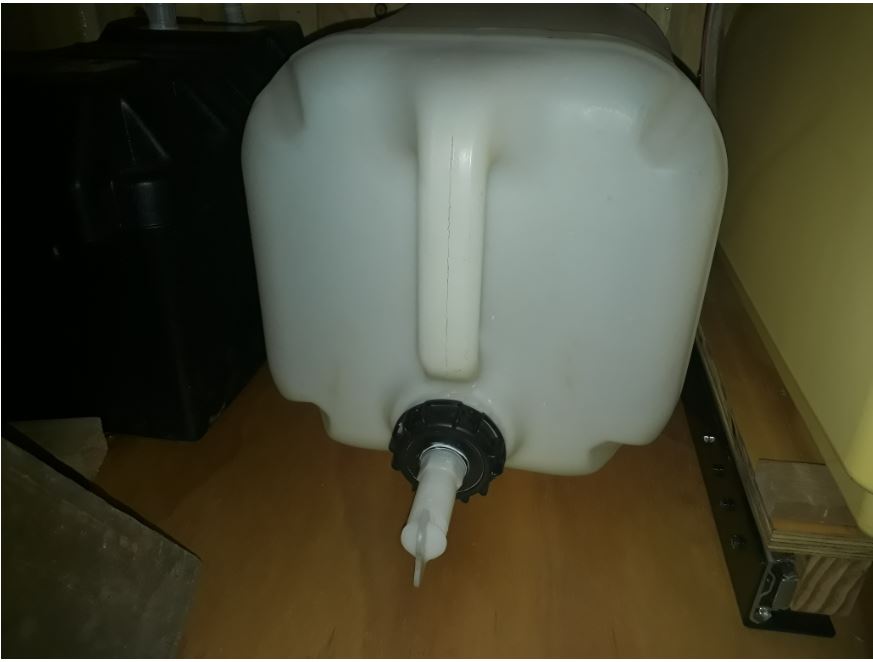
water tank 8.9.2020.JPG (41.03 KiB) Viewed 2284 times
MickinOz
1000 Club
1000 Club
 
Posts: 1254
Images: 3
Joined: Mon Feb 04, 2019 3:54 pm
Location: Somewhere, in 379,725 square miles of South Australia
Top

Re: Slow Build in Oz

Postby MickinOz » Wed Sep 09, 2020 1:10 am

So I did a test piece of plywood.
About 12" x 6" (can't be bothered going out to the shed to get the tape to measure it.)
1/2 raw timber, 1/4 with a couple coats of thinned polyurethane but still rough to the touch, 1/4 with multiple coats poly to the point it is a proper layer on top.
Left this for a week, then applied the Zinsser Cover Stain Primer.
No sanding.
Two coats 1 hour apart, per the instructions on the tin.
Left it over night to dry.
In the morning, the raw timber was well and truly adhered. The thinly poly'd section not to shabby, a bit soft still, but I'd be happy to go over it with top coat.
The heavily polyurethaned section was a disappointment. A bit soft still, and easily scratched off with a finger nail, and a chisel peeled it off like it was a piece of tape.

Threw the test piece on the bench in disgust and took off for the Post Office to grab one of their 24" TV/DVD combos that were listed in this morning's catalogue.
Got one, happy about that.

Then I went for an afternoon man cave session at my mate's place.
Discussed waterproofing timber and painting over it with a cabinet maker who happened to be there.
He said, "Just give it a little scrub with steel wool and carry on mate, it'll stick."
So I came home and had another look at my test piece. After another 6 hours or so of warm day, transformation.

Now, the stuff over the glossier section is stuck.
Couldn't scratch it with a finger nail and the chisel took timber with it as I tried to shift the primer.

Theory: raw wood provided the best surface and also sucked up some solvent, causing good early cure of the primer.
Thinly poly'd section not absorbing solvent, but nicely textured for adhesion.
Slow cure on heavily poly'd section due to no solvent absorption.

The annotated picture tells the story, I hope.
Primer test piece.JPG
Primer test piece.JPG (87.67 KiB) Viewed 2257 times
MickinOz
1000 Club
1000 Club
 
Posts: 1254
Images: 3
Joined: Mon Feb 04, 2019 3:54 pm
Location: Somewhere, in 379,725 square miles of South Australia
Top

Re: Slow Build in Oz

Postby MickinOz » Thu Sep 10, 2020 4:38 am

Not much photographable progress since last post.
But I have not rested. Honest.
Some milestones.
After 2 days of curing, that Zinsser Cover Stain Primer is bullet proof. No sh**, you could just paint the wagon with that stuff and stop there.
Aldi, the new comer supermarket in town, advertised that there would be 24" 12V TV/DVD Combo's for sale at $179 last Saturday, or maybe the Saturday before.
Whichever, I turned up pretty early that day to find none left.
Went home mumbling in my beard to kick the dog. Of course, he's smart enough to know exactly what sort of look paralyses my leg no matter how grumpy I am.
So the hound and I had a beer, and I chalked up the lack of in-flight entertainment to fate/karma/whatever.
Roll forward a few days, and the catalogues hit the mail box. The Post Office sold me a 12V TV/DVD combo for $149. (They can't make a quid delivering the mail, so they have all sorts of other good stuff for sale.)
Reminds me of a song:
https://www.youtube.com/watch?v=Z1ia-Oc1VZc
The TV made me happy for a while. Came with a 240V/12V adapter, no 12V cable.
Rather than buy a cable to run this thing off 12V ($25 for a cable to plug into a cigarette lighter socket :shock: ), I rummaged in the shed until I found a coaxial connector the right size, and soldered and heat-shrinked a cable I could wire straight to the fuse block.
Pretty damned happy with that.
Then I machined and drilled a piece of ply to mount the TV. Even found enough 4mm screws to mount it with the factory mount.
Soon, I hope to be camp-able. Real soon.
MickinOz
1000 Club
1000 Club
 
Posts: 1254
Images: 3
Joined: Mon Feb 04, 2019 3:54 pm
Location: Somewhere, in 379,725 square miles of South Australia
Top

Re: Slow Build in Oz

Postby MickinOz » Sat Sep 26, 2020 3:02 am

Advances this day.
There is light.
Renogy charge controller instructions left a bit to be desired, but I eventually worked out how to select flooded lead acid and one touch load on and off.
lectrickery.JPG
lectrickery.JPG (72.34 KiB) Viewed 2122 times
MickinOz
1000 Club
1000 Club
 
Posts: 1254
Images: 3
Joined: Mon Feb 04, 2019 3:54 pm
Location: Somewhere, in 379,725 square miles of South Australia
Top

Re: Slow Build in Oz

Postby MickinOz » Sun Sep 27, 2020 5:19 am

Plan is to keep the wiring as simple as possible.
To that end, the lights have built in switches, and I also fitted a switch to the cabin power outlet.
Had to, all the USB outlets these days have fancy LED back lighting that would drive me crazy at night. So I fitted a switch so I need only see it when in use.
My wiring schematic below. Red is positive, black is negative.
As simple and functional as I could make it. I wasn't going to even fit a battery isolator, just rely on pulling the fuse. However, during the installation I found that to be a PITA, so in went an isolator. You do need one when the teardrop is garaged - the controller requires a small amount of power to run it, which would drain the battery eventually. So, of course then I need a solar panel isolator. Many charge controller manuals say never connect the panel without the battery or the controller can be damaged. Renogy is one of those, so its isolate the panel, then isolate the battery.
The power to all the stuff in the cabin comes from the load terminals in the charge controller.
All the lights plus the TV would be 6 amps. TV is 3 amps - should be able to run that for a while with 100 AH battery.
The controller will handle up to 20 amps. The idea is that it will protect the battery from excessive discharge, by disconnecting if voltage is too low, or the current draw exceeds 20 Amps.

Wiring diagram.JPG
Wiring diagram.JPG (49 KiB) Viewed 2084 times
MickinOz
1000 Club
1000 Club
 
Posts: 1254
Images: 3
Joined: Mon Feb 04, 2019 3:54 pm
Location: Somewhere, in 379,725 square miles of South Australia
Top

Re: Slow Build in Oz

Postby edgeau » Sun Sep 27, 2020 5:37 am

Have you got something to stop the fridge draining the battery lower than 50% depth of discharge? It looks like you are bypassing the controller, I assume because of amp rating. I know some fridges have this built in but I doubt the classic 80s Engle did

Sent from my Pixel 3 using Tapatalk
User avatar
edgeau
500 Club
 
Posts: 509
Images: 2
Joined: Sun Nov 13, 2016 8:21 am
Location: Gold Coast Australia
Top

Re: Slow Build in Oz

Postby MickinOz » Sun Sep 27, 2020 5:48 am

#2 son, that'd be the electrician, inspected the wiring.
"Not bad," he said, "can I have my flash whacko crimping tool back now?"
Battery set up 27.9.2020.JPG
Battery set up 27.9.2020.JPG (77.09 KiB) Viewed 2074 times


Can't really see the setup in this photo, which was the target :)
Wanted it visually simple, too.
No, there is no discharge protection on the fridge circuit, but it only draws 3 amps when running, and runs less than half the time when its down to temperature.
A new fridge is on the horizon - I find I miss the little engel in the back seat of the truck.
Check this one out - short and wide, just right to replace the engel. Most fridges are 600mm long at least, too lomg for the teardrop unless I mount it sideways. This one is only 500mm.
https://www.roadtechmarine.com.au/22l-b ... r/p/GH1610
The 22 litres is wider and shallower than most, a good thing in a teardrop, and it can run at 45 degrees tilt for up to 30 minutes, the manual claims.
Best of all, local agent, unusual for the cheaper fridges.
MickinOz
1000 Club
1000 Club
 
Posts: 1254
Images: 3
Joined: Mon Feb 04, 2019 3:54 pm
Location: Somewhere, in 379,725 square miles of South Australia
Top

Re: Slow Build in Oz

Postby MickinOz » Sun Sep 27, 2020 5:55 am

P.S. The direct drive to the fridge isn't an oversight, it was a conscious decision.
The depth of discharge thing is really only an estimate based on battery voltage. The controller will still disconnect all other loads if the battery gets down, which will limit the damage somewhat - and let me know things are out of hand when the telly drops out. :)
I almost didn't use the load control for the rest of the circuitry either, but it was actually the easiest way to get electrickery from the battery t the fuse block with the least amount of wire (long runs waste power) so I thought I may as well.
MickinOz
1000 Club
1000 Club
 
Posts: 1254
Images: 3
Joined: Mon Feb 04, 2019 3:54 pm
Location: Somewhere, in 379,725 square miles of South Australia
Top

Re: Slow Build in Oz

Postby tony.latham » Sun Sep 27, 2020 9:05 am

Wanted to do some spotlighting tonight...


The funny thing is that I used to sit out on a knob in the middle of the night watching for "shiners" as we called them. And then I'd sneak in blacked out and then light 'em up with the blues and put the bracelets on. :frightened:

The problem here is that it's an illegal method of deer hunting.

What do you "shine" over there?

Tony
User avatar
tony.latham
Gold Donating Member
 
Posts: 6899
Images: 17
Joined: Mon Jul 08, 2013 4:03 pm
Location: Middle of Idaho on the edge of nowhere
Top

Re: Slow Build in Oz

Postby MickinOz » Sun Sep 27, 2020 9:26 am

tony.latham wrote:
Wanted to do some spotlighting tonight...


The problem here is that it's an illegal method of deer hunting.

What do you "shine" over there?

Tony

Over here in the state of South Australia, with thee purchase of a ~$120 5 year permit, we can hunt anything "feral".
So rabbits, cats, foxes, goats, pigs, deer, horses, camels, donkeys, etc,
I just realised that each animal on the list is regarded as a destroyer of native vegetation of wildlife.
Kangaroos require a cull permit and tags. Dingoes south of the dog fence.
It's legal to spotlight any of the above.
Duck hunting is requires a recognition test and a separate hunting permit, and you can't spotlight 'em.
Just about any native animal other then the above is illegal to hunt.
MickinOz
1000 Club
1000 Club
 
Posts: 1254
Images: 3
Joined: Mon Feb 04, 2019 3:54 pm
Location: Somewhere, in 379,725 square miles of South Australia
Top

Re: Slow Build in Oz

Postby MickinOz » Sun Sep 27, 2020 6:52 pm

BTW Tony, I reckon I saw a comment from you about using a scotchbrite pad on a sander to scuff the surface prior to painting.
Is that just a nylon scourer or does it have an abrasive in it?
MickinOz
1000 Club
1000 Club
 
Posts: 1254
Images: 3
Joined: Mon Feb 04, 2019 3:54 pm
Location: Somewhere, in 379,725 square miles of South Australia
Top

Re: Slow Build in Oz

Postby MickinOz » Mon Sep 28, 2020 5:26 pm

Edge got me second guessing myself a little.
I took my heritage listed antique Engel fridge and plugged it into the power outlet in the cabin.
This was so I could use the measuring functions of the controller.

Starting from a fridge that has not been run for several weeks, 27C ambient conditions, fridge sitting on the ground on the shaded side of the trailer, it used 12 Ah in six hours. I dunno where I got 3 amps draw from, it draws 5 amps. I'm happy with that though. Seems the fridge will not flatten the battery overnight.
I'm fairly sure a lot of the power use was getting the fridge from ambient to cold in the first hour.
Today, I will do a test starting with a cold fridge, and run it for another 6 hours, to see what "maintenance" usage is.
MickinOz
1000 Club
1000 Club
 
Posts: 1254
Images: 3
Joined: Mon Feb 04, 2019 3:54 pm
Location: Somewhere, in 379,725 square miles of South Australia
Top

PreviousNext

Return to Build Journals

Who is online

Users browsing this forum: No registered users and 11 guests