Joe's Teardrop Build

...ask your questions in the appropriate forums BUT document your build here...preferably in a single thread...dates for updates, are appreciated....

Re: Joe's Teardrop Build

Postby western traveler » Sun Mar 14, 2021 7:14 pm

Is it possible that you racked it when adding the second skin? That is the type of thing I am concerned with.
I really dislike do overs but that is a place I think it happens...
Tony makes it look easy....wink
western traveler
Donating Member
 
Posts: 396
Images: 264
Joined: Wed Dec 28, 2016 6:59 am
Location: The Front Montana

Re: Joe's Teardrop Build

Postby tony.latham » Sun Mar 14, 2021 8:36 pm

Now off to figure out how to disassemble a hatch :(


Here's the tool:

https://www.amazon.com/gp/product/B07TW55GD4/ref=ppx_yo_dt_b_search_asin_title?ie=UTF8&psc=1

:thumbdown:

Tony
User avatar
tony.latham
Gold Donating Member
 
Posts: 6899
Images: 17
Joined: Mon Jul 08, 2013 4:03 pm
Location: Middle of Idaho on the edge of nowhere

Re: Joe's Teardrop Build

Postby JoeGrz » Tue Mar 30, 2021 8:23 pm

Not a lot of progress over the last two weeks. I have chipped away the skin from the two sides, across the top and bottom cross spars and the second spar from the top. Here is what it looked like Saturday when I knocked off
20210327_161530 Small.jpg
20210327_161530 Small.jpg (34.1 KiB) Viewed 1498 times

I have actually started on the interior skin but I have not gotten very far. Between long work days, some bad weather, errands and some yard work now that spring is here, it has not gone as quickly as I would have liked.
western traveler wrote:Is it possible that you racked it when adding the second skin?
I think it was built into it. One of my spars is not perpendicular and from there on the others are off as well. I built it on the trailer and didn't notice everything off so I assumed it was good.

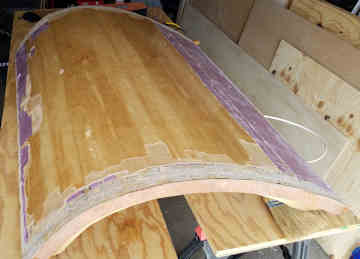
The idea is to salvage as much as possible. I definitely wanted to keep the sides. I thought about starting over but decided I could not duplicate the side pieces if I wanted to. The top and bottom spars should be good. I am hoping that the second spar, since it is reasonably square, is still good as well. I wanted to remove the skin and since I was very liberal with the staples on the sides, they needed to be removed so they didn't create problems later. The best way that I could come up with to remove the staples was to chip away the skin with a chisel and then clean the glue and remaining wood out of the way. When the area around the staple was cleaned up, pull the staples our with a pair of pliers using a rolling motion. grab it. pull a little out. Grab it again and pull a little more out until it was free. In the 3/4 exterior plywood, the staples let go easily. In the baltic birch, not so easily. Those that broke with a leg left in the wood were driven below the surface with an old punch that I use to set finish nails.

Once I get all the staples out and the wood I want to keep exposed, I will come back and try to trim away as much of the construction adhesive as I can. Unlike the tite bond, the construction adhesive has a thickness that I want to remove. Tony specified the tool of choice for this task and I believe he is correct. I would like to use it with a scrapper blade that I have. Hopefully that will do the trick. I thought about sanding but I think the adhesive will just gum up the sand paper. If the oscillating scraper doesn't do the trick, I think a hand scrapper with a replaceable blade will be my best option. I don't think I can dissolve the adhesive since it has cured.

After I get all the adhesive of the wood I want to keep, I will cut off the interior spars that are wrong with the oscillating saw. Because of the blocking being attached with the tite bond glue, I don't think it will separate off that easily. I will cut the spars flush with the existing blocking. I plan on mounting the hurricane hinge back on and attaching the hatch frame to the trailer. My hope is with the bad spars out, the twist will be out of the frame. Also with the hinge installed, I don't think I will need the spacers. If it is square, I will attach the new spars to the blocking probably just above the existing spar stubs. If I don't move them away from the stubs, I think I will drive my screws into the pocket holes used to attach the original spars. I will then go through and place 1/2 inch blocking to lock those spars in place. If it is not square, I will cut out either the second or bottom spar, check it for square and then, if necessary, cut out the other. Theoretically, unless I really messed up, the top spar should be good.

western traveler wrote:Tony makes it look easy.
That he certainly does. Trying to duplicate his work over the last year has shown me what a craftsman he is. :beer: When I grow up, I hope to be half as good at this as he is. And I haven't even tried to figure out the welding yet
JoeGrz
Teardrop Master
 
Posts: 107
Joined: Thu May 28, 2020 4:24 am
Location: Panhandle of Texas
Top

Re: Joe's Teardrop Build

Postby tony.latham » Tue Mar 30, 2021 9:04 pm

Trying to duplicate his work...


You'll get it right on the third or fourth teardrop. I've had my disasters.

Tony
User avatar
tony.latham
Gold Donating Member
 
Posts: 6899
Images: 17
Joined: Mon Jul 08, 2013 4:03 pm
Location: Middle of Idaho on the edge of nowhere
Top

Re: Joe's Teardrop Build

Postby western traveler » Tue Mar 30, 2021 11:06 pm

Great to see you getting after it. Wouldn’t it be great if we never made a mistake?
western traveler
Donating Member
 
Posts: 396
Images: 264
Joined: Wed Dec 28, 2016 6:59 am
Location: The Front Montana
Top

Re: Joe's Teardrop Build

Postby pchast » Wed Mar 31, 2021 9:30 pm

I think it would be boring. :D
pchast
Platinum Donating Member
 
Posts: 2026
Images: 97
Joined: Mon Jan 28, 2013 5:47 pm
Location: Athens, NY
Top

Re: Joe's Teardrop Build

Postby JoeGrz » Sat Apr 03, 2021 8:14 pm

I finally got all those staples pulled. Well, except for the ones in the bottom spar. I wanted to see if I was going to keep it before I put any more time into something I was just going to cut away in the end. After I pulled the last one, I rolled it back over and went after it with the jig saw. Here is the end result
20210403_184639 Small.jpg
20210403_184639 Small.jpg (35.66 KiB) Viewed 1423 times

There you can see what I am keeping in the front and what was thrown away in the back. The next thing I did was get the hinge reattached and put the remains of the hatch on the cabin. After close inspection and a second opinion, I determined the twist was gone :D Here is is back on the cabin
20210403_200943 Small.jpg
20210403_200943 Small.jpg (37.35 KiB) Viewed 1423 times

Sorry about the focus. It is a little fuzzy but there it is. I started cleaning up the glue and found that the Dremel Rigid Scrapper that I have for my oscillating tool works well for scraping off the glue without cutting away the wood. Though it struggles with the areas that still have plywood attached. I think with this scrapper, I will be able to clean up the spars and rails very quickly. Afterwards, I think I will go over it with the sandpaper to clean up any little bits that are hanging on. Tomorrow, I will pull it off the cabin and clean up the under side and hopefully, later this week, I will get the new spars cut down to size. Next weekend should see the spars attached and, hopefully, the inside skin reattached. I can see forward progress around the corner and that's a good feeling.

I do have one question. Will I need to block the new spars. I will attach them to the blocking that is already attached. Do I need to use blocking to lock the new spars or will the two pocket hole screws be enough? If I need to make new blocking, I will need to make new a new template since I got rid of the old one trying to make some space in the garage.
JoeGrz
Teardrop Master
 
Posts: 107
Joined: Thu May 28, 2020 4:24 am
Location: Panhandle of Texas
Top

Re: Joe's Teardrop Build

Postby tony.latham » Sat Apr 03, 2021 8:42 pm

I do have one question. Will I need to block the new spars. I will attach them to the blocking that is already attached. Do I need to use blocking to lock the new spars or will the two pocket hole screws be enough?


The skins will lock the spars in place. No new blocking needed.

And yes, your photo and you should luck fuzzy after this juncture.

Tony
User avatar
tony.latham
Gold Donating Member
 
Posts: 6899
Images: 17
Joined: Mon Jul 08, 2013 4:03 pm
Location: Middle of Idaho on the edge of nowhere
Top

Re: Joe's Teardrop Build

Postby JoeGrz » Tue Apr 13, 2021 7:47 pm

This past weekend saw forward progress again. The hatch has a full set of spars and the inner skin. Thanks Tony for replying back on the blocking. Not having to put that in again saved a bit of time. Looking at it to lay out the spars again, I found that the third spar was placed at 10 inches from the previous spar on one side and 11 inches on the other side. I'm not sure if that caused the twist when they all staggered but I appear to be past it now. Since I had difficulty holding the spars in place last time, I made a little jig to hold each end in place while I checked my measurements and secured the ends.
20210410_112241 small.jpg
20210410_112241 small.jpg (39.57 KiB) Viewed 1339 times
I would like to say that this was my idea but I copied it from the other book I read to figure out how to build a teardrop, The Handmade Teardrop Trailer by Matt Berger. He placed his roof spars prior to the ceiling and used a similar jig to hold the spars in place before they were secured. One fixture on each end worked well for holding the spars in place and allowed me to check and double check the measurements between each spar. Rather than place the spar over the cut off, I set the new spar next to the cut off on the 11 inch side. The frame was secured to the cabin with the hinge so that the hatch would be in the same place as the previous build. After the spars were in place, I checked for twist and all appears good. Here is the hatch with the spars in place prior to receiving the inner surface.
20210410_184341small.jpg
20210410_184341small.jpg (47.46 KiB) Viewed 1339 times

I trimmed the 3mm plywood down to fit between the gussets and secured the skin the next day. Instead of stapling the top and securing the next row with screws, I lined up the sheet and secured it with screws then stapled it along each spar. Something that I noticed after the third view of Tony's video is that the bottom spar shouldn't remain perpendicular to the curve but should line up with the end. Since I haven't done that, I will need to build a piece to reinforce the skin on the bottom. Here is the inner skin before the end was trimmed
20210411_134407 Small.jpg
20210411_134407 Small.jpg (40.77 KiB) Viewed 1339 times

The blue tape on the gussets is how I marked the spar locations. I drew a line between the pieces of tape and placed the staples along the line. After the skin was trimmed, I mounted the hatch back on the cabin and still no twist. I would like to place the blocking for the attachments, wiring, foam and exterior skin next weekend. The exterior skin may be a problem since one of my pieces of plywood was too short for use as the inner skin. I will have to see if I can pick up a sheet or if I will have to order one in. I also will need the weather to cooperate. They are calling for rain this weekend which means that the garage won't be open to build in.
It feels good to be constructing again instead of pulling it apart.
JoeGrz
Teardrop Master
 
Posts: 107
Joined: Thu May 28, 2020 4:24 am
Location: Panhandle of Texas
Top

Re: Joe's Teardrop Build

Postby JoeGrz » Mon Apr 26, 2021 7:38 pm

After two weekends of working, I have a hatch!! The construction of the hatch went a little different than I planned originally. I put my blocking in and was getting ready to drill the holes and run the wiring when I decided that finishing the interior surface would be a whole lot easier without wires flopping around in the way. I was expecting to put two coats on last Sunday but it never got out of the low 50's so the varnish didn't cure as fast as I needed to get the second coat on. So this past Friday was a lot warmer and I managed to put on the last two coats. Saturday I was able to place the foam and attach the skin.
western traveler wrote:Is it possible that you racked it when adding the second skin?
I know that earlier I said I thought it was not from the skinning process but now I am not so sure. I went to align the plywood with the bottom spar and I could not get the skin square on the frame. the bottom spar like the rest of the build was not perfectly square so I may have put the twist in making it square. To hopefully put everything on without twisting it, I started at the hinge end and worked to the curve. I, because I didn't want to pull two sets of staples if I had to redo the exterior again, started with only one row of staples down the side. Don't do that! Run two sets on each side. 1/8 or 3mm plywood may bend but it doesn't want to. At about the 3rd interior spar, it wouldn't bend without the second row of staples down the side to hold it in place. Here is the hatch on the cabin.
20210425_111458 Small.jpg
20210425_111458 Small.jpg (35.74 KiB) Viewed 1132 times
Sunday, I took it down, removed the hinge and rounded the edges. There wasn't time to put down the fiberglass so Friday, weather permitting, It will be glassed and I will fill the holes and low spots later in the weekend. Maybe Sunday.
The other task I was taking care of was my electrical enclosure. It was something that I could do at night as time allowed. Here is what I have come up with
20210425_201920 Small.jpg
20210425_201920 Small.jpg (40.38 KiB) Viewed 1132 times
the top is my power meter/charge indicator then below I have a 20 amp breaker/switch and two 12 volt outlets. The hinges are stiff so I was thinking that I can get by with the pull shown. As I am opening and closing it, I am beginning to think that I will need to use one of the latching pulls like I am planning for the drawers. It is not finished yet. It will get its varnish when I finish the drawers.
That's where I am today. Depending on how I feel when I get home at night, I can either run wires, build drawers, or continue to figure out welding. I think my next welding issue to address can be fixed with wire speed adjustment so I am looking for an opportune time to see if that fixes some of my issues.
JoeGrz
Teardrop Master
 
Posts: 107
Joined: Thu May 28, 2020 4:24 am
Location: Panhandle of Texas
Top

Re: Joe's Teardrop Build

Postby western traveler » Tue Apr 27, 2021 7:18 am

Great to see you clear that hurdle Joe! Thanks for the details...
western traveler
Donating Member
 
Posts: 396
Images: 264
Joined: Wed Dec 28, 2016 6:59 am
Location: The Front Montana
Top

Re: Joe's Teardrop Build

Postby JoeGrz » Wed May 05, 2021 6:36 pm

The build creeps forward. Last weekend I fiberglassed the exterior of the hatch. Back to where I was before I found the twist! :D Other than that, there was not much to add. I had very little epoxy left after the hatch. Since there was not enough epoxy to thicken and stick the brake light on the top, I attached it with the construction adhesive and secured it with two screws. I ended up filling the the gaps and smoothing the back of the block out with body filler. Here is what that looked like when I finished
20210502_202951 Small.jpg
20210502_202951 Small.jpg (27.13 KiB) Viewed 1049 times
I put a piece of glass cloth over it and then the last little bit of resin over it tonight. Other activities of note are that I finished the wiring and can turn the lights on with battery power and I am playing better with the welder. I actually have beads that look close to the way they are supposed to. I won't put the chassis together yet but I'm closer.
Next up, I will fill the holes with the body filler and prime the cabin and hatch. Next post will hopefully show a white teardrop cabin. Of course, the other thing that I have to do is weld. I don't think I'm far but I'm not there yet.
JoeGrz
Teardrop Master
 
Posts: 107
Joined: Thu May 28, 2020 4:24 am
Location: Panhandle of Texas
Top

Re: Joe's Teardrop Build

Postby GarthB » Wed May 05, 2021 7:47 pm

Excellent work! I too am following Tony's design for most of my build. Just got my walls glued together. Up until now, cutting the hatch sides off of the wall has seemed like the most nerve wracking portion of the build that lies ahead. After seeing the lessons you learned with skinning your hatch and keeping it properly aligned, that seems like it may be the most challenging portion. I appreciate you sharing everything you figured out! Looking forward to following the remainder of your build.
GarthB
Teardrop Master
 
Posts: 141
Images: 212
Joined: Wed Mar 31, 2021 4:28 am
Location: Northern Michigan
Top

Re: Joe's Teardrop Build

Postby tony.latham » Wed May 05, 2021 8:48 pm

I have a hatch!!


Wowsers. What a journey. I'm just back from a nearly month-long camping trip in the southwest.

Image

I've gotta admit, I was thinking of you and hatch #1 a time or two.

Tony
User avatar
tony.latham
Gold Donating Member
 
Posts: 6899
Images: 17
Joined: Mon Jul 08, 2013 4:03 pm
Location: Middle of Idaho on the edge of nowhere
Top

Re: Joe's Teardrop Build

Postby JoeGrz » Fri May 14, 2021 11:03 am

Well, it has been a busy week so here I am trying to catch up the journal.
GarthB wrote: After seeing the lessons you learned with skinning your hatch and keeping it properly aligned, that seems like it may be the most challenging portion. I appreciate you sharing everything you figured out! Looking forward to following the remainder of your build.
I think, looking back on it, pay careful attention to the framing and the skinning will not be a problem. Since I initially lined up on a spar that wasn't aligned just right, it threw off the skin placement. That hatch framing requires more care than the other structural activities.
tony.latham wrote:I'm just back from a nearly month-long camping trip in the southwest.
Sounds like a great trip. Hope you didn't spend too much time thinking about the hatch. It was definitely an execution issue. Now I know where I need to be especially careful.

Last weekend, I filled the holes with body filler and primed the cabin. I now have a gray teardrop cabin
20210509_163128 small.jpg
20210509_163128 small.jpg (29.83 KiB) Viewed 946 times

Getting there was quite a learning experience since I had never used body filler or the Rust-Oleum primer. Start with the body filler. I think I threw away as much as I put down. The trick to that in my case is to make very little because, unlike the wood filler, it becomes unworkable in a few minutes. I got a little bit of working time going light on the hardener but not much. The primer was an experience too. I was planning on something like the latex primer for the house. This stuff had no thickness to it. It dripped and ran down the walls faster than I could work in some areas. Not only is the cabin gray, so are several areas of the garage floor. And Tony, you were right. The primer highlights the low spots. I have some more filling to do.

This weekend, I am going to concentrate on welding. I was hoping to practice some during the week but it didn't happen. I am hoping to turn the cabin Smurfadelic Memorial day weekend. Somewhere along the way, maybe get to the point where I can weld up the chassis. Other than the chassis, there is finish constructing 3 drawers, then the stove drawer, and then finish them. Not much carpentry left.
JoeGrz
Teardrop Master
 
Posts: 107
Joined: Thu May 28, 2020 4:24 am
Location: Panhandle of Texas
Top

PreviousNext

Return to Build Journals

Who is online

Users browsing this forum: No registered users and 28 guests