Joe's Teardrop Build

...ask your questions in the appropriate forums BUT document your build here...preferably in a single thread...dates for updates, are appreciated....

Re: Joe's Teardrop Build

Postby tony.latham » Sat Jan 09, 2021 7:52 pm

Looking at the picture, it looks like there is a piece under the outside spacer. Am I seeing this correctly? I think that piece is pushing my hatch walls out so that they are not next to the edge of the cut and the spacer on the hatch spar.


Image

Well... here's the scoop: I don't know what that thing is. It may be a piece of light-colored masking tape. :frightened:

Ignore it. The shims are there so the hatch end pieces are centered on the wall.

Sorry about the confusion. :thinking:

Tony
User avatar
tony.latham
Gold Donating Member
 
Posts: 6899
Images: 17
Joined: Mon Jul 08, 2013 4:03 pm
Location: Middle of Idaho on the edge of nowhere

Re: Joe's Teardrop Build

Postby JoeGrz » Sun Jan 10, 2021 9:32 am

Thanks Tony! The snow is not what they said it would be so I should get the spars on today :D
JoeGrz
Teardrop Master
 
Posts: 107
Joined: Thu May 28, 2020 4:24 am
Location: Panhandle of Texas

Re: Joe's Teardrop Build

Postby JoeGrz » Sun Jan 17, 2021 8:28 pm

The adventure continued last weekend. I cut the poplar down to size so that I had (6) 2" wide x 60" long pieces. I put the spacers on and set the hatch walls in place. I found that one of my gussets slipped in the glue up and the side would not sit right. So, I cut off about an 1/8th of the top. To make up for the amount I was off on the bottom, I needed a little bit to add on. It turns out that the little sticks I used for mixing the epoxy was just the right size to take up the missing bit of wood. I glued that on and stapled it to make sure it would stay. I finally got to the part where I cut the spars to size and put them in. The first one went in just fine. The second one, no so much. Apparently, measure twice and cut one has to be followed exactly. I measured, cut, and then measured again when it came out too short. Fortunately, the next two after that went in fine. I finished last weekend with three spars in place. I had to stop there since my son was coming over to visit. Not as much progress as I had hoped for but the trimming of the side wall took up more time than I had available.
This weekend, not much happened. We ran up to Colorado for a break and get some things that we can't get at home. With the little bit of time left this afternoon, I got those last two spars on. Of course this is one short. I need to head to the store and get another piece so that I can make up that last spar.
One tip that I have for anyone following is to clamp a block to the side to provide a guide and rest for the spar while you are screwing the other side into place. Here is a picture of the block with the spar in place
20210110_153354 Small.jpg
20210110_153354 Small.jpg (31.56 KiB) Viewed 1710 times

Hopefully, I can get the blocking cut and some of it placed before I run out of weekend next week.
JoeGrz
Teardrop Master
 
Posts: 107
Joined: Thu May 28, 2020 4:24 am
Location: Panhandle of Texas
Top

Re: Joe's Teardrop Build

Postby tony.latham » Sun Jan 17, 2021 9:07 pm

One tip that I have for anyone following is to clamp a block to the side to provide a guide and rest for the spar...


I just checked and apparently, I figured that out. (At least by the third spar.) Great minds.... :thumbsup:


Or at least by the third spar. :thinking:

Tony
User avatar
tony.latham
Gold Donating Member
 
Posts: 6899
Images: 17
Joined: Mon Jul 08, 2013 4:03 pm
Location: Middle of Idaho on the edge of nowhere
Top

Re: Joe's Teardrop Build

Postby JoeGrz » Sun Jan 24, 2021 8:50 pm

tony.latham wrote:I just checked and apparently, I figured that out. (At least by the third spar.) Great minds....

It looks like you figured it about about the same point I did as well.

I actually had a productive weekend and some nice weather to go with it . I got on the remaining spars though one of the spars looked like it slipped from where it was supposed to be or I focused on the wrong mark on the end of the wall. All but one of the spars is roughly horizontal. This other one that is off has a definite slope to one side. Fortunately when I took it off the back of the trailer and put it back on, it all seems to fit fine. I made the blocking, cut it out and glued on the first side. Like I did with the blocking on the roof, I clamped the piece to the side of the hatch, marked the spars on the side of the blocking, then cut it out on the miter saw. Most of the pieces were close though a couple needed a significant amount of trimming. I could only do one side a day because that's all the clamps I had. Here is what it looked like after the first day.
20210123_120733 Small.jpg
20210123_120733 Small.jpg (32.36 KiB) Viewed 1638 times


I did the same thing on the other side yesterday. After I got the blocking on, I cut out the lower strut pivot blocks. To do this, I actually trimmed a piece of paper to where I could set it between the countertop and gusset plate on the hatch and traced the shape. I then found the 1/8 hole that I drilled to mark my strut attachment point and pierced the paper at that point. I cut the wood to size and drilled a 1/8 inch hole for the attachment point and, using a drill bit through the mounting plate, lined up the holes. Everything looked good. Then I moved on to the plate with the ball that the strut mounts to. Looking at how the plates lined up on Tony's build, I think my counter is a little higher than his. I could not align mine as he did his so I just found an alignment that worked. After that, everything went fine until it was time to put the assembly on the wall. Thinking about it now, I should have just removed the plate, run the drill through it and then reattached the plate afterwards. I didn't think of that yesterday. What I did was get a piece of a toothpick, place it in the hole in the plate and lined up the hole with the toothpick. It seems to have worked OK.

Today, I pulled the Hatch framing off the trailer and cut my hinge down to size. I looked at Tony's videos again and noticed he had one where he tested the struts prior to placing the skin on the hatch. I figured that would be a good idea to see how they lined up. Once the skin is on, I won't see the struts in the closed position. I attached the hatch side of the hinge to the hatch and slid the cabin side in to place. With my son's help, we lifted the hatch into place and secured the hinge to the main cabin. It worked but did not lie against the structure the way I hoped. Next time, I will place the two pieces on the respective parts then slide them together. It is one of those things that sounds like it is easier said then done but hopefully everything will lay out the way is should. Here is what it looked like with the struts on and the hatch open
20210124_190645 small.jpg
20210124_190645 small.jpg (35.02 KiB) Viewed 1638 times


Next weekend is supposed to have a couple days in the 60s. I am thinking of trying to use the good weather to prep and place the fiberglass on the cabin roof. If I don't do that, I will continue with the hatch. We will have to see how I feel and what the available time looks like when I get there.
JoeGrz
Teardrop Master
 
Posts: 107
Joined: Thu May 28, 2020 4:24 am
Location: Panhandle of Texas
Top

Re: Joe's Teardrop Build

Postby JoeGrz » Sun Feb 14, 2021 9:35 pm

It has been a busy few weeks since I last posted. The following week since my last post, I was able to place the blocking and secure the inner skin to the hatch frame. Here is what it looked like after I got it secured but before the glue set and I trimmed the skin down with the bottom bearing trim bit.
20210130_181139 Small.jpg
20210130_181139 Small.jpg (29.31 KiB) Viewed 1546 times


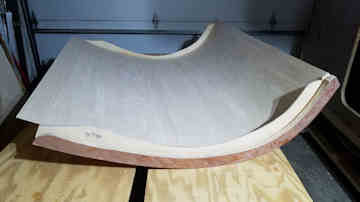
This is the last picture that I have taken since everything else didn't really show anything new or interesting.
I started to work out the wiring in the hatch and figured that it would be a lot easier to varnish the inside without the wires sticking out and getting in the way. With two days of upper 60s and lower 70s temperatures coming on, I put off finishing the carpentry work, took the work from home option for a couple days and finished the inside surface of the hatch. I put the last coat of polyurethane down Wednesday afternoon and winter returned for a few more days Thursday. The following weekend I ran the little bit of electrical in the hatch, cut, kerfed, and inserted the foam, and put the outer skin on. This represents a big milestone in the project. All carpentry except the galley is complete. :)

Happy with my progress and wanting to push on. I saw another warm weekend coming so I sanded my walls smooth so that I could get a good round over of my roof. That went mostly well. If you recall, I tried filling my screw holes with the thickened epoxy. The epoxy wasn't quite thick enough and it oozed out of the holes. I was able to sand off the high drips from the ooze but at the bottom, where the walls secure to the floor, my sander was not quite flush with the wall and I removed the top ply and probably all the epoxy from the underlayment. Note to others, be careful when you start sanding in that area. It doesn't tale long to sand that away. I will probably brush some more epoxy over that area to let it soak in if it will absorb it.

With the warm day coming, I went to fiberglass the roof and hatch. That's end of this run going well. First mistake is that I should have brought the epoxy inside over night to warm up. It still got cold overnight and when I started it was very thick and didn't pump well. A little time in the sun solved that problem towards the end of the day but that didn't help starting out. My fiberglass cloth is a tighter weave than the standard and I could not get the goo that was my resin to flow through the cloth. With much pushing and working, I was able to get the cloth to wet and stick to the wood. The problem is that since it didn't flow well I have a lot of areas that the epoxy is barely covering the cloth while other areas are thick. As the epoxy warmed up, it started to flow better but the vertical surface then started to be a problem. I figured the best course of action was to pour the epoxy on the curve and work it down trying to get it worked into the cloth before it ran on the floor. It worked mostly well though not great. I have no idea how I would have done it if I had one of those profiles that curved at the bottom a well as the top. The final issue was that the epoxy ran out as I got to the end of the cabin. I had just enough to finish the cabin. I didn't get to apply the fiberglass to the hatch. :(

While it is still cold, I will finish the wiring and the galley as well as start welding. One day an axle will arrive and I will need to fabricate the chassis. :frightened: After all that is complete, the weather should be warming up so that the epoxy will flow and I can try again with the fiberglass on roof and hatch.
JoeGrz
Teardrop Master
 
Posts: 107
Joined: Thu May 28, 2020 4:24 am
Location: Panhandle of Texas
Top

Re: Joe's Teardrop Build

Postby JoeGrz » Sun Mar 07, 2021 9:38 pm

This past week I actually made some progress. The first thing I did was put a facing on the end of the plywood in the galley. I used the poplar strips that I cut off when I made the spars. Of course those were 3/4 inches wide and the plywood is just under 3/4 inch or 1/2 inch. I figured the trim router would be the simplest way to cut them down to size. Unfortunately, I'm not real good with the router yet and I couldn't keep it level on the face. The end result was less than stellar. I got out the sander with the 120 grit and smoothed it out though I ended up beveling some of the areas of the side wall. After that, I started cutting out the drawer boxes. I have those first three cut out ready to have the slot for the bottom cut in and then assembled. Here is what the galley looks like at this time.
20210302_200229 Small.jpg
20210302_200229 Small.jpg (32.97 KiB) Viewed 1400 times

First thing you would notice is the giant 50 qt electric cooler on the right side. I'm surprised it fit. I was looking at another one that is smaller. Instead of getting a new cooler, I will buy a mattress and get the cooler later. I want the smaller one so that I can have that drawer that Tony's original design has above it. On the left side, you will notice that there is a considerable distance between the water jug and stove and the center drawer column. If I made my measurements correctly, that will allow for the propane bottle to sit on the tray when it is pulled out. In the center, I broke the top drawer into two shallow drawers so that, hopefully, smaller things will be easier to find.

The main event for this weekend was finishing up the fiberglass work. I received some more resin and this time kept it inside. I recovered the cabin yesterday. I pushed it out into the driveway so that the sun would help everything flow better and I think I got a nice, relatively even covering. The wind blew so there are little bits of debris that floated by and stuck in the epoxy as well as two flies who wished they had stayed away. It will all be sanded away next weekend. This morning I covered the hatch. The epoxy was thicker but I got a mostly even coating everywhere but the edges. It is almost like it follows the fabric and runs off the end. I couldn't work outside today. The wind was too strong. It blew the table covering around as well as the glass cloth on the hatch. Since I had to keep the door closed, the resin never really warmed up. Here is what they are looking like.
20210306_181547 Small.jpg
20210306_181547 Small.jpg (34.71 KiB) Viewed 1400 times
20210307_201109 Small.jpg
20210307_201109 Small.jpg (30.18 KiB) Viewed 1400 times

my next step is to make another attempt at filling the screw holes and painting it with primer. Tony, if you see this, what type of primer did you use? You call out Rust-Oleum fiberglass primer in the book. Is that the automotive primer or is there another one that I have not come across yet?

Also arriving this week were the axle and the Monstaliner. The winning color was Smurfadelic. It will be a blue teardrop. I also tried welding today. I think there are some tensions that need to be adjusted. I definitely need more practice before I attempt the chassis.
JoeGrz
Teardrop Master
 
Posts: 107
Joined: Thu May 28, 2020 4:24 am
Location: Panhandle of Texas
Top

Re: Joe's Teardrop Build

Postby tony.latham » Sun Mar 07, 2021 10:02 pm

Tony, if you see this, what type of primer did you use?


Rustoleum. One quart will give two coats. Give it a light sanding in between coats of course.

It's looking great. :thumbsup:

Tony
User avatar
tony.latham
Gold Donating Member
 
Posts: 6899
Images: 17
Joined: Mon Jul 08, 2013 4:03 pm
Location: Middle of Idaho on the edge of nowhere
Top

Re: Joe's Teardrop Build

Postby JoeGrz » Tue Mar 09, 2021 9:35 pm

Thanks Tony! I will look and see what the auto parts stores have. The big box home centers had primer for clean metal and rusty metal.

I was hoping to fill screw holes with epoxy today but, in looking for when the third brake light attaches, found I missed a step. I spent the little bit of time I had today finding a 2x6 and then trying to figure out how to cut it on the diagonal. I got it worked out between the table saw, power plane and the belt sander. Tomorrow I will drill the holes for the light wires and hopefully adhere the block Thursday. I know the instructions were to drill the hole first but I got distracted with how to actually cut the shape. I think I can still get a reasonably straight hole since I kept the waste piece to square it up with.
JoeGrz
Teardrop Master
 
Posts: 107
Joined: Thu May 28, 2020 4:24 am
Location: Panhandle of Texas
Top

Re: Joe's Teardrop Build

Postby tony.latham » Tue Mar 09, 2021 9:41 pm

I know the instructions were to drill the hole first but I got distracted with how to actually cut the shape.


Hey, it's an adventure. :frightened:

At one time, Monstaliner had recommended Rustoleum but I don't think it's anything special.

Image

The auto-body spot-filler works great.

Tony
User avatar
tony.latham
Gold Donating Member
 
Posts: 6899
Images: 17
Joined: Mon Jul 08, 2013 4:03 pm
Location: Middle of Idaho on the edge of nowhere
Top

Re: Joe's Teardrop Build

Postby Bezoar » Wed Mar 10, 2021 6:57 am

I think the blue is going to look great! Don't you love the Monstaliiner color names??

Keep us posted, your project is looking good!
User avatar
Bezoar
Teardrop Master
 
Posts: 155
Images: 37
Joined: Mon Mar 10, 2008 9:01 pm
Location: Southern Wisconsin
Top

Re: Joe's Teardrop Build

Postby JoeGrz » Wed Mar 10, 2021 9:07 pm

tony.latham wrote:
At one time, Monstaliner had recommended Rustoleum but I don't think it's anything special.


I guess I need to read the instructions after all :thinking: I better do that now rather than just before I get ready to mix it and apply it

Bezoar wrote:I think the blue is going to look great! Don't you love the Monstaliiner color names??


Those names are great! I'm kind of disappointed with "Smurfadelic" when I could have had a color name like "Nuclear Winter" or "Zombie Sunset." I like the color but when I see the name, I see Papa Smurf looking back at me.
JoeGrz
Teardrop Master
 
Posts: 107
Joined: Thu May 28, 2020 4:24 am
Location: Panhandle of Texas
Top

Re: Joe's Teardrop Build

Postby western traveler » Sat Mar 13, 2021 3:01 pm

Joe,
I have finally caught up to present on your build Journal. It has been great but has created a bit of apprehension regarding my abilities. I am still in the planning stages of mine.

It will be closely tied to Tony’s book as well (Not interested in re-inventing the wheel). I do have a few things I want to do to write my name on it but if I ended up with a clone to his or yours I would be thrilled.

One bite at a time...

Been in the tool gathering mode and now beginning to order things that need lead time. Doors, axle, etc.

Tony has been helpful to me too...
western traveler
Donating Member
 
Posts: 396
Images: 264
Joined: Wed Dec 28, 2016 6:59 am
Location: The Front Montana
Top

Re: Joe's Teardrop Build

Postby JoeGrz » Sun Mar 14, 2021 5:52 pm

western traveler wrote: It has been great but has created a bit of apprehension regarding my abilities. I am still in the planning stages of mine.

Western Traveler - Don't be apprehensive about your abilities. This really does go together well. So far, up until today, my main problem was figuring out how to accurately run my tools, especially the jig saw. Every time I think I can follow a line with it, it proves me wrong

Today was not a happy day at the teardrop factory. It started out good. I got the hurricane hinge attached to the hatch and the cabin. I went to check it and it went down hill from there. I don't know how I did it, but I managed to build a twist into my hatch. :cry:

Here's the pictures. First the hinge with the brake light in place and ready to be epoxied into place.
20210314_140114 Small.jpg
20210314_140114 Small.jpg (29.46 KiB) Viewed 1222 times

All looks good from this angle. then the driver side
20210314_140325 Small.jpg
20210314_140325 Small.jpg (33.58 KiB) Viewed 1222 times

Not bad. Then I get the passenger side
20210314_140159 Small.jpg
20210314_140159 Small.jpg (29.16 KiB) Viewed 1222 times

You can see the gap between the cabin and the hatch. I have no idea how I managed to do this. I do know that the attachment point of the spars on one side shifted down about an inch. I misread my tape and the attachment is lower on one side than the other. I didn't think this would be an issue since the hatch was built on the trailer and everything appeared to be in place when I finished the framing. Another idea is that the cuts were not perfectly square on some of the spars and that changed the alignment. Either way, something went wrong. Tomorrow, unless someone has an idea on how to salvage this, I will start cutting up the hatch with the goal of recovering my sidewalls. If I can recover those, it is just a matter of remaking the spars and reattaching them.

On another note. I did read the instructions for the Monstaliner. I didn't see anything about the primer. I will get the automotive that says it is for metal and fiberglass and not worry about that. The important thing that I saw, if I'm reading it correctly, is that it needs 50 degrees minimum for the first 12 hours that it is curing. It turns out that we won't have those weather conditions for a couple weeks in the panhandle. the nights get too cold and the garage isn't heated.

Now off to figure out how to disassemble a hatch :(
JoeGrz
Teardrop Master
 
Posts: 107
Joined: Thu May 28, 2020 4:24 am
Location: Panhandle of Texas
Top

Re: Joe's Teardrop Build

Postby tony.latham » Sun Mar 14, 2021 6:21 pm

Now off to figure out how to disassemble a hatch


A damn tough bullet to bite...

Tony
User avatar
tony.latham
Gold Donating Member
 
Posts: 6899
Images: 17
Joined: Mon Jul 08, 2013 4:03 pm
Location: Middle of Idaho on the edge of nowhere
Top

PreviousNext

Return to Build Journals

Who is online

Users browsing this forum: No registered users and 25 guests