Joe's Teardrop Build

...ask your questions in the appropriate forums BUT document your build here...preferably in a single thread...dates for updates, are appreciated....

Re: Joe's Teardrop Build

Postby JoeGrz » Tue Oct 27, 2020 9:09 pm

Lows in the teens. Highs in the 20s. 4-6 inches of snow tomorrow. Funny thing, back in the 60s this weekend if you can believe the weatherman. Of course it is all relative. I am willing to bet this would be a wsrm up for Idaho
JoeGrz
Teardrop Master
 
Posts: 107
Joined: Thu May 28, 2020 4:24 am
Location: Panhandle of Texas

Re: Joe's Teardrop Build

Postby tony.latham » Tue Oct 27, 2020 9:52 pm

JoeGrz wrote:Lows in the teens. Highs in the 20s. 4-6 inches of snow tomorrow. Funny thing, back in the 60s this weekend if you can believe the weatherman. Of course it is all relative. I am willing to bet this would be a wsrm up for Idaho
Ouch. I had no idea.

We have not had any snow yet. Missoula -3 hours north- got 13” and -7 last week. It set a record.

Tony
User avatar
tony.latham
Gold Donating Member
 
Posts: 6899
Images: 17
Joined: Mon Jul 08, 2013 4:03 pm
Location: Middle of Idaho on the edge of nowhere

Re: Joe's Teardrop Build

Postby JoeGrz » Sun Nov 01, 2020 8:42 pm

Well, it was cold last week culminating Thursday with 4-1/2 inches of snow. But the nice thing about the Texas Panhandle, the weather changes quickly. This weekend we had 60s and even broke 70 yesterday. Besides running errands, which seems to take more time than it should, I managed to cut my headboard doors and work through how I wanted to place the power outlets on the headboard shelf. Here is what the sides will look like by the headboard.
20201101_193843small.jpg
20201101_193843small.jpg (26.09 KiB) Viewed 2024 times

You can see on the shelf, my little enclosure for the power outlet and the flashlight. The wood for the enclosure needs to be finished and the whole assembly attached but you can see the concept. Above, because I had a little bit of time and was curious about how much trouble it was. I pushed the wires down the slot, wired up and mounted the first reading light. Pushing the wire through was tough. In the end, I cut the cable jacket off and pushed the individual conductors down the slot. I should have made the slot a little wider or deeper. I'm not sure which but I could not get both conductors in as a single 14/2 cable. Also not shown is the cabin now has a sun roof and there is a piece of blocking cut for the cabin light.

I do have a question for you Tony. Why did you place the fuse box over the headboard? I am looking at placing mine in the galley and building an electrical enclosure. This picture shows the rough plan.
20201101_195610 small.jpg
20201101_195610 small.jpg (30.82 KiB) Viewed 2024 times

Since I am planning on the primary charger being the tow vehicle and then utilize a solar panel after I reach my destination, I have purchased the Renology DC to DC controller. It will take both an alternator input and a solar input. The problem is it is a lot bigger than your solar controller. My solution is to mount it on the counter on little rails. I will mount breakers and a cabin power outlet on the bulkhead and mount my fuse box on the side wall. I will put a cover over it that would include two power outlets for the galley and the battery monitor. I'm still working with the concept to lay everything out and see how much space it takes up.
JoeGrz
Teardrop Master
 
Posts: 107
Joined: Thu May 28, 2020 4:24 am
Location: Panhandle of Texas
Top

Re: Joe's Teardrop Build

Postby tony.latham » Sun Nov 01, 2020 8:50 pm

I do have a question for you Tony. Why did you place the fuse box over the headboard? I am looking at placing mine in the galley and building an electrical enclosure. This picture shows the rough plan.


I dithered back and forth. I could have and maybe should have put it above the battery, behind waterjug. Your idea will work fine of course.

That DC to DC box is big. Could you put it under the headboard and run some heavier gauge wire to the battery?

Tony
User avatar
tony.latham
Gold Donating Member
 
Posts: 6899
Images: 17
Joined: Mon Jul 08, 2013 4:03 pm
Location: Middle of Idaho on the edge of nowhere
Top

Re: Joe's Teardrop Build

Postby JoeGrz » Wed Nov 04, 2020 9:02 pm

Tony - I liked the idea of putting it in the headboard. Thinking through it though, I am leaning away from placing it in there. The instructions state that it needs to be as close to the battery as possible. I agree that increasing wire size makes that need go away. The other issue I have is access. Reaching back there to change it out would be a lot of trouble once the trailer is operable. I am also thinking about putting it above the battery under the counter. I need to select a battery and see how it all fits together. If that doesn’t work out well, it will have to go on the counter or on the wall above the counter.
JoeGrz
Teardrop Master
 
Posts: 107
Joined: Thu May 28, 2020 4:24 am
Location: Panhandle of Texas
Top

Re: Joe's Teardrop Build

Postby tony.latham » Thu Nov 05, 2020 8:55 am

Tony - I liked the idea of putting it in the headboard.


There's always a quandary with this stuff. If it were me, I think I'd put it there. The distance to the battery --relatively speaking-- in the RV world is still short. And this box is one of those devices that shouldn't need access.

Did your weather turn around? It's supposed to snow here this weekend so I'm going to button up our teardrop.

Tony
User avatar
tony.latham
Gold Donating Member
 
Posts: 6899
Images: 17
Joined: Mon Jul 08, 2013 4:03 pm
Location: Middle of Idaho on the edge of nowhere
Top

Re: Joe's Teardrop Build

Postby JoeGrz » Wed Nov 18, 2020 9:10 pm

It has been a couple weeks since I posted. I have spent the last two weekends wiring and finishing and installing the last little bit of interior wood. Other than the headboard doors, the cabin interior is complete. The headboard doors are made of underlayment and I'm not sure I'm happy with them. I will sand the edges and see if the doors don't hang up as much. If they do, I may look at an alternate wood for the doors.
I have run the wires and connected the ceiling light, two side/reading lights, the fan and the power outlets, two in the front and one in the rear of the cabin. I have wired a 1amp, 12 volt wall wort to the fuse panel and now have light in the cabin until the rest of the electrical gets finished out. The last thing I did was place the charge controller in the headboard. If the advice from someone who knows more about this than I do says it will be OK, it will be OK and I should follow that advice. After all, he did write the book. It also allowed me to use a size smaller wire which was nice as well. The need to get this wired before the roof goes on made me think about how all this part of the system fits together. Wire, terminal connectors and a hammer crimper showed up at various times last week and I now have all the wires that will be covered installed.

Now that the interior is finished, I am storing some of these parts that I have but can't install yet in the cabin. Two of those parts are the doors. I set one of the doors in to see how it fits. The door fits in snugly but the interior trim ring doesn't fit. I didn't receive installation instructions with the doors so I will do a little more digging on the web for how to install them as well as reaching out to the manufacturer. What I am finding is that I may need to cut a larger opening (about 1/8 inch side to side and about a 1/2 to 3/4 top to bottom) in each of the walls. I will first cut out the template. The tricky part will then be putting the template on the wall to expand the opening with the router.

So that's where I am today. If the weather holds and everything goes like I think it could, I will have the foam and roof installed by Thanksgiving with the fiberglass on the roof sometime in the following weekend. I say if the weather holds. Since it snowed, the weather has been in the 60s and 70s with a day or two dipping down in to the 50s. A lot of real nice days once it warms up. A few years back, we had really pleasant weather up to Thanksgiving. After Thanksgiving, cold, rainy and just overall miserable. The month of December could see the completion of the hatch. Somewhere along the way, I need to buy steel and an axle. Then I need to learn to weld :frightened:

It's coming together slowly and even looks like a teardrop
JoeGrz
Teardrop Master
 
Posts: 107
Joined: Thu May 28, 2020 4:24 am
Location: Panhandle of Texas
Top

Re: Joe's Teardrop Build

Postby tony.latham » Wed Nov 18, 2020 9:28 pm

The headboard doors are made of underlayment and I'm not sure I'm happy with them.


I'm not sure I'm happy with mine either. That stuff used to be a higher quality product. I may replace mine with 1/4" Baltic next summer.

Tony
User avatar
tony.latham
Gold Donating Member
 
Posts: 6899
Images: 17
Joined: Mon Jul 08, 2013 4:03 pm
Location: Middle of Idaho on the edge of nowhere
Top

Re: Joe's Teardrop Build

Postby JoeGrz » Tue Dec 15, 2020 9:28 pm

It has been a while and the last few weeks did not go as planned. If you remember my last post, I was hoping to have the roof of the cabin covered with fiberglass after Thanksgiving. Boy was I mistaken. The Friday before Thanksgiving, I ran down to the only supplier in the area that carries the baltic birch plywood. I figured I would pick up 6 more sheets of the 3 mm (inches are a thing of the past). When I got there, I was given the we don't stock that size response. When I explained that I picked some up in the spring (yes, it has been that long), I learned that they had it because someone else ordered it and then didn't pick it up. I was told they can get it but it would be the week after Thanksgiving since they didn't expect a delivery before Thanksgiving.

I headed home a little disappointed that things wouldn't go as planned but I could take a little time away from the trailer. The next day, I got the 2 inch foam for the ceiling space and decided to find wire for the brake light so I could have the wire come up through the same hole that the power wire for the battery charger comes up through. Pulled that and after putting the holiday decorations up, cut the foam and filled the areas between the roof spars. A couple lessons learned for anyone who might be thinking about working with the foam. When removing material to make room for the blocking, a router is not the way to go. In an attempt to not have little white beads throughout the garage, I got the pink foam board. I used the jig saw to cut it to the right length and then the strips to fill the voids. When I covered the wire way, I turned the jigsaw on its side and cut in the middle of the board the length of the blade and used a utility knife to remove the block. That worked well and the jig saw does not make a mess. When I got to the blocking for the ceiling light, I had to remove a fairly large section 3/4 inch deep. After several unsuccessful attempts with the jig saw and other methods of cutting, I got the bright idea to use my router. It did a great job. A nice smooth cavity that was cut fairly quickly and the foam fit nicely in the void. The problem is I will be finding little pink pieces for the rest of eternity. The mess went everywhere. The next one that needed a void in was the one that goes over the blocking for the charge controller. That is a large piece since it has, or will have, the controller, some breakers and terminal blocks. This time, on the suggestion of my wife, I used the oscillating saw. It took several passes to get an area large enough, was still messy, and rough looking but the mess was localized and much easier to clean. I will be using the same method when and if I get to the hatch.

Anyhow, the next week I didn't get a call to tell me the wood has shown up. Not a problem since we ran up to the mountains for the weekend and enjoyed the change in scenery. This past week, I didn't hear anything so I called hoping that maybe they forgot to call me. No such luck. I got some story about inventory and maybe it would be here this week. Hopefully, it will show up this week and I can get the roof on but I am beginning to fear that it will be after the first of the year before this stuff shows up. On the other hand, I guess I could drive out to Albuquerque to pick it up. 8 hours plus in the old truck is unpleasant and I have concerns about running it that far until I have a little work done to it. If I run this option, it will still be the beginning of the new year.

My other idea was to start the hatch. Unfortunately, the more I thought about it, the less I thought using the HD birch that I had was a good idea. Hopefully, my 3mm will come in this week and I can pick it up along with whatever the metric equivalent of a half inch is. If not, I may just get the half inch and some poplar and start framing the hatch.

So that's where I am in the process. If I had known that the 3mm wasn't a stock item, I would have ordered it much earlier. Hopefully I will be able to report progress soon.
JoeGrz
Teardrop Master
 
Posts: 107
Joined: Thu May 28, 2020 4:24 am
Location: Panhandle of Texas
Top

Re: Joe's Teardrop Build

Postby Bezoar » Tue Dec 15, 2020 10:32 pm

Looking good! :thumbsup:

I'm just getting started with Tony's book as guide and now your experience of things to watch out for. Thank you for posting your "lessons" for the rest of us!
User avatar
Bezoar
Teardrop Master
 
Posts: 155
Images: 37
Joined: Mon Mar 10, 2008 9:01 pm
Location: Southern Wisconsin
Top

Re: Joe's Teardrop Build

Postby rjgimp » Wed Dec 16, 2020 12:07 am

It appears the best and cleanest method of cutting foam, particularly carving out cavities, is with a hot wire. I haven't jumped off that bridge yet but will make a hot wire when I get there. George (ghcoe) seems to have had some great success and has designed a very neat and effective system.

http://www.tnttt.com/viewtopic.php?f=55&t=55323&hilit=hot+wire
-Rob


I hope to make it to a Procrastinators Anonymous meeting someday...
just as soon as the steering committee gets around to scheduling one!
User avatar
rjgimp
500 Club
 
Posts: 782
Images: 7
Joined: Fri Feb 22, 2019 3:59 am
Location: Saint Paul MN
Top

Re: Joe's Teardrop Build

Postby JoeGrz » Sun Dec 20, 2020 8:31 pm

Rob - Thanks for the link to the hot wire. That would have simplified a lot and not made near the mess. I may try to put that to use when I build the hatch.

Bezoar - Tony's book has been a great guide. Outside of a single dimensional issue that I ran into, all the sticking points are my own doing. It has been a long time since I have played with these toys and it shows.

The 3 mm plywood finally arrived. So I studied up on the process for putting on the roof. Here I noticed in my second time through that the blocking and the spars need to be even. I ran outside and looked and sure enough, they weren't. My spars were a little below the blocking. These were cut at 2 inches thick which turns out wasn't quite right for how things laid out for me. I think I follow the same process when building the hatch. So, when I build that, I will cut the spars a little large, fit it up, and then trim down to final size. My jig saw skills are hopefully good enough that I don't need to custom cut every one. Anyhow, to smooth this out, I pushed the trailer out of the garage so the wind would carry away the mess, and, with my belt sander, leveled everything out. One of the things that I had been curious about is how this would look with the tow vehicle. Since it was out of the garage, I backed the jeep to it and snapped a picture. There is about 4 foot (what I believe is the length of the tongue) between the cabin and the Cherokee.

20201219_144811 small.jpg
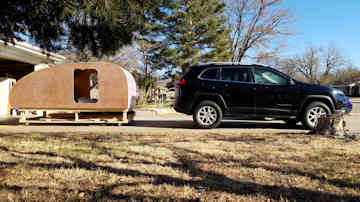
20201219_144811 small.jpg (39.14 KiB) Viewed 1667 times


Starting at the back as recommended, the first piece went on fine. The 5 ft board extended just beyond the opening for the fan. The next day, I cut out the fan opening and clamped the second piece through the opening and on the sides. I was hoping that I would be able to clamp it down and just start stapling. No such luck. The book recommends strapping down the sheet. I would say it is more than a recommend. If you're working alone, it is a must. My ratchet straps were too short to go all the way around so I ended up placing a C-clamp on the stand and hooking the ratchet side to that. The other end was hooked to the galley counter. The three straps I had worked fine though I would have used a fourth one if I had it. For the last little bit, I cut off a 19 inch piece and measured where the staples needed to go. Pressed it place and put a staple in the center. Use a couple here. The sheet pushed around the staple and slipped. After I got it secured in the center. I ran staples out the left edge then the right.

20201220_160759 small.jpg
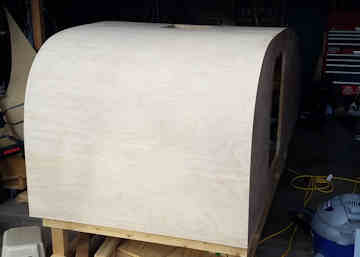
20201220_160759 small.jpg (30.04 KiB) Viewed 1667 times


We will see what the weather holds for next week. If it is warm like they are predicting now, I could get the fiberglass top coat on. If not, I will start the hatch. Until next time
Joe
JoeGrz
Teardrop Master
 
Posts: 107
Joined: Thu May 28, 2020 4:24 am
Location: Panhandle of Texas
Top

Re: Joe's Teardrop Build

Postby JoeGrz » Sun Jan 03, 2021 7:11 pm

Happy New Year! I would like to say that the teardrop is just about done but No. I enjoyed the holidays and worked some time in between. It is also so cold once the sun goes down, it is hard to go out to the garage. This two weeks was spent making templates and creating the hatch side walls. Not much to say in regards to making the templates. Trace the shape and cut it out. What I did prove is that I'm still not very good with the jig saw. The one thing that I learned here is that you need to measure your pieces instead of just following the book. If I had done this right, my sides would be 2 inches deep. Mine turned out to be about 1-7/8 inches. This wouldn't matter for most of the spars that go in but the first and possibly last ones need to match the side dimension. I don't think this will be a problem when I put it all together though it looks like my gap for my seal is a little small in this picture.

20210102_193432 Small.jpg
20210102_193432 Small.jpg (38.05 KiB) Viewed 1501 times


One thing I did learn about working with the baltic birch, and probably all plywood with a smooth surface, is that you need to be careful with the direction of cut. I found that when the cut approached the portion I wanted to keep, bits of wood would tear out. When the cut along the curve was away from the piece, all was fine. It may be the blades that I was using but, since they were two different styles, I think it is something that needs to be watched. The picture below represents what was accomplished the past two weeks

20210103_170203 Small.jpg
20210103_170203 Small.jpg (36.77 KiB) Viewed 1501 times


Looking again at this picture reminded me of something else. Up until today, all my c-clamps and spring clamps were 2 inch. The sides of the hatch, when glued up, are a little larger than two inch. If you're outfitting for this build, pass on the 2 inch clamps and buy the 3 inch. This is the only step that it has been an issue but you will need the larger clamps.

Finally, I tried to fill holes and gaps today with thickened epoxy. It approached 60 degrees so I wanted to see if I could get the screw holes covered and the gap between the side and roof filled in. I will see how it cures but it looks like some of it has oozed out of the holes and the gap. We will see how well I did and if the epoxy cures in a reasonable amount of time. Any more filling I do will probably be with body filler. If it cures well, I will round over the edges and apply the fiberglass. If not, wait for a warm day in March.

Next up, the hatch spars and maybe the hatch assembly. 4 hours a day of warmth just doesn't give a whole lot of time to get something done.
JoeGrz
Teardrop Master
 
Posts: 107
Joined: Thu May 28, 2020 4:24 am
Location: Panhandle of Texas
Top

Re: Joe's Teardrop Build

Postby tony.latham » Sun Jan 03, 2021 10:13 pm

If I had done this right, my sides would be 2 inches deep.


Joe:

It won't be an issue. The depth of the hatch --with this method-- is driven by the depth of the spars as you've probably figured out.


:thinking:

Tony
User avatar
tony.latham
Gold Donating Member
 
Posts: 6899
Images: 17
Joined: Mon Jul 08, 2013 4:03 pm
Location: Middle of Idaho on the edge of nowhere
Top

Re: Joe's Teardrop Build

Postby JoeGrz » Sat Jan 09, 2021 7:39 pm

[/quote]
It won't be an issue. The depth of the hatch --with this method-- is driven by the depth of the spars as you've probably figured out.
Tony[/quote]

My concern wasn’t as much the middle spars as the ones on each end. When I drew the templates for the blocking, I traced the cutout which is why I was concerned about it being too small. Fortunately, I followed the drawing in the book for the top by the hinge and traced the bottom which happened to come out right. 2 inch spars as you say will fit just fine.

Today I placed all my spacers on the trailer for hatch build and went to place the hatch side walls on the trailer and the walls are not appearing to line up correctly. Looking at the picture, it looks like there is a piece under the outside spacer. Am I seeing this correctly? I think that piece is pushing my hatch walls out so that they are not next to the edge of the cut and the spacer on the hatch spar.

Tonight it is supposed to snow. If it stops early enough and can clear the drive to back the car out, I will cut the spars and down 2 inches and start attaching them. Hopefully I can make a little progress tomorrow.
JoeGrz
Teardrop Master
 
Posts: 107
Joined: Thu May 28, 2020 4:24 am
Location: Panhandle of Texas
Top

PreviousNext

Return to Build Journals

Who is online

Users browsing this forum: No registered users and 26 guests