5x8x4 POD. Finally starting

...ask your questions in the appropriate forums BUT document your build here...preferably in a single thread...dates for updates, are appreciated....

5x8x4 POD. Finally starting

Postby pace » Fri May 21, 2021 3:15 pm

I have been lurking in the forums for quite a number of years. Finally starting a 5W x 8L x 4H POD. I need to use my trailer for other work. Materials have gotten expensive however I have shifted gears a bit and I will be going with 1"x6" tounge and groove planks. Today I am cutting the wood for the front wall. 5'W x 30"H. Good test piece to see how things will line up as well this will give me some references regarding construction. I will also be using a KREG pocket hole kit to assemble all my framing.

Still not 100% positive how to make my 5'W x 8'L Floor? My current plan is to buy to sheets of plywood possible tounge and groove cut a 3'W and a 2'W piece. Glue those together and them put an 2"x8" over the seem glued and screwed. Then there will be a could braces that go left and right on the trailer glied and screwed.

That's the current plan. I will try tondo a quick CAD tonight for reference. Any thoughts? Looking forward to hearing comments and seeing my own personal progresss. I have 9 weeks to get the shell finished. Heading out west for a 15 days. Plan to do the final touches over the winter.

Sent from my SM-G965U using Tapatalk
pace
Teardrop Builder
 
Posts: 34
Joined: Sun May 17, 2020 5:09 am

Re: 5x8x4 POD. Finally starting

Postby pace » Fri May 21, 2021 5:36 pm

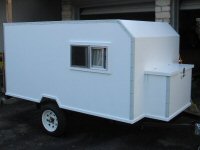
This is my design. Only image I have on my phone at the time. I have not finalized the windows. I have 2 large RV windows but not entirely sure how to install and trim them so I have not put that framing in my CAD drawingImage

Sent from my SM-G965U using Tapatalk
pace
Teardrop Builder
 
Posts: 34
Joined: Sun May 17, 2020 5:09 am

Re: 5x8x4 POD. Finally starting

Postby tony.latham » Fri May 21, 2021 6:49 pm

Still not 100% positive how to make my 5'W x 8'L Floor?


I build a framework that's 3/4" high and sheath it on both sides with 1/4" plywood set at 90º. The voids are filled with foam board of course. Strong and stiff.

Image

The gussets are temporary until one side is sheathed.

Image

The plywood supports the battery, water jug, and cooler.

Tony
User avatar
tony.latham
Gold Donating Member
 
Posts: 6900
Images: 17
Joined: Mon Jul 08, 2013 4:03 pm
Location: Middle of Idaho on the edge of nowhere
Top

Re: 5x8x4 POD. Finally starting

Postby pace » Sat May 22, 2021 7:02 am

I really like that design. However in my neck of the woods that floor design is going to cost me about $250. 1/4" ,plywood I have available is $47/sheet and $66/sheet for 3/4". Plus "The Mix", Foam and PL3. I certainly agree its would be a superior, and stiff floor. I saved the images for future reference. I will be building a larger trailer in the future. Going this size now based on my current trailer size but looking for larger trailer base next year.

Sent from my SM-G965U using Tapatalk
pace
Teardrop Builder
 
Posts: 34
Joined: Sun May 17, 2020 5:09 am
Top

Re: 5x8x4 POD. Finally starting

Postby swoody126 » Sat May 22, 2021 7:54 am

cut 2-8' pcs 5' long

run the seam across the middle of the trailer w/ a trailer beam under it for support

the leftover 3' pcs can be used in your bulkhead

if you do use the TnG 3/4" stuff the seam wil be reasonably sound

BON CHANCE

sw
"we are the people our parents warned us about" jb
swoody126
500 Club
 
Posts: 769
Joined: Mon Feb 22, 2016 6:11 pm
Location: north of Ft Worth
Top

Re: 5x8x4 POD. Finally starting

Postby pace » Wed Jun 02, 2021 5:19 am

Purchases and progress

I'm leaving for Yellowstone in less than 7 weeks. Crunch time after 6 years of planning...hahaha.. My camper will not be completely finished but will be a shelter with lights, fans heat ac and 2kWh power.

Purchased
$20 Kreg drill bit
$44 Helmsman Spar Urethane
$8. Mineral Sprits
$166 DIY Lithium Ion Battery packs 2kWh
$210 7.25" x 8' x 0.75" Tongue and Groove planks for the sides
$16 1/4" shank tongue and groove router bits
$20 dewalt Fine tooth circular saw blade
TOTAL
$484 --To date

I have been on this journey for several years. Started last fall and ran into car trouble. Thankfully I purchased (20) 2x4. I also discovered I have (3) sheets of 3/4" oak plywood. Purchased about 5 years ago. I'm still looking for the receipts. But I may just include current pricing for those Items for relevance.

Today I spent hours clearing a path in my garage. I'm off the next 8 days and would like to see the majority of the shell assembled. I'm running into a bit of an issue regarding joining the floor. I cant find any router bits locally. I was hoping to do that Wednesday. I borrowed a friends very new very nice router.

SIDEBAR--- Mine was involved in a broken pipe accident a few years back when the discharge hose for the sump pump broke and sprayed water all over the basement....... oh did I forget to mention I was in Hawaii for 11 days and it rained at home most of the time we were gone. The sump was actively spraying when we got home since the water was never actually being removed. Ruined a large portion of my tools to include my Rockler Router table and router. 6 months after this incident I needed some automotive wiring. That was in a tool box under the stairs. When I opened it it was full of water. This split in that tool box was 7" high. So the water was at least that deep at one point.

At any rate my friends router is a dewalt DWP611... it's only has 1/4 collet. No one local has 1/4 shank tongue and groove bits. (Just had a thought.... will that take a 1/2 collet. There's not one in the box???) Today I did cut the (2) floor pieces 4' x 5'. Plan to urethane and build the front wall tomorrow. Changing my dimensions slightly.. Going with 7'11" long and 4'11" wide. Just in case I have to revise my trailer plans.

Pictures.... nothing is what it seems to be. 18mm plywood. Bought the new blade because the old one was chipping the edges even though I was moving slowly to get a good cut.ImageImage

Sent from my SM-G965U using Tapatalk
pace
Teardrop Builder
 
Posts: 34
Joined: Sun May 17, 2020 5:09 am
Top

Re: 5x8x4 POD. Finally starting

Postby tony.latham » Wed Jun 02, 2021 9:18 am

the old one was chipping the edges even though I was moving slowly to get a good cut.


Try applying a piece of blue painter's tape where the cut will be. It'll help reduce the tear-out issue.

But yeah, you can get a 1/2" collet for that router.

Tony
User avatar
tony.latham
Gold Donating Member
 
Posts: 6900
Images: 17
Joined: Mon Jul 08, 2013 4:03 pm
Location: Middle of Idaho on the edge of nowhere
Top

Re: 5x8x4 POD. Finally starting

Postby pace » Thu Jun 03, 2021 8:48 pm

Love the app. Typed a reply and it never posted. Tony thanks for the info. I was wondering if the blue tape would be the key and thanks for confirming I can get a 1/2" collet for that router. Saves me from hunting down that piece of info. I have 28 days to complete the shell. So the Urethane can off gas. Impressive how long that smell lingers

Sent from my SM-G965U using Tapatalk
pace
Teardrop Builder
 
Posts: 34
Joined: Sun May 17, 2020 5:09 am
Top

Re: 5x8x4 POD. Finally starting

Postby pace » Thu Jun 03, 2021 8:52 pm

$20 - black beauty asphalt fence post paint for the bottom
$484 pervious total

$504 to date

Sent from my SM-G965U using Tapatalk
pace
Teardrop Builder
 
Posts: 34
Joined: Sun May 17, 2020 5:09 am
Top

Re: 5x8x4 POD. Finally starting

Postby pace » Sat Jun 05, 2021 9:16 pm

My choices for sealing my wood. Helsman Urethane and Black Beauty Fence Post paint for the bottom. I have been working on the floor for a couple of days not. Never thought it would take this long to get the floor done. The drying time is killing me. I did a coat of 50% Mineral Spirits/50%Urethane. I sanded with 80 grit, wiped with a wet rag (to pull up the grain) then painted in a reasonable coat of Mix, let it dry for 6 hours (temp 84 degrees), then sanded 150 grit wipe clean with wet rag and painted second coat of Mix. Let dry over night. Sanded again with 150 grit wiped clean with wet rag applied Urethane full strength. Tomorrow I will sand and apply with Black beauty to the bottom and start building the front wall. I also started on the tounge and groove to connect the 2 pieces of the floor. Cutting the tounge and groove was not nearly as difficult as I thought. I did 3 test cuts and I'm pretty Impressed. Things are not perfectly symmetric because as I showed in a previous picture I have 18mm plywood....(if only Reagan would not have screwed us over) but the joints are strong. I have not assembled the floor yet still sealing the halves
Way easier to move them 4x5 pieces than the 5x8 will be. I did changed the dimensions slightly to 4'11" x 7'11". I want to make sure a 5x8 trailer fits properly.

ImageImageImage

Sent from my SM-G965U using Tapatalk
Last edited by pace on Sun Jun 06, 2021 4:56 am, edited 1 time in total.
pace
Teardrop Builder
 
Posts: 34
Joined: Sun May 17, 2020 5:09 am
Top

Re: 5x8x4 POD. Finally starting

Postby pace » Sat Jun 05, 2021 9:21 pm

Purchases
$3 - (2) 3" chip brushes
$12 - 1 gallon mineral spirits
$16 - 1/4 shank tongue and groove router bit set

$504 Previous total
$535 Current total

Tip for your urethane brush. Just put it in a zip lock baggie. Stays soft over night

Sent from my SM-G965U using Tapatalk
pace
Teardrop Builder
 
Posts: 34
Joined: Sun May 17, 2020 5:09 am
Top

Re: 5x8x4 POD. Finally starting

Postby pace » Sun Jun 06, 2021 6:42 am

<b>MORE POWER</B>
Got my batteries for my power bank. Lots more work to do. These batteries are from those rentable scooters. They have to receive a signal every 5 seconds to stay on. It's no difficult but I need to purchase a micro controller and program a few lines of code. So I guess I'm going to "Learn to Code".

1.8kWh of power for $166

Just need a Charger, microcontroller, inverter,.......

I think I'm missing a piece?

Specs are 36v 12.8aH, 460wHImage

Sent from my SM-G965U using Tapatalk
pace
Teardrop Builder
 
Posts: 34
Joined: Sun May 17, 2020 5:09 am
Top

Re: 5x8x4 POD. Finally starting

Postby pace » Mon Jun 07, 2021 6:29 am

Tongue and groove cut. Perfectly. I cut a test piece before the primer cut each time. Then test fit the second cut on the full piece before making the second full cut. The test pieces fit awesome. Should be assembling the floor today.ImageImage

Sent from my SM-G965U using Tapatalk
pace
Teardrop Builder
 
Posts: 34
Joined: Sun May 17, 2020 5:09 am
Top

Re: 5x8x4 POD. Finally starting

Postby pace » Mon Jun 07, 2021 6:56 pm

Well the black beauty stuff must take a long time to dry. 18 hours later and everytime I move my floor Inend up with black lines on my hands. But it will work Out.. I guess.... of not I will use a heat gun and scrap it off. The full strength coating of Helsman was looked really nice and durable before I sanded it to add the black beauty paint. I'll see I suppose. Assembling the front wall now. Iys going to come together better than I planned.

Sent from my SM-G965U using Tapatalk
pace
Teardrop Builder
 
Posts: 34
Joined: Sun May 17, 2020 5:09 am
Top

Re: 5x8x4 POD. Finally starting

Postby tony.latham » Mon Jun 07, 2021 8:50 pm

pace wrote:Well the black beauty stuff must take a long time to dry. 18 hours later and everytime I move my floor Inend up with black lines on my hands. But it will work Out.. I guess.... of not I will use a heat gun and scrap it off. The full strength coating of Helsman was looked really nice and durable before I sanded it to add the black beauty paint. I'll see I suppose. Assembling the front wall now. Iys going to come together better than I planned.

Sent from my SM-G965U using Tapatalk
That stuff was the bomb in 1935.

Tony


Sent from my iPad using Tapatalk
User avatar
tony.latham
Gold Donating Member
 
Posts: 6900
Images: 17
Joined: Mon Jul 08, 2013 4:03 pm
Location: Middle of Idaho on the edge of nowhere
Top

Next

Return to Build Journals

Who is online

Users browsing this forum: Bing [Bot], Jdub78 and 64 guests