Page 2 of 6

Posted:
Fri Apr 22, 2011 10:02 amby dguff
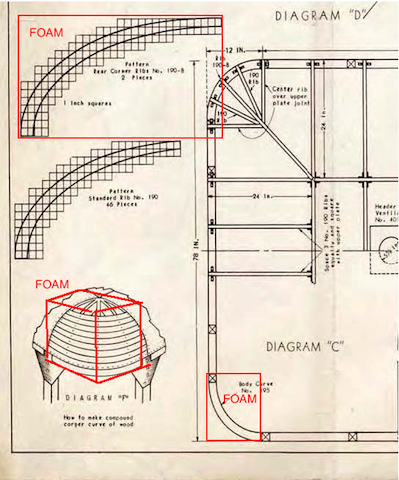
At the top of the page under the "Vintage Plans" section is a set of plans for a Jim Dandy model C trailer. Very complete with great info on how to build the roof. I think the design is classic and if I was going to build a breadloaf this would be the one.
Jerome
Posted:
Sat Apr 23, 2011 1:05 amby mezmo
Hi Tom/aggie79
You're Welcome.
I'm glad I was able to finally find the pics again. I was
beginning to think I couldn't find them !
Now it'll be a piece of cake for you ! Ha!
Cheers,
Norm/mezmo
Posted:
Sat Apr 23, 2011 8:10 amby aggie79
Jerome,
Thank you for pointing out the Jim Dandy in the Vintage Plans section. I've swung by that section several times before but for some reason I didn't recall seeing the breadloafs there.
Take care,
Tom
Posted:
Sat Apr 30, 2011 8:24 amby GPW
If the rounded corners are the problem , just make them out of foam , shape it like you want , and then fiberglass over it ... Easy !!! Maybe do all the roof edges like this and make it really "bread loaf" rounded ... No extensive woodworking or metal skills involved...

Love those old designs ...

[url][/url]
Posted:
Sat Apr 30, 2011 6:07 pmby aggie79
GPW,
I like your thinking. I do plan to skin it with glass cloth and epoxy, so I adding the foam corners would simplify things.
Take care,
Tom
Posted:
Sun May 01, 2011 6:41 amby GPW
Thanks Tom , I've always loved those Rounded trailers... and am Not a metal working guy , but Foam is so easy to cut and shape ... The glass just makes it permanent ... I guess if the Old Timers had these materials available they would have used it too instead of cutting all those little wood arches .. That's a Lot of work ..

Posted:
Sun May 01, 2011 7:08 amby 48Rob
GP,
I came across several photos of vintage trailers being built (in the collection of the Library of Congress).
They are currently down for maintenance, but here is one that shows the pre formed corners they used in the material scarce war years;
<img src="http://images.yuku.com/image/pjpeg/9ff263240959c5e946d3aa0c1ff356a59550e144.jpg">
It appears to be some sort of paper or fiber material made on a form.
Rob
Posted:
Sun May 01, 2011 10:15 amby aggie79
Rob,
That is an interesting picture. I have read that several of the breadloafs had canvas roofs and Masonite skins. I guess the fiberboard corners would be similar to Masonite.
At one time, I had kicked around the idea of using sonotube for the curved edges (covered with glass cloth and epoxy). It seems though that curves are actually elliptical rather than radial so the sonotube can't make that shape.
Thanks again for the pictures.
Tom
Posted:
Sun May 01, 2011 11:50 amby GPW
Gosh , that is an awful lot of seams to deal with .... No wonder they covered them with canvas...
I recall the old mentions of fiberboard , being like a type cardboard ...

guess once it's sealed and painted (and covered with canvas) it' not going anywhere...
Posted:
Mon May 02, 2011 4:49 pmby aggie79
48Rob wrote:GP,
I came across several photos of vintage trailers being built (in the collection of the Library of Congress).
They are currently down for maintenance, but here is one that shows the pre formed corners they used in the material scarce war years;
<img src="http://images.yuku.com/image/pjpeg/9ff263240959c5e946d3aa0c1ff356a59550e144.jpg">
It appears to be some sort of paper or fiber material made on a form.
Rob
Rob,
Thanks for the photograph and the tip. The site seems to be back up now:
http://www.loc.gov/pictures/. I found the pictures under "Western Trailer Company".
I guess, due to the war, steel was in short supply. In addition to the pre-formed paper corners, the site showed fender wells being made that way too. It is almost like paper-mache (not sure of the spelling) molded over a form. On picture showed the reel of paper being "mushed" through the glue. Other things I found interesting were that masonite was applied over 1/8" fir plywood as the exterior. Also, batting was used under the canvas roofs.
It is a very interesting site. Thank you for the reference.
Tom
Posted:
Mon May 02, 2011 6:47 pmby Wimperdink
Not sure if this would work or not with my limited experience with fiberglass but..... What about Fiberglassing over a little more than half of a large beach ball with some epoxy/mat or lay it up with strips of cloth paper machete style. Do all your smoothing and sanding. Then all you would have to do is cut along the equator, then quarter it after its all dry and peel the plastic from the ball out.
You could design your side, front, back curves all to the same radius as the beach ball your using.
Posted:
Tue May 03, 2011 7:53 amby GPW
W, that should work !!! Cool idea !!!
How about fiberglassing Inside half a proper size plastic ball ... that way the outside would be slick and ready to finish ... no sanding and filling .. get 4 corners too ..
Posted:
Tue May 03, 2011 11:11 amby Wimperdink
GPW wrote:W, that should work !!! Cool idea !!!
How about fiberglassing Inside half a proper size plastic ball ... that way the outside would be slick and ready to finish ... no sanding and filling .. get 4 corners too ..
I thought about that too but I couldn't figure out where to find a plastic ball large enough and hard enough to maintain its spherical shape long enough for the epoxy to dry. Gotta remember when you cut it in half or almost in half that its going to loose its strength to maintain shape. Also it would have to be a decent sized ball to get the radius right.
How big do those styrofoam balls from the craft stores get? Just fiberglass over it and leave the foam in place for insulation.
Edit: google found some 12" foam balls but they are pricey at 25 bucks each. And thats only a 6" radius. Kinda tight for a breadloaf.
Posted:
Tue May 03, 2011 11:29 amby Wimperdink
Also I suppose if you wanted to go through the trouble.... You could use one of those big rubber kids balls..... (The ones you always want to rip out of the rack at wallyworld and throw at your buddy) While its aired up, submerge half of it into a plaster bath.... then when its dry cut off the part that still sticking out, and glass the inside of it, break the plaster, quarter it, and peel the rubber off and have a nice smooth outside finish.
Posted:
Tue May 03, 2011 1:25 pmby GPW
W, EXACTAMUNDO !!!
Guess it would only be practical if you were going to make a Bunch of them ...
Now the ideal thing to do is make a mold and include some tabs for attachment coming out the sides/bottom , the whole corner slight raised to accommodate the roof and side material .. Install the corner then sheet over the edges ...