The Poet Creek Express - Foamie Hybrid

Canvas covered foamies (Thrifty Alternatives...)

Moderator: eaglesdare

Re: The Poet Creek Express - Foamie Hybrid

Postby Mary C » Sun Oct 05, 2014 10:21 am

Randy, Thankfully no one was hurt too bad. having said that, I guess it is time for a Newer Truck??? maybe the parts on the old one will work for the Newer one. Glad the mounty helped you out.

KC no mater how I say it it always comes out that I am in Awe of your abilities that you are sharing with us. I will forever be thankful for your picture of a one of your creations it helped me explain something to a builder that got interested in your complete build and has decided to build his own little TD. I am not sure what he has ultimately decided but I know it is for one person to be hauled behind a covered three wheeled motor cycle. I think it is a Goldwing, I was at the shop where he works to get a appraisal on some future work, that I cannot afford. This is my luck in life. I will find an alternative. just let me sleep on it for a week.

Mary C.
User avatar
Mary C
1000 Club
1000 Club
 
Posts: 1776
Images: 473
Joined: Mon Oct 15, 2012 6:29 pm
Location: Waco, Georgia

Re: The Poet Creek Express - Foamie Hybrid

Postby tony.latham » Sun Oct 05, 2014 1:14 pm

KC:

Actuator for a hatch lift? An electric ACTUATOR? Are you kidding me? You're setting a damn high bar (again). Do you realize there has NEVER been a teardrop on the Magruder Road with an electric operated hatch? Is Lloyd Magruder gonna roll over in his grave? Sheeeesh. I hope my wife doesn't see this...

When do we get to see a video of that motor lifting your hatch?

Tony
User avatar
tony.latham
Gold Donating Member
 
Posts: 6914
Images: 17
Joined: Mon Jul 08, 2013 4:03 pm
Location: Middle of Idaho on the edge of nowhere

Re: The Poet Creek Express - Foamie Hybrid

Postby GPW » Sun Oct 05, 2014 1:24 pm

Electrically operated hatch .... Now Everybody’s gonna’ want one ... just watch ... :roll:
... gotta’ admit, it is waaay COOL eh !!! 8) :D :thumbsup:
There’s no place like Foam !
User avatar
GPW
Gold Donating Member
 
Posts: 14912
Images: 546
Joined: Thu Feb 09, 2006 7:58 pm
Location: New Orleans
Top

Re: The Poet Creek Express - Foamie Hybrid

Postby KCStudly » Sun Oct 05, 2014 9:52 pm

No joke, Tony. Truth be told, I kinda of wish that some hydraulic struts had landed in my lap instead. I think that they would be a much more practical solution (instant opening and closing, fail safe operation, easier integration, and lighter weight).

I just sort of lucked into the actuators and thought the novelty would be kind of cool. They have been done before, so it's not like I'm breaking new ground, but there is sort of a "neato factor" to them, so that’s cool enough for me to go to the extra effort.

I won't try to run them with the hatch until I get the hatch skin fully glued, so that the hatch frame is stable. The cabin side hinge spar needs to be polyed, glued and screwed, and the hinge needs to be installed. To install the hinge I also need to drill out the second hole pattern for the screws that will hold the rubber seal and trim over the piano style hinge.

I will figure out how to share a video when the time comes. My camera does take video, but I have also been thinking about asking the wife for a Go-Pro (or equal) this year for Xmas (it’ll be here before we know it). I’d like to document the Poet Creek trip, and we could use it on the chunker, too. Any advice on what to get for an action style camera, and/or accessories to go with it?

Thank you Mary. I’m glad you were able to share the inspiration! I appreciate you sharing that.

Wolf, when a vehicle goes over it is a good idea to clear the combustion chambers before trying to spin the engine over. On a gas engine you would pull the plugs and spin it over; not sure what to do on a diesel. The thing is when they get sideways or upside down, the crankcase oil can run past the piston rings and cause hydraulic binding with damage when you turn the engine over. Sounds like you guys handled the recovery yourselves and all went pretty easy.

So back to the build. I climbed inside the galley again with my head lamp and a nice sharp pencil, while Karl held the lower hatch skin in place on the temporary cleat and hard up against the upper skin. I could see that where it butted up against the lower spar was not even (the spring in the upper skin must be pulling up on the middle ribs and flexing the lower spar up in the middle). In hindsight I probably should have clamped the bumper blank onto the bottom to see if that would pull it in straight, but instead I scribed a pencil line and planed the lower edge of the lower skin to match the spar as is (my thinking on the hatch as a whole is to try and build it where it sits without inducing stresses that might try to warp it out of shape later).

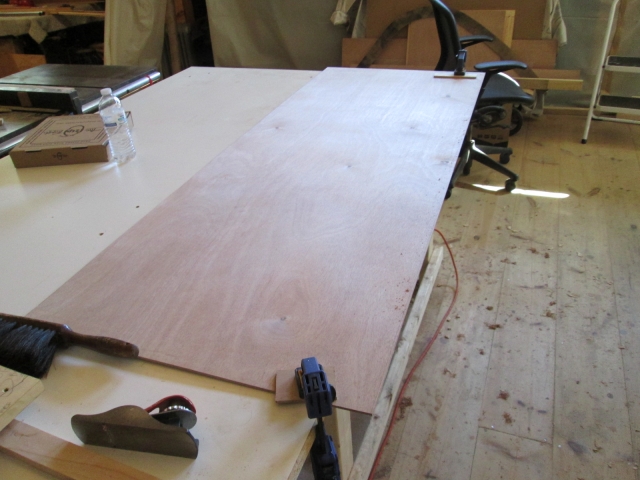
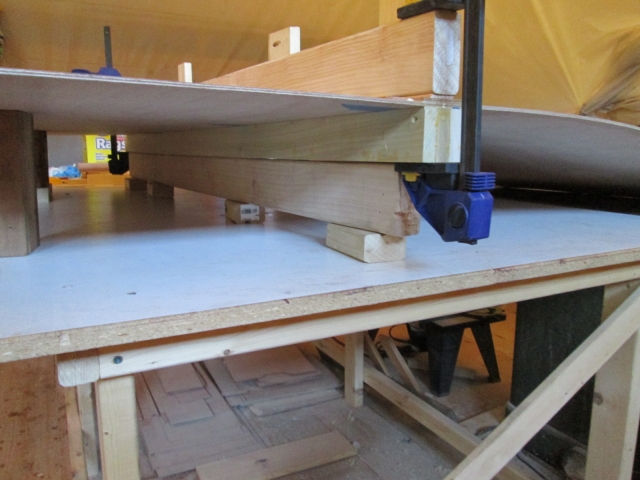
Next I climbed back in, and, with Karl’s help again, scribed the joint at the upper skin. To play it safe I ripped a good 1/4 inch away from the line and used the small hand plane to creep up on it. Here is the lower skin clamped to the bench getting planed.
Image

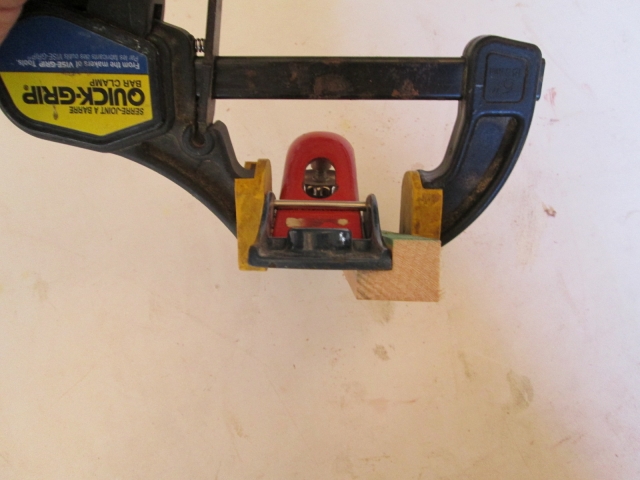
To help me hold the plane square to the edge I clamped this little scrap that already had a rabbet in it (a scrap of half lap siding left over from the barn).
Image
Image

After several trial fits to make sure the edges of the skins would pass each other and creeping up on it, it was time to remove the upper skin from the hatch frame and lay the two skins down flat together to see what was what with the joint.

Just a minor adjustment with the plane and they fit pretty well. The larger upper skin was a full 4 ft width with factory edges, so they were not as crisp as my hand planed edge; had a little roll from being handled and the corners were a little beat up. The corners don’t matter because they will be covered when the sides of the hatch get wrapped, but if I had been thinking I might have taken a skim cut on the upper skin before scribing to it so that I could get a better splice. I think it will be okay. I remembered to tape each edge first, then taped the two pieces together. Was a bit awkward to flip, but I managed.

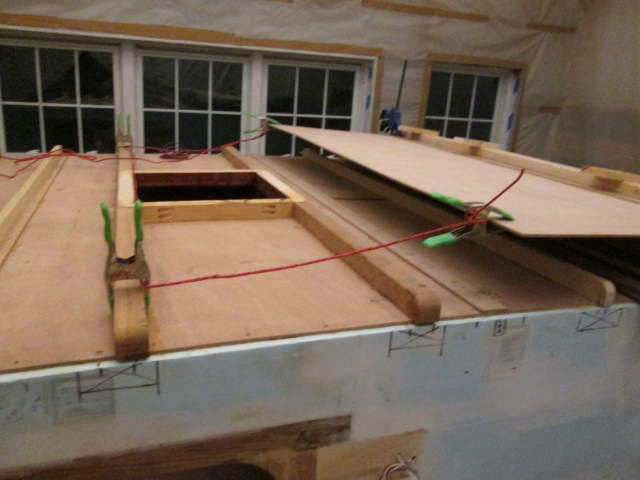
My long 2x4 I had used to clamp the roof skin butt splices to the bench with had been cut down for something else, and the curve trained into the upper skin made it a bit awkward, but I managed to prop everything up enough to where I could manage the curl and get it clamped up flat at the joint. Used the tape on the inside as a hinge to open the joint, and my double sided taped temporary cleats to help align the backing piece, then glued it, closed it up and clamped it using the wedge shims, same method as before.
Image

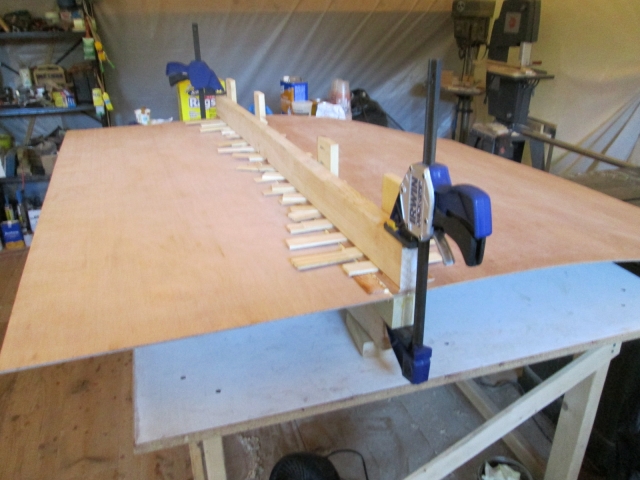
That’s the hatch bumper blank under there backing up the joint and adding to the pile, and the hatch rib spacer jig acting as the clamp strongback on top. The rest are just spacers to help accommodate the curl in the upper panel.
Image

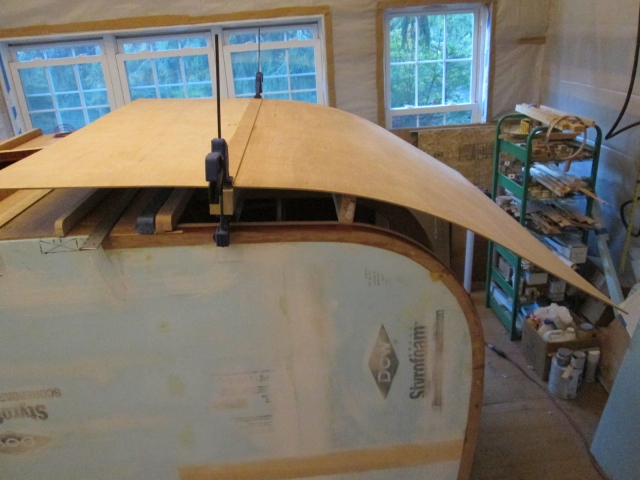
After that sat for a good hour or so and I had some time to contemplated a few details, consider the galley light mount and more of the hatch build sequence, I pulled most of the clamp setup (but left the backer in place to help stabilize) and got Karl to help me move the panel up onto the cabin. I needed to use the saw and thought that it would help to let the skin drape over the back of the galley (albeit backwards) to have gravity help hold the trained curl. Here it is draped over the back.
Image

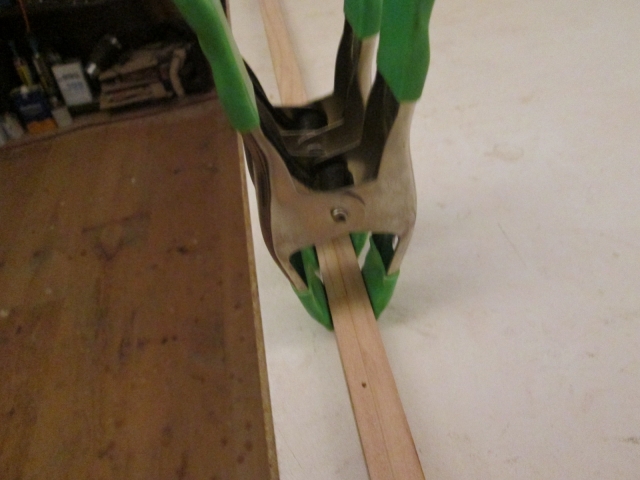
A better look at the spline backing up the splice. Under the clamp it looks like there is a big gap at the joint, but that is just the rolled corner of the ply that I mentioned.
Image

This wasn’t super secure just balancing up there, so just to be on the safe side I used a few spring clamps and a length of para cord to tether the skin so that it couldn’t slide off.
Image

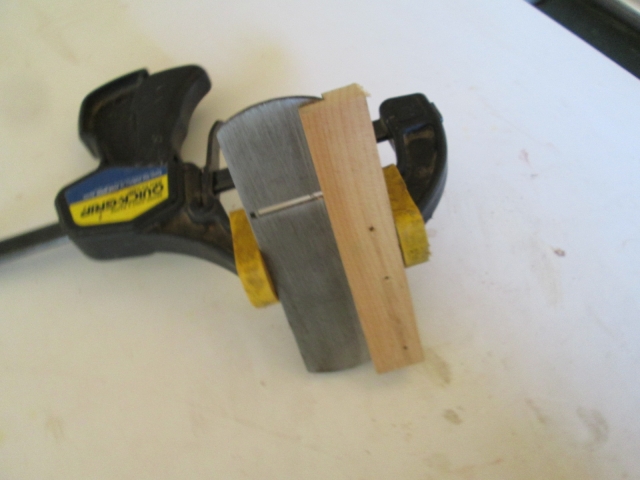
Trying to conserve bigger pieces of wood and wanting to use a relatively light species for the permanent cleat that will back up the lower edge of the hatch skin and help attach it to the lower spar, I decided to rip a shorter scrap in half and do a half lap joint to glue it back together as a longer, narrower piece. I guess I missed a few pics, but I did the rip on the table saw then used the miter guide to nibble away the half lap. Here it is under the clamps after gluing. (Not really picture worthy, I guess.)
Image
Image

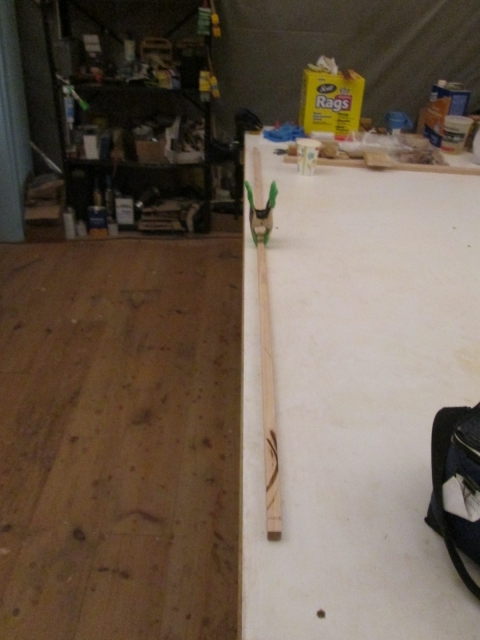
This piece will get ripped again to set a slight angle on the rear top so that the screws that will attach it down onto the top of the lower hatch spar (where it will eventually get covered with foam) will pull the edge of the skin in tight to the ribs, while also leaving room for the drill motor to drive the screws.

Next time I plan to finish this cleat, get it glued onto the lower edge of the skin, and start dry fitting the skin to the hatch frame again so that I can pilot all of the screw locations for the lower skin; and check to see that all is still fitting as planned before final glue up.

Trains a rollin’.
KC
My Build: The Poet Creek Express Hybrid Foamie

Poet Creek Or Bust
Engineering the TLAR way - "That Looks About Right"
TnTTT ORIGINAL 200A LANTERN CLUB = "The 200A Gang"
Green Lantern Corpsmen
User avatar
KCStudly
Donating Member
 
Posts: 9616
Images: 8169
Joined: Mon Feb 06, 2012 10:18 pm
Location: Southeastern CT, USA
Top

Re: The Poet Creek Express - Foamie Hybrid

Postby KCStudly » Tue Oct 07, 2014 7:51 pm

Last night I ripped the top angle on the lower hatch skin cleat and drilled the holes for the screws that will go down into the top of the lower hatch spar.
Image

The angled top might not have been necessary, but it made me feel better about toeing the screws.

Next I pulled the hatch skin down off of the cabin, pulled the masking tape off, scraped and sanded the seam.
Image
Image

I will sand the rest of the panel eventually, but I wanted to get the lower cleat glued on before leaving and I’d rather do the sanding after; less chance of marring the sanded finish while handling.

Speaking of marring, I had a momentary lapse with the scraper and put a pretty good gouge right in the middle of the panel. There is also a small 3/4 x 3/4 punch mark in the top ply of the upper skin section; guess it came that way or happened in handling somewhere along the way. I decided that side was the better side despite the flaw, whereas the other side was slightly rougher overall. I’m considering trying my hand at a Dutchman repair; cutting out a small shape of the top layer and splicing in a single layer patch… maybe trying to get it to spring back with a damp cloth and hot iron… or maybe just leaving it.

Anyway, next up was gluing the cleat on the bottom edge of the skin. I propped the arch up to try and preserve it.
Image
Image
Image

Today after work, despite having a bitter stomach all day, I managed to squeeze out some new, improved, washers for the upper hatch actuator pivot points. First I drilled the plastic dowel in the lathe; then plunged the cope in the end on the mill using a 0.810 end cutter (reground from .875… a close match to the 0.800 diameter of the actuator shaft); then back in the lathe to part off at a slightly reduced 0.065 thickness at the saddle (the 0.075 thk ones were a little tight on the street side). These will do a better job handling the chamfer where the pivot bolt hole is in the shaft.
Image

Coming soon: dry fitting the hatch skin again to pilot all of the screw holes in the lower section and verify fit; remove it again; sand the underside fully; mask the sides of the ribs that are easy to get to (but I’m not going to worry about it too much because the PL on the roof didn’t ooze out nearly as bad as the TB2 has been and I will be using that again for this); and gluing the skin on.

Other ‘to do’ items include: poly on the exposed surfaces of the cabin side hinge spar; glue and screw that on; then fitting the shaped piece, the “bumper” under the lower hatch spar; staining and poly under the hatch; pre-fitting the hinge; front, top and hatch foam; then canvas.

Train kept a rollin’.
Last edited by KCStudly on Thu Oct 09, 2014 7:18 am, edited 1 time in total.
KC
My Build: The Poet Creek Express Hybrid Foamie

Poet Creek Or Bust
Engineering the TLAR way - "That Looks About Right"
TnTTT ORIGINAL 200A LANTERN CLUB = "The 200A Gang"
Green Lantern Corpsmen
User avatar
KCStudly
Donating Member
 
Posts: 9616
Images: 8169
Joined: Mon Feb 06, 2012 10:18 pm
Location: Southeastern CT, USA
Top

Re: The Poet Creek Express - Foamie Hybrid

Postby KCStudly » Wed Oct 08, 2014 11:03 pm

I’m much happier with the 2nd version of the hatch actuator upper pivot washers.
Image
Image

I took another look at the underside of the hatch skin and decided that the little punch mark was smaller than I had stated above, and wasn’t worth trying to “fix” (probably end up making it stand out more). So I just sanded the scrapper gouge, and gave the panel a quick once over with 220 grit openhanded.

Then I needed some more room at the back of the cabin, so I levered the work base up on to moving dollies.
Image
Image

I used the green wire rack to prop the free end of the skin up until I got the front edge tucked under the hinge spar and tapped into place, then I wet the area at the tight radius again and started screwing it down.
Image

In the previous pic you can see the short length of cedar 1x2 resting on the lower cleat. I had a couple of clamps on this so that I could hook on the ratchet straps from under the cabin. With the extra leverage from the lower skin and the weight of the ratchet buckles, all I had to do was set a little friction and just draw the straps thru the buckle by hand; no winding needed.

That got the top part all screwed off again. The lower section is much straighter and the straps were no longer needed. When I got to this point I was able to use the gauges to complete the layout for the screws into the ribs.
Image
Image
Image

I had to shave the bottom edge of the outside corners just a touch more to get the lower edge to drop into place; used the matchbox plane and small sanding block.

Once the lower panel was all screwed, I put a clamp on the lower spar at each rib location and used a wedge shim against it to make sure the very bottom was hard up to the ribs before driving the adjacent screws down thru the cleat and into the spar.
Image

I’ll say it again, if I had it to do over I would not have been so stingy with my plywood planning. An extra 1/4 inch for trimming would have been nice. I guess I hadn’t read that advice yet when I made my cut list. So on the curb side the skin is almost flush at the very bottom.
Image

In the middle it underlaps the wall by a solid 1/8 inch (the dark vertical line here and in above pic).
Image

You can see how it fades to a slight overlap at the top here.
Image

I’m going to see if I can pull the walls in a tad by shortening the galley shelf face frame and counter support rail.

On the street side you can see that I made it flush at the bottom (don’t mind the temporary block sticking out from under the lower spar).
Image

In the middle the upper panel hangs off a good 3/16 of an inch.
Image

And at the top it tapers back to flush.
Image

Anyway, the hatch skin is all dry fit for now, so a mini milestone has been achieved!
Image

Close up of the lower cleat/toe kick in place.
Image

Bonus pics! We have a bustle!
Image
Image
Image

3-1/2 hrs rollin’.
KC
My Build: The Poet Creek Express Hybrid Foamie

Poet Creek Or Bust
Engineering the TLAR way - "That Looks About Right"
TnTTT ORIGINAL 200A LANTERN CLUB = "The 200A Gang"
Green Lantern Corpsmen
User avatar
KCStudly
Donating Member
 
Posts: 9616
Images: 8169
Joined: Mon Feb 06, 2012 10:18 pm
Location: Southeastern CT, USA
Top

Re: The Poet Creek Express - Foamie Hybrid

Postby Wolffarmer » Wed Oct 08, 2014 11:09 pm

Do you have a "hedge row"?

Randy
"these guys must be afraid of the dark"
User avatar
Wolffarmer
Donating Member
 
Posts: 4612
Images: 309
Joined: Wed May 02, 2007 1:32 pm
Location: Idaho Rupert
Top

Re: The Poet Creek Express - Foamie Hybrid

Postby lthomas987 » Wed Oct 08, 2014 11:15 pm

Over again your work is stunning. And you're making big visible progress.
Laura
Bike-Drop a Micro-Foamy Build Journal http://www.tnttt.com/viewtopic.php?f=50&t=59274
My first Superlegarra-ish Foamy build http://www.tnttt.com/viewtopic.php?f=55&t=59049
User avatar
lthomas987
Donating Member
 
Posts: 357
Images: 204
Joined: Sun Feb 02, 2014 2:41 pm
Location: Minneapolis, MN, USA
Top

Re: The Poet Creek Express - Foamie Hybrid

Postby KCStudly » Wed Oct 08, 2014 11:42 pm

Wolffarmer wrote:Do you have a "hedge row"?

Um, not that I know of. Is that a tool? Perhaps a plane with a guide fence for trimming the edge?

lthomas987 wrote:Over again your work is stunning. And you're making big visible progress.

Thanks Laura. You're moving right along yourself! I like your color scheme. :thumbsup:
KC
My Build: The Poet Creek Express Hybrid Foamie

Poet Creek Or Bust
Engineering the TLAR way - "That Looks About Right"
TnTTT ORIGINAL 200A LANTERN CLUB = "The 200A Gang"
Green Lantern Corpsmen
User avatar
KCStudly
Donating Member
 
Posts: 9616
Images: 8169
Joined: Mon Feb 06, 2012 10:18 pm
Location: Southeastern CT, USA
Top

Re: The Poet Creek Express - Foamie Hybrid

Postby Wolffarmer » Thu Oct 09, 2014 12:17 am

KCStudly wrote:
Wolffarmer wrote:Do you have a "hedge row"?

Um, not that I know of. Is that a tool? Perhaps a plane with a guide fence for trimming the edge?

Stairway to Heaven reference, now that you have a bustle

If there's a bustle in your hedgerow, don't be alarmed now,
It's just a spring clean for the May queen.
Yes, there are two paths you can go by, but in the long run
There's still time to change the road you're on.
And it makes me wonder.

Randy
"these guys must be afraid of the dark"
User avatar
Wolffarmer
Donating Member
 
Posts: 4612
Images: 309
Joined: Wed May 02, 2007 1:32 pm
Location: Idaho Rupert
Top

Re: The Poet Creek Express - Foamie Hybrid

Postby KCStudly » Thu Oct 09, 2014 7:11 am

Aah, I missed that reference entirely! (Thanks for sharing.)

I was too focused on when is the right time and how to trim the overlapping skin. I'm thinking I may want to pull the lower locating blocks now and see what moves. I doubt I will have any side shift, but I might get some spring back (hopefully minimal :worship: ). From there I might just pull the whole hatch assembly off and try a little experiment; make some temporary stretchers a little shorter than the shelf frame and counter rail, and see if it has the desired affect pulling the wall(s) into position before I commit to cutting the good pieces. Either way, I will wait and trim the skin flush to the wall after the hinge has been installed.

I'm also finding it tough to judge just how much the foam and canvas will stiffen the inner skin. Over the tight radius at the hump the skin has stiffened up really tight (as expected), but in the flatter area over the upper actuator mounts where the low arch of the roof transitions onto the hatch, the panels in between the ribs are still somewhat flexible (I know this will stiffen up considerably with the foam and canvas, but I'm just not sure if it will be enough to cope with the relatively long leverage and high load from the actuator brackets. I may heed Mary's advice and add a stiffener on the underside in between the middle pair of ribs. The trick will be to come up with a nice design that also incorporates the paper towel rack. Maybe an "open truss" style consisting of a 1x3 lightened with a series of 1-1/2 inch holes that have been rounded over with the router, then hang the paper towel roll and a hanging friction weight off of that using 550 cord; or a simple hanger fabricated out of small diameter tubing with some sort of release catch mechanism to allow easy roll changes.

I'm getting some ideas. :thinking: :thumbsup:
KC
My Build: The Poet Creek Express Hybrid Foamie

Poet Creek Or Bust
Engineering the TLAR way - "That Looks About Right"
TnTTT ORIGINAL 200A LANTERN CLUB = "The 200A Gang"
Green Lantern Corpsmen
User avatar
KCStudly
Donating Member
 
Posts: 9616
Images: 8169
Joined: Mon Feb 06, 2012 10:18 pm
Location: Southeastern CT, USA
Top

Re: The Poet Creek Express - Foamie Hybrid

Postby GPW » Thu Oct 09, 2014 8:50 am

Looking like a trailer !!! 8) :applause: :beer:
There’s no place like Foam !
User avatar
GPW
Gold Donating Member
 
Posts: 14912
Images: 546
Joined: Thu Feb 09, 2006 7:58 pm
Location: New Orleans
Top

Re: The Poet Creek Express - Foamie Hybrid

Postby KCStudly » Thu Oct 09, 2014 2:43 pm

It's "almost done". :D

(not)
KC
My Build: The Poet Creek Express Hybrid Foamie

Poet Creek Or Bust
Engineering the TLAR way - "That Looks About Right"
TnTTT ORIGINAL 200A LANTERN CLUB = "The 200A Gang"
Green Lantern Corpsmen
User avatar
KCStudly
Donating Member
 
Posts: 9616
Images: 8169
Joined: Mon Feb 06, 2012 10:18 pm
Location: Southeastern CT, USA
Top

Re: The Poet Creek Express - Foamie Hybrid

Postby wagondude » Thu Oct 09, 2014 8:30 pm

Wolffarmer wrote:Do you have a "hedge row"?

Randy


:lol: :lol: I get it! Obscure "Stairway to Heaven" reference. 8) 8)

Edit: Should have read further. I see you already explained it.
Bill

TnTTT ORIGIONAL 200A LANTERN CLUB
101137
User avatar
wagondude
1000 Club
1000 Club
 
Posts: 1535
Images: 35
Joined: Sun Jan 16, 2011 7:41 pm
Location: Land of the Jayhawks
Top

Re: The Poet Creek Express - Foamie Hybrid

Postby Wolffarmer » Thu Oct 09, 2014 8:56 pm

Funny how my mind works. ( lots of people say that ) I went right to it.

:frightened: Randy
"these guys must be afraid of the dark"
User avatar
Wolffarmer
Donating Member
 
Posts: 4612
Images: 309
Joined: Wed May 02, 2007 1:32 pm
Location: Idaho Rupert
Top

PreviousNext

Return to Foamies

Who is online

Users browsing this forum: No registered users and 10 guests