The Poet Creek Express - Foamie Hybrid

Canvas covered foamies (Thrifty Alternatives...)

Moderator: eaglesdare

Re: The Poet Creek Express - Foamie Hybrid

Postby tony.latham » Thu Apr 30, 2015 5:31 pm

You might take a peak at Half Dome Danny's third brake light, it's the same one I used. It's a combination three lights, blinkers, and tail light. I stole his idea.

viewtopic.php?t=59328

They're about $25 on eBay. Great lights.

Tony
User avatar
tony.latham
Gold Donating Member
 
Posts: 6907
Images: 17
Joined: Mon Jul 08, 2013 4:03 pm
Location: Middle of Idaho on the edge of nowhere

Re: The Poet Creek Express - Foamie Hybrid

Postby KCStudly » Thu Apr 30, 2015 10:38 pm

Thanks for the links, Tony. I hadn’t seen the multipurpose light bars before. Unfortunately I have already purchased the standard LED 3 light bar so will likely stick with it. Nice mount you made there.

While I stew over my options on the clearance lights I made progress on the license plate holder and marker light.

First I ripped (actually, resawed) some fir and a smaller piece of poplar from 1x2 to 9/16 thk. This will be the blocking for the plate and marker light fasteners; when combined with the 5 mm (3/16 thk) ply it will end up back at 3/4 inch thk, the same as one layer of the hatch foam. Next I laid out the fir for the four T-nuts, countersunk with the Forstner, drilled thru and installed the T-nuts. These will mount the plate.
Image
Image

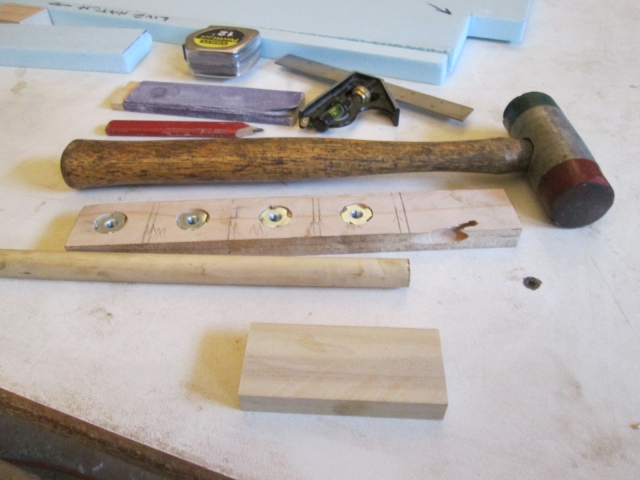
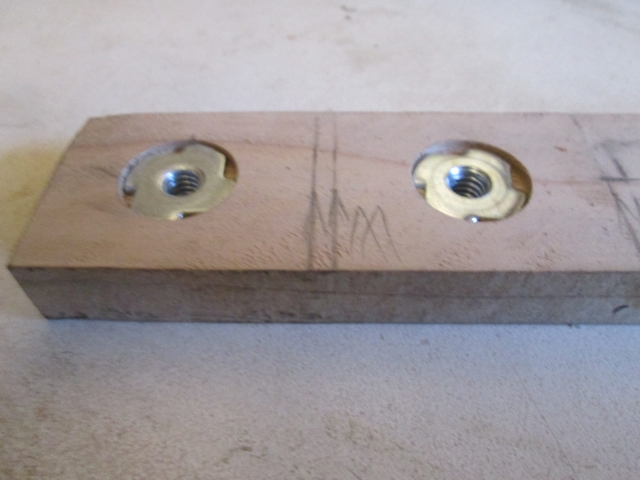
Next I cut those into individual blocks; rounded over the corners of the plate backer; drilled the necessary holes; drilled out some temporary wooden washers; and scrounged some 1/4-20 SS bolts from Karl’s surplus.
Image
Image

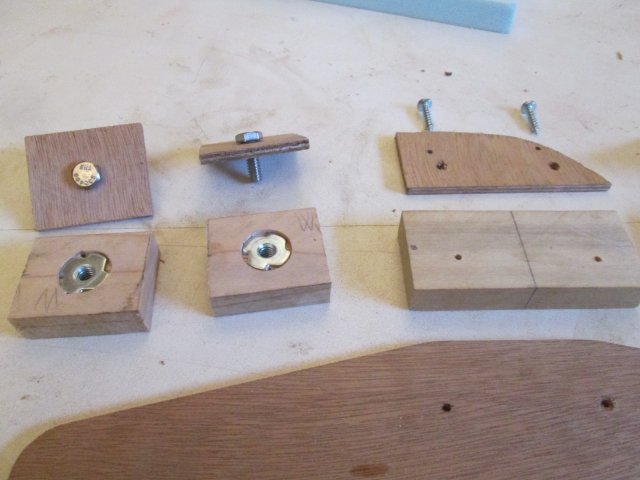
The wooden washers will protect the face from the heads of the fasteners during glue up; using the fasteners for clamping and to hold alignment (in lieu of clamps) during glue up.

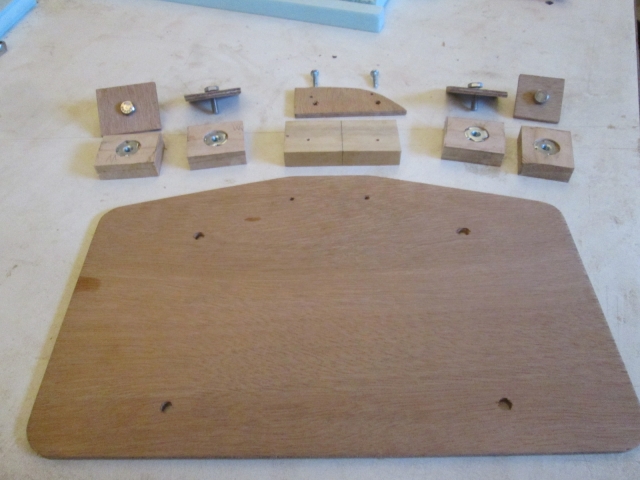
Did a dry run assembly. This is the side the plate and light will fasten to…
Image

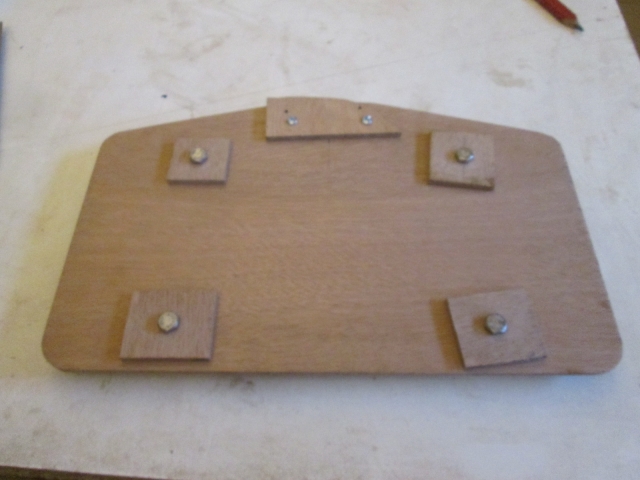
… and this is the side that will get imbedded into the hatch foam.
Image

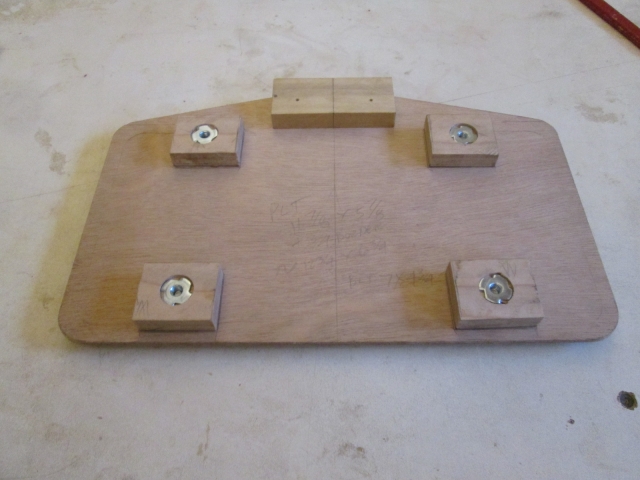
It looked pretty much exactly the same after gluing with TB2. I’ll be sure to slather this up really good, including a good soaking of the bolt holes, with “the mix”; and I will also run some caulk inside the holes around the bolt shanks when I mount the plate permanently (the plate in the earlier pic was just an old dead plate Karl had kicking around used for mock-up).
KC
My Build: The Poet Creek Express Hybrid Foamie

Poet Creek Or Bust
Engineering the TLAR way - "That Looks About Right"
TnTTT ORIGINAL 200A LANTERN CLUB = "The 200A Gang"
Green Lantern Corpsmen
User avatar
KCStudly
Donating Member
 
Posts: 9616
Images: 8169
Joined: Mon Feb 06, 2012 10:18 pm
Location: Southeastern CT, USA

Re: The Poet Creek Express - Foamie Hybrid

Postby Sheddie » Fri May 01, 2015 3:27 am

Regards the lighting
Do it right do it once ;)
User avatar
Sheddie
1000 Club
1000 Club
 
Posts: 1499
Images: 1129
Joined: Mon Jul 01, 2013 3:26 pm
Location: Whangarei, New Zealand
Top

Re: The Poet Creek Express - Foamie Hybrid

Postby OP827 » Fri May 01, 2015 1:46 pm

KCStudly wrote:You hit it on the head, OP. I have seen that but figured I would have plenty of lighting and did not want to clutter the nice lines of the camper with a bunch of bumps and warts, so I kind of skipped over that stuff when the time was right.

Now I'm having second thoughts. :thinking: :NC

Thanks, Tony. That's pretty much the attitude Karl and I both had when we talked about leaving them off way back when I was building the walls.

Right now I'm thinking that I will put the 3-light up on the hatch where I can still tunnel it in a little to get it plumb and reduce the amount of blister needed, and I might have a look and see what my options are for rear facing clearance lights. Subject to change.


KC,
I looked at your 3D model in the start of this build. Did you consider that you maybe able to find small markers that have both rear and side light and locate them at the lower portion of your trailer, on the sides?
Image

Are these (nice looking of course) corner markers exist?
I am thinking small, maybe something similar to these? - Image
User avatar
OP827
Donating Member
 
Posts: 1560
Images: 405
Joined: Fri Apr 25, 2014 7:27 pm
Location: Bruce County Ontario
Top

Re: The Poet Creek Express - Foamie Hybrid

Postby KCStudly » Fri May 01, 2015 8:20 pm

Oh don’t get me wrong. I have always planned for side running lights front and rear down at the wall sill, I just didn’t plan for clearance lights up at the top on the sides of the walls. Here is the electrical rough in and recessed pocket for the street side front…
Image

… and curb side rear.
Image

Here are the lights I bought in the first order form superbrightleds.com. You can see one of the rectangular amber front running lights with chrome bezel in the first pic, near the nickel. Also visible in the upper left corner of the second pic, still in the bags, are the matching red ones for the rear; and the 3-light bar. (This was from my post back on 12/01/12.)
Image
Image

At this point I think I will add the clearance lights, 5 in total across the top crest of the hatch. I don’t really like the light bar SS base; however the lamps are screwed to it from the back and can be removed. I just placed an order for two additional lights; these are the same lamp as the 3-light bar except they are screwed to a stud mount trim base. I want all five of them to match and it was a couple bucks less to buy two of these than to scavenge from another light bar.

I think I will remove them all from their stock bases and make 5 individual bases to mount them into 5 individual hatch blisters.

We’ll see how that goes.
KC
My Build: The Poet Creek Express Hybrid Foamie

Poet Creek Or Bust
Engineering the TLAR way - "That Looks About Right"
TnTTT ORIGINAL 200A LANTERN CLUB = "The 200A Gang"
Green Lantern Corpsmen
User avatar
KCStudly
Donating Member
 
Posts: 9616
Images: 8169
Joined: Mon Feb 06, 2012 10:18 pm
Location: Southeastern CT, USA
Top

Re: The Poet Creek Express - Foamie Hybrid

Postby Sheddie » Fri May 01, 2015 9:09 pm

There have been many times that I have resisted putting bits and pieces on vehicles, trailers, boats etc, because I thought they would stick out like dogs b....! :o
Finally, after I have fitter whatever it was, I have stood back (and as long as it was done tidily) and looked at it, have thought "that looks like it should have been there all along". :R
User avatar
Sheddie
1000 Club
1000 Club
 
Posts: 1499
Images: 1129
Joined: Mon Jul 01, 2013 3:26 pm
Location: Whangarei, New Zealand
Top

Re: The Poet Creek Express - Foamie Hybrid

Postby KCStudly » Fri May 01, 2015 10:36 pm

I'm not ruling out the side upper clearance lights yet Sheddie ( :lol: ...curious that I don't see them on your build, just lower marker lights... :thinking: :lol: :lol: :lol: ), and I know exactly what you are saying. For now I am working on the rear clearance lights for up on the crest of the hatch, and I can tell you that the idea is growing on me now that I have put my own custom spin on them. So maybe I can also find a way to add the side ones. We will see.

For now, follow along on my design session for the rear lights.

Okay, that previous post was written earlier this evening, but wouldn’t post for some reason when the server went down, so I saved it and posted it tonight.

Since then I separated one of the 3-light lamps off of the bar and had a look at the back of it.
Image

There is one hot lead that feeds the first lamp and daisy chains off a second point on each circuit board to the next lamp. I had to snip one of the jumpers in order to separate the lamp because the jumpers were added thru the windows in the bar after they had been screwed to it. Also the potting, which appears to be silicone sealant, was added post assembly, as well. In the above pic you can see that there is exposed wire between the wire insulation and the potting. No Bueno, the exposed wire could corrode down into the circuit board.

The ground side of the circuit is thru contact between the little terminal tab and the bar.

Here’s a close up of the back of the middle lamp still attached to the bar.
Image

The last lamp in the chain only has the one jumper wire.
Image

The plan, as it stands right now, is to make up a set of individual mounting plates represented by this sketch here.
Image

The tab ears on either end of the plate with 3/16 diameter holes will allow the assembly to be screwed down using truss head screws. The 5/32 holes are for the screws that go thru the back to hold the lamp to the plate. The 1/4 inch hole above the centerline is a clearance hole for the hot lead. The one on the centerline is a clearance hole for the jumper wire (even though it will be clipped and potted over, I don’t want there to be any chance of the stub grounding out). The 1/4 inch hole below the centerline is to allow a dedicated ground wire to be soldered onto the terminal tab. Karl has a scrap of 18 ga stainless left over from a recent industrial steam hood job he just completed, from which he will shear a strip for me that I can use to make 5 of these plates.

From there I will make up five backing plates from the 5 mm ply with screw blocks, and fair them with foam similar to the way I did the taillight mounts.

So why go to all of this trouble. Well, I already bought the 3-light bar. I know I can buy surface mount marker lights, and I do like the fancier light bars that Tony linked to, but all along I have tried to keep the lighting budget fairly conservative using simple, almost retro style fixtures (albeit in modern low draw LED's). It doesn't make much sense to change that theme now and I would just as much prefer to put my own little custom spin on these.

A little progress is still progress. :thumbsup:
Last edited by KCStudly on Fri May 08, 2015 6:28 am, edited 1 time in total.
KC
My Build: The Poet Creek Express Hybrid Foamie

Poet Creek Or Bust
Engineering the TLAR way - "That Looks About Right"
TnTTT ORIGINAL 200A LANTERN CLUB = "The 200A Gang"
Green Lantern Corpsmen
User avatar
KCStudly
Donating Member
 
Posts: 9616
Images: 8169
Joined: Mon Feb 06, 2012 10:18 pm
Location: Southeastern CT, USA
Top

Re: The Poet Creek Express - Foamie Hybrid

Postby Sheddie » Sat May 02, 2015 4:15 am

We don't require all the lights that you do in the states, here is a look at our requirements, from LTSA.

Light trailer requirements
If you tow a light trailer (up to 3500kg when loaded), it must have a WoF. To meet the WoF standard your trailer must be in good condition (no rust around safety areas) and it must have the following equipment in good working order:
trailer-features-side.jpg
trailer-features-side.jpg (5.7 KiB) Viewed 904 times


Features your light trailer must have

A safe and strong coupling and a safety chain or cable.
If the trailer or its load is more than 2 metres wide, it must have two white lights at the front to show how wide it is.
Safe tyres – the tread depth must be at least 1.5 millimetres right around the tyre.
Mudguards.
Two red reflectors at the back (one on each side).
Your trailer will also need the following features:
trailer-features-back.jpg
trailer-features-back.jpg (5.22 KiB) Viewed 904 times


Features your light trailer must have

Two red lights at the back to show how wide the trailer is.
Direction indicators at the back.
Two red stop lights at the back, if the driver's signals can't be seen.
A number plate light at the back.
A current trailer WoF issued by a WoF inspector. This must be renewed:
every 12 months for the first six years, then
every six months after.
A licence label needs to be positioned close to the number plate
Last edited by Sheddie on Sat May 02, 2015 4:09 pm, edited 1 time in total.
User avatar
Sheddie
1000 Club
1000 Club
 
Posts: 1499
Images: 1129
Joined: Mon Jul 01, 2013 3:26 pm
Location: Whangarei, New Zealand
Top

Re: The Poet Creek Express - Foamie Hybrid

Postby GPW » Sat May 02, 2015 5:51 am

KC , if you have too much exposed wire on that component , you can grab the wire part on the other end with pliers , and slide the insulation towards the exposed parts. Quick and easy ..
Just a note .... The plane guys years ago learned that silicon as it cures releases something (acidic) that causes wire to corrode ... I don’t know if that’s a concern with manufactured components. :thinking:

Ps. I think taking light fixture bits and then putting your own personal touch on them is Brilliant !!! :applause: JMHO...
There’s no place like Foam !
User avatar
GPW
Gold Donating Member
 
Posts: 14912
Images: 546
Joined: Thu Feb 09, 2006 7:58 pm
Location: New Orleans
Top

Re: The Poet Creek Express - Foamie Hybrid

Postby daveesl77 » Sat May 02, 2015 1:17 pm

KC, I love reading about and viewing all the things you are doing on your build. Your craftsmanship and ingenious ideas are a real pleasure for me and I unabashedly steal many of them (but never claim them as my own).

I'm playing around with my lighting thing now. I found some very small mason-type jars, like 1.5 inches tall and 2 inches across. They have this great diamond pattern and an actual clear spot on one portion. They only cost like 50 cents each, so I can waste a few trying to get the translucent red to work out well. I'll be using LEDs as the prime light source.

I also got a reel of some neat RGB led, where the all 3 colors are in one single spot. My thought is to set these up in some hidden parts around the trailer for when camping. They can be white, yellow or whatever, so they can be bug lights or bright or christmas time. All lighting on mine will be LEDs, been using them for years and love them.

Thank you for sharing your build in so much detail, it is a true inspiration!

dave
*******
Dave and Regina - Enjoying old age, a LOT!

Build Journal - http://www.tnttt.com/viewtopic.php?f=50&t=62386
User avatar
daveesl77
Donating Member
 
Posts: 871
Images: 273
Joined: Tue Jan 27, 2015 4:33 pm
Location: Pocahontas County, West Virginia
Top

Re: The Poet Creek Express - Foamie Hybrid

Postby KCStudly » Sun May 03, 2015 12:15 am

.
That all seems very reasonable, Sheddie, thanks for sharing. :thumbsup:

Roger that, GPW. I’ll have to do a little more research to be sure I seal these up with the correct stuff; and thanks for the kind words of support. :thumbsup:

Dave, thank you so much for the very kind words. I’m honored by your comments and that you can find useful ideas from my efforts. It’s just a matter of mixing and matching the few basic engineering elements until you get them to do what you want them to do. Simple, right? :lol:

Today I spent all morning and most of the afternoon at the annual tractor show and swap meet. Spotted a bunch of cool CI cookware, GPA’s, lots of nice old tools, and many other boy’s toys. Read more about it and the goodies I scored, including an arm full of wooden clamps, here.

Once we got back to the shop and I gave the new tools a little TLC, I put a pair of the clamps straight to work gluing in the hatch handle blocking. The blue tape is over the seam to keep the GG squeeze out from gluing the clamp to the hatch.
Image

A couple of strips of blue tape held the temporary foam spacers in place until I could get the clamps positioned.
Image

A little while later and the GG was doing its thing.
Image

Getting back to the hatch clearance lights, rather than use 5 mm ply backed by small blocks for the screws, I decided that these little lights wouldn’t need much a of a screw to hold them securely (since they are so small and light with no real load on them), so I decided to just use some resawn stud lumber to make the mounting plates and blocking in one piece. Slabbed off some 1/4 inch thk 2x and cut five 3-1/2 inch lengths. From there I rough cut radii on two corners using the vertical band saw. Next I ganged them together in a clamp and used the small matchbox plane and sanding block to even them out and smooth over the radii. To make sure that the corners all came out the same and symmetrical I flipped every other piece end for end, reclamped them and sanded again to match. Just seemed quicker, easier, and safer to do it this way, rather than trying to run these small parts on edge thru the large radius router bit.
Image

Hope to continue with these and maybe the stainless plates tomorrow; maybe get the last of the foam filler strips into the front roof foam.
KC
My Build: The Poet Creek Express Hybrid Foamie

Poet Creek Or Bust
Engineering the TLAR way - "That Looks About Right"
TnTTT ORIGINAL 200A LANTERN CLUB = "The 200A Gang"
Green Lantern Corpsmen
User avatar
KCStudly
Donating Member
 
Posts: 9616
Images: 8169
Joined: Mon Feb 06, 2012 10:18 pm
Location: Southeastern CT, USA
Top

Re: The Poet Creek Express - Foamie Hybrid

Postby KCStudly » Sun May 03, 2015 11:20 pm

Just small details today, only about 3 hrs in.

Broke down the clamp setup and cleaned up the hatch handle blocking. Had to shave the seam and sand just a little to blend it into the bumper.
Image

Moving back to the hatch clearance light blisters, I cut 5 foam blocks for the fairing pods, each 1-1/2 inch tall x 3-1/2 inches wide by about 6-1/2 long; a little extra long so that the wire cutter has something to work with on the profile cut. Cut these on the table saw for accuracy.
Image

The blocking that will receive the lights with the SS mounting plates, and the foam beyond, needs to have a pocket for the wires and screw heads to recess into, but not so large that there is not enough meat for the mounting screws or to form a seal. I originally thought that I would make a router template to cut the pocket holes in the blocks… (here it is with the light held up to the back)
Image

… but then decided, since I would be roughing them out with the scroll saw, why go to the extra step? So instead I just jigged the fixture up and used it to trace the cut line on the blocks, then just cut the holes (somewhat crudely) on the scroll saw.
Image
Image

That allowed me to pull the wires thru and get an idea of how the light will present on the back of the blister, albeit w/o the SS trim at this point.
Image

Next, I beveled the bottom edges of the blocks to match the location on the hatch where they will go after the two layers of 3/4 inch foam are installed… close enough.
Image
Image

I need to work out the carving sequence, but these blocking plates will be glued to the ends of the foam blisters something like this.
Image

That will probably be it for these for now. Now that I have the details worked out I can proceed knowingly with the hatch foam and place the wire ways where they need to be. As far as covering is concerned, for these and the taillight blisters I think I will cover them separately and glue them onto the hatch after it is covered. That way the hatch will be a smooth surface and there won’t be any inside corners to deal with.
KC
My Build: The Poet Creek Express Hybrid Foamie

Poet Creek Or Bust
Engineering the TLAR way - "That Looks About Right"
TnTTT ORIGINAL 200A LANTERN CLUB = "The 200A Gang"
Green Lantern Corpsmen
User avatar
KCStudly
Donating Member
 
Posts: 9616
Images: 8169
Joined: Mon Feb 06, 2012 10:18 pm
Location: Southeastern CT, USA
Top

Re: The Poet Creek Express - Foamie Hybrid

Postby Cary Winch » Mon May 04, 2015 9:48 am

One note. This was stated "Take a look at Camp-Inn's Raindrop 560. It's an eighty-incher of course."

Our trailers are 78" wide, not 80" or more so the fender light requirement does not apply. You will find this to be true with most teardrops that are 5' wide or less. Ours are wider than most because we use full sized tires and wheels and still under the requirement.

Cary
User avatar
Cary Winch
Teardrop Manufacturer
 
Posts: 484
Images: 1
Joined: Thu May 27, 2004 8:06 pm
Location: Necedah Wis.
Top

Re: The Poet Creek Express - Foamie Hybrid

Postby tony.latham » Mon May 04, 2015 10:27 am

Cary Winch wrote:One note. This was stated "Take a look at Camp-Inn's Raindrop 560. It's an eighty-incher of course."

Our trailers are 78" wide, not 80" or more so the fender light requirement does not apply. You will find this to be true with most teardrops that are 5' wide or less. Ours are wider than most because we use full sized tires and wheels and still under the requirement.

Cary


Cary: Thanks for straightening me out on this. You guys sure make a fine product.

Tony
User avatar
tony.latham
Gold Donating Member
 
Posts: 6907
Images: 17
Joined: Mon Jul 08, 2013 4:03 pm
Location: Middle of Idaho on the edge of nowhere
Top

Re: The Poet Creek Express - Foamie Hybrid

Postby KCStudly » Thu May 07, 2015 11:02 pm

On Monday I made it out to Mecca but didn’t get thing one done. Nothing. Didn’t lift a finger. Instead Karl and I commiserated about our respective days.

Last night I reconfigured the stretcher to full width using the remnant of Tyvek that Karl donated. There was just enough left on the 10 ft roll for me to true up the edge and cut about 8 inches off to get the required width of the cabin.

I used the same long poplar 1x2 as the tack strip for the fixed end, but backed it up with a cedar 2x2 held fast with a dry wall screw at each end. (The 1x2 had flexed some at the front and I didn’t want to fill the 2x2 with holes, but it was long enough and sturdy enough to double up the 1x2.)

Rather than cut the Tyvek to a specific length, I folded the tag end back on itself and used packing tape to form a pocket at the length I needed for the hatch. This gives me options to adjust the length if need be.

Here’s the stretcher clamped to some spacers up at the hatch hinge. The stretcher is folded back up on itself here. Note that the fixed end of the stretcher is up at the hinge so that when it pulls it will pull the lower hatch foam down into the bumper. You can also see the pocket or loop in the Tyvek with aluminum square tube slipped in. (At first I thought I would be using the tourniquet clamps again, so needed something longer than the cabin is wide; all out of lumber so grabbed the aluminum out of Karl’s rack. Turns out I can catch the quick clamps on the bottom of the bumper so did not need the tourniquets.)
Image

The 2x3 spacers provide clearance for the wire bung donut on the hatch skin.
Image

In order to keep the Tyvek even and avoid point load punctures, wherever there is a bump or transition, such as the two small blocks for the galley light screws or the hatch handle blocking, I added temporary fillers/spacers. At the galley light blocking it was just a long strip of Red Grandis laid on top of the blocks.
Image
Image

For the hatch handle blocking I taped a couple of lengths of 1 inch foam onto the lower end of the existing first layer of foam on the left…
Image

… with corresponding pieces taped to the right hand panel to be glued.
Image

During a dry run I found that the pocket in the Tyvek around the aluminum tried to pull tight into a triangle shape (as predictable), whereas when stapled and rolled on to a wooden beam it would pull from one side only. This triangle tension was enough to shift the footing of the clamps, so I gave the aluminum tube a wrap, clamped a few spring clamps on to keep it from unravelling, and did another dry run; better.
Image

Finally, here’s another look at the top while tensioned. Note that I swapped to screw clamps so that I would have more quick clamps for along the bumper.
Image

Tonight (Thursday) I went ahead and glued (PL300) the center filler strip of foam at the front of the cabin, just using tape to hold it down.
Image

Back at the lower end of the hatch I decided to put the center strip in first, since the right side lower foam panel will want to be pushed into the handle blocking I figured it would work better this way. Since the tape doesn’t like to pull at a 90 deg angle, I had the first opportunity to use bamboo skewers to pin the piece in place.
Image

A couple of strips of 3/4 inch foam taped to the edge of the hatch gave me the reference I needed to transfer the profile needed for the clearance light blisters. Using 5 mm ply for the hot wire templates.
Image
Image

Shown upside down on the bench is one of the clearance light blister foam blanks, the blocking plate, and the two cutter templates. I cut them on the band saw and fine-tuned them with the sanding block to match both the hatch profile and each other.
Image

So just a couple of hours each night, but progress all the same.
KC
My Build: The Poet Creek Express Hybrid Foamie

Poet Creek Or Bust
Engineering the TLAR way - "That Looks About Right"
TnTTT ORIGINAL 200A LANTERN CLUB = "The 200A Gang"
Green Lantern Corpsmen
User avatar
KCStudly
Donating Member
 
Posts: 9616
Images: 8169
Joined: Mon Feb 06, 2012 10:18 pm
Location: Southeastern CT, USA
Top

PreviousNext

Return to Foamies

Who is online

Users browsing this forum: No registered users and 5 guests