The Poet Creek Express - Foamie Hybrid
Moderator: eaglesdare
Re: The Poet Creek Express - Foamie Hybrid
![]() by dales133 » Sun May 08, 2016 4:35 pm
by dales133 » Sun May 08, 2016 4:35 pm
I feel your pain with the masking tape thing, i did exactly the same thing when i masked up my hatch ribs to pmf the skin and took of 4 coats of poly.
-

dales133 - 4000 Club

- Posts: 4605
- Images: 1
- Joined: Mon Oct 13, 2014 5:26 pm
Re: The Poet Creek Express - Foamie Hybrid
![]() by KCStudly » Mon May 09, 2016 11:18 pm
by KCStudly » Mon May 09, 2016 11:18 pm
Randy, here’s hoping you guys have a good time, and many more so that I can catch the next one.
Dale, the tape thing hardly bothers me anymore. Yeah, I could have sprayed all of the parts after a final assembly, or used clear epoxy instead of varnish, but at the time I didn’t go that way and couldn’t see any way other than the way I went. I’ll do another round of finishing and see if I can’t fix it so that it looks half way decent. If not, so what? I’m still going to have fun camping in it!
Yesterday I laid low and went and saw my mom for mother’s day.
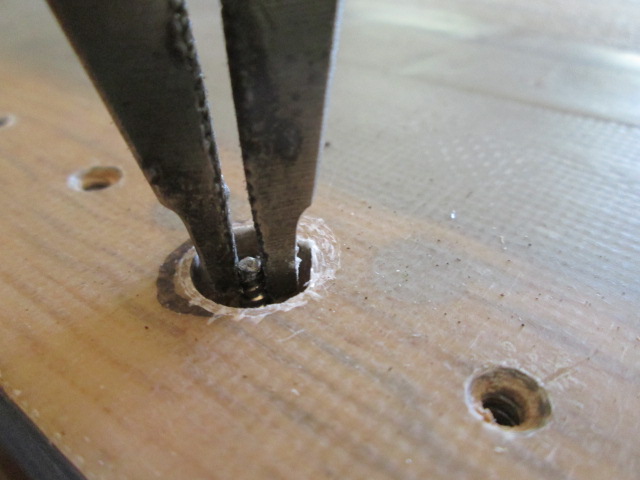
Tonight I started fixing all of those broken screws that snapped when I took the hatch hinge off last. I took a slightly different approach, improving the process, taking another tip from Karl. Rather than gouging out around the screw shank to get the broach started, since the pilot drill could not be used to center on the broken screw, I made a small jig to locate off of the OD of the broach, using the two adjacent screw holes to hold the jig. Here you can see the parts and how my initial attempt to spot the broach in freehand did not work.
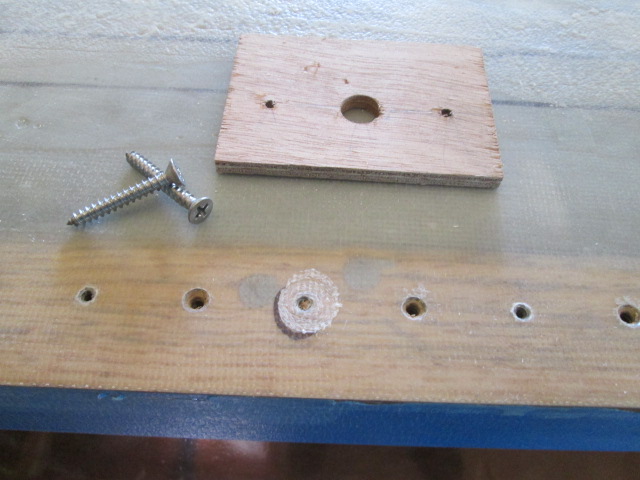
Here’s how it works. The screws hold the jig on location and the jig keeps the broach from wandering.
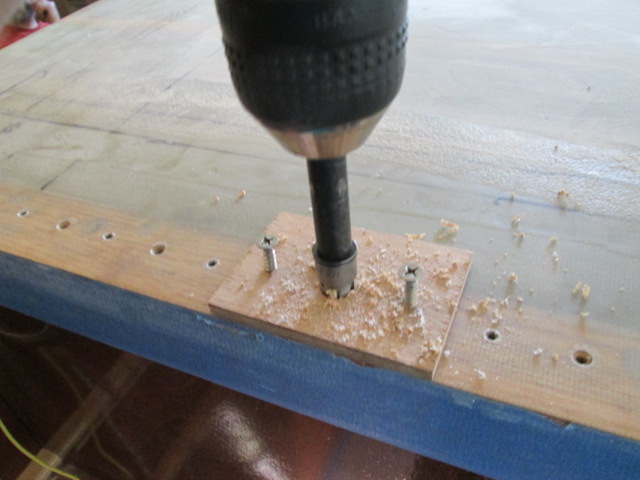
Because there is a step in the outside of the broach it only goes so deep before contacting the jig, but that is far enough to establish a cut.
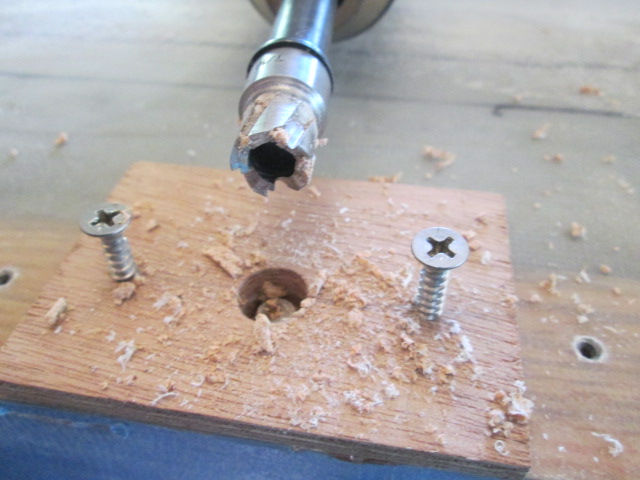
From there I removed the jig, ran the broach down again to get a little deeper, and used a narrow screwdriver blade to break the core of wood from around the screw. Sometimes the oak wouldn't break all the way, but it would at least enough to get the needle nosed vice grips onto the screw.
Karl predicted that I might need to grind the tips of the (his) pliers and gave me permission to do so before it became obvious that it would help a lot (best friend). Sure enough, it really helped get the pliers in there to get a good grab without having to broach an even bigger hole.
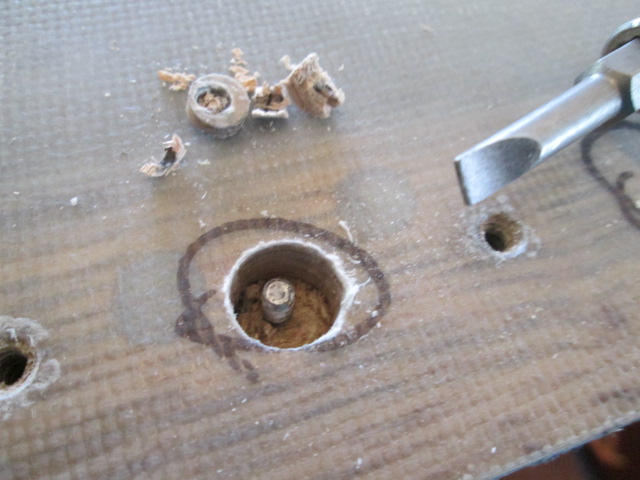
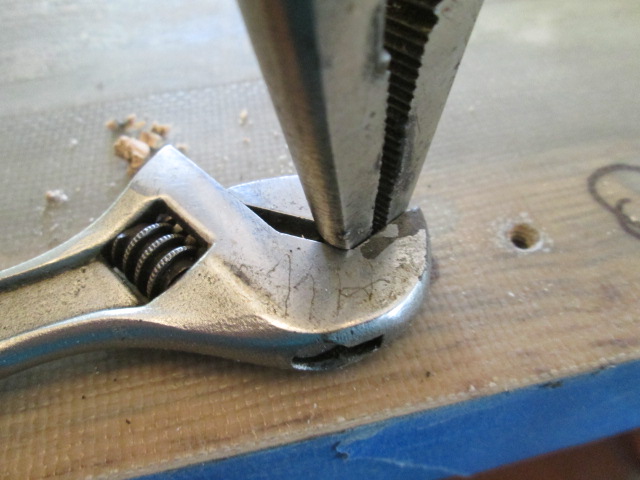
By using a small adjustable wrench pinched down low on the plier jaws to turn the pliers it prevented the jaws from twisting out of position on the screws, and they turned right out.
Once the screw was out I used the screwdriver again to break out whatever may have been left of the core, and gave the edge of the glass a little swipe with a swatch of sandpaper to get this.
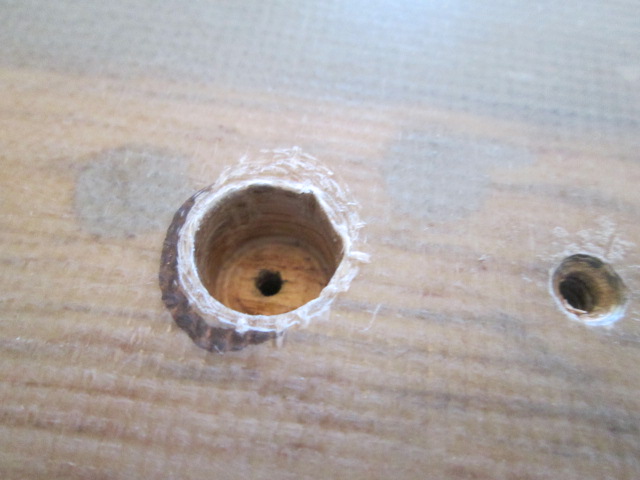
I just had to repeat that 6 times, and then I drilled out all of the holes in the seal trim pattern with a pilot for the upsized No. 8 screws, so that when I pot these in with filled epoxy I can have the proper sized screw waxed and started in the hole.
Dale, the tape thing hardly bothers me anymore. Yeah, I could have sprayed all of the parts after a final assembly, or used clear epoxy instead of varnish, but at the time I didn’t go that way and couldn’t see any way other than the way I went. I’ll do another round of finishing and see if I can’t fix it so that it looks half way decent. If not, so what? I’m still going to have fun camping in it!
Yesterday I laid low and went and saw my mom for mother’s day.
Tonight I started fixing all of those broken screws that snapped when I took the hatch hinge off last. I took a slightly different approach, improving the process, taking another tip from Karl. Rather than gouging out around the screw shank to get the broach started, since the pilot drill could not be used to center on the broken screw, I made a small jig to locate off of the OD of the broach, using the two adjacent screw holes to hold the jig. Here you can see the parts and how my initial attempt to spot the broach in freehand did not work.
Here’s how it works. The screws hold the jig on location and the jig keeps the broach from wandering.
Because there is a step in the outside of the broach it only goes so deep before contacting the jig, but that is far enough to establish a cut.
From there I removed the jig, ran the broach down again to get a little deeper, and used a narrow screwdriver blade to break the core of wood from around the screw. Sometimes the oak wouldn't break all the way, but it would at least enough to get the needle nosed vice grips onto the screw.
Karl predicted that I might need to grind the tips of the (his) pliers and gave me permission to do so before it became obvious that it would help a lot (best friend). Sure enough, it really helped get the pliers in there to get a good grab without having to broach an even bigger hole.
By using a small adjustable wrench pinched down low on the plier jaws to turn the pliers it prevented the jaws from twisting out of position on the screws, and they turned right out.
Once the screw was out I used the screwdriver again to break out whatever may have been left of the core, and gave the edge of the glass a little swipe with a swatch of sandpaper to get this.
I just had to repeat that 6 times, and then I drilled out all of the holes in the seal trim pattern with a pilot for the upsized No. 8 screws, so that when I pot these in with filled epoxy I can have the proper sized screw waxed and started in the hole.
KC
My Build: The Poet Creek Express Hybrid Foamie
Poet Creek Or Bust
Engineering the TLAR way - "That Looks About Right"
TnTTT ORIGINAL 200A LANTERN CLUB = "The 200A Gang"
Green Lantern Corpsmen
My Build: The Poet Creek Express Hybrid Foamie
Poet Creek Or Bust
Engineering the TLAR way - "That Looks About Right"
TnTTT ORIGINAL 200A LANTERN CLUB = "The 200A Gang"
Green Lantern Corpsmen
-

KCStudly - Donating Member
- Posts: 9616
- Images: 8169
- Joined: Mon Feb 06, 2012 10:18 pm
- Location: Southeastern CT, USA


 In the recent experience of painting that old railroad Cafe ( See Album) , there were days that were just smooth painting all the way , other days we faced seemingly “impossible” tasks , but once started were able to complete them surprisingly easy ... All a matter of perseverance and enjoying the journey ... That really is the FUN part ... When I;’s done , you’ll, be thinking of building something else ... It is our ”curse’ as a “maker of things “

