The Poet Creek Express - Foamie Hybrid

Canvas covered foamies (Thrifty Alternatives...)

Moderator: eaglesdare

Re: The Poet Creek Express - Foamie Hybrid

Postby GPW » Wed Jun 01, 2016 6:29 am

Camping season !!! :o
There’s no place like Foam !
User avatar
GPW
Gold Donating Member
 
Posts: 14912
Images: 546
Joined: Thu Feb 09, 2006 7:58 pm
Location: New Orleans

Re: The Poet Creek Express - Foamie Hybrid

Postby KCStudly » Wed Jun 01, 2016 9:48 pm

So it is.

Tonight: (1) washed amine off of the skim coat on the street side door edge; (2) sanded what little raised bits there were (not much to speak of); and (3) applied flox to the curb side door edge. Equals three more steps closer to camping.

I think I did a better job the second time, keeping excess off of the area where the router bearing will ride and doing a better job filling the chamfer. We will see.

Had a small dab of thick leftover, so I spread that along the street side roof lap just over the door and to the front (note to self: wash amine here and along the rear of roof).
KC
My Build: The Poet Creek Express Hybrid Foamie

Poet Creek Or Bust
Engineering the TLAR way - "That Looks About Right"
TnTTT ORIGINAL 200A LANTERN CLUB = "The 200A Gang"
Green Lantern Corpsmen
User avatar
KCStudly
Donating Member
 
Posts: 9616
Images: 8169
Joined: Mon Feb 06, 2012 10:18 pm
Location: Southeastern CT, USA

Re: The Poet Creek Express - Foamie Hybrid

Postby Ned B » Thu Jun 02, 2016 5:41 am

:applause: I just woke up so I won't try any witty repartee , which is safer for all concerned, beyond saying " huzzah!"
User avatar
Ned B
1000 Club
1000 Club
 
Posts: 1036
Joined: Sat Apr 16, 2011 10:25 am
Location: Syracuse NY (ish)
Top

Re: The Poet Creek Express - Foamie Hybrid

Postby KCStudly » Thu Jun 02, 2016 6:43 am

Thanks Ned. :thumbsup:
KC
My Build: The Poet Creek Express Hybrid Foamie

Poet Creek Or Bust
Engineering the TLAR way - "That Looks About Right"
TnTTT ORIGINAL 200A LANTERN CLUB = "The 200A Gang"
Green Lantern Corpsmen
User avatar
KCStudly
Donating Member
 
Posts: 9616
Images: 8169
Joined: Mon Feb 06, 2012 10:18 pm
Location: Southeastern CT, USA
Top

Re: The Poet Creek Express - Foamie Hybrid

Postby GPW » Thu Jun 02, 2016 9:01 am

Another day closer... 8)
There’s no place like Foam !
User avatar
GPW
Gold Donating Member
 
Posts: 14912
Images: 546
Joined: Thu Feb 09, 2006 7:58 pm
Location: New Orleans
Top

Re: The Poet Creek Express - Foamie Hybrid

Postby KCStudly » Thu Jun 02, 2016 10:30 pm

Tonight I pulled the flox dams off of the curb side door; scraped some epoxy flash; did the amine wash thing; rough trimmed sort of flush with the router; and block sanded to fair.

A lot less pock marks, but one very egregious pucker hole that I can't believe I missed; it must have been dragged out in handling the door on the 4x4 blocks. No matter, that's what the 3min epoxy/filler step is for. I'll do that tomorrow (Friday).

Gave another tour today to a visitor of Karl's. Professional carpenter, seemed to like my work just fine, thank you.

I noticed that the view count for this thread is now over 160K. Thank you all very much for seeing this through with me. I can't thank everyone enough, those of you who have shared your own experience, contributed technical advice and encouraged me with your own artistry and/or admiration. What a ride it has been so far!
Last edited by KCStudly on Fri Oct 07, 2016 1:14 pm, edited 1 time in total.
KC
My Build: The Poet Creek Express Hybrid Foamie

Poet Creek Or Bust
Engineering the TLAR way - "That Looks About Right"
TnTTT ORIGINAL 200A LANTERN CLUB = "The 200A Gang"
Green Lantern Corpsmen
User avatar
KCStudly
Donating Member
 
Posts: 9616
Images: 8169
Joined: Mon Feb 06, 2012 10:18 pm
Location: Southeastern CT, USA
Top

Re: The Poet Creek Express - Foamie Hybrid

Postby KCStudly » Fri Jun 03, 2016 8:54 pm

This evening I cut glass tape for the curb side door fix, and to wrap around both of the doors. Then I used the 3min epoxy, thickened, to fill the small pocks in the curb side door flox corner.

Looking forward over the next couple of days I would like to get the door edges laid up, cleaned up, and then get the door skins on and cleaned. If I can get the shims for the hinges made and the doors properly hung I would be very happy.

That probably won’t all happen, though, as the wife and I have an anniversary coming up and plan to spend time together tomorrow to celebrate.

I’ll take what I can get.
KC
My Build: The Poet Creek Express Hybrid Foamie

Poet Creek Or Bust
Engineering the TLAR way - "That Looks About Right"
TnTTT ORIGINAL 200A LANTERN CLUB = "The 200A Gang"
Green Lantern Corpsmen
User avatar
KCStudly
Donating Member
 
Posts: 9616
Images: 8169
Joined: Mon Feb 06, 2012 10:18 pm
Location: Southeastern CT, USA
Top

Re: The Poet Creek Express - Foamie Hybrid

Postby KCStudly » Sat Jun 04, 2016 10:33 pm

Yvette and I went to the Willimantic Brewing Co. for lunch. It’s a brew pub and restaurant in the old post office building, so many of the dishes are named for local towns with their zip codes. We had the Yantic Brew-Shetta ap, I had the Windham Village corned beef sandwich with a couple of porters, and Vette had the Portland Portabella Mushroom Wrap. We both enjoyed it.

Then we visited The Mill Museum. Willimantic has a big history with thread mills and textiles and it was interesting to learn a little more about it and check out some of the antiques that they have on display there.

From there we went to the Connecticut Eastern Railroad Museum. They have a restored 60ft turntable that they let us turn (by hand) and rebuilt roundhouse as well as some other local RR related buildings and projects. Plus a hand car that they let us try out, some of those speedsters that Kirk was wanting to get involved in, a caboose that was almost completely restored, one that was under restoration, a diesel-diesel electric engine from the old Hew Haven line, a steam engine that looked pretty rough but was getting worked on, and more. They even had the old bridge keeper's cabin off of the old Niantic River drawbridge. The docents were very friendly, knowledgeable, and willing to share lots of interesting tidbits of info.

Lastly we went to one of our favorite Mexican restaurants for an early supper, Festival Cinco de Mayo. From the outside this place looks like a hole in the wall, literally sandwiched between an automotive repair garage and a Chinese buffet restaurant; but once you get inside it is all very well done trompe l'oeil frescos giving the feel that you are sitting in a villa scene. The food is good, the service is friendly and they make the best guacamole in the county. We shared the chicken enchilada mole plate and the vegetarian plate (cheese ench., chile relleno, and gauc. burrito). The margaritas weren’t as good as we had remembered, but they still went down okay.

Anyway, I didn’t get to the shop today, but wanted to share our adventures in case anyone is coming this way or wants to see what there is to do in this region. Call it a mini trip report.
Last edited by KCStudly on Sun Jun 05, 2016 3:29 pm, edited 1 time in total.
KC
My Build: The Poet Creek Express Hybrid Foamie

Poet Creek Or Bust
Engineering the TLAR way - "That Looks About Right"
TnTTT ORIGINAL 200A LANTERN CLUB = "The 200A Gang"
Green Lantern Corpsmen
User avatar
KCStudly
Donating Member
 
Posts: 9616
Images: 8169
Joined: Mon Feb 06, 2012 10:18 pm
Location: Southeastern CT, USA
Top

Air Conditioner Option

Postby Mo-Jack » Sun Jun 05, 2016 2:12 pm

Studly... I've finally caught up with your build. Whew... my mind is winded! :-)

I'll add my praise for your attention to detail. T'is a level of craftsmanship to which we could all aspire, but most of us (especially me) will never achieve. Hear, hear.

I will be able to take away many construction tricks... and for that I'm grateful. One other major thing I've learned from your build is... there is no way I have the patience to go the glass route. I've recently begun the design process, and I will take into account many techniques I've gained from your story. But, I'm leaning toward a wooden framed foam insulation core, sandwiched between composite skins.

Also, I just ran across this new air conditioner concept, and have added it into my design. Since this is my first post to the TnTTT board, I'm not certain where to share this link, so feel free to transfer it to where ever it might be more appropriate. Thanks, and cheers.

https://www.indiegogo.com/projects/noria-cool-redefined--3#/
Teardrop Dreamer - Design Phase in Progress

"My sanity will be eternally thankful for all who have
shared their experiences with the TnTTT family." Mo-Jack
User avatar
Mo-Jack
Teardrop Inspector
 
Posts: 16
Images: 4
Joined: Sun Jun 05, 2016 7:19 am
Location: St. Peters, Missouri
Top

Re: The Poet Creek Express - Foamie Hybrid

Postby KCStudly » Sun Jun 05, 2016 7:07 pm

Thanks for the kind words, MJ. I am glad to hear that you have found some benefit in my efforts, and welcome to the forums. I would think you might get some interest in the AC concept in the General Discussion forum, or in the Teardrop Construction Tips & Techniques forum.

If it ever becomes more than just a money grab funding campaign, and has the performance of a larger unit, I would think it will do well and will package in a camper well. To imply that such a small unit can cool such a large space, with so much glass (i.e. solar gain) is a pretty bold statement (that I assume is marketing hype at this point, although I did not see or bother to look for any specs published from their prototyping efforts). Call me a skeptic.

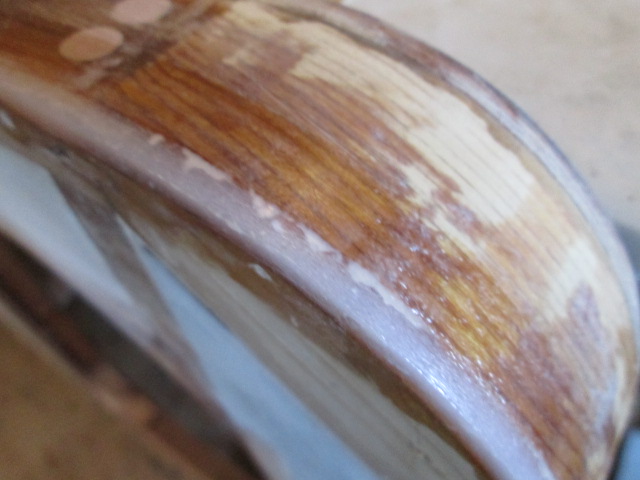
Pic’s from earlier in the week, just to prove that it really happened:
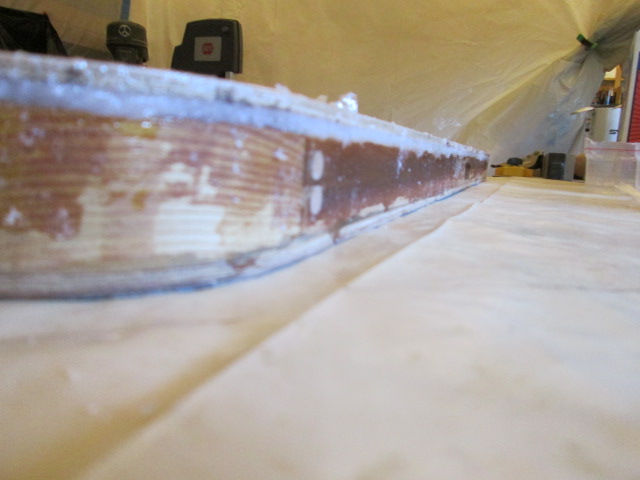
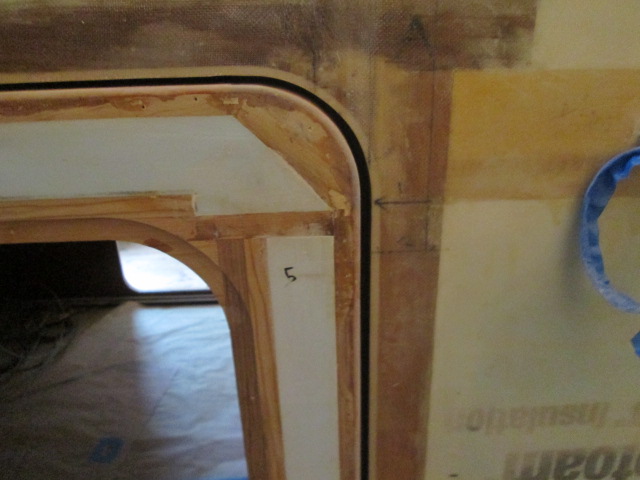
The curb side door outer corner floxed.
Image

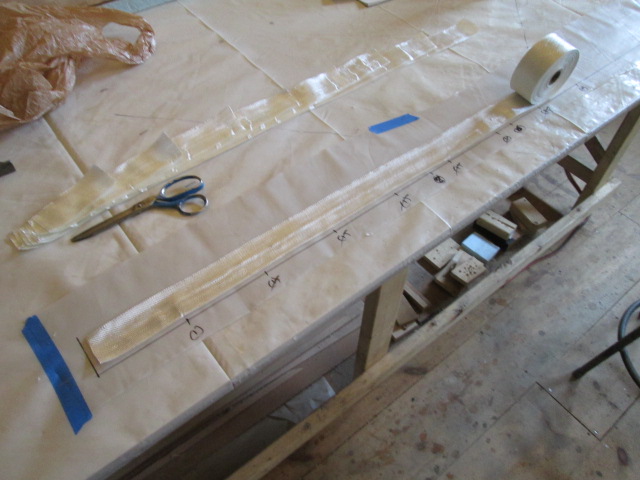
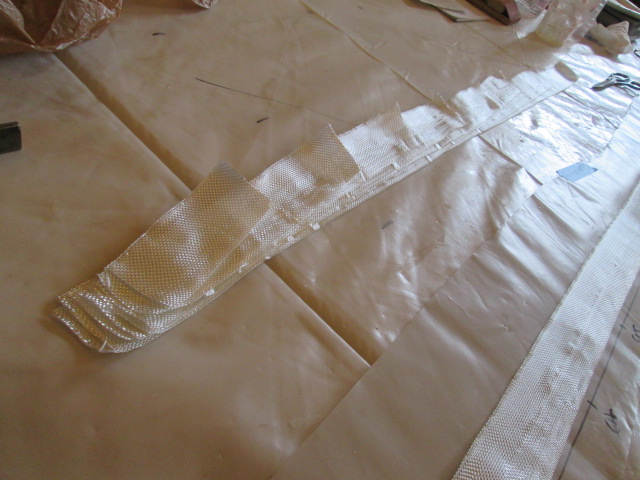
Cutting station for staggered strips to build up the curb side door hinge edge taper, and for the pieces that will wrap around the perimeter of both doors.
Image
Image

The 3min epoxy/filler applied to pock holes in the curb side door outer flox corner.
Image

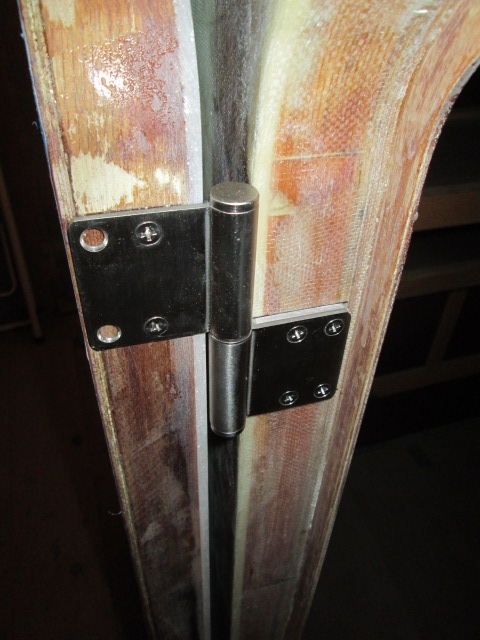
Today’s build report: The weather here is wet today. Too, humid to glass, so instead I made the 1/8 inch thk aluminum shims for the door hinges. Basically I traced around one of the hinges using a scribe directly onto the soft aluminum; then used the combination square to extend these lines; clamped the hinge on (using a small folded piece of rosin paper to prevent the clamp from scratching); and scribed around the insides of the screw holes. I had wanted to use a transfer punch to mark the centers of the holes, but due to the length of the punch tip and the counter sunk taper of the holes that wasn’t going to work (the punch prick touched before the shaft of the punch picked up on the inside diameter of the hole).
Image

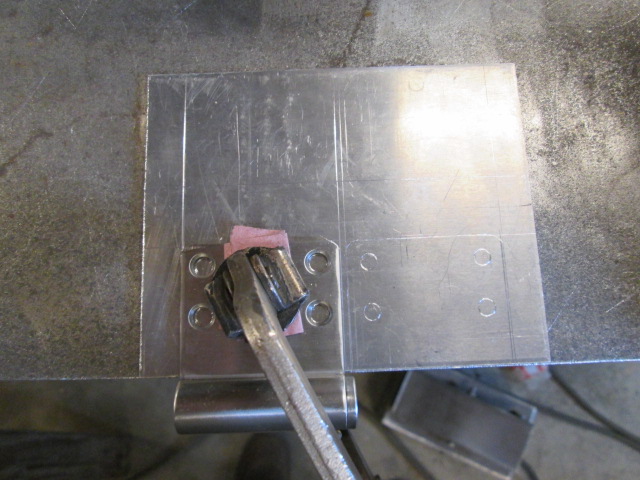
From there I used the square to eyeball the middle of the scribed circles, scribed cross hairs and used a center punch to mark the centers. You will note that I didn’t lay the parts out on the corners of the stock. That meant I had a little more work to do cutting the pieces out, but I would be punching the holes on the iron worker and didn’t want to deform them by trying to punch too close to the edge. Also, I left a little material between them for the band saw kerf, since the piece of stock was a little small to comfortably cut in the shear.

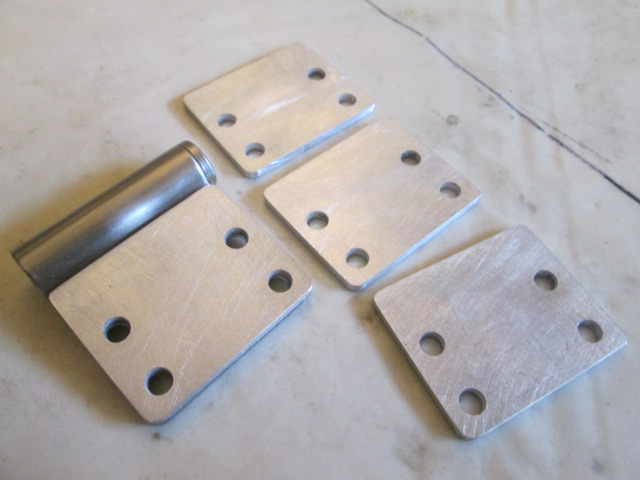
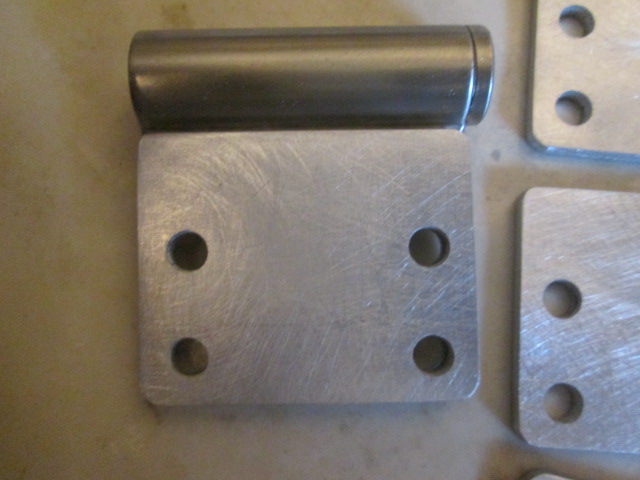
Karl was using the big band saw, so I swapped the wood blade out of my small band saw upstairs and cut them out. From there I stacked them together; used a pair of the transfer punches as alignment pins; clamped them in the mill vise; and just hand filled and sanded the saw marks off (would have been quicker to have set the mill up and just taken a skim cut, but it’s nice to make things by hand sometimes). Here are the finished shims after deburring and filing the corners round a bit.
Image

The holes lined up extremely well.
Image

Here’s one of them installed on the street side behind the upper fixed hinge half.
Image

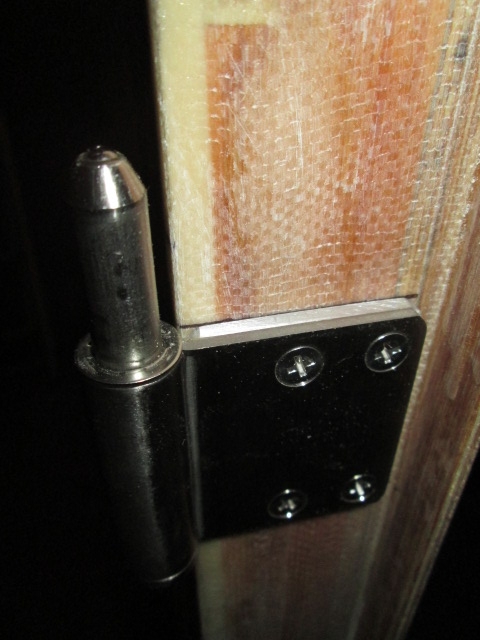
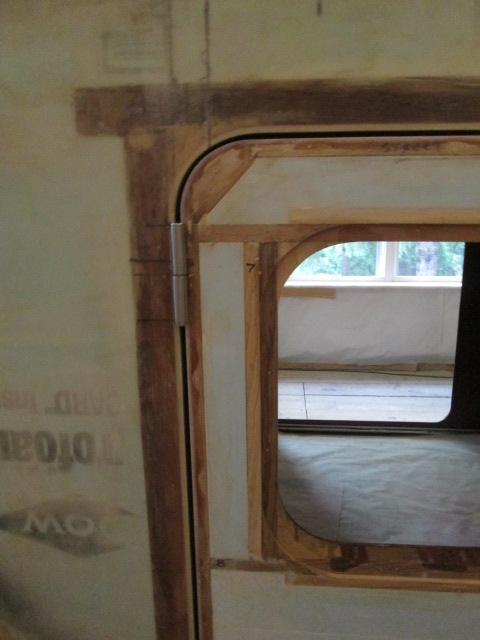
And here it is with the door reinstalled for test fitting.
Image

The door almost closes now, but still stops about 1/2 inch short of flush at the latch side. What the heck? So I got out a scrap of paper and slid it all along the gap, not finding any tight spots. Curious, and… WHAT THE HECK?

Got out the flashlight, climbed all around looking and looking, seeing decent gaps everywhere. Okay, double check that the screw heads are all flush and that the hinges aren’t hanging up on the shims; nope, nothing suspicious there.

What else could it be? Ah ha, I got it. Either the door or jamb edge isn’t perfectly square to the face of the wall, so when the edge of the door comes up against the fixed side hinge leaf and stops where everything is supposed to be parallel, the door still "wings" out on the opposite side; confirmed by slipping a scrap of paper between the door and fixed side hinge leaf, the only place the paper pinches is here top and bottom. I suspect that this was the result of uneven sanding of the jamb and subsequent glass work, tending to flair the jamb out. You don't notice it at all to just look at it, but the error gets multiplied way out at the swing side of the door.

There are a couple of possible solutions that don’t require much alteration, but since the door gaps still aren’t perfectly even and show that I can shift the door toward the rear a tad more, I think I’ll make another pair of shims for under the door side hinge and move it back another 1/32 to 1/16 inch. This will center the door in the opening and allow the hinge to close past zero degrees just enough to let the door swing thru the latch position w/o binding.

With the door sprung closed you can see how the latch side gap is just a hair bigger than along the top…
Image

… while at the same time the hinge side gap is just a hair smaller than the top gap.
Image

I suppose another option would be to build out the hinge locations on the door with a bit of extra glass tape, but I think interchangeable shims would be more versatile and easier to make with precision.

So there’s just a little bit more work to do on this side.
KC
My Build: The Poet Creek Express Hybrid Foamie

Poet Creek Or Bust
Engineering the TLAR way - "That Looks About Right"
TnTTT ORIGINAL 200A LANTERN CLUB = "The 200A Gang"
Green Lantern Corpsmen
User avatar
KCStudly
Donating Member
 
Posts: 9616
Images: 8169
Joined: Mon Feb 06, 2012 10:18 pm
Location: Southeastern CT, USA
Top

Re: The Poet Creek Express - Foamie Hybrid

Postby GPW » Mon Jun 06, 2016 6:42 am

You made your own hinges ??? Why not , you made everything else !!! :thumbsup: 8)
There’s no place like Foam !
User avatar
GPW
Gold Donating Member
 
Posts: 14912
Images: 546
Joined: Thu Feb 09, 2006 7:58 pm
Location: New Orleans
Top

Re: The Poet Creek Express - Foamie Hybrid

Postby KCStudly » Mon Jun 06, 2016 7:07 am

GPW wrote:You made your own hinges ???

No, just the shims to space them out away from the jamb a bit.
KC
My Build: The Poet Creek Express Hybrid Foamie

Poet Creek Or Bust
Engineering the TLAR way - "That Looks About Right"
TnTTT ORIGINAL 200A LANTERN CLUB = "The 200A Gang"
Green Lantern Corpsmen
User avatar
KCStudly
Donating Member
 
Posts: 9616
Images: 8169
Joined: Mon Feb 06, 2012 10:18 pm
Location: Southeastern CT, USA
Top

Re: The Poet Creek Express - Foamie Hybrid

Postby GPW » Mon Jun 06, 2016 12:11 pm

Shucks , I was just thinking “how Cool is that ? " to make your own hinges ... :thumbsup: 8) ... but we’re still impressed with the spacers ( ok, so not as much as with hinges naturally ), but still think you could have made the hinges if you really wanted to ... :thumbsup:
There’s no place like Foam !
User avatar
GPW
Gold Donating Member
 
Posts: 14912
Images: 546
Joined: Thu Feb 09, 2006 7:58 pm
Location: New Orleans
Top

Re: The Poet Creek Express - Foamie Hybrid

Postby KCStudly » Wed Jun 08, 2016 11:20 pm

Thanks for the vote of confidence, GPW.

Monday the only progress was cleaning and sanding the previous fairing coat on the door edge (at the moment I have lost track of which door).

There was some contemplation and consultation with Karl, on both this project and a few of his, but other than analyzing "the door dilemma" that was pretty much it. I did check the jamb and door with the small combo square, but that was not conclusive.

Tonight I decided that, instead of making more metal shims, I would try building up the area on the door edge (under the hinges) with a stack of extra FG tape swatches. Measuring with the tape measure it looks like the door can go another 1/32 to the rear to be perfectly centered in the opening. Measuring how much the door has left to close and doing some math I calculated that the shim would need to be about 0.045 thick. So at 0.012 inch per ply, I cut four (4) pieces of the FG tape for each hinge location. First I attached the hinge half to the door and made a nice sharpie line top and bottom, then I used that to scale the glass for the cuts. Fortunately the glass is 2 inches wide and the hinges are 2 inches tall, so it should be easy enough to line up and hopefully get nice crisp edges (more or less, considering the medium).

The gap between the upper and lower hinge halves is relatively small, so I need a relatively sharp cut off on the glass shim stack. To that end I will wrap the perimeter of the door first then lay the swatch stacks on top of that (rather than trying to blend the shim in by laying the edge wrap over it). If I have to I can sand the shim stacks down after cure, or as needed so that they don’t interfere with the jamb side leaves. Here is the prep.
Image

While I was at it I packed stretch wrap into the screw holes and marked them with black sharpie. I’ll probably still use the hinge jig and centering drill when I open these holes back up, but should make it a little easier to reestablish them later.
Image

I guess this all seems a little nit picky, but the doors need to close freely and to me it is worth the extra effort to get the gaps even.

Then I did a little more sanding prep, mixed up a couple of small batches of filled 3min and skim coated those pock holes in the street side (or was it the curb side?) flox corner. Only after I had cleaned up and disrobed PPE did I notice that I missed a spot along the face of the door. ARRRGGGH!

Oh well, you can’t rush the pursuit of “good enough”.
KC
My Build: The Poet Creek Express Hybrid Foamie

Poet Creek Or Bust
Engineering the TLAR way - "That Looks About Right"
TnTTT ORIGINAL 200A LANTERN CLUB = "The 200A Gang"
Green Lantern Corpsmen
User avatar
KCStudly
Donating Member
 
Posts: 9616
Images: 8169
Joined: Mon Feb 06, 2012 10:18 pm
Location: Southeastern CT, USA
Top

Re: The Poet Creek Express - Foamie Hybrid

Postby KCStudly » Sat Jun 11, 2016 12:28 am

Moving forward.

I thought I might be able to apply the FG tape to the perimeter of the street side door all in one session, and a week night session at that. I had cut two long and two short lengths of tape, thinking that it would be easier to manage rather than trying to wet out and apply one big long tape all the way around. The long pieces cover the long side edges (duh) and wrap around the corner radius blocks, plus a bit to make sure they overlap the glued joints between the radius blocks and stick frame members of the door; while the shorter pieces cover the top and bottom edges in between. However, after wetting and laying one short and one long, when it came time to turn the door up on edge to do the third side, I decided against standing it on the still wet end.

I had thought that I would wet the tape on a narrow piece of plastic then use it to transfer to the door edge, but the binding thread along the edge of the tape does a good job of keeping it from going all askew, so I decided to keep things simple and just peeled the wet tape up off of the plastic, stretched it out taut a bit as I was positioning it, and laid it down on the wet edge. Using a shortened chip brush I was able to nudge the edge of the tape just a hair over the inside edge of the inner plywood, both to make sure that the edge of the wood is fully protected, and also to leave as little extra as possible to have to sand off; thus minimizing the potential of damaging the already finished inside surface of the inner skin (…despite the fact that polyurethane clear coat will likely be damaged when I finally peel the masking tape off). On the outside flox corner the glass tape overlapped by about 1/4 inch. Perfect.

Unfortunately I had a couple of minor drips run down the masking tape and onto the rosin paper, plus an area where my wet gloved hand left a sizeable finger print from holding an edge. I wiped it up fairly quickly and sure hope that there wasn’t enough saturation there to glue the rosin paper to the door skin. Maybe I should have torn the affected areas away right then and there, but I was more worried about upsetting the layup than dealing with that. We’ll see how big of a deal it is after the cure. Here’s hoping it is nothing, at least not any worse than the masking tape issues that are sure to be there.

I still had some neat in the pot (since I had mixed up more than enough to do the whole perimeter), so I added in some 410 fairing filler and spread that along the roof glass lap near the hatch hinge (no pic). That really seemed to have the desired effect, even with just a thin application.

Then I realized that I hadn’t added the extra swatches for the hinge shims. So I mixed up another small one pump batch to do that.

I still had some wet left, so I decided to experiment a bit and really wet the hinge side edge and shims. I know procedure is to let each layer start to set a bit before piling up, but I’m not prepared to spend all night in the loft, and despite some cooler dry weather, it was still too warm to switch back to the fast hardener.

Again, the leftover neat was mixed with 410 and smeared along the curb side roof glass overlap seam, reaching from the hinge area forward a couple of feet.

Here is the over saturated hinge side edge.
Image

Here’s a better look at one of the shim stacks.
Image

Wetness.
Image

If the weather is similar tomorrow I may switch back to the fast hardener. I had plenty of time as it was and want to get thru this so I can move on to skinning the outer surfaces.

I’ve decided to use a simpler approach for the window recesses. Rather than trying to get tricky with some sort of mold to pull the glass into the sharp inside corners, I’m just going to glass up to the edge of the rabbet, and just paint neat epoxy onto the rabbet recess and inside of the RO.

The only place where I think the doors may still be a little vulnerable is on the inside face between the above^ glass edge and where the door seal will actually contact. At the moment my thought is that the polyurethane there (applied previously) will likely lift when I remove the masking tape. So if I make a sanding block with a guide step that runs on the edge of the door, I can do some controlled sanding, say 3/4 inch wide, take the finish down to raw, or near raw; wet the edge band with epoxy; then paint a 1 inch wide band using the same black enamel that I used for the inside edges of the door seal flange (that I also plan to use for the galley wall edges inboard of the seal rabbet).

Rolling.
KC
My Build: The Poet Creek Express Hybrid Foamie

Poet Creek Or Bust
Engineering the TLAR way - "That Looks About Right"
TnTTT ORIGINAL 200A LANTERN CLUB = "The 200A Gang"
Green Lantern Corpsmen
User avatar
KCStudly
Donating Member
 
Posts: 9616
Images: 8169
Joined: Mon Feb 06, 2012 10:18 pm
Location: Southeastern CT, USA
Top

PreviousNext

Return to Foamies

Who is online

Users browsing this forum: No registered users and 8 guests