Thrifty Alternatives ..Building Foam Campers

Canvas covered foamies (Thrifty Alternatives...)

Moderator: eaglesdare

Re: Thrifty Alternatives ..Building Foam Campers

Postby Lotsahorses » Mon Dec 26, 2016 6:52 am

George, I read your build as you suggested and took notes and found it to be invaluable.
The cat condo was not done to the same level of care that I would use for a camper. The weather was really cold here when I started, 10-15 degrees at night and I was trying to speed the process for the sake of these three litter mates who are about 5 months old and making it on their own without mom. So I did not fair the seams, nor did I continue to roll the canvas with the dry roller until the canvas was nearly dry. I rolled until it was nice and flat and seemed to be well embedded in the glue and adhered. I did get a few bubbles during the prolonged cure as I'm working in a 60-65 degree space not during summer heat. I also did not sand the foam or clean with alcohol, I already felt guilty about the time it was taking to get this outside for these kittens. As it is, it's water proof and plenty strong enough and should provide adequate insulation (plus the heating pad :) )

KC, I'm not sure how to characterize the level of effort to remove the canvas but I expected something like separating industrial level velcro. It was more like removing packing tape.
There was some foam particles on the back of the canvas but not a layer of foam where the foam failed before the glue. That made me wonder if it was the temperature at which I applied the glue and canvas (60-65) or a lack of preparation of the surface. The glue had been applied 4-5 days prior to cutting out the door and testing the canvas adhesion and it felt dry. I have already made the floor for the slide in truck camper while I was waiting for parts of the cat condo to dry. One side of the 2" foam is glued with TBII to 1/4 Luan and the other side to 3/8 fir plywood. Both layers seem to be well stuck and very flat. I just want to be certain about the canvas before I start the lower section of the walls of the camper. In terms of timing I'm estimating that gripper was applied 2 days post glue-up. 24 hours later, first coat of Glidden top coat. 2 days later the door was cut out and I separated the canvas from the foam.
I'm wondering if the glue had not fully dried and the layers of Gripper and top paint maybe delayed further drying?

Thanks for the help and advice, Tim
Lotsahorses
Teardrop Inspector
 
Posts: 12
Joined: Sun Dec 11, 2016 7:20 am

Re: Thrifty Alternatives ..Building Foam Campers

Postby lthomas987 » Mon Dec 26, 2016 8:21 am

I would guess lack of surface prep. There isn't a lot of tooth for the glue to hold to the foam if you don't sand it.

Sent from my LGLS991 using Tapatalk
Laura
Bike-Drop a Micro-Foamy Build Journal http://www.tnttt.com/viewtopic.php?f=50&t=59274
My first Superlegarra-ish Foamy build http://www.tnttt.com/viewtopic.php?f=55&t=59049
User avatar
lthomas987
Donating Member
 
Posts: 357
Images: 204
Joined: Sun Feb 02, 2014 2:41 pm
Location: Minneapolis, MN, USA

Re: Thrifty Alternatives ..Building Foam Campers

Postby ghcoe » Mon Dec 26, 2016 9:14 am

You do not have to keep rolling the canvas till it is nearly dry. I did mention that in the ceiling section that was curved since the canvas was shrinking as it was drying. Which due to the inside curve of the roof was causing the canvas to pull itself off the foam as it shrunk. If you have bubbles forming then yes your surface prep was not adequate. In my experience I have not had any bubbles where I sanded or wiped the area with alcohol before applying the canvas. I did forget to prep properly a section on the hatch. I realized it after painting, but before canvasing. The paint looked fine so I went ahead and applied the canvas. A few weeks later I noticed some bubbling. Luckily it was on the inside of the hatch. I was able to repair them and no more bubbling as of yet. I do not think the temperature had anything to do with it. I have applied canvas/TBII in lower temperatures than that, probably in the 50-55 range. I do make sure the overnight temps do not drop below 45 though.

I think pulling off the canvas/TBII from the foam should be close to pulling a 2" wide strip of regular masking tape off, If you want to use tape as a measuring guide. Of course that would be a surface prepped piece of foam. The canvas is never going to be pulled off like you mentioned going down the road unless something real bad happens :roll: . I do not preshrink my canvas before applying so my build has the added effect of a drum tight like surface once the canvas dries.

My outside wall canvasing method starts here. viewtopic.php?f=55&t=54099&start=405
My improved method starts here. viewtopic.php?f=55&t=54099&start=435
A bit farther in the thread is the roof and ceiling methods.

Good luck George.
George.

Gorrilla Glue, Great Stuff and Gripper. The three G's of foamie construction.

My build viewtopic.php?t=54099
Working with flashing for foamie construction viewtopic.php?f=55&t=60303
Making a hot wire http://tnttt.com/viewtopic.php?f=55&t=55323
User avatar
ghcoe
1000 Club
1000 Club
 
Posts: 1946
Joined: Fri Dec 11, 2009 11:20 pm
Location: SW Idaho
Top

Re: Thrifty Alternatives ..Building Foam Campers

Postby Lotsahorses » Mon Dec 26, 2016 11:04 am

George, I will go with your judgment that it's surface prep and not temp. I'll start the lower walls soon and see how that goes. I appreciate the help. Tim
Lotsahorses
Teardrop Inspector
 
Posts: 12
Joined: Sun Dec 11, 2016 7:20 am
Top

Re: Thrifty Alternatives ..Building Foam Campers

Postby NebraskaTeachr » Mon Dec 26, 2016 1:26 pm

I just read through 12 pages to get "caught up ", and have pretty much decided to go with foam when I rebuild my teardrop. It is a super leggera but I installed the hurricane hinge incorrectly and the sides of the galley are now rotting away. I am thinking about using the existing floor, as it is completely intact. I will be towing with a Cherokee so weight is not a concern. Since I just moved a year ago, and we just bought a house, money is a concern. I also tend to value function over appearances, so I am not bogged down by perfectionism. I always loved looking at the build threads with highly finished galleys and exteriors, but I don't have the resources or desire to do that myself. I don't want to be afraid of using it when I'm done.
User avatar
NebraskaTeachr
Donating Member
 
Posts: 123
Images: 53
Joined: Tue Feb 10, 2009 2:01 pm
Location: Hardin, MT
Top

Re: Thrifty Alternatives ..Building Foam Campers

Postby Lotsahorses » Tue Dec 27, 2016 5:21 am

George, I reread your improved canvas technique and have a question about edges. During the canvas application, the canvas extends past the edges of the foam so what do you do as you are applying glue to the canvas? Do you glue the canvas out past the foam edge a couple of inches and let it dry like that so that it is stiffer and easier to cut a straight line on when wrapped around? I'm guessing the 50/50 TBII mix is diluted enough that it will allow the glued canvas once dry to bend and is then glued down during a later step. On the cat condo project I wrapped around the edges on the initial canvas glue up and secured with push pins and had no problems with that but I wasn't concerned about nice straight edges.
Also, do you now apply gripper to the entire foam surface prior to gluing up or do you only go over the faired areas with gripper? Tim
Lotsahorses
Teardrop Inspector
 
Posts: 12
Joined: Sun Dec 11, 2016 7:20 am
Top

Re: Thrifty Alternatives ..Building Foam Campers

Postby ghcoe » Tue Dec 27, 2016 6:53 pm

Lotsahorses wrote:George, I reread your improved canvas technique and have a question about edges. During the canvas application, the canvas extends past the edges of the foam so what do you do as you are applying glue to the canvas? Do you glue the canvas out past the foam edge a couple of inches and let it dry like that so that it is stiffer and easier to cut a straight line on when wrapped around? I'm guessing the 50/50 TBII mix is diluted enough that it will allow the glued canvas once dry to bend and is then glued down during a later step. On the cat condo project I wrapped around the edges on the initial canvas glue up and secured with push pins and had no problems with that but I wasn't concerned about nice straight edges.
Also, do you now apply gripper to the entire foam surface prior to gluing up or do you only go over the faired areas with gripper? Tim


Yes I glue the canvas (sizing) just a little bit past where I want to make my cuts. This is where I explain that a bit better, although the body edging is a bit weak viewtopic.php?f=55&t=54099&start=420 . I used a piece of left over flashing to push the canvas down and then mark the cut line. Then I used a razor to make the cuts. With the sizing the canvas cuts real nice.

Yes I let the glue dry and then mark and make the cuts. Then I use full strength TBII to glue the flaps down. The canvas will shrink so by letting the canvas dry before making the cuts makes for nice clean straight edges. The full strength glue insures a nice bond to the body and then to the next layer of canvas. 50/50 glue still allows the canvas to bend easily. By spraying the canvas a bit with water makes it real nice to work with around the radiuses as well. My front radius is 2' and it was real easy. Using a roller really helps in this procedure. The rear radius is 6" and I was still able to get the canvas to lay down good. Although it did take a lot of working the canvas with the roller to get it there.
George.

Gorrilla Glue, Great Stuff and Gripper. The three G's of foamie construction.

My build viewtopic.php?t=54099
Working with flashing for foamie construction viewtopic.php?f=55&t=60303
Making a hot wire http://tnttt.com/viewtopic.php?f=55&t=55323
User avatar
ghcoe
1000 Club
1000 Club
 
Posts: 1946
Joined: Fri Dec 11, 2009 11:20 pm
Location: SW Idaho
Top

Re: Thrifty Alternatives ..Building Foam Campers

Postby Lotsahorses » Wed Dec 28, 2016 5:39 am

George, I don't know how I missed the part about using left over edging to hold the dried canvas down for accurate cut lines...great method. I'm looking forward to the next step of my build-thanks again. Tim
Lotsahorses
Teardrop Inspector
 
Posts: 12
Joined: Sun Dec 11, 2016 7:20 am
Top

Re: Thrifty Alternatives ..Building Foam Campers

Postby GPW » Mon Jan 30, 2017 7:55 am

Dear Folks, One of the only problem that plagues my foamie is that nasty green mold that grows on the surface , and your really have to scrub to get it off ... Today ,I’m going to try something else we saw on the ‘net .... Hydrogen Peroxide.... It’s supposed to actually Kill the mold , bleach only makes it clear and invisible , cleans it but doesn’t kill it ... So we’re going to buy some , put it in a spray bottle and see how that works ... Worse comes to worse , we can always use bleach to make it look good again and then the Peroxide to kill the remaining mold which may come back .... it sure does in our warm Humid climate ... :duh:

We tried the other mold remediation products , but they are expensive and you still have to use bleach , as stated on the labels .... AARGH !!! :frightened:


You guys and ladies of course, have any secrets ???
There’s no place like Foam !
User avatar
GPW
Gold Donating Member
 
Posts: 14912
Images: 546
Joined: Thu Feb 09, 2006 7:58 pm
Location: New Orleans
Top

Re: Thrifty Alternatives ..Building Foam Campers

Postby aggie79 » Mon Jan 30, 2017 3:10 pm

Be careful to not mix the two. The reaction creates heat which might help to kill the bacteria but may also hurt the integrity of the glue bond.


Sent from my iPhone using Tapatalk
Tom (& Linda)
For build info on our former Silver Beatle teardrop:
Build Thread

93503
User avatar
aggie79
Super Duper Lifetime Member
 
Posts: 5405
Images: 686
Joined: Tue Aug 07, 2007 5:42 pm
Location: Watauga, Texas
Top

Re: Thrifty Alternatives ..Building Foam Campers

Postby KCStudly » Mon Jan 30, 2017 3:21 pm

While we're on the subject, never mix bleach and ammonia because it makes toxic gas (like mustard gas used in WWII), and be careful mixing bleach with anything acidic (releases chlorine gas).
Last edited by KCStudly on Tue Jan 31, 2017 7:55 am, edited 1 time in total.
KC
My Build: The Poet Creek Express Hybrid Foamie

Poet Creek Or Bust
Engineering the TLAR way - "That Looks About Right"
TnTTT ORIGINAL 200A LANTERN CLUB = "The 200A Gang"
Green Lantern Corpsmen
User avatar
KCStudly
Donating Member
 
Posts: 9613
Images: 8169
Joined: Mon Feb 06, 2012 10:18 pm
Location: Southeastern CT, USA
Top

Re: Thrifty Alternatives ..Building Foam Campers

Postby GPW » Tue Jan 31, 2017 7:37 am

Thanks for the warnings !!! We only mix it with water to use in the pump sprayer ...
We did get some Hydrogen Peroxide ( it was cheap ) , and tried a sample sprayed on the FS...
There’s no place like Foam !
User avatar
GPW
Gold Donating Member
 
Posts: 14912
Images: 546
Joined: Thu Feb 09, 2006 7:58 pm
Location: New Orleans
Top

Re: Thrifty Alternatives ..Building Foam Campers

Postby GPW » Wed Feb 01, 2017 12:03 pm

Cleaning Report : Well, the Hydrogen Peroxide was a bit disappointing in the cleaning dept... it wouldn’t get the mold stains off, yet removed the green part of the mold .. So we resorted to the old 50-50 Clorox and water to take everythig off .... Now that it’s really clean, I see we won’t have to re- paint the whole thing again .... the paint is still in good shape underneath ... Just the roof part and a few touch up areas need to be done .... PLus adding some small patches where the Fire ants ate through the bottom ( ants visible in my Azaleas ... grrrrr!!!!) The makeshift drip edge on the front is still working like a Champ ...The Gorilla tape still stuck fast and the trailer bottom is dry ... :thumbsup: 
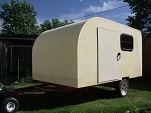
And the funny thing is the side that’s sat in the Sun has all but healed the dents my helper put in there working on the roof .... on the shadow side ... still dented ... we’ll fix that by turning it around for a while .... And it’s not even Summer yet ... ;) Once that summer sun/heat happens it’ll all be nice and tight again ... :beer:
Attachments
DSCN0107.jpg
DSCN0107.jpg (161.34 KiB) Viewed 1570 times
DSCN0106.jpg
DSCN0106.jpg (213.29 KiB) Viewed 1570 times
There’s no place like Foam !
User avatar
GPW
Gold Donating Member
 
Posts: 14912
Images: 546
Joined: Thu Feb 09, 2006 7:58 pm
Location: New Orleans
Top

Re: Thrifty Alternatives ..Building Foam Campers

Postby ghcoe » Wed Feb 01, 2017 9:27 pm

There is mold a mildew resistant paint available

http://www.homedepot.com/p/Zinsser-1-ga ... /204361822
George.

Gorrilla Glue, Great Stuff and Gripper. The three G's of foamie construction.

My build viewtopic.php?t=54099
Working with flashing for foamie construction viewtopic.php?f=55&t=60303
Making a hot wire http://tnttt.com/viewtopic.php?f=55&t=55323
User avatar
ghcoe
1000 Club
1000 Club
 
Posts: 1946
Joined: Fri Dec 11, 2009 11:20 pm
Location: SW Idaho
Top

Re: Thrifty Alternatives ..Building Foam Campers

Postby GPW » Thu Feb 02, 2017 7:44 am

George , Thanks , we will have to try that paint !!!! All the dampness here , mold will grow on most anything .... I just need to wash the trailer more often to keep it under control ... Once a month is too much , once a year waaaay too little ... :o
There’s no place like Foam !
User avatar
GPW
Gold Donating Member
 
Posts: 14912
Images: 546
Joined: Thu Feb 09, 2006 7:58 pm
Location: New Orleans
Top

PreviousNext

Return to Foamies

Who is online

Users browsing this forum: No registered users and 42 guests