Page 2 of 7

PostPosted: Mon Apr 18, 2011 9:08 am
by eaglesdare
tape off. most of the excess canvas cut off also.
Image

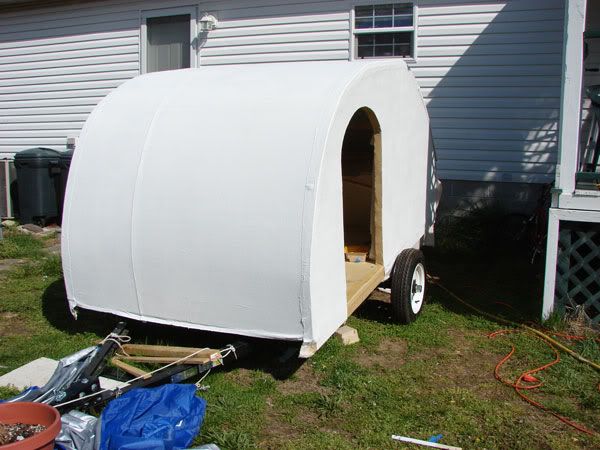
so full strenght t2 [titebond 2 glue] is used on the foam, then the canvas is laid down. then i used a diluted t2 with water. 2 parts t2 with 1 part water. rolls on nice. when it dries, it dries in a yellow color. no pics sorry.
i was recovering from surgery and i had a deadline to be campbable. so had to work quickly.
but really it was just dried glue.

then i put a coat of primer on. again, no pics. but it was just white.

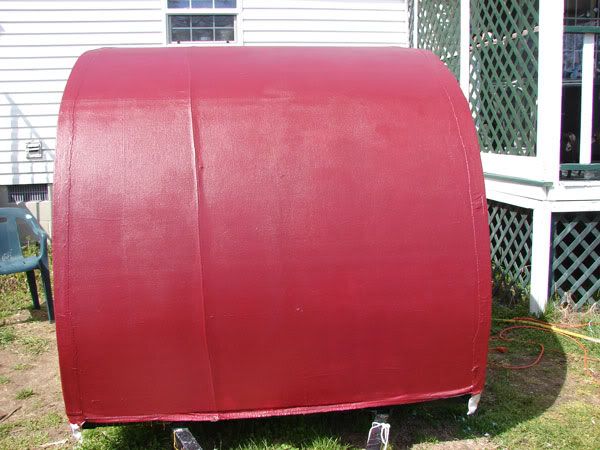
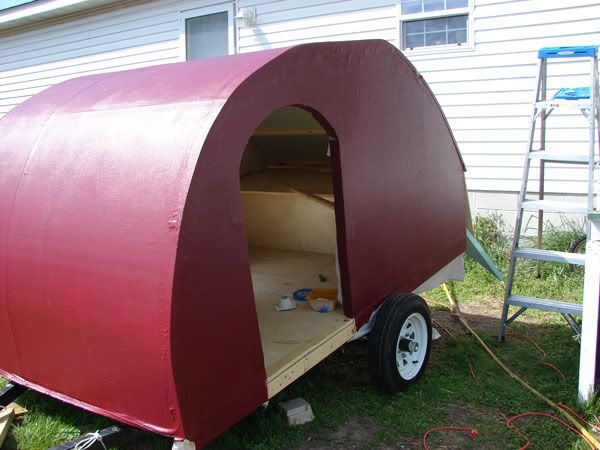
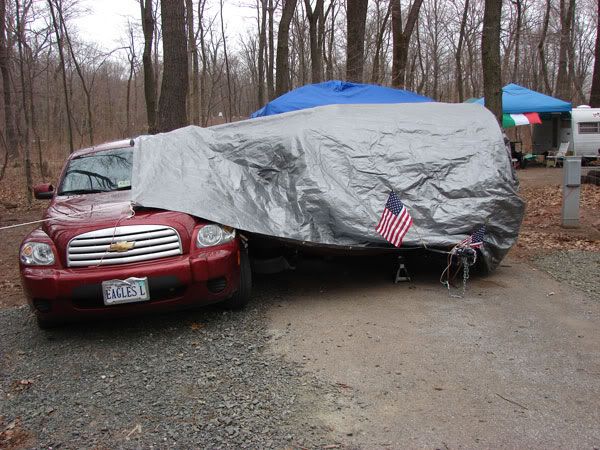
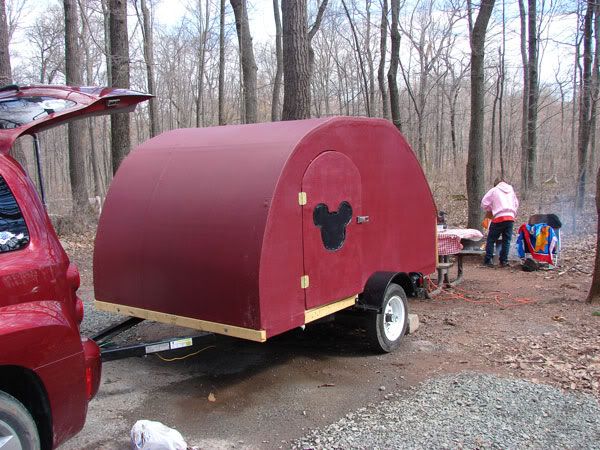
next i put 2 coats of paint on. i wanted it to match my car.
Image

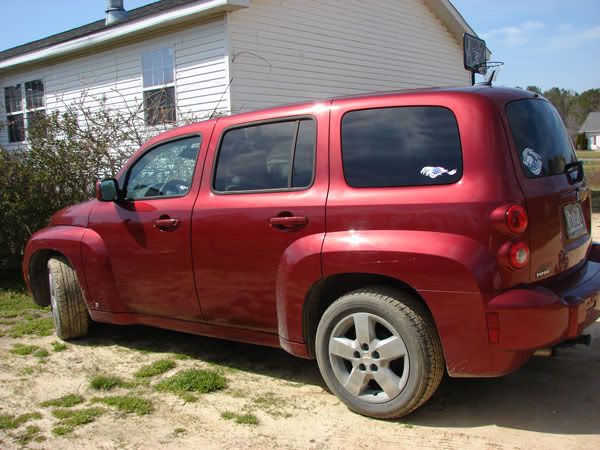
i think it comes pretty close
Image

Image

PostPosted: Mon Apr 18, 2011 9:15 am
by eaglesdare
hmm the doors. i really had a hard time with the doors. they were cut out in a tombstone shape. and i figure the cut outs would make for great halloween decor. but when the gals came down we decided to just use them anyway. orginally we were going to cut out another set of doors from another piece of foam. to get a better fit and to have like a coler lid type of fit. but with time constraints we went with what was already there.

a cut out in the door was done for a window. we also cut out a piece of plexiglass to use. but could not get a good working plan how to secure it. so one of the guys that came down the first weekend left an old tent for the kids to play with. sorry kids, but i used it for my windows. i cut the screen mesh out and hot glued that into the shape of my windows. then i cut some of the nylon sides and hot glued that on the inside. for now, i am just duct taping that part on the inside. and can be opened for the breeze to come thru the screen. will be working on those windows and doors some more though in the future.

but here is a road worthy pic
Image

PostPosted: Mon Apr 18, 2011 9:33 am
by eaglesdare
our deadline date had arrived. and we were on the road with a campable teardrop
Image

i have never towed anything so i let hubby drive. also because our hatch just wasn't perfect i was not comfortable relying on it, so we used cinch straps and that worked great.


it took hubby 5 hours to get there. we went to french creek in elverson pa. the name now has been changed to drench creek state park.
Image
this is our set up. we need more organization and we need to get a better way of dealing with tarps. but this did work. just wasn't pretty.


not sure if you know this or not, but i am a disney fan. so i was playing with the ears on my hubby. this was also our cubby hole to stay dry.
Image

a pic of grandson sleeping in the bunk bed. this will not be used for a bunk anymore though. he kept kicking my sides and i was so afraid he would kick the side walls off. he was giving some good whacks also. they did not budge.
Image

now the next morning, i got out of the tear first, then hubby followed. well lesson learned here. the tear had no more weight in the front once we got out and it fell over backwards, with the grandson still in the bunk. :lol:

but we did end up with a crack in the wood, no damage done to the foam/canvased parts. :thumbsup:
Image
this was the crack that resulted. and that is not a saw cut to begin with. that was one solid piece of wood. so we will be replacing that.

PostPosted: Mon Apr 18, 2011 9:39 am
by eaglesdare
the weather` was aweful. rained the whole day and most of the night.
Image

Image

sunday morning it was finally dry. but still cold. did i mention it was cold the whole weekend also. temps were around 42.
after we finally took the tarp off to pack up, this is the pic at our site
Image

PostPosted: Mon Apr 18, 2011 9:47 am
by eaglesdare
the foamie teardrop works and i love it. i have an hhr and tow capacity of 1000lbs. we haven't weighted this one yet, am hopeful to get to that this coming saturday.

but it rattles alot when towing empty. but add the weight from your gear and the sounds are gone.

i drove it home and it only took me an extra 15 minutes to get back. so i was doing pretty good. i actually got it up to 60 mph. :lol: `

now do overs, i would make it a tad bit bigger in lenght and width, not by much, just maybe a couple of inches.
i would precanvas the roof before putting it on the frame. canvasing the roof was hard, after the shell was built.

i still have to finish the` inside, add some type of seam cover on the outside. i also think i am going to add an a/c on the top counter/bunkbed and build walls around that.
i am going to set up camp in the back yard to try to get more organized.

all in all, it works and i love it. any questions please feel free to ask. i am not sure i answered everything here. and thanks for looking.

PostPosted: Mon Apr 18, 2011 10:35 am
by Ratkity
Wow Eagle,

You have been so busy reconstructing a build thread!! Great job!!

I have some pictures of the process when we were configuring the doors. I'll upload those after work today. It shows where we gorilla glued in reinforcing wood blocks on the door and door jambs for screwing in the hinges and latches.

Drench Creek was loads of fun and a great test of water-tightness! I put my new boots to the test during the deluge - happy to report they are indeed, waterproof as stated.

For all the future foamie builders and thread followers, the pictures of the completed product doesn't really capture how nicely the color match is to the car! The outer canvas is very tough and rigid. There is no side to side sway due to the rigidity and wooden bulkheads.

Hugs,
Ratkity

PostPosted: Mon Apr 18, 2011 10:54 am
by eaglesdare
Ratkity wrote:Wow Eagle,

You have been so busy reconstructing a build thread!! Great job!!

I have some pictures of the process when we were configuring the doors. I'll upload those after work today. It shows where we gorilla glued in reinforcing wood blocks on the door and door jambs for screwing in the hinges and latches.

Drench Creek was loads of fun and a great test of water-tightness! I put my new boots to the test during the deluge - happy to report they are indeed, waterproof as stated.

For all the future foamie builders and thread followers, the pictures of the completed product doesn't really capture how nicely the color match is to the car! The outer canvas is very tough and rigid. There is no side to side sway due to the rigidity and wooden bulkheads.

Hugs,
Ratkity


thanks patrica. if you want to post those pics here that would be good. i did not get those.

for all those who don't know, ratkitty is one of the gals that came down and worked on the canvas. she did most of the canvasing on the inside. she even had to work upside down. hence why i said, if you can precanvas the insides panels. glue in your hair is not fun to get out!

there was zero side to side sway. we were hit with some nasty winds at drench creek. we did not move at all.

there was some leaking around one corner of my latch, we did not have the easy up properly over it, and the easy up had pool of water build up. so when we dumped the pools of water well that just splashed right into my hatch. but for the amounts of rain we had very little water got in. you could see inside the hatch where the canvas was starting to get wet. but better tarping over the tear and/or adding weather stripping will/should take care of that issue.

sorry patricia we did not get to spend more time together, it was too cold and wet for me. :lol: i think i spent more time in the bathroom where the heat was and the blow dryer was my friend. :lol:

PostPosted: Mon Apr 18, 2011 11:05 am
by GPW
Eagle , excellent build thread !!! Love the pics !!! Just a few questions....
1. Are you confident enough yet to cross "the bridge" now ???
2. Where exactly do you live ??? (state)
3. Did you really make Hubby wear those Mouse ears .... ??? :D

PostPosted: Mon Apr 18, 2011 11:12 am
by Ratkity
eaglesdare wrote:
sorry patricia we did not get to spend more time together, it was too cold and wet for me. :lol: i think i spent more time in the bathroom where the heat was and the blow dryer was my friend. :lol:


LOLOL I thought about you everytime I went into the ladies restroom because it was soooooo warm in there. I admit I had to thaw out my fingers a couple of times under the hand drier.

BTW, I didn't even know you brought anyone else other than your kiddo and hubby. Never saw the grandkid hiding in the car.

With the wind gusts we had and sideways rain, what little wetness you got was even less than some of the other folks. The foamie is a marvel!

Hugs,
Ratkity

PostPosted: Mon Apr 18, 2011 11:26 am
by eaglesdare
GPW wrote:Eagle , excellent build thread !!! Love the pics !!! Just a few questions....
1. Are you confident enough yet to cross "the bridge" now ???
2. Where exactly do you live ??? (state)
3. Did you really make Hubby wear those Mouse ears .... ??? :D


1: i am more confident of the nose bleed bridge. i still don't like that one with just driving a car. but i will eventually concur that one with the tear. we'll be going over it in may.
..but for this trip we did have a bridge to cross, not the nose bleed bridge, but still a bridge. i drove home so i drove/towed the tear home. i was a little nervous but i managed and feel much better.

2: we live on the eastern shore of va. near chincoteague island. for us to get to the mainland of usa, we have to drive north or south then west, and we have bridges to cross on the south part and west parts.

3: you are just oo funny! :lol:

PostPosted: Mon Apr 18, 2011 12:10 pm
by Miriam C.
Image for building and then document the Foamy for us! :thumbsup:

PostPosted: Mon Apr 18, 2011 12:13 pm
by eaglesdare
Ratkity wrote:
eaglesdare wrote:
sorry patricia we did not get to spend more time together, it was too cold and wet for me. :lol: i think i spent more time in the bathroom where the heat was and the blow dryer was my friend. :lol:


LOLOL I thought about you everytime I went into the ladies restroom because it was soooooo warm in there. I admit I had to thaw out my fingers a couple of times under the hand drier.

BTW, I didn't even know you brought anyone else other than your kiddo and hubby. Never saw the grandkid hiding in the car.

With the wind gusts we had and sideways rain, what little wetness you got was even less than some of the other folks. The foamie is a marvel!

Hugs,
Ratkity


actually it was the son that was hiding out in the car. grandson was out and about.

coop had his hatch opened, rick went over to close it, it was raining pretty good by then. he wasn't expecting the weight on that thing though and it `shut hard, rick grabbed a corner and sliced his hand. but he said that hated weights more than my whole teardrop. :lol:

PostPosted: Mon Apr 18, 2011 1:28 pm
by Ratkity
Oh yeah about those hatches!

Some of those hatches weigh a ton! It would be just my luck to have one fall and knock me out. Sorry Rick busted up his hand.

Your hatch is beyond light! I think the cinch straps were a good idea for traveling. Even Kate and Jeremy had straps on their new woody for traveling.

Ooops, got the kiddos mixed up. Easy to do. They all look alike to us single people hehe.

Hugs,
Ratkity

PostPosted: Wed Apr 20, 2011 8:46 pm
by Ratkity
Ok.. here's before we started the canvas - it was quite windy that day!

Image

Image

Measuring canvas for roof:

Image

Roof canvas on and doing sides:

Image

Door work:
Image
Note the wooden blocks to screw in hardware. Matching blocks on main foamie body.

Image

Image

Image
Canvas on ceiling - talk about glue in da hair!

PostPosted: Wed Apr 20, 2011 11:35 pm
by S. Heisley
The foamie is a marvel!


It really is! You've done something amazing! Thank you for sharing your story and pictures. What fun! :thumbsup: :applause: