10' Standie Foamie ... on hold

Canvas covered foamies (Thrifty Alternatives...)

Moderator: eaglesdare
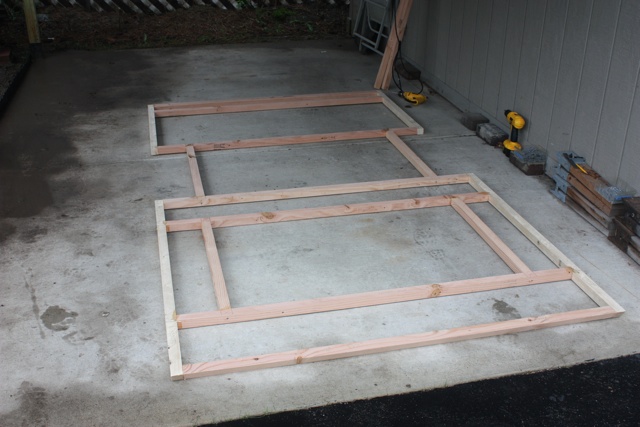
Postby CliffinGA » Fri May 13, 2011 9:25 pm

Oh yeah I think we're all interested!!

Cliff :thumbsup:
In God we trust, shoot the rest and he will sort out!

My Build:

viewtopic.php?f=50&t=42628
User avatar
CliffinGA
1000 Club
1000 Club
 
Posts: 1499
Images: 207
Joined: Sat Nov 14, 2009 1:29 pm
Location: Jefferson, GA

Postby swampjeep » Fri May 13, 2011 9:45 pm
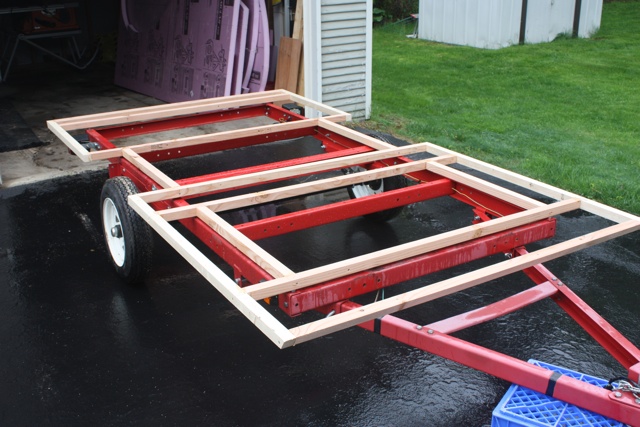
GPW wrote:Interested ... :o Oh Heck Yeah !!!!! It's coming along really quick... You going to pre cover the outside ... probably easy to do at this stage (flat)... JMHO, I'd lay it out flat , roll on the glue and just lay the canvas into that, trim and let dry... you may have to stretch it a bit so somebody else would be handy... and for the best job , you might ask, beg ,bribe Chell to iron the fabric for you with a steam iron ... if the material was folded then those wrinkles will come out in the finish (subtle )...gotta' get those out if you want a perfect finish .... also good to thoroughly vacuum the foam surface , make sure the canvas stays Clean .... tiny bits of anything turns into a bump ...but you can push in on it and they usually disappear ... best clean from the get go... just trying to be helpful...


I hear if you dampen the canvas, and throw it in the drier for a few minutes, it will take the wrinckles out... but that's just what I've heard.
:D
User avatar
swampjeep
Teardrop Master
 
Posts: 203
Images: 3
Joined: Mon Apr 04, 2011 7:51 pm
Location: waterford mi

Postby starleen2 » Fri May 13, 2011 9:52 pm

swampjeep wrote:
GPW wrote:Interested ... :o Oh Heck Yeah !!!!! It's coming along really quick... You going to pre cover the outside ... probably easy to do at this stage (flat)... JMHO, I'd lay it out flat , roll on the glue and just lay the canvas into that, trim and let dry... you may have to stretch it a bit so somebody else would be handy... and for the best job , you might ask, beg ,bribe Chell to iron the fabric for you with a steam iron ... if the material was folded then those wrinkles will come out in the finish (subtle )...gotta' get those out if you want a perfect finish .... also good to thoroughly vacuum the foam surface , make sure the canvas stays Clean .... tiny bits of anything turns into a bump ...but you can push in on it and they usually disappear ... best clean from the get go... just trying to be helpful...


I hear if you dampen the canvas, and throw it in the drier for a few minutes, it will take the wrinckles out... but that's just what I've heard.
:D


Your are correct - but if you don't take it out immediatley and place it on a roll - you'll have even more wrinkles than when you started out with! Also leave the dryer sheet out as well ;)
User avatar
starleen2
5th Teardrop Club
 
Posts: 16272
Images: 224
Joined: Sat May 12, 2007 8:26 pm
Location: Pea Ridge ,AR
Top

Postby mikeschn » Sat May 14, 2011 6:18 am

Well, we are supposed to get some rain today. And the rain seems to be stalled over us.

But we'll try to do something in the garage. :?

Image

Mike..
The quality is remembered long after the price is forgotten, so build your teardrop with the best materials...
User avatar
mikeschn
Site Admin
 
Posts: 19202
Images: 479
Joined: Tue Apr 13, 2004 11:01 am
Location: MI
Top

Postby eaglesdare » Sat May 14, 2011 7:35 am

so you are going to cover the sides before they are together? and you are going to use 2 layers of canvas?

if this is correct, then i would only do one layer of canvas first, then the second layer of canvas after it is all together.

as gpw stated in the beginning of the long thread, this canvas will act like a sock, this is what really holds it altogether.

2 layers of this canvas is going to be real strong though. if there are any major dings, i suppose i would fix them now, before the covering. but like i said somewhere, i did not even bother with that.

the finished feel will be like sandpaper, that is if you use the diluted t2 on top. it will be very rough, personally i loved the look. it was also mentioned in the article that lauriesand referenced to lightly sand paper the canvas before putting on the primer. i did that on part of a door, and did not do it for the rest. i just did not see any difference.
Louella
May the foam be with you.
User avatar
eaglesdare
Donating Member
 
Posts: 3168
Images: 13
Joined: Tue Aug 26, 2008 7:06 pm
Top

Postby GPW » Sat May 14, 2011 7:50 am

If you want it really smooth , you could use a thick primer like Gesso or Concrete block filler... and Lots of sanding ... :o Not my idea of Fun !!!
There’s no place like Foam !
User avatar
GPW
Gold Donating Member
 
Posts: 14912
Images: 546
Joined: Thu Feb 09, 2006 7:58 pm
Location: New Orleans
Top

Postby eaglesdare » Sat May 14, 2011 7:59 am

i suppose that will be a personal preference. i love that rough look.
Louella
May the foam be with you.
User avatar
eaglesdare
Donating Member
 
Posts: 3168
Images: 13
Joined: Tue Aug 26, 2008 7:06 pm
Top

Postby mikeschn » Sat May 14, 2011 9:53 am

I got the sub-floor built. I have 2 more cross members (you can see them in the back of the photo. They go where the plywood joints are, to give me something to screw into, and keep the water out!
Image

and dry fitted to make sure I didn't mess up the numbers... Yes, I haven't moved the 2nd cross member yet!
Image

Mike...
The quality is remembered long after the price is forgotten, so build your teardrop with the best materials...
User avatar
mikeschn
Site Admin
 
Posts: 19202
Images: 479
Joined: Tue Apr 13, 2004 11:01 am
Location: MI
Top

Postby mikeschn » Sat May 14, 2011 4:18 pm

The rain really slowed me down. I don't have much in the way of progress pictures... :cry:

I did glue in the extra crossmembers in the sub-floor.

Then I experimented with a window frame. My first attempt: I built the wooden frame with glue and screws. Then I dropped it in the hole. It's not bad, but it's not especially snug.

Image

So for the second window I decided I would glue each piece in individually. First the two horizontal pieces. Then I cut the two vertical pieces so that they were tight, and pressed the horizontal pieces against the foam.

Then I cut two more horizontal pieces which would press the vertical pieces tight against the foam. (These would later be removed and thrown away.)BTW, did you notice the duct tape on the opposite side?That'll hopefully keep the glue from ozing out the back side.

Image

Image

As you can see, this joint is much tighter!!!
Image

Mike...

P.S. Tomorrow I get to think about the door frame!
Last edited by mikeschn on Sat May 14, 2011 5:57 pm, edited 1 time in total.
The quality is remembered long after the price is forgotten, so build your teardrop with the best materials...
User avatar
mikeschn
Site Admin
 
Posts: 19202
Images: 479
Joined: Tue Apr 13, 2004 11:01 am
Location: MI
Top

Postby GPW » Sat May 14, 2011 5:15 pm

Mike ,That looks great !!! Nice and snug !!! Anxious to see your thoughts on the door frame ... and door framing ...
There’s no place like Foam !
User avatar
GPW
Gold Donating Member
 
Posts: 14912
Images: 546
Joined: Thu Feb 09, 2006 7:58 pm
Location: New Orleans
Top

Postby Ratkity » Sat May 14, 2011 5:52 pm

Very innovative on the window design. Love it!

Hugs,
Ratkity
Ratkity
Gold Donating Member
 
Posts: 1065
Images: 0
Joined: Wed May 26, 2010 1:01 pm
Top

Postby eaglesdare » Sat May 14, 2011 6:04 pm

wow, that is fantastic. its a shame the rain put a damper on things. you are going to have a nice looking trailer when its done.
Louella
May the foam be with you.
User avatar
eaglesdare
Donating Member
 
Posts: 3168
Images: 13
Joined: Tue Aug 26, 2008 7:06 pm
Top

Postby mikeschn » Sat May 14, 2011 6:36 pm

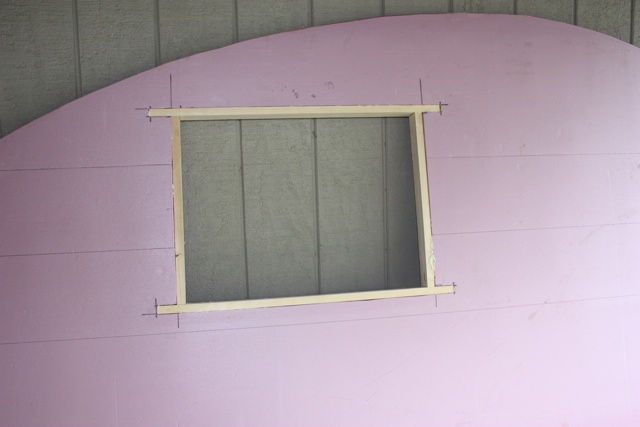
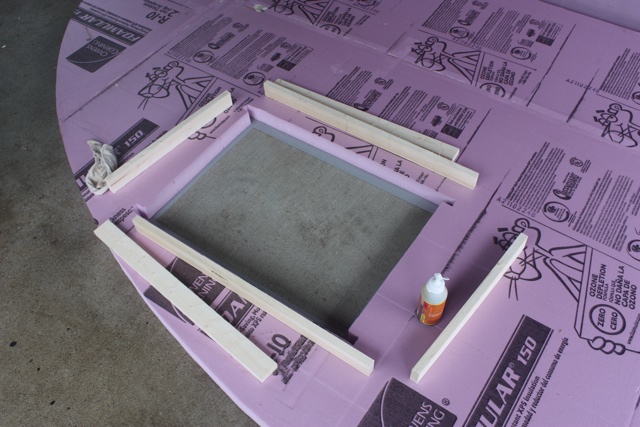
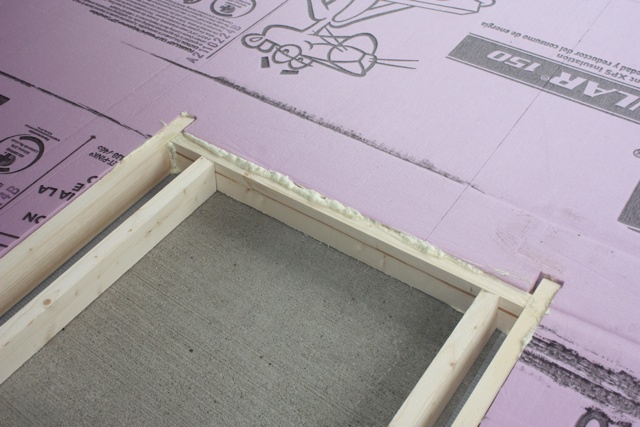
GPW wrote:Mike ,That looks great !!! Nice and snug !!! Anxious to see your thoughts on the door frame ... and door framing ...


I'm anxious to see my thought on the door frame too! :duh:

Ratkity wrote:Very innovative on the window design. Love it!
Thanks Ratkity. GPW helped!

eaglesdare wrote:wow, that is fantastic. its a shame the rain put a damper on things. you are going to have a nice looking trailer when its done.

Thanks eaglesdare! Looks like we have rain in the forcast for the next 7 days. :cry:


Meanwhile, I discovered that a random orbital sander roughs up the surface of the foam nicely in preparation for skinning with canvas and T2.

Image

Mike...
The quality is remembered long after the price is forgotten, so build your teardrop with the best materials...
User avatar
mikeschn
Site Admin
 
Posts: 19202
Images: 479
Joined: Tue Apr 13, 2004 11:01 am
Location: MI
Top

Postby eaglesdare » Sat May 14, 2011 6:43 pm

hmm, is there really a need to rough that stuff up? i know the kind gpw had was a glossy skin, but the stuff you are i am using is not.

i did not rough my surface up. so do you think this is necessary? is there an added benefit to it?
Louella
May the foam be with you.
User avatar
eaglesdare
Donating Member
 
Posts: 3168
Images: 13
Joined: Tue Aug 26, 2008 7:06 pm
Top

Postby mikeschn » Sat May 14, 2011 6:46 pm

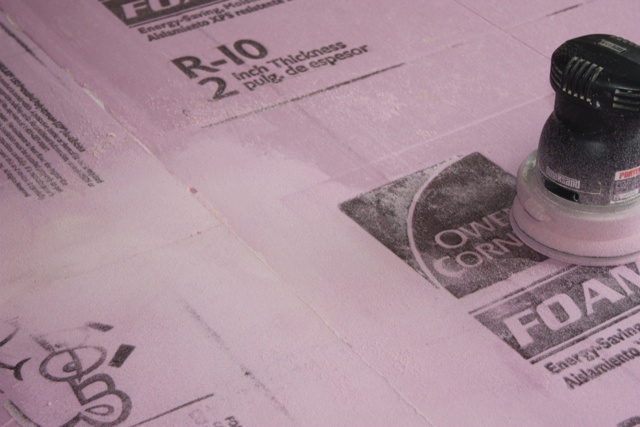
eaglesdare wrote:hmm, is there really a need to rough that stuff up? i know the kind gpw had was a glossy skin, but the stuff you are i am using is not.

i did not rough my surface up. so do you think this is necessary? is there an added benefit to it?


I can test it both ways!

Mike...
The quality is remembered long after the price is forgotten, so build your teardrop with the best materials...
User avatar
mikeschn
Site Admin
 
Posts: 19202
Images: 479
Joined: Tue Apr 13, 2004 11:01 am
Location: MI
Top

PreviousNext

Return to Foamies

Who is online

Users browsing this forum: No registered users and 19 guests