3D Foamies

Canvas covered foamies (Thrifty Alternatives...)

Moderator: eaglesdare

3D Foamies

Postby NGuage » Sat Oct 08, 2011 11:55 pm

Wow! New here and have spent the last week reading every post of the 175 page thread as well as all foam builds the builds. What a great group here. I have worked with this foam stuff in model railroading and would like to toss a few ideas into the ring.

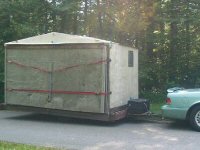
Here is a pic of my last N gauge model railroad build using the exact same foam as you guys. The layers are glued together using box store foam glue. The bucket is filled with water to press the pieces together, the firewood was eventually used in a thrifty manner to heat the house. (Even included beer!)

Image


Model railroad people carve the foam to make mountains and tunnels. A must have is a drywall rasp. It's a couple bucks at box stores shown here...Understand that this tool can also create a fairly smooth surface, ready for coarse sanding.


Image


Here is how it turned out...


Image


What I have learned working with this stuff made me realize I have a few ideas that would definatly work for foamies. Vinyl spackling by the way definitely covers up seams and imperfections and is thrifty. I have used it a ton as have others in the community.

You have to look at a 4x8 sheet of foam as something that could be cut up and stacked very easily with a jigsaw or even a steak knife. It is NOT plywood. For example look at these leftovers from my railroad build...

Image

Imagine those were 4 feet wide arches. Shave off the "steps" and you have the front of a "foamstream", with a curve left and right AND up and down. Doing the math, cut the arches 3 inches wide, offset each one 1/2 inch from the front, use 3 inch drywall screws and glue to attach to each other and it would work. You should be able to get at least a 60 inch rise and 30 inch curve from a single piece of 8x4 foam and still have it 2 inches thick.

Other thoughts...Windows/doors...take 2, 1 inch pieces of foam (to be glued together) and cut out out a matching hole in both pieces. Place a piece of lexan/plexigalass/glass between the 2 sheets and glue. You may have create a "pocket" for the window to sit down into. Extend the pocket to the side, add a handle to the window and it should slide open into the pocket you made. The same should work with a plexiglass door...like a pocket door.

For a BIG front window...imagine the the view we have all seen from the tow vehicle side of a build that just has the 2 vertical side walls up. Now imagine an inside groove on both sides of the sidewalls (about an inch down from the roof line that follows the roof line) that you could slide a flexible piece of lexan/plexiglass into. Glue, silicone seal and put a 1 inch removable curved foam piece on top. Stargazer!

The cool thing about any of these ideas, if they fail, get out the jig saw and foam and glue. Repairs could even involve the roof but big deal.

PS...sorry for the length but wanted to share all my thoughts with everyone.

-Nguage
NGuage
Teardrop Inspector
 
Posts: 2
Images: 4
Joined: Sat Oct 08, 2011 8:29 pm
Location: Virginia

Postby Wolffarmer » Sun Oct 09, 2011 1:14 am

Hey Ngauge, Welcome to the asylum.

Man you must be about all read out if you read the main thread here. Not to mention all the others.

I think you have some nice ideas. Not sure just how to figure out the curve and all. I might be hitting you up for some designing drawings

:lol:

Randy
"these guys must be afraid of the dark"
User avatar
Wolffarmer
Donating Member
 
Posts: 4612
Images: 309
Joined: Wed May 02, 2007 1:32 pm
Location: Idaho Rupert

Postby eaglesdare » Sun Oct 09, 2011 7:44 am

thanks for you input!
btw, i love your train set up and what you are doing with the foam.
Louella
May the foam be with you.
User avatar
eaglesdare
Donating Member
 
Posts: 3168
Images: 13
Joined: Tue Aug 26, 2008 7:06 pm
Top

Postby GPW » Sun Oct 09, 2011 8:18 am

NG, Nice “landscaping !â€
There’s no place like Foam !
User avatar
GPW
Gold Donating Member
 
Posts: 14911
Images: 546
Joined: Thu Feb 09, 2006 7:58 pm
Location: New Orleans
Top

Postby NGuage » Sun Oct 09, 2011 7:01 pm

Thanks for your kind words all.

Randy, it's rise over run. With 2 inch foam, if you offset each piece 1/2 inch towards the back it will give you a curve of 30 inches towards the back (and sides) for every 60 inches in rise. You can vary this as you like.

I think the point is that the construction of these things lends itself to outside of the box thinking, like laminating plexiglass between 2 one inch pieces of foam for side walls/windows. The opening for the window could be square, oval round or even star shaped.

Want a nike swoosh on the sides? Glue it on and paint. Heck, you could make a teardrop that looks like a boulder, inside and out at no extra cost. Just a bit more glueing and carving,

Fred Flintstone would love you!

NGuage
NGuage
Teardrop Inspector
 
Posts: 2
Images: 4
Joined: Sat Oct 08, 2011 8:29 pm
Location: Virginia
Top

Postby GPW » Mon Oct 10, 2011 6:41 am

Hahaha... brings to mind the Chevy commercial jingle .... â€
There’s no place like Foam !
User avatar
GPW
Gold Donating Member
 
Posts: 14911
Images: 546
Joined: Thu Feb 09, 2006 7:58 pm
Location: New Orleans
Top

Postby pete42 » Mon Oct 10, 2011 7:06 am

"Randy, it's rise over run. With 2 inch foam, if you offset each piece 1/2 inch toward the back it will give you a curve of 30 inches toward the back (and sides) for every 60 inches in rise. You can vary this as you like. "

Help me, I keep reading this but my feeble mind can't grasp the concept.

even a line drawing would help.

old pete
User avatar
pete42
Super Lifetime Member
 
Posts: 2203
Images: 13
Joined: Sat Nov 07, 2009 11:52 am
Location: SouthWest Ohio
Top


Return to Foamies

Who is online

Users browsing this forum: No registered users and 11 guests