The Poet Creek Express - Foamie Hybrid

Canvas covered foamies (Thrifty Alternatives...)

Moderator: eaglesdare

Re: The Poet Creek Express - Foamie Hybrid

Postby Fred Trout » Fri Jul 24, 2015 4:40 pm

Looking very good. :thumbsup:

I would fill with spackle if you do not want the low spots will show when you canvas/cloth. Every thing shows unless you use thick canvas; the thinner the skinning material the more that shows.

BTW, my few finger sized bubbles ironed out good ---- so far; will see if paint application makes them pop again.

EDIT: paint is dry bubbles still gone.
Last edited by Fred Trout on Sat Jul 25, 2015 8:49 pm, edited 1 time in total.
User avatar
Fred Trout
The 300 Club
 
Posts: 396
Joined: Fri May 08, 2015 4:30 pm
Location: SW Montana

Re: The Poet Creek Express - Foamie Hybrid

Postby GPW » Fri Jul 24, 2015 5:26 pm

Can't put it off any longer .... Time to cover that puppy !!! :thumbsup: 8) :D Best find help to make it easy on yourself... ;)
There’s no place like Foam !
User avatar
GPW
Gold Donating Member
 
Posts: 14911
Images: 546
Joined: Thu Feb 09, 2006 7:58 pm
Location: New Orleans

Re: The Poet Creek Express - Foamie Hybrid

Postby NebraskaTeachr » Sat Jul 25, 2015 5:03 pm

I cant wait to see the canvas go on. This is an awesome build. For some reason building with foam seems more intimidating than regular plywood. I've really enjoyed watching your build

Tim
User avatar
NebraskaTeachr
Donating Member
 
Posts: 123
Images: 53
Joined: Tue Feb 10, 2009 2:01 pm
Location: Hardin, MT
Top

Re: The Poet Creek Express - Foamie Hybrid

Postby KCStudly » Sat Jul 25, 2015 10:46 pm

Hey Fred, glad the bubbles worked out for you. I'm leaning toward doing the filler work; just trying to decide the best method/material to use. I don't want to put that much spackle to it and expect it to hold up.

GPW, we're not there yet, not quite.

Tim, thanks for the very kind words. I think the biggest differences are the workability and the fragility. You can work the foam fairly easily compared to ply, but it is a lot more fragile. Seems like every time I touch it I make more work for myself. Then again the problems keep getting smaller and smaller, so I guess it is just a matter of keeping going. Build 2 will be much less complicated and likely skinned with ply (if there is a 2nd).

Stay tuned for an update on today's efforts.
KC
My Build: The Poet Creek Express Hybrid Foamie

Poet Creek Or Bust
Engineering the TLAR way - "That Looks About Right"
TnTTT ORIGINAL 200A LANTERN CLUB = "The 200A Gang"
Green Lantern Corpsmen
User avatar
KCStudly
Donating Member
 
Posts: 9611
Images: 8169
Joined: Mon Feb 06, 2012 10:18 pm
Location: Southeastern CT, USA
Top

Re: The Poet Creek Express - Foamie Hybrid

Postby KCStudly » Sat Jul 25, 2015 11:39 pm

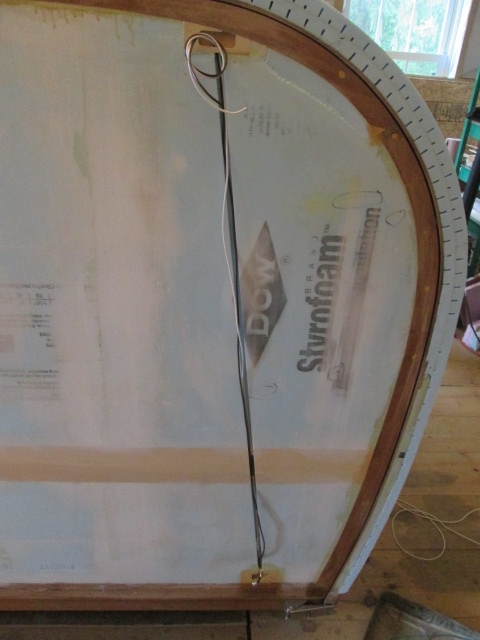
I decided to work on something less physical this afternoon after having to work at my day job until about 1pm. So starting to rough in the wiring for the side clearance lights seemed like a good idea.

The recessed pockets that I cut behind the lower marker lights are kind of small without much room for extra wire or splices, so I decided that I needed to take a closer look at how those would go before deciding how to tie the wires for the upper clearance lights in.

When I picked the marker lights I based the decision on the following in order of precedence: 12v LED; surface mount; their basic somewhat retro/generic appearance (simple but not too flashy); and inexpensive price. I also liked the fact that the bezels screwed down first and the light assembles snap into place so that the screws will be hidden. What I didn’t do was pay too much attention to how they would be wired. I think superbrightleds.com has updated their website with lots more pictures and info than when I bought these, but to be honest I probably didn’t consider it much at the time. The specs said they had a hot lead attached, but in fact they have a pair of female bullet terminals imbedded in the back (see pic below) and a pigtail with a male bullet included for the hot lead. The ground terminal nests into a rivet ring with tab in the mounting base and the tab gets pinched under one of the mounting screws to complete the circuit back to a grounded chassis. Since I will be screwing this thru the painted canvas into the wood sill of my walls, I knew I would have to hard wire the grounds, figured out what size and type of bullet connector to buy, and got those sometime back.

Well, it turns out that the bullet connectors I bought, although straight like the one provided, are of much better quality, thicker material, with a longer shank and insulator, so they would stick out further behind the fixture. Also, when fitting the light into the bezel the extended part of the female terminal that sticks into the rivet ring didn’t seem to fit with the bullet installed. If I snapped the light into the bezel first, the bullet couldn’t be pushed thru the ring into the terminal because the terminal was pinched closed slightly by the forcing cone action of the ring. So, since the problem was the OEM grounding feature that I couldn’t use, didn’t need and was causing me problems, the solution was to cut them out. Here you can see the as built bezel on the left; the bezel in the middle marked for cutting; the bezel on the right after cutting the ground feature out; and the back side of the lamp with the female terminals.
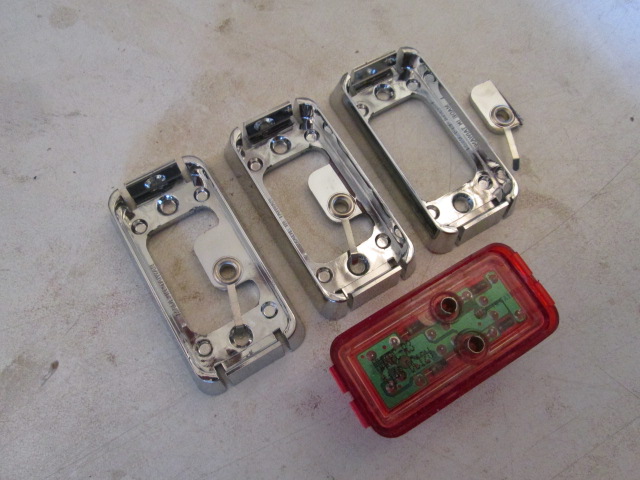
Image

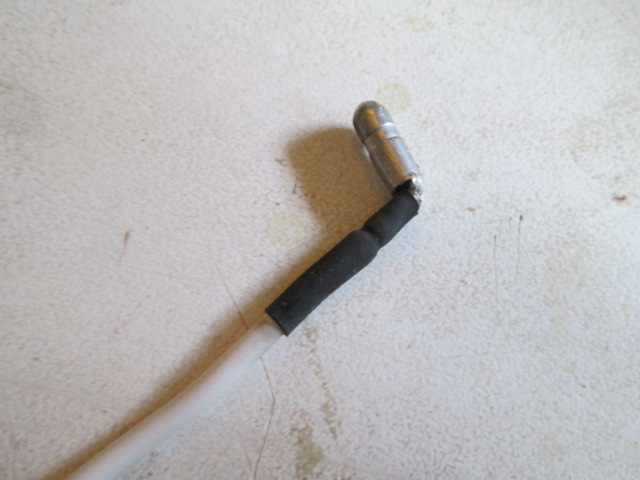
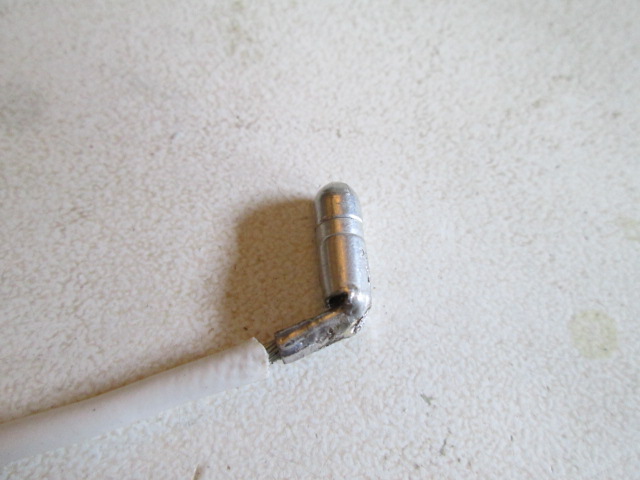
Still, the good bullet terminals I bought would stick too far out the back, and I didn’t feel like having to order the 90 deg type. So I looked at them a little closer. I frequently strip off the factory insulation on this sort of thing so that I can make solder connections. From there it looked like I could bend the crimp portion over almost 90 deg; except that in bending it the crimp area got crushed so I would have to solder the wires in before bending.
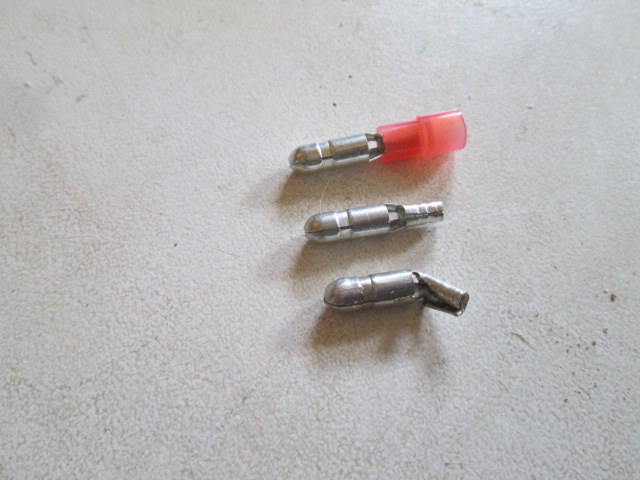
Image

Here’s one soldered first then bent, followed by the shrink tubing.
Image
Image

I did find that if I didn’t bend them straight over that the shell could tear or crack open a little, so careful inspection, a little solder, or just try again; I have 50 in the pack and only need 8 good ones.

To solve the problem of having extra wire to deal with, I decided to use the extra wire I had left at the marker light rough in to move the splice up into the clearance light wire way. By doing this I can set the third leg length from the tee splice so that the bullet just sticks out a little bit, but there is still enough wire to work with, and if I had to I could pull the upper clearance light out from the end of the line and retrieve the extra wire or rebuild the end of the harness as needed. So here are the two bullets at the marker light…
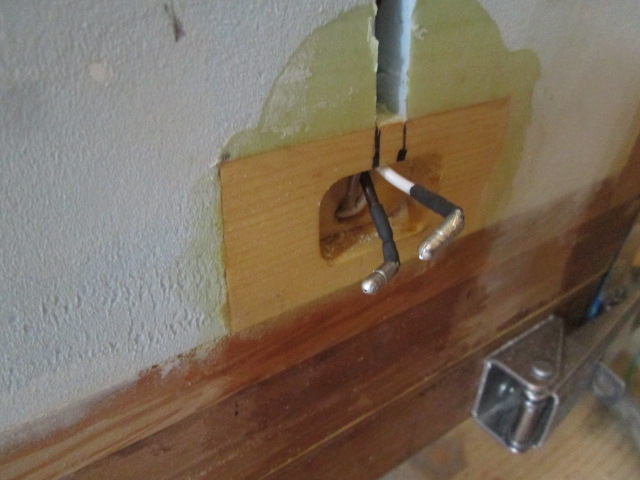
Image

… the splices staggered a little higher up…
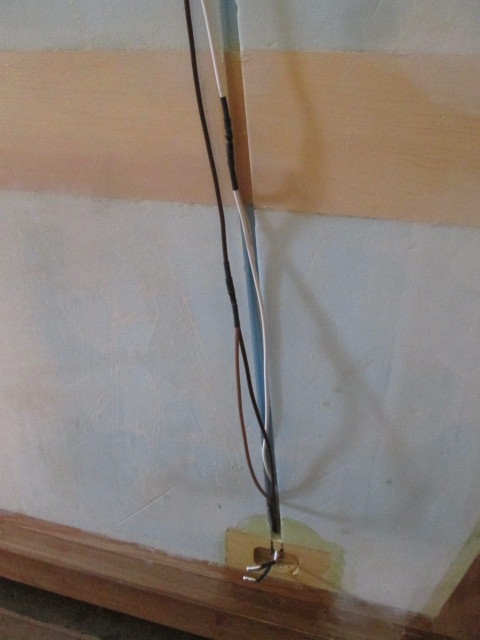
Image

… and an overview.
Image

Just need to do that 3 more times.
KC
My Build: The Poet Creek Express Hybrid Foamie

Poet Creek Or Bust
Engineering the TLAR way - "That Looks About Right"
TnTTT ORIGINAL 200A LANTERN CLUB = "The 200A Gang"
Green Lantern Corpsmen
User avatar
KCStudly
Donating Member
 
Posts: 9611
Images: 8169
Joined: Mon Feb 06, 2012 10:18 pm
Location: Southeastern CT, USA
Top

Re: The Poet Creek Express - Foamie Hybrid

Postby GPW » Sun Jul 26, 2015 7:45 am

details ... :o
There’s no place like Foam !
User avatar
GPW
Gold Donating Member
 
Posts: 14911
Images: 546
Joined: Thu Feb 09, 2006 7:58 pm
Location: New Orleans
Top

Re: The Poet Creek Express - Foamie Hybrid

Postby KCStudly » Sun Jul 26, 2015 11:33 am

Exactly!!! :twisted: :FNP
KC
My Build: The Poet Creek Express Hybrid Foamie

Poet Creek Or Bust
Engineering the TLAR way - "That Looks About Right"
TnTTT ORIGINAL 200A LANTERN CLUB = "The 200A Gang"
Green Lantern Corpsmen
User avatar
KCStudly
Donating Member
 
Posts: 9611
Images: 8169
Joined: Mon Feb 06, 2012 10:18 pm
Location: Southeastern CT, USA
Top

Re: The Poet Creek Express - Foamie Hybrid

Postby sincere01 » Tue Jul 28, 2015 5:01 pm

This thing is looking good so far. Finally had time to go back and look at your original plans. You have an immense amount of patience and a wonderful eye for detail. Can't wait to see this thing progress.
Cheers,
Scott

My build thread: http://tnttt.com/viewtopic.php?f=50&t=63853
User avatar
sincere01
Teardrop Advisor
 
Posts: 64
Joined: Mon Jul 20, 2015 5:03 pm
Top

Re: The Poet Creek Express - Foamie Hybrid

Postby KCStudly » Tue Jul 28, 2015 5:42 pm

Thanks, Scott. Most of the time I'm on it 6 days a week, but I have been in a bit of a slow down lately missing a few days here and there.

The details take all of the time, but hopefully will be reflected in the finished product. Other than the self-satisfaction that I get from building and sharing with the good people here, it surely will never be worth the effort I have put in. But then again, it is worth the experience to me. :D
KC
My Build: The Poet Creek Express Hybrid Foamie

Poet Creek Or Bust
Engineering the TLAR way - "That Looks About Right"
TnTTT ORIGINAL 200A LANTERN CLUB = "The 200A Gang"
Green Lantern Corpsmen
User avatar
KCStudly
Donating Member
 
Posts: 9611
Images: 8169
Joined: Mon Feb 06, 2012 10:18 pm
Location: Southeastern CT, USA
Top

Re: The Poet Creek Express - Foamie Hybrid

Postby GPW » Wed Jul 29, 2015 6:53 am

Well of course it’s worth the effort !!! :thumbsup: :applause: 8) :beer:
There’s no place like Foam !
User avatar
GPW
Gold Donating Member
 
Posts: 14911
Images: 546
Joined: Thu Feb 09, 2006 7:58 pm
Location: New Orleans
Top

Re: The Poet Creek Express - Foamie Hybrid

Postby KCStudly » Wed Jul 29, 2015 9:31 pm

Just a short update: I got out to the build today… 93 deg F in the loft with 63/ct humidity. Went into production mode and knocked out the wire rough-in for the remaining clearance lights. While at it I filed the tip clean on the big soldering iron. It had gotten a little pocked up and was holding more solder than desired, making it harder to control.

Karl is doing a test with the smart BatteryMINDer I bought for TPCE. He installed a battery tender/trickle charger on his tractor last year (in fact, IIRC, it was a parts store generic that he bought to replace an actual Battery Tender brand charger he had on there before). The tractor battery no longer takes a charge off of that or his big charger, so it will be fun to see if the minder is able to restore it.
KC
My Build: The Poet Creek Express Hybrid Foamie

Poet Creek Or Bust
Engineering the TLAR way - "That Looks About Right"
TnTTT ORIGINAL 200A LANTERN CLUB = "The 200A Gang"
Green Lantern Corpsmen
User avatar
KCStudly
Donating Member
 
Posts: 9611
Images: 8169
Joined: Mon Feb 06, 2012 10:18 pm
Location: Southeastern CT, USA
Top

Re: The Poet Creek Express - Foamie Hybrid

Postby KCStudly » Thu Jul 30, 2015 9:46 pm

Tonight I used the little bench top 10 inch band saw to rip the leftover strips from when I chinked the roof gap. I took the 1/2 x 5/8 “bars” of foam and zipped them down to 3/8 x 3/8. For the second cut I pretty much had to pull them thru the saw, rather than push, because at 3/8 x 1/2 they weren’t stiff enough to push. Setting the back fence to the 3/8 inch dimension made it easy to run the four pieces thru twice with just one change to the front fence.

The plan was to dry fit them snugly, use TB2 to glue them in (because I didn’t want foaming glues to expand into the wireway, and I felt the TB2 would sand easier than PL300), and then just push them in about 1/4 inch, leaving 1/8 inch to be sanded flush later. Well, when the rubber hit the road I ended up pushing the foam in almost flush in most places, and flush in several local areas; but where the wire splices were a little bulkier, it held them up a bit more.

Here’s an overall look at the street side.
Image

Here’s a closer look at the street side rear.
Image

I wrapped the marker light bullets with a bit of blue tape to ward off glue drips, which ended up being useful. Also thinned the TB2 just slightly to extend the working time a little (pretty hot today with the fan blowing on high), and to help it go on a little faster. I was having trouble pouring just a few drops of water into the mixing cup, until I figured that I needed a damp towel for cleanup anyway. By pouring the water onto the rag first I could squeeze out what I wanted into the mixing cup and get just the little bit I wanted (in hindsight I could have just used the spray bottle, but this was using stuff already at hand and worked well).

The glue on foam has the effect of reducing the friction of the snug fit, so the foam “splines” slip in easier. Between that and the push from wiping the excess glue afterward, resulted in the overshoot on insertion. If need be I may never be able to pull these wires out, or in the least may chunk some foam out with the wires if I do, but I guess that is just a case of would-have-should-have done this under the inner skin like the rest of the vertical wire chases. To quote capnTelescope, “I’ll burn that bridge when I come to it”.

Let’s take a walk around and have a look at each corner. Street side rear.
Image

Street side front.
Image

Curb side front.
Image

Curb side rear.
Image

It takes a lot, lot, lot, lot of little steps (and a few big ones) to build a TD, but progress is progress. :D
KC
My Build: The Poet Creek Express Hybrid Foamie

Poet Creek Or Bust
Engineering the TLAR way - "That Looks About Right"
TnTTT ORIGINAL 200A LANTERN CLUB = "The 200A Gang"
Green Lantern Corpsmen
User avatar
KCStudly
Donating Member
 
Posts: 9611
Images: 8169
Joined: Mon Feb 06, 2012 10:18 pm
Location: Southeastern CT, USA
Top

Re: The Poet Creek Express - Foamie Hybrid

Postby Fred Trout » Thu Jul 30, 2015 11:40 pm

Nice work & you are getting closer. After a bit I realized that I did not need to glue in the foam strips everyplace since they were going to be encased in glue anyway. So you can skip the glue in lots of places as you like if they are friction tight. OTOH, if they shift around freely, they mess up the surface when fairing.

I could not help noting that you hardly have any large spans of unmodified foam left anyplace. Lots of edges.

Do you know a pro dry-wall finisher ? He could knock that off down to the skim coat in minutes per application extending over the several coats required and leave it practically pristine. Those guys are awesome.
User avatar
Fred Trout
The 300 Club
 
Posts: 396
Joined: Fri May 08, 2015 4:30 pm
Location: SW Montana
Top

Re: The Poet Creek Express - Foamie Hybrid

Postby dales133 » Fri Jul 31, 2015 3:09 am

Looks great mate. Fred might have a point with the plasterer skim coating it.
They realy can do magic.
The only concern id have is what they use and how flexible it is.
Keep up the good work
User avatar
dales133
4000 Club
4000 Club
 
Posts: 4605
Images: 1
Joined: Mon Oct 13, 2014 5:26 pm
Top

Re: The Poet Creek Express - Foamie Hybrid

Postby Fred Trout » Fri Jul 31, 2015 7:12 am

dales133 wrote:Looks great mate. Fred might have a point with the plasterer skim coating it.
They realy can do magic.
The only concern id have is what they use and how flexible it is.
Keep up the good work


Really, most of the smoothing & spackle is from fairing & sanding before you canvas so the canvas & glue hold it in place. The skim coat is very thin and a primer like Gripper will hold it in place just fine. An experienced dry wall finisher will tell you what needs fixing before they do the mud since there are limits to the process but they work so fast and make it so smooth that it's art in motion.
User avatar
Fred Trout
The 300 Club
 
Posts: 396
Joined: Fri May 08, 2015 4:30 pm
Location: SW Montana
Top

PreviousNext

Return to Foamies

Who is online

Users browsing this forum: No registered users and 10 guests