The Poet Creek Express - Foamie Hybrid

Canvas covered foamies (Thrifty Alternatives...)

Moderator: eaglesdare

Re: The Poet Creek Express - Foamie Hybrid

Postby GPW » Sat Sep 26, 2015 11:38 am

PS. There’s really no such thing as Too much sanding ! You just add more foam sheeting on top and proceed anew... schmaybe’ put a bit of crown on the roof ? :thumbsup: 8) :D

PsPs. RE: fiberglass skinning ... One only has to search back in the archives and read the epic tales of “GlassIce” , and his Foamie from long ago ... I guess reading that , and learning to interpret his “accent” , reading of the Perils of glassing must have made some impression when we were dreaming about Foamies ... Then one day ... he was gone ... :roll:

And Ned’s got a good point !!! Foam doesn’t exactly come perfectly straight and flawless...
And here’s a wild arse idea ... a thick Vinyl “wrap” ... like they do cars and busses .. SMOOTH , Shiny and with the right colors/pattern would hide even minute imperfections , undetectable to all but the owner/builder... :thinking: Saw some that looked carbon fiber cloth weave 8) Crumbs for thought... :thinking:
Last edited by GPW on Sat Sep 26, 2015 11:47 am, edited 1 time in total.
There’s no place like Foam !
User avatar
GPW
Gold Donating Member
 
Posts: 14912
Images: 546
Joined: Thu Feb 09, 2006 7:58 pm
Location: New Orleans

Re: The Poet Creek Express - Foamie Hybrid

Postby tony.latham » Sat Sep 26, 2015 11:45 am

You are probably saying to yourself, “self, he’s crazy, that’s nothing”


Sweet Jesus! I just set my coffee down and bit my lip. For a moment I believed you you're clairvoyant and reading my mind from clear across the country. :shock:

But heck, we're all a bit nuts or we'd a run out and bought a Little Guy. Years ago.

You're thread is still reading like a good mystery-thriller. Something tells me that when you write the ending, they'll be no loose ends. No unanswered questions. They'll be closure. Especially when we read the epilogue and see the pictures of the PCE camped in Poet Creek, Idaho.

Tony :thumbsup:
User avatar
tony.latham
Gold Donating Member
 
Posts: 6905
Images: 17
Joined: Mon Jul 08, 2013 4:03 pm
Location: Middle of Idaho on the edge of nowhere

Re: The Poet Creek Express - Foamie Hybrid

Postby GPW » Sat Sep 26, 2015 11:51 am

Consider this .... All the guys in the wooden trailer section are sayin’ ... “ Those Foamie guys are Crazy huh !!! “ .. :lol: They’ve been saying that for 5 Years now ... :R :beer:
There’s no place like Foam !
User avatar
GPW
Gold Donating Member
 
Posts: 14912
Images: 546
Joined: Thu Feb 09, 2006 7:58 pm
Location: New Orleans
Top

Re: The Poet Creek Express - Foamie Hybrid

Postby OP827 » Sat Sep 26, 2015 12:04 pm

Atomic77 wrote:
dales133 wrote:If it's bothering you fix it mate or you'll regret it later


I second that.


Me three.
User avatar
OP827
Donating Member
 
Posts: 1558
Images: 405
Joined: Fri Apr 25, 2014 7:27 pm
Location: Bruce County Ontario
Top

Re: The Poet Creek Express - Foamie Hybrid

Postby capnTelescope » Sat Sep 26, 2015 12:16 pm

KCStudly wrote:Capn, I don’t think taking away from the wall would be viable.

KC, thanks for the pics and explanation. I see your situation much better now, and I agree.

CapnObvious sez:
FWIW, as a long-time woodworking hobbyist, I've learned over time that there will be mistakes and imperfections. Especially the first time you try to make any particular thing. When you're a hobbyist, you're almost always making a project, large or small, for the first time, so mistakes and imperfections run rampant. As time passes, you'll forget about them because no one ever points them out. (Not counting my neighbor, who spotted the less than perfect join of roof sheet metal. He looks, but never comments.)

Sometimes the best you can do is accept the imperfections, learn why something went wrong and carry that experience over to the next project.

"If you're not making mistakes, you aren't doing anything." Ec tetera.

Getting out and enjoying your camper is going to be a lot more fun than spackling.

Ned B wrote:Nobody ... will ever be so bold as to point out any flaw. We will all be too busy lauding your triumphs and admiring the end product instead.


OP827 wrote:It is your build and your call and I am sure all here will respect your decision.

Amen.
Last edited by capnTelescope on Sat Sep 26, 2015 12:25 pm, edited 1 time in total.
I'll burn that bridge when I come to it.

Brad
ImageImageImage

Building the Bed & Breakfast
User avatar
capnTelescope
Lifetime member
 
Posts: 1218
Images: 368
Joined: Sun Jun 27, 2004 3:44 pm
Location: Round Rock, TX
Top

Re: The Poet Creek Express - Foamie Hybrid

Postby Wolfgang92025 » Sat Sep 26, 2015 12:20 pm

Hey KC,

Been following your post for a longtime.

I spend most of my adult live living in San Diego until beginning of 2012. So in 2009/2010 I built my trailer around the camping environment that i had known for 30 years. Pretty much all black top roads. In 2012 a unforeseen job change forced a move to the Salt Lake City area. Camping is different out here, both in style and the type of road you get to travel on. Even tho I spent a lot of time and money building the trailer, on my first outing I decided she would not be a garage queen. Good think, because some of the road out west are not easy on a trailer finish.

Now to my point, I have looked on were you plan on taking your trailer for your big trip out west and I have driven on plenty of forest roads in Utah and Idaho with and without my trailer.
Are you prepared to have your TV & trailer receive the road rash that comes with the territory ?
If you are somewhat careful, all you will get is rock chips and maybe some pin stripes (branches scratching the finish as you drive by).
If not, maybe you need to consider how much more work you will put in the finish before you say its good.

Just my thoughts...

Wolfgang
Wolfgang

Image
User avatar
Wolfgang92025
Lifetime member
 
Posts: 1064
Images: 651
Joined: Fri Apr 18, 2008 10:16 pm
Location: Salt Lake City area, Utah
Top

Re: The Poet Creek Express - Foamie Hybrid

Postby Wolffarmer » Sat Sep 26, 2015 8:34 pm

Get some of those Stick on bullet holes and be done with it. :lol: :lol:
"these guys must be afraid of the dark"
User avatar
Wolffarmer
Donating Member
 
Posts: 4612
Images: 309
Joined: Wed May 02, 2007 1:32 pm
Location: Idaho Rupert
Top

Re: The Poet Creek Express - Foamie Hybrid

Postby capnTelescope » Sat Sep 26, 2015 9:48 pm

+1 :lol:
I'll burn that bridge when I come to it.

Brad
ImageImageImage

Building the Bed & Breakfast
User avatar
capnTelescope
Lifetime member
 
Posts: 1218
Images: 368
Joined: Sun Jun 27, 2004 3:44 pm
Location: Round Rock, TX
Top

Re: The Poet Creek Express - Foamie Hybrid

Postby KCStudly » Sat Sep 26, 2015 9:57 pm

Thank you all for your sympathy, support and advice. TPCE is far from perfect. It has its flaws here and there, but I have tried to keep all of the warts small; down in the weeds. This is not that, at least not to my eye.

Ned, I’m pretty sure that I have found the limits of spackle and foam, and am taking it right up to that point as best I can. The thing is this is something that is so basic. I mean, how hard is it to make a flat wall flat? I’d rather people not have to hold their tongue, I’d rather just impress them with something nice; but more, it is my own personal threshold of pain. I’ll say it again: this build is not just about getting it done, or going camping. It has as much to do with my ability to reach my goals and stay committed to seeing a major vision thru. It’s like pushing that block plane. Working the tool and seeing the result of your own hard work provides a sense of craftsmanship and pride. To me I know I am a better craftsman than that bent wall, and the reason it bugs me is not because fixing it will keep me in the shop for a few days (let’s be honest… a week or more?), but rather because if I don’t fix it I will have to keep it to myself every time I see it.

After spending another day in the loft, looking at it from time to time, I had started to waffle the other way and was thinking I would just leave it be. Now, after reading all of the supportive comments, I may be leaning the other way.

OP, I have not had the same luck with the knocked down GS as you; perhaps just because I haven’t used the technique very much. I’m not sure that I am understanding your strip suggestion, but if you mean gluing foam strips spaced a few inches apart, fairing those to the desired ‘flat’ (less surface to sand to get back to the proper reference plane), then filling in between the strips with spackle and using the strips as guides for spreading the spackle… that starts to sound like a reasonable option… because I am mechanically minded… but in reality probably is more involved than necessary. I mean, it really just comes back to how well I can sand it back flat again and my confidence sanding spackle w/o sanding foam has grown immensely of late.

GPW, pretty sure I still have my sanity (for now at least). Not convinced that the issues you are seeing can be so easily “swept under the rug”. The idea behind the canvas has always been the comparative ease of application and lower cost. That lower cost is only justifiable if the results are comparable, and acceptable. With a lot more history and feedback from other builders I’m seeing enough evidence to sway me toward epoxy/glass. Nothing mental about it. Just logic. My build costs have been deferred over a long period with very little recent expenditures, so my threshold of pain to change gears and go with composites is not such a concern. The extra durability of a hard shell is hard to ignore. The materials and methods are well documented and proven to be long lasting. My personal experience with glass and epoxy has also improved from some of the work I have done here, so my arguments against it have reduced. Now add all of the “conditions” that have been put onto getting a good canvas job: questions about surface prep (to perf or not), problems with tacky glue pulling up spackle, bubbles forming due to how the glue cures from the outside in, shrinkage, and maybe more.

Yes, glass has its own issues, too. Just saying.

On vinyl wrap, I don’t think that would hide very many flaws at all.

Well, as it turns out our Tony Latham is a bit of an author, himself. One might say he is a professional. I have no idea about what it takes to write a good novel; plot twists, cliff hangers, introspective inducing gambits. Nope, and I’m pretty sure that I must certainly hold the record for run on sentences and the most use of commas and semicolons, too, but if you say so Tony.

Capn, I am “that” neighbor. Not really, but when I see something like this on someone else’s build I hate to see it for their sake. I’m reminded of a quote from Young Frankenstein: Gene Wilder as Dr. Frankenstein, “Damn your eyes”; Marty Feldman as Igor, “Too late.” I’d much rather be totally impressed and be able to gush with admiration, than to have an eyesore poke me and have to act coy. I feel the same way about my own “junk”.

In reality it is easy to have respect for everyone’s accomplishments. Nothing is easy and we all have our own hurdles and struggles to overcome.

Wolfgang, thanks for chiming in. As you will see in tonight’s build update, rock guards have been in the plan from the beginning, and I made progress on that front today. I plan to use this thing and won’t be too worried about incidental damage. This part of the build is all about the process and building to my expectations. Once it is in use I plan to enjoy it, but I am not one to fuss and primp. It will only be like new once, and I’m okay with that, but I at least want it to be new once.

Randy/Wolffarmer, I have actually considered using the camouflage ploy. Like GPW did on the small foamie, and has so rightfully pitched. You can hide a lot with a busy paint job. To stick with the tone on tone gray scheme while introducing more white, still trying to tie into the black Jeep and not have such a dark color (equals melted foam), I have been having fleeting thoughts about going with a snow camo theme.

Again, thank you everyone for coming along for this crazy ride with me. Stand by for today’s build progress.
KC
My Build: The Poet Creek Express Hybrid Foamie

Poet Creek Or Bust
Engineering the TLAR way - "That Looks About Right"
TnTTT ORIGINAL 200A LANTERN CLUB = "The 200A Gang"
Green Lantern Corpsmen
User avatar
KCStudly
Donating Member
 
Posts: 9615
Images: 8169
Joined: Mon Feb 06, 2012 10:18 pm
Location: Southeastern CT, USA
Top

Re: The Poet Creek Express - Foamie Hybrid

Postby KCStudly » Sat Sep 26, 2015 11:33 pm

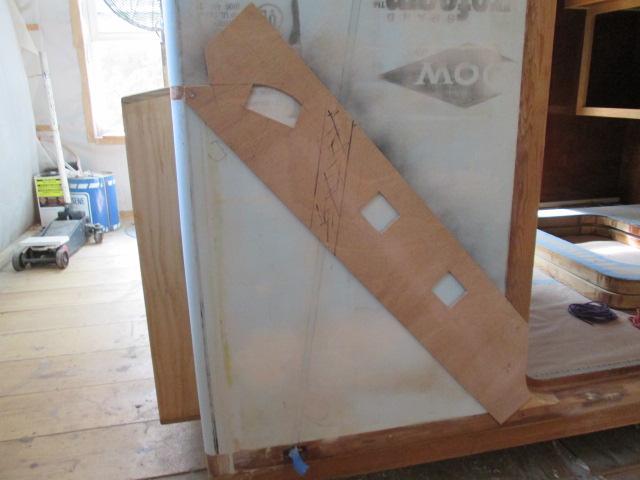
After sanding the filled holes on the hinge spar, and realizing that I didn’t have any white glue for sizing canvas cut lines, I decided to get after the blocking for the top edges of the rock guards where they will wrap onto the side walls. I started by making a pattern out of rosin paper (because I didn’t have any poster board handy).
Image

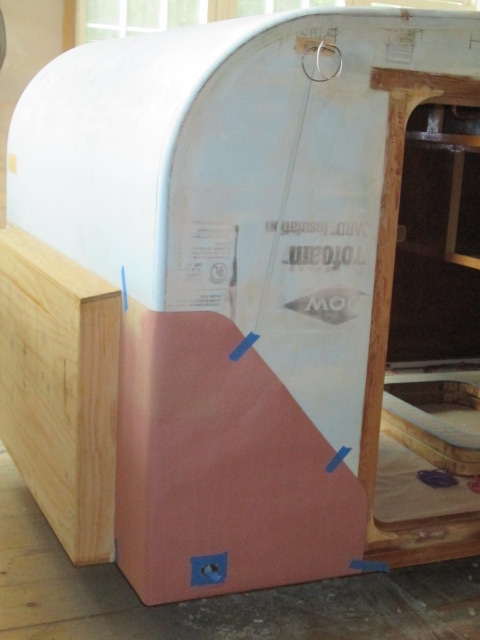
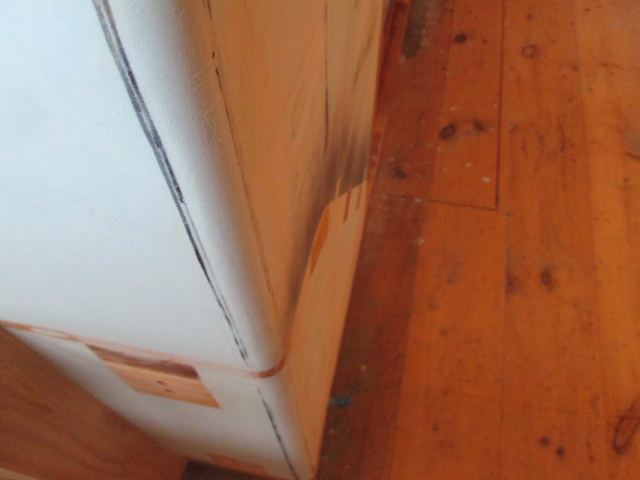
To find the side marker light wiring recess I just nipped an “X” with the razor knife, pulled the wire (wrapped in blue tape) thru, then pushed the flaps in to crease them over the opening. Then I taped around the edges of the hole to reinforce the paper which tends to tear easily. In this pic you can also see how I fogged the top edge of the pattern with gray primer to transfer the location onto the wall (being careful not to soak the foam by holding the spray can well back to avoid chemically melting it).
Image

This gave me a nice line to use so that I could get the blocking close to the edge of the guard, but not have to worry about it running past and telegraphing thru the canvas; in other words, I can get the blocks close to the line but not over.
Image

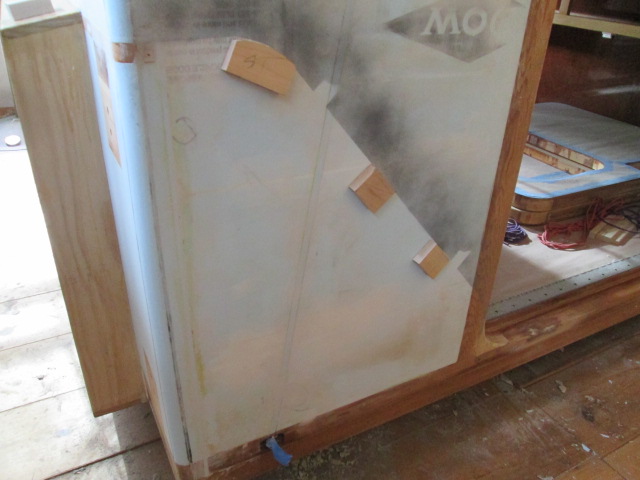
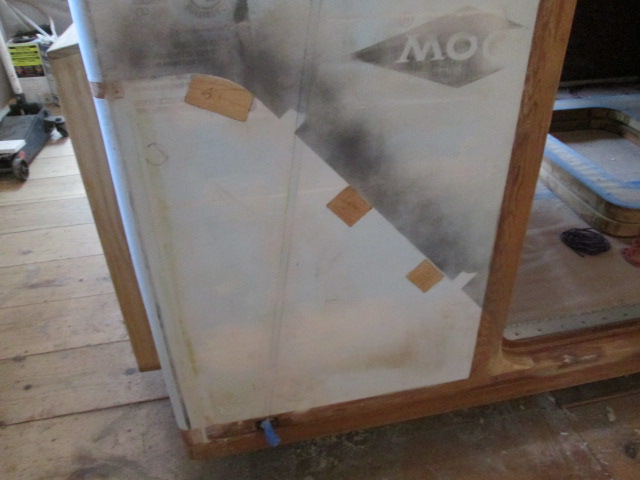
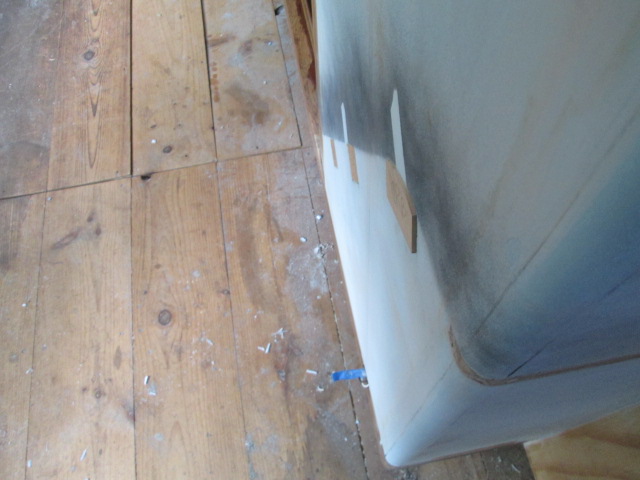
This is the router template that I came up with. A contoured block at the top corner and two equally spaced along the angled edge. There will also be screws into the door frame, along the floor edge, and into the end grain of the front sparette. Also note the “no cut zone” (sharpie marked area) over the wireway for the side clearance light.
Image

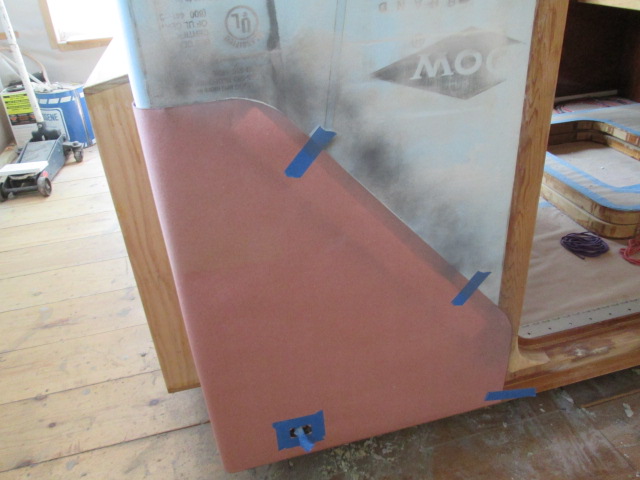
The notch at the top helps align to the end of the sparette.
Image

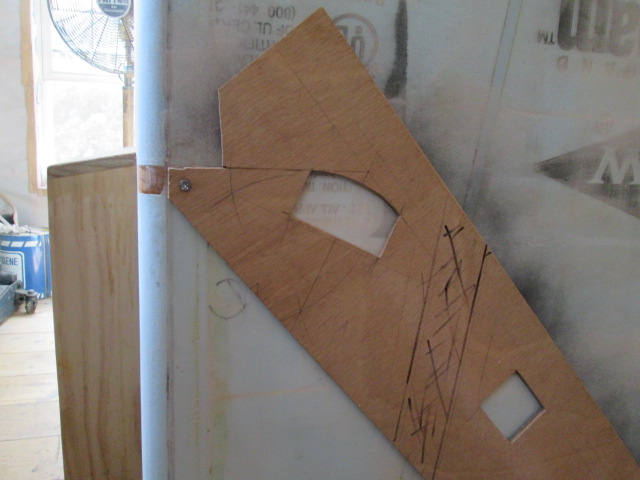
The cut at the bottom helps align to the door jamb.
Image

Between these two, and sighting the primer line thru the cutouts in the template, I was able to locate the template pretty accurately. Also, both the pattern and the template can be reversed for use on the curb side.

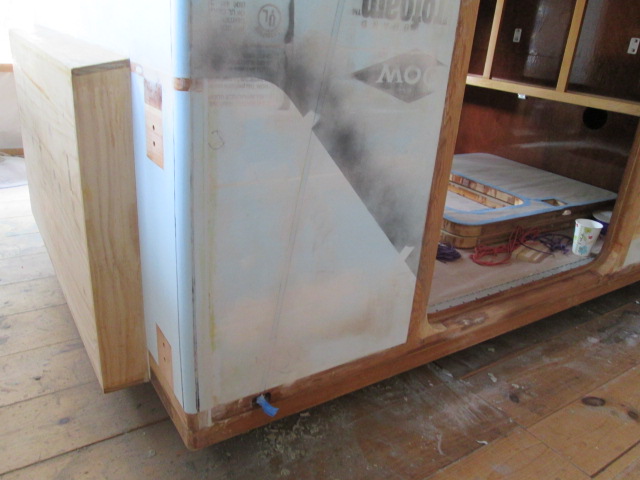
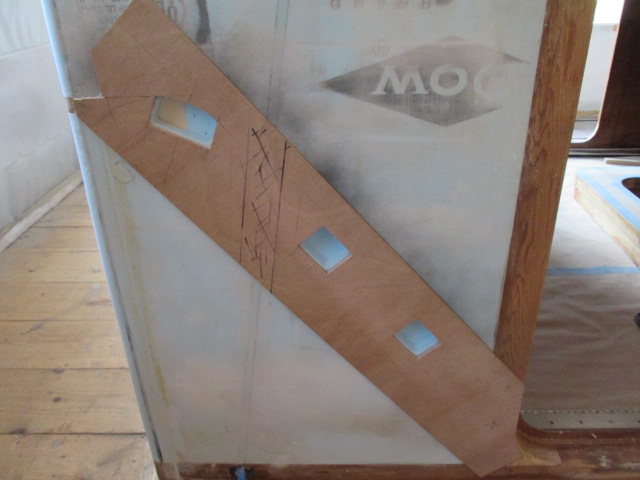
Made the router cuts using the guide collar.
Image

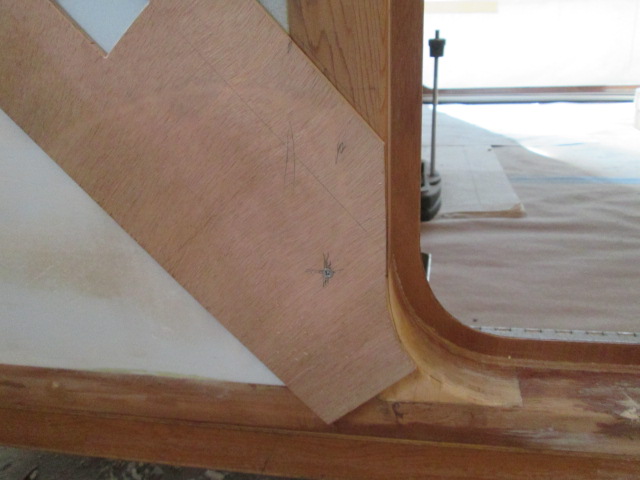
You can see where it found the back of the blocking for the pillow light on the inside.
Image

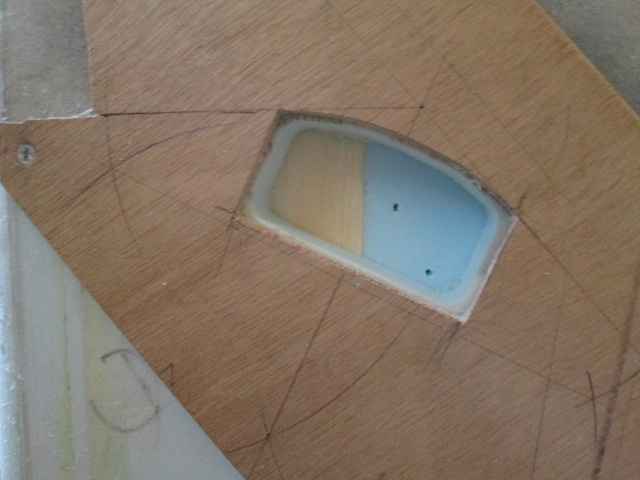
I decided to use up some scraps of maple for the blocking due to its good screw holding capability, even though I have used pine everywhere else. Here you can see the dry fit was very snug, to the point that I did not want to push them all the way in, lest I would not be able to get them back out again (trouble brewing).
Image

Damped the blocks slightly with a damp paper towel and used GG spread very thin to glue them in.
Image
Image

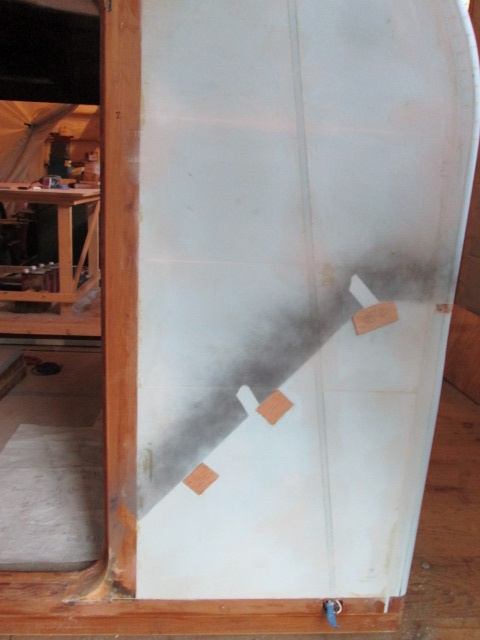
The street side came out nice and flush,
Image

…but on the curb side the upper block stuck out almost 1/8 inch, despite tapping it in with a mallet.
Image

I went back and checked the scrap that I had taken that one piece from and, sure enough, it was over size. That maple is going to be hell to sand flush, unlike pine. Doh!

Oh well, if you want to make an omelet you have to break some eggs.

All in all I was happy with the progress I made. :thumbsup:
KC
My Build: The Poet Creek Express Hybrid Foamie

Poet Creek Or Bust
Engineering the TLAR way - "That Looks About Right"
TnTTT ORIGINAL 200A LANTERN CLUB = "The 200A Gang"
Green Lantern Corpsmen
User avatar
KCStudly
Donating Member
 
Posts: 9615
Images: 8169
Joined: Mon Feb 06, 2012 10:18 pm
Location: Southeastern CT, USA
Top

Re: The Poet Creek Express - Foamie Hybrid

Postby OP827 » Sat Sep 26, 2015 11:48 pm

Nice work KC :thumbsup: .
And I would not try to sand this maple piece if I were you, but rather do a simple sliding jig for a router to router it off flash with the foam. Just my 0.02.
User avatar
OP827
Donating Member
 
Posts: 1558
Images: 405
Joined: Fri Apr 25, 2014 7:27 pm
Location: Bruce County Ontario
Top

Re: The Poet Creek Express - Foamie Hybrid

Postby KCStudly » Sun Sep 27, 2015 12:00 am

Great minds think alike, OP. I was having the same thought!!! :D
KC
My Build: The Poet Creek Express Hybrid Foamie

Poet Creek Or Bust
Engineering the TLAR way - "That Looks About Right"
TnTTT ORIGINAL 200A LANTERN CLUB = "The 200A Gang"
Green Lantern Corpsmen
User avatar
KCStudly
Donating Member
 
Posts: 9615
Images: 8169
Joined: Mon Feb 06, 2012 10:18 pm
Location: Southeastern CT, USA
Top

Re: The Poet Creek Express - Foamie Hybrid

Postby wagondude » Sun Sep 27, 2015 7:07 pm

Fantastic progress. If you decide to use the hinge spar to clamp the canvas when you cover the hatch, don't forget to put some of that butcher paper in there just in case some glue wicks in. It would really bite to have to un-glue the hatch (but I'm guessing you already thought of that). As for the dip in the side, are you going for a smooth, shiny finish or a textured finish? If your going shiny, you will never be happy with it if you don't fix it. If you decide to leave the rough texture, well, you've seen it used in houses, a little texture hides a lot of sins. You may find that it almost disappears once the canvas is on (to the eye anyway). If you still don't like it, you can glue another layer of canvas in the dip to bring it up faster and blend it in with less filler. Kind of like repairing a fiberglass boat. Or glue the small canvas in the dip before you cover the whole side and blend it in.
Bill

TnTTT ORIGIONAL 200A LANTERN CLUB
101137
User avatar
wagondude
1000 Club
1000 Club
 
Posts: 1535
Images: 35
Joined: Sun Jan 16, 2011 7:41 pm
Location: Land of the Jayhawks
Top

Re: The Poet Creek Express - Foamie Hybrid

Postby lfhoward » Sun Sep 27, 2015 8:42 pm

Catching up on your progress! Wow, there has been a lot of goings on since the last time I looked at your build. Nice work with the sanding. Your trailer's edges/corners are really pretty. It's going to look great when it's all finished! I like the custom sanding tools that you've built for the project. Maybe I missed it, but what are you going to build the camper's rock guard out of? The paper model you made for it has nice lines.
My off-road camper build on an M116A3 military chassis:
http://www.tnttt.com/viewtopic.php?f=50&t=62581
Tow vehicle: 2008 Jeep Liberty with a 4 inch lift.
User avatar
lfhoward
1000 Club
1000 Club
 
Posts: 1370
Joined: Wed Jan 22, 2014 6:10 pm
Location: Philadelphia, PA
Top

Re: The Poet Creek Express - Foamie Hybrid

Postby OP827 » Sun Sep 27, 2015 9:43 pm

KCStudly wrote:Thank you all for your sympathy, support and advice. .....
OP, ... I’m not sure that I am understanding your strip suggestion...

KC, just to clarify, it was 1)rip the needed thickness (1/8" or more?) and qty of strips on a table saw required to cover the low area, 2) glue them there side by side with no gaps between the strips. I just said not to put glue in between the strips so you can sand them down with long board better. I hope it is clear now. I still fill that GS would probably be easiest to do to correct this issue by looking at how others did homemade cars out of foam, but again, have no personal experience with that.
User avatar
OP827
Donating Member
 
Posts: 1558
Images: 405
Joined: Fri Apr 25, 2014 7:27 pm
Location: Bruce County Ontario
Top

PreviousNext

Return to Foamies

Who is online

Users browsing this forum: No registered users and 4 guests