The Poet Creek Express - Foamie Hybrid

Canvas covered foamies (Thrifty Alternatives...)

Moderator: eaglesdare

Re: The Poet Creek Express - Foamie Hybrid

Postby aggie79 » Wed Oct 15, 2014 8:36 pm

KC,

I haven't commented on your build in awhile, but I continue to be impressed by your craftsmanship and ingenuity!

Take care,
Tom
Tom (& Linda)
For build info on our former Silver Beatle teardrop:
Build Thread

93503
User avatar
aggie79
Super Duper Lifetime Member
 
Posts: 5405
Images: 686
Joined: Tue Aug 07, 2007 5:42 pm
Location: Watauga, Texas

Re: The Poet Creek Express - Foamie Hybrid

Postby KCStudly » Wed Oct 15, 2014 8:48 pm

Thanks for that, Tom. I'm happy to hear that you are still following along. I don't follow the bread loaf forum. Last I knew you were thinking along those lines for your 2nd build. I wonder if you have started yet? If so, please post a link; I'd love to follow along! :thumbsup:
KC
My Build: The Poet Creek Express Hybrid Foamie

Poet Creek Or Bust
Engineering the TLAR way - "That Looks About Right"
TnTTT ORIGINAL 200A LANTERN CLUB = "The 200A Gang"
Green Lantern Corpsmen
User avatar
KCStudly
Donating Member
 
Posts: 9611
Images: 8169
Joined: Mon Feb 06, 2012 10:18 pm
Location: Southeastern CT, USA

Re: The Poet Creek Express - Foamie Hybrid

Postby KCStudly » Wed Oct 15, 2014 8:58 pm

I went home after work on Monday because I wasn’t feeling well. My tummy wasn’t happy, but I am feeling much better now, so let’s get going again!

Here are a couple of shots of the cabin hinge spar with the first coat of poly from the other night. I had set it up on a V-block to make it easier to brush the two sides that will be exposed in the galley.
Image
Image

I started tonight by removing the temporary screws holding the bottom of the hatch to the cabin. On top of the 1/16 inch gap that I had set, there was about 1/8 inch additional spring out at the very bottom on the street side; totally acceptable and within what the draw latches should be able to handle.
Image

On the curb side there was less than 1/16 inch change.
Image

Just a little way up on either wall there was no additional gap.
Image

Next I undid the temporary screws at the top and Karl helped me flip the hatch over onto the bench.
Image

In this fuzzy pic you can kind of see the PL squeeze out and tape that now needed to be cleaned up.
Image

I spent the rest of the evening, about 2-1/2 hrs, with the extended razor knife cutting and scraping until I got about halfway thru the job.

After experimenting on the outside of the first rib (end of bench in the above pic) I decided that things would be more stable and accessible if I stood the hatch on edge. Now that I had access to grab onto the ribs, it was much easier for me to maneuver the hatch by myself… still very reasonably light.
Image

First I would pull the tape…
Image

… then cut the squeeze out with the razor guiding along the rib, then complete the cut by guiding along the skin. Trim a little closer then scrape some using the tip of the razor laid into the corner of the joint. In this close up you can see the white line that is an artifact of the PL (won’t go away).
Image

Stand back a little and it doesn’t stand out so much.
Image

Stand back a little further and it looks better still.
Image

I just hope that the stain doesn’t highlight the whiteness.

Moving on I set the hatch down onto the floor to get the next couple of ribs, then flipped it over and started working my way back on the other sides of the ribs; which is where I quit for the night.
Image

Very tedious work, but it “must” be done.
KC
My Build: The Poet Creek Express Hybrid Foamie

Poet Creek Or Bust
Engineering the TLAR way - "That Looks About Right"
TnTTT ORIGINAL 200A LANTERN CLUB = "The 200A Gang"
Green Lantern Corpsmen
User avatar
KCStudly
Donating Member
 
Posts: 9611
Images: 8169
Joined: Mon Feb 06, 2012 10:18 pm
Location: Southeastern CT, USA
Top

Re: The Poet Creek Express - Foamie Hybrid

Postby KCStudly » Fri Oct 17, 2014 11:51 pm

Thursday night it was more picking PL on the hatch ribs and hatch hinge spar. Karl reminded me that I could use a thin-ish chunk of the blue foam to act as a flexible semi-firm sanding block. I used this on the curved underside of the hatch skin to get rid of the big stain where I had smudged PL. Since I had wiped it with spirits, it wasn't to bad and cleaned up pretty easily.
Image

Less critical, but still needing attention, was the inside corner between the outside of the skin and the back face of the hinge spar. Had to flip the assembly again to clean the blobs there (wouldn’t want them to interfere with a nice tight fit on the foam).
Image
Image

Tonight (Friday), before removing the lower spar (in natural maple stain) so that I can stain the inside of the hatch (Red Chestnut), I started by masking the areas around the bottoms of the ribs. This will be for when I glue the two back together (glue will be after the stain, but before the poly). Here you can see it after I removed the spar and trimmed the tape from under the lower skin cleat.
Image
Image
Image

Then I set to work masking the raw wood on the hatch where I don’t want stain to interfere with future glue bonds. First the bottoms of the ribs and lower cleat.
Image

Then the edges of the skin outside of the ribs where the canvas will wrap under.
Image

Then along the top of the hinge spar where the canvas will be captured under the hinge.
Image

Of course, all along the way I have been finessing this here and that there; looking closely here and there, hoping to get a nice finish on the underside.

Tomorrow I will remove the upper actuator brackets and apply the Red Chestnut stain. Maybe put another coat of poly on the cabin side hinge spar.

Depending on timing and dust management, I may even start putting foam on the cabin roof.

The train rolls on.
KC
My Build: The Poet Creek Express Hybrid Foamie

Poet Creek Or Bust
Engineering the TLAR way - "That Looks About Right"
TnTTT ORIGINAL 200A LANTERN CLUB = "The 200A Gang"
Green Lantern Corpsmen
User avatar
KCStudly
Donating Member
 
Posts: 9611
Images: 8169
Joined: Mon Feb 06, 2012 10:18 pm
Location: Southeastern CT, USA
Top

Re: The Poet Creek Express - Foamie Hybrid

Postby KCStudly » Sat Oct 18, 2014 8:19 pm

Jumped right in, removed the upper actuator brackets, and put the stain on the inside of the hatch.
Image

Then rubbed it out.
Image
Image
Image
Image

I almost got ahead of myself, getting ready to glue the lower hatch spar onto the bottom of the hatch. Fortunately I realized that it would be easier to pre drill the top of the spar for the rest of the bumper screws now. Also, when I put the screws down thru the ends of the lower hatch spar (to hold the temporary screw blocks with the intent being to reuse these holes for the bumper, too) I hadn’t yet worked out the details of the cleat at the bottom of the inner skin. Those two screws ended up slightly under the edge of the cleat. I had noted this during the dry fitting, had intended to make a couple of clearance notches, and am glad that I remembered that before proceeding.

So here I have trimmed the masking tape off of the top rear of the lower spar, adjusted the line for the bumper screws back a little, and drilled the rest of the holes.
Image
Image
You can see how close the head of the end screw is to the small hole from the cleat screw.

With the hatch laying on its back on the bench, I used the nose of the big sanding block with very coarse grit to quickly notch the cleat at both ends.
Image

I secured the hatch on the bench with the bottom hanging off in such a way that I could attach the spar and still drive the cleat screws in from below. After spreading the PL on the spar I put the relatively long screws that go up into the bottoms of the ribs thru a couple of the holes. By hanging the spar off of these two screws first it allowed me to start all of the screws before pressing the joint together, and helped keep me from smudging PL all over. Once I had all of the screws started by hand, I ran them up a little at a time and secured the joint. From there I sat down on the floor with my back to the bench and shot the cleat screws up and in.

After using the wooden stick and a bit of paper towel to wipe up the small amount of squeeze out, and pulling the masking tape, I went back with the needle from my little pencil compass and scooped up a little more squeeze out. I am more than pleased with how this went.
Image
Image
Image

Here’s how the little notches in the cleat worked out.
Image

And how the relocated bumper screw holes worked out.
Image

When I screwed the hatch skin onto the ribs I used a combination of bright zinc plated steel screws and stainless steel that I had on hand (all #6 x 3/4), but I knew from experience on the cabin front radius that even the brief exposure to water from soaking the skin would start the steel screws rusting.
Image

So I had picked up a couple more packs of the SS screws to swap in when I went to remove the temporary wooden washers. The SS screws appear more silver, while the zinc plate has a bit of a blue-gray tinge. Just to be sure and to speed the process, I used a magnet to cull the steel screws out.
Image

Remember Pinhead from the Hell Raiser movie series (Warning: Link contains disturbing graphic images)? Well, that was what all the wooden washers reminded me of, and I was pleased to remove them one at a time; 90 out of 96 of them.
Image
Image

I came up half a dozen screws short, so need to pick up another pack.

Lastly for today, I trimmed the excess masking tape from the rear face of the hinge spar in prep for foam.
Image

Rollin’ on.
KC
My Build: The Poet Creek Express Hybrid Foamie

Poet Creek Or Bust
Engineering the TLAR way - "That Looks About Right"
TnTTT ORIGINAL 200A LANTERN CLUB = "The 200A Gang"
Green Lantern Corpsmen
User avatar
KCStudly
Donating Member
 
Posts: 9611
Images: 8169
Joined: Mon Feb 06, 2012 10:18 pm
Location: Southeastern CT, USA
Top

Re: The Poet Creek Express - Foamie Hybrid

Postby S. Heisley » Sun Oct 19, 2014 8:57 pm

The curve in that hatch is amazing. :o
User avatar
S. Heisley
Super Lifetime Member
 
Posts: 8772
Images: 495
Joined: Mon Sep 17, 2007 10:02 am
Location: No. California
Top

Re: The Poet Creek Express - Foamie Hybrid

Postby KCStudly » Sun Oct 19, 2014 10:17 pm

Thank you, Sharon! It's actually not that tight of a bend. I don't recall the number at the moment, but it is a larger radius than the front of the cabin. <edit> I think the fact that the total sum of the radii is greater than 90 deg's </edit> (which is a little different from most) is what is making it look tighter.

Let's just call it "The Bustle Effect". 8) :lol:
Last edited by KCStudly on Sun Oct 19, 2014 11:23 pm, edited 1 time in total.
KC
My Build: The Poet Creek Express Hybrid Foamie

Poet Creek Or Bust
Engineering the TLAR way - "That Looks About Right"
TnTTT ORIGINAL 200A LANTERN CLUB = "The 200A Gang"
Green Lantern Corpsmen
User avatar
KCStudly
Donating Member
 
Posts: 9611
Images: 8169
Joined: Mon Feb 06, 2012 10:18 pm
Location: Southeastern CT, USA
Top

Re: The Poet Creek Express - Foamie Hybrid

Postby KCStudly » Sun Oct 19, 2014 10:25 pm

Today I started by swapping out those last few screws in the hatch skin and removing the last of the wooden washers.

I decided to compromise on what I’m going to call the Paper Towel Brace (PTB). Rather than hanging the hatch again and going to all the trouble of getting the actuators to work in order to decide where to place the PTB, then having to take the hatch back off to apply the poly; I decided to make an educated guess and just screw it in place w/o adhesive. I can still pull it out, sand the hatch stain and glue it back in, or even move it later, but for now it just made sense to do it this way.

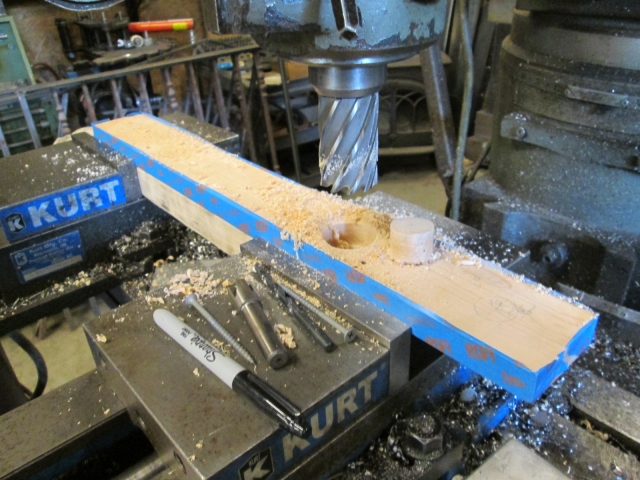
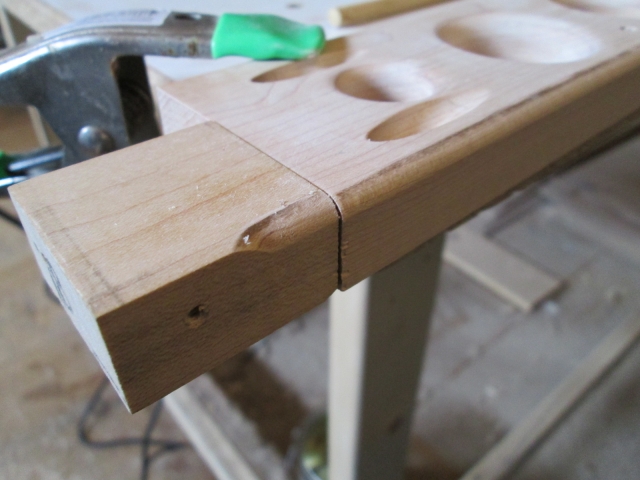
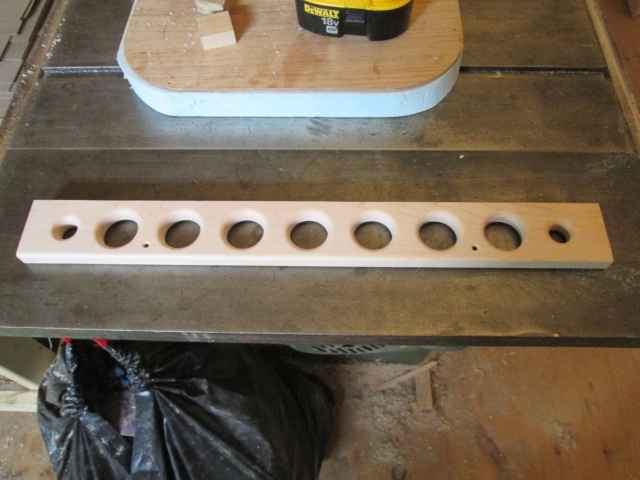
Here we go. I had already cut the 1x3 maple to length, done my layout and put the pocket screw holes on the “back” side. Here I have masked the edges, backed the blank up with a 2x3 to avoid breakout, and have core bored the first of seven 1-1/2 inch lightening holes. The plug (or core) is shown next to the hole.
Image

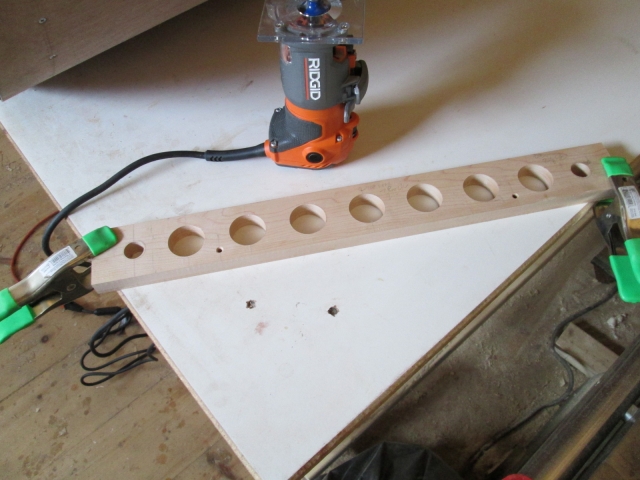
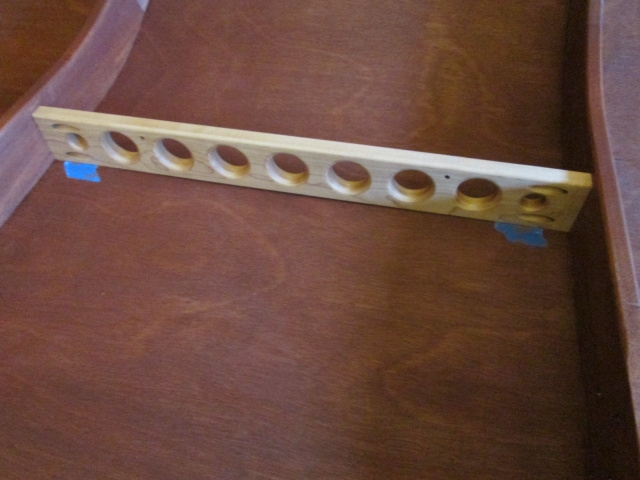
The two smaller holes on either end sort of give a tapered look, but also fit between the pocket screw holes on the other side. The two much smaller holes on either side of center will be where the actual paper towel hanger will attach.
Image

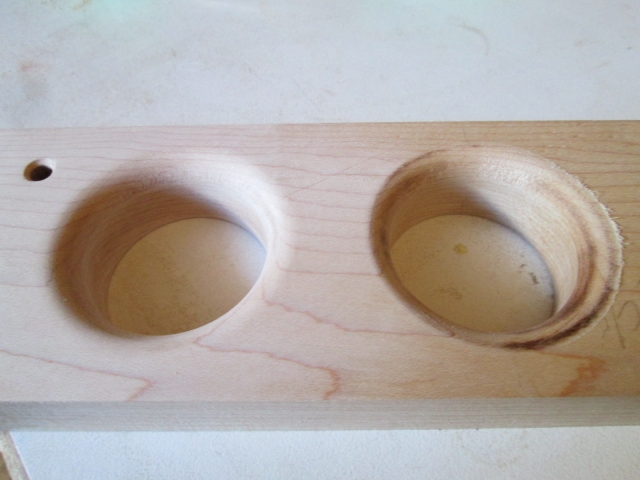
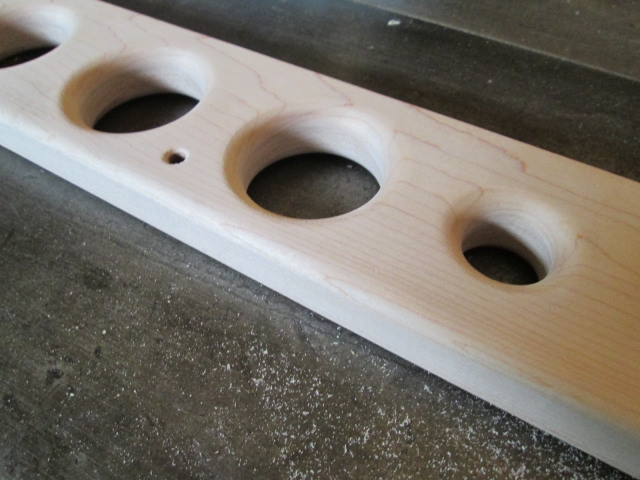
There are a few things going on here. First, the small hole for the towel hanger has been chamfered. I plan on using paracord for the hanger; the cord will be knotted on the back, will pass thru the hole, and will hang down in a loop for the towels (perhaps being threaded thru a length of SS tubing, and with a wire hook on one end to make changing rolls easy); the chamfer eases the edge of the hole so the fibers of the cord won’t fray. The large lightening hole on the right is as routed, and the one on the left is after hand sanding with 220 grit sand paper.
Image

I rounded over all of the holes on both sides using the 1/4 inch round over bit, except for the backs of the smaller holes where I used the 3/16 radius bit (to avoid encroaching on the pocket screw holes).
Image

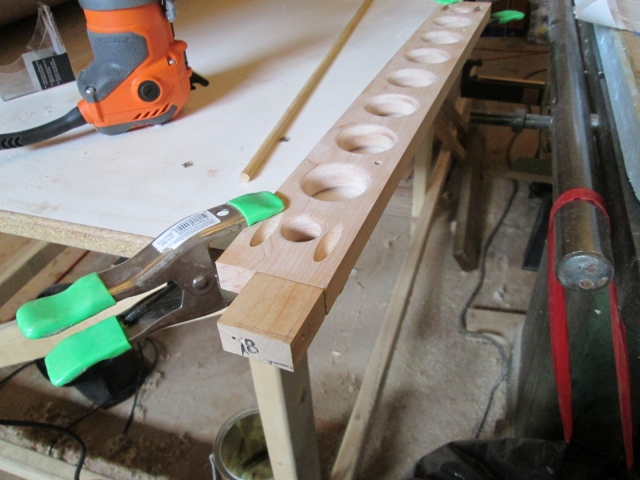
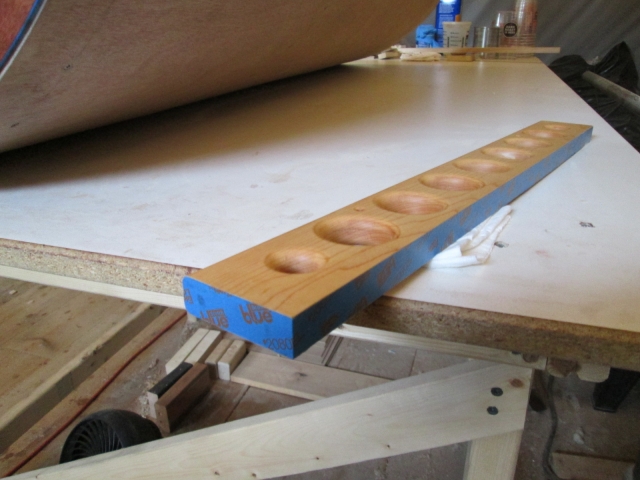
The upper edge of the PTB will be hard up against the hatch skin, but the lower edge needed to be rounded over. Since the hatch ribs are 3 inches deep and the PTB is only 2-1/2, I wanted the edge radii to butt into the sides of the ribs. To keep from accidently rounding over the end of the blank I used a scrap of wood and one of the pocket screws to act as a waster to start and finish the router on. (The dowel was used with a piece of sandpaper wrapped around it in order to sand out the discoloration from drilling the pocket screw holes.)
Image
Image

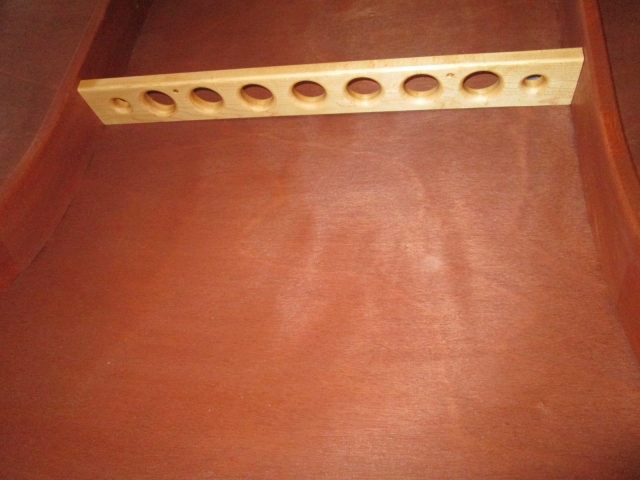
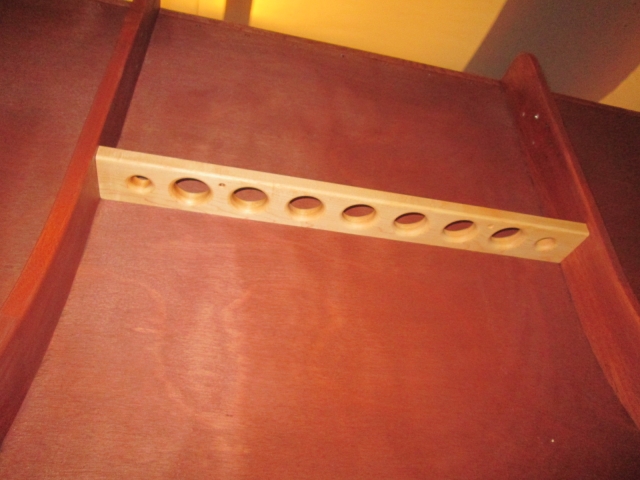
Here it is all sanded out.
Image
Image

Here it is with glue edges masked (still hadn’t decided at this point) and natural oil stain.
Image

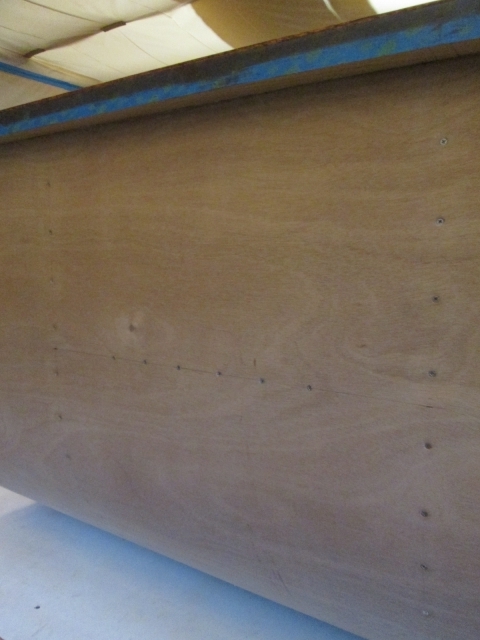
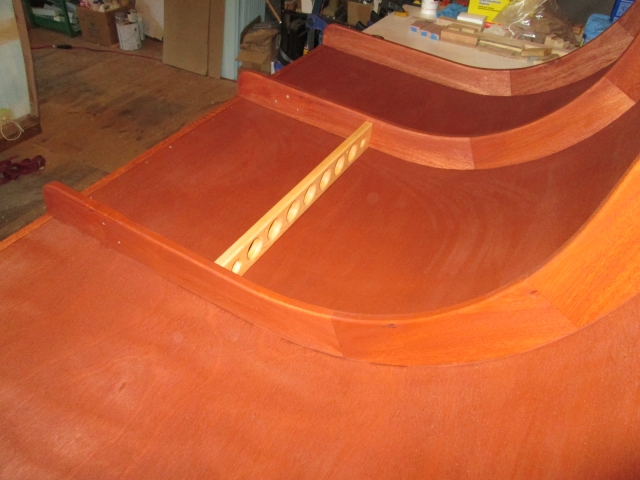
Looking at the underside of the hatch from the hinge edge, I measured to a point where I hope the roll will dangle and perhaps drag on the “front” rail of the upper galley shelf. If I got this close to correct, the rail will act like a friction brake and will keep the towels from stripping off in the wind. If not I will add a bobble on another piece of cord that will perform the same function. Here I have placed blue tape at 14-1/2 inches from the edge of the hinge spar to act as a guide for locating the PTB. I had to press out slightly on the ribs with the palms of my hands as I pushed the brace down with my fingers. The tape kept me on track; once the brace was seated it was a snug fit and I didn’t want to move it around too much for fear of scratching the finish.
Image

Another thing to note in the above pic is the dark shadow showing how the skin is bowing away from the brace. At this point I drove the pocket screws in to pin the location, then measured carefully to locate screws that will come from the top of the skin and land between the lightening holes; the horizontal row of screws in this pic.
Image

That sucked the skin up nice and tight to the brace.
Image
Image
Image

About 6 hrs on what I hope will be another signature feature.

Happy train rollin' along.
KC
My Build: The Poet Creek Express Hybrid Foamie

Poet Creek Or Bust
Engineering the TLAR way - "That Looks About Right"
TnTTT ORIGINAL 200A LANTERN CLUB = "The 200A Gang"
Green Lantern Corpsmen
User avatar
KCStudly
Donating Member
 
Posts: 9611
Images: 8169
Joined: Mon Feb 06, 2012 10:18 pm
Location: Southeastern CT, USA
Top

Re: The Poet Creek Express - Foamie Hybrid

Postby GoTurtleGo » Sun Oct 19, 2014 10:39 pm

Oh no! KC, I communicated badly. Let me try again -

"I'm open to constructive criticism. I know that I can be verbose in my technical writing"

Not at all and absolutely no criticism, rather a compliment. You have so much technical knowledge in so many different fields that I find myself being exposed to many new things when I read your posts. I see them all over this forum on various different subjects. They are always helpful and full of technical knowledge that stretches my brain in the best of ways.

So, I sometimes have to reread your posts because they are above my technical education level or about a topic of which I am totally ignorant. After I have studied them, I have always learned something new or have clarified some previous incomprehension.

Whew! I hope that clarifies what I meant.

And your tear drop is continuing to look great. The stain looks so nice.

Looking forward to having to reread and learn some more.
GoTurtleGo
User avatar
GoTurtleGo
Teardrop Advisor
 
Posts: 77
Images: 0
Joined: Tue Jul 29, 2014 6:03 am
Top

Re: The Poet Creek Express - Foamie Hybrid

Postby KCStudly » Sun Oct 19, 2014 11:18 pm

Thank you, Kathleen (GTG) for such a glowing reply. That was certainly one of the options I had considered from your comment. :D 8) :thumbsup:

Still, I know from reading back thru my posts that they can sometimes be a bit "muddy". :lol: :lol: :lol:

Truth be told, most of the good advice I have regarding TD's is all stuff I have learned from reading other peoples experiences here. Sure, I have applied my engineering knowledge, my experience with tools and as a fabricator, and have learned a lot about finish carpentry from this project, but it is all stuff that is "out there" (a lot of credit to Norm Abram's New Yankee Workshop).

In fact I just wrote a whole diatribe up for noseoil on beam reaction moment calculation and hatch strut vector analysis. I'm just not sure that it will make any sense to anyone without a full college course in Statics. :lol: :FNP :lol:

But hey, that is what is so great about this forum. Everyone has something to offer and we can all share our insightful experiences. The whole is greater than the sum of the parts, kind of like the "airplane" build philosophy.
KC
My Build: The Poet Creek Express Hybrid Foamie

Poet Creek Or Bust
Engineering the TLAR way - "That Looks About Right"
TnTTT ORIGINAL 200A LANTERN CLUB = "The 200A Gang"
Green Lantern Corpsmen
User avatar
KCStudly
Donating Member
 
Posts: 9611
Images: 8169
Joined: Mon Feb 06, 2012 10:18 pm
Location: Southeastern CT, USA
Top

Re: The Poet Creek Express - Foamie Hybrid

Postby GPW » Mon Oct 20, 2014 11:49 am

Thank Goodness they don’t have to fly , or we’d have to make them Much Lighter... :o

KC , Your Brace is , in a word, NEAT-O’ !!! :thumbsup: 8) :D
There’s no place like Foam !
User avatar
GPW
Gold Donating Member
 
Posts: 14911
Images: 546
Joined: Thu Feb 09, 2006 7:58 pm
Location: New Orleans
Top

Re: The Poet Creek Express - Foamie Hybrid

Postby KCStudly » Mon Oct 20, 2014 1:40 pm

Thanks GPW... I think. :thinking:

The brace actually turned out very light, especially considering how much support it will be adding to the ribs in the area of the actuator brackets.

I never said that I was building ultra light. I suppose that my hatch is heavier than a pure foam one would be, but it is still light enough for me to lift and move by myself; if not for the bulkiness I would say easily. Might weigh 25 or 30 lbs? And it is a pretty large hatch to boot.

One way to shed some weight would be to laminate the plywood skin over a form of the profile (or use paper or FG). That would eliminate the stress of bending the stock plywood and would allow slightly shallower ribs. I could also have added lightening holes in the ribs themselves (kind of wish I had thought of that before :thinking: :FNP :? :frightened: ).

Like I said in the beginning of this thread: rough dirt road capable; nice wood inside; a certain level of quality; no hassle with aluminum skins or fitting aluminum trim that is prone to leakage; and lighter than a traditional, but not an ultra light.

That light at the end of the tunnel (which I can't see yet, but know is there) is a train that is a rollin'! :thumbsup:
KC
My Build: The Poet Creek Express Hybrid Foamie

Poet Creek Or Bust
Engineering the TLAR way - "That Looks About Right"
TnTTT ORIGINAL 200A LANTERN CLUB = "The 200A Gang"
Green Lantern Corpsmen
User avatar
KCStudly
Donating Member
 
Posts: 9611
Images: 8169
Joined: Mon Feb 06, 2012 10:18 pm
Location: Southeastern CT, USA
Top

Re: The Poet Creek Express - Foamie Hybrid

Postby KCStudly » Mon Oct 20, 2014 8:13 pm

There was frost on the pumpkin this morning.

I didn’t actually get anything done on the build today, unless you abide by the Edison adage that eliminating things that won’t work is the same as progress.

I would like to avoid having to fit the hatch an additional time by finishing up the last (perhaps unnecessary) additions and then getting the polyurethane on now. On the other hand, if I put the poly on, go thru the motions to get the actuators working, then decide I want some more support at the top end of the ribs, it would be much more difficult to work upside down, or would require the hatch to come off again, and working after the poly is always more tedious.

I considered, and even mocked up several different corner blocks and filler pieces, but didn’t like most of them. Some were not aesthetically pleasing to me. Others had conflicts with the existing screws that come down thru the hinge spar and into the ends of the ribs. The biggest issue was that I was trying to work from the bits and pieces of good wood scraps on hand, and they did not lend themselves to what I think I now want to do.

So I did what any self-respecting builder would do; I procrastinated.

The bandsaw had started spitting the blade out from the guide blocks, so I dug into that. The upper wheel had a very slight amount of “wink” in the bearing, so I plucked the spiral lock ring off and had a look. The shaft looked okay and the bearings weren’t obviously fragged, so I dabbed a little fresh grease in there and put it back together again. After cleaning sawdust bits off of the rubber facing on both wheels, they didn’t look that bad. Still didn’t fix it. Adjusted the drive belt (which I knew would have no effect but needed doing because there is only one set screw on the pulley and because it rests on the key, the pulley and key can walk off of the shaft… need to add another set screw). Finally, I looked at the inner side of the blade and found a crust of fine sawdust and pine resin that had built up. After scrapping that off the saw was back to normal, and stayed back in the guide blocks like it should.

Anyway, I think I know what I want to do for the upper rib brace, now that I know what I do not want to do, so I’ll get back on that on Wednesday.

Ta for now.
KC
My Build: The Poet Creek Express Hybrid Foamie

Poet Creek Or Bust
Engineering the TLAR way - "That Looks About Right"
TnTTT ORIGINAL 200A LANTERN CLUB = "The 200A Gang"
Green Lantern Corpsmen
User avatar
KCStudly
Donating Member
 
Posts: 9611
Images: 8169
Joined: Mon Feb 06, 2012 10:18 pm
Location: Southeastern CT, USA
Top

Re: The Poet Creek Express - Foamie Hybrid

Postby Heifer Boy » Mon Oct 20, 2014 9:36 pm

KCStudly wrote:There was frost on the pumpkin this morning.


Is that some sort of euphemism for something that those of us in the Southern Hemisphere aren't aware of... :R
Heifer Boy
Teardrop Builder
 
Posts: 38
Joined: Mon Feb 28, 2011 1:51 am
Location: Woolamia, NSW
Top

Re: The Poet Creek Express - Foamie Hybrid

Postby KCStudly » Mon Oct 20, 2014 10:08 pm

When the Frost is on the Punkin By James Whitcomb Riley

I'm not really sure. It's just something that we say up here nostalgically around this time of year when the weather starts to change. It's an autumn thing.

Might mean something else to others; dunno.
KC
My Build: The Poet Creek Express Hybrid Foamie

Poet Creek Or Bust
Engineering the TLAR way - "That Looks About Right"
TnTTT ORIGINAL 200A LANTERN CLUB = "The 200A Gang"
Green Lantern Corpsmen
User avatar
KCStudly
Donating Member
 
Posts: 9611
Images: 8169
Joined: Mon Feb 06, 2012 10:18 pm
Location: Southeastern CT, USA
Top

PreviousNext

Return to Foamies

Who is online

Users browsing this forum: No registered users and 14 guests