The Poet Creek Express - Foamie Hybrid

Canvas covered foamies (Thrifty Alternatives...)

Moderator: eaglesdare

Re: The Poet Creek Express - Foamie Hybrid

Postby KCStudly » Wed Apr 09, 2014 3:04 pm

Thank you, Bonnie! :D
KC
My Build: The Poet Creek Express Hybrid Foamie

Poet Creek Or Bust
Engineering the TLAR way - "That Looks About Right"
TnTTT ORIGINAL 200A LANTERN CLUB = "The 200A Gang"
Green Lantern Corpsmen
User avatar
KCStudly
Donating Member
 
Posts: 9612
Images: 8169
Joined: Mon Feb 06, 2012 10:18 pm
Location: Southeastern CT, USA

Re: The Poet Creek Express - Foamie Hybrid

Postby Ned B » Wed Apr 09, 2014 5:04 pm

KC, can I make an upgrade suggestion for your sweet new saw? Instead of those irwin clamps, pick up a set of these from Rockler...
http://www.rockler.com/search/go?p=R&sr ... -it-square
I just ordered a set for my shop, so I don't have any direct experience with them (yet)... but lots of my woodworking buddies have them and recommend them.
User avatar
Ned B
1000 Club
1000 Club
 
Posts: 1036
Joined: Sat Apr 16, 2011 10:25 am
Location: Syracuse NY (ish)

Re: The Poet Creek Express - Foamie Hybrid

Postby KCStudly » Wed Apr 09, 2014 8:17 pm

Thanks Ned. I had seen those but kind of forgot about them. I'm going to forward that link to Karl. He said that he would spend the balance of what I have into the saw on the parts and accessories until he catches up with me.

I'll try to post an update on tonight's efforts in a little bit (my 'puter is running a little slow at the moment).
KC
My Build: The Poet Creek Express Hybrid Foamie

Poet Creek Or Bust
Engineering the TLAR way - "That Looks About Right"
TnTTT ORIGINAL 200A LANTERN CLUB = "The 200A Gang"
Green Lantern Corpsmen
User avatar
KCStudly
Donating Member
 
Posts: 9612
Images: 8169
Joined: Mon Feb 06, 2012 10:18 pm
Location: Southeastern CT, USA
Top

Re: The Poet Creek Express - Foamie Hybrid

Postby KCStudly » Wed Apr 09, 2014 10:46 pm

Still working on the front locker.

One of the notches I made in the sill for the locker opening is the lower part of the rabbet for the inner skin to land on. The side panels and top cap piece also need a rabbet around the outside rear face (the open side). Saw set up 3/16 wide x 3/8 deep.
Image

Here’s the locker cap (upside down) with the first cut. I also ran both of the side panels thru with the same settings.
Image

Then I adjusted to 3/8 wide x 3/16 deep and completed the cuts running the pieces thru on edge. The cap top side up…
Image

… and one of the side panels.
Image

Once I rabbet the underside of the cap the fit will look something like this with the pencil ‘X’ removed.
Image

So the next rabbets I need to make are for where the solid wood panel recesses into the front of the locker. These will be 3/16 deep x 3/4 wide so I thought I might try the stacked dado blade set that my dad used to us on an old Craftsman radial arm saw. First I needed a table insert. The die cast insert has been working great so far, so rather than completing the zero clearance insert I had started before, I decided to use the insert blank for the dado set. The lugs in the insert opening are 7/16 inch down in the hole, while the ply that I made the insert blank from is 3/4 nominal sanded. Here’s another look at the lugs.
Image

So I match marked the lug locations on to the blank, sketched a line around each one with a bit of margin and free handed the outlines with a straight bit in the plunge router.
Image

With the blade removed I should have been able to fit the wooden insert all the way down into the recess, but it got very tight, so I worked it over some more with various sanding blocks until it would go in and come out, yet was still snug.

After installing the dado stack (hmm, I didn’t seem to get a pic of that) and the insert, I captured the insert under the fence and also clamped the feather board strong back over the edges of the insert so that it wouldn’t lift out; turned the saw on and then slowly raised the blade.
Image

I had quite a bit of smoke so before getting all the way thru I pulled the insert out and chiseled a generous 1/16 inch plus clearance on either side of the plunge cut.
Image

Put it back in and completed the plunge slowly… with even more smoke. Trimmed the sides again and did a little clean up with the chisels.
Image
Image
Image

I did a test on a scrap to check the set up.
Image

One of the rake blades was in pretty rough condition as if it had run into something metal, so the cut wasn’t super clean or especially even (I may be able to swap that one out for another in the set). The side blades need a good cleaning, but don’t look to be especially worn. Even still, Karl and I both have similar molding head sets that include rectangular "jointer/planer" cutters that look like they could be used for dadoes and/or rabbets. I think I’ll post a question about using that vs the stacked set, and see if I can’t get a better result.
KC
My Build: The Poet Creek Express Hybrid Foamie

Poet Creek Or Bust
Engineering the TLAR way - "That Looks About Right"
TnTTT ORIGINAL 200A LANTERN CLUB = "The 200A Gang"
Green Lantern Corpsmen
User avatar
KCStudly
Donating Member
 
Posts: 9612
Images: 8169
Joined: Mon Feb 06, 2012 10:18 pm
Location: Southeastern CT, USA
Top

Re: The Poet Creek Express - Foamie Hybrid

Postby Ned B » Thu Apr 10, 2014 2:41 am

not trying to pick, but could the stack have been installed backwards as to rotation?
User avatar
Ned B
1000 Club
1000 Club
 
Posts: 1036
Joined: Sat Apr 16, 2011 10:25 am
Location: Syracuse NY (ish)
Top

Re: The Poet Creek Express - Foamie Hybrid

Postby KCStudly » Thu Apr 10, 2014 6:26 am

I don't think so. I was mindful of of the direction of rotation during install, but it would not hurt to double check! Thx.
KC
My Build: The Poet Creek Express Hybrid Foamie

Poet Creek Or Bust
Engineering the TLAR way - "That Looks About Right"
TnTTT ORIGINAL 200A LANTERN CLUB = "The 200A Gang"
Green Lantern Corpsmen
User avatar
KCStudly
Donating Member
 
Posts: 9612
Images: 8169
Joined: Mon Feb 06, 2012 10:18 pm
Location: Southeastern CT, USA
Top

Re: The Poet Creek Express - Foamie Hybrid

Postby Ned B » Thu Apr 10, 2014 12:43 pm

looking at the photo I agree, it doesn't look like it was backwards. odd though, that it would let the smoke out like that. :thinking:
User avatar
Ned B
1000 Club
1000 Club
 
Posts: 1036
Joined: Sat Apr 16, 2011 10:25 am
Location: Syracuse NY (ish)
Top

Re: The Poet Creek Express - Foamie Hybrid

Postby KCStudly » Fri Apr 11, 2014 11:59 pm

What day is this? It’s all becoming a blur, what with the long hours continuing at work and still putting my time in on TPCE.

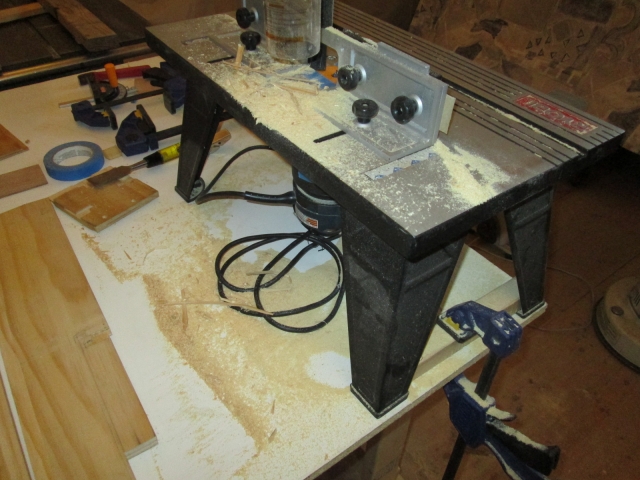
Let’s see, last night was Thursday. I tried restacking the dado set with the good rake in place of the chipped one and the cut improved but was now not square to the edge, so I ditched that plan and switched over to the router table. Made some sawdust.
Image
(Later I found that the set screws in the die cast table insert were vibrating around, so I reset those and staked them in place.)

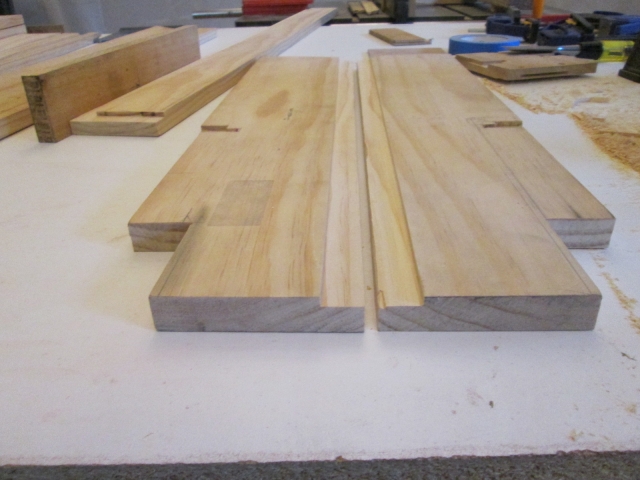
I made these rabbets in the front inside edges of the locker side panels by making a couple of passes with a half inch bit. I have a 3/4 bit, too, but I guess I thought that might be too aggressive (used it later after finding the soft pine to cut easily). If I had planned things out better I might have left the panels a little longer and trimmed to final length afterward to avoid the little bit of chip out, but it’s just not that critical in this application.
Image

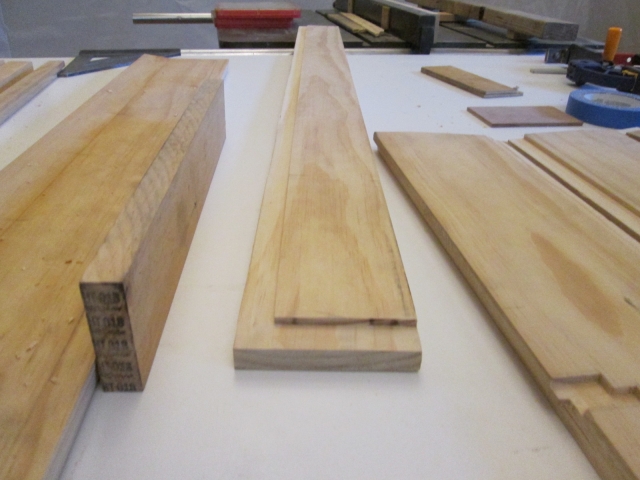
The floor of the locker gets 3 rabbets, one on each side and across the front. Used the miter gauge for the cross cuts.
Image

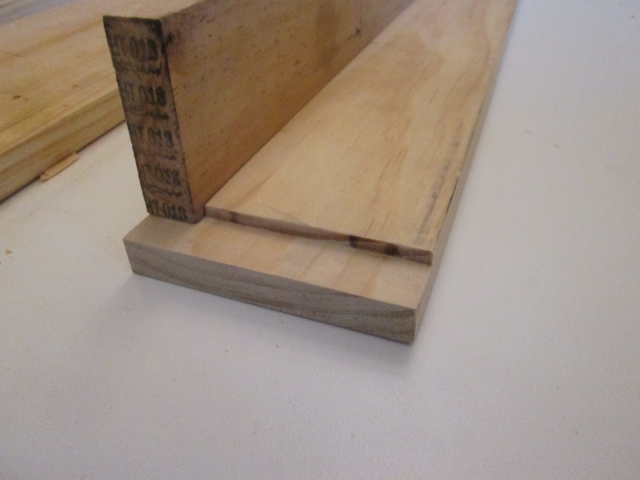
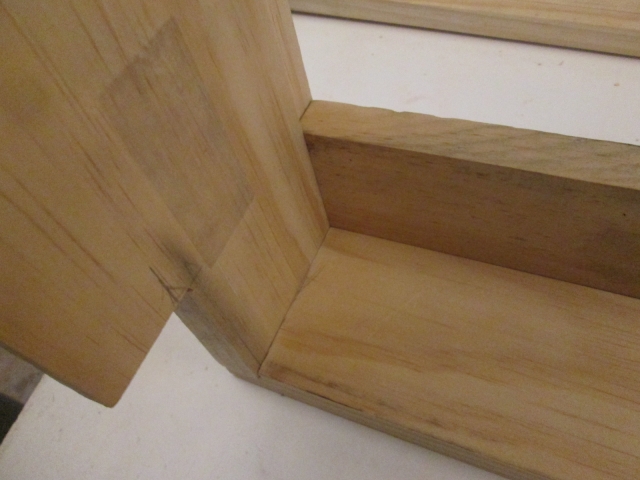
I used this darker piece of scrap to check fit and demonstrate how the locker floor, side and front panel will come together. The small piece represents the front panel that will be front to back with the tongue box. The side with no rabbet will butt up to the lower part of the cabin front wall.
Image

This is looking down into the street side of the well of the locker from what will be inside of the cabin.
Image

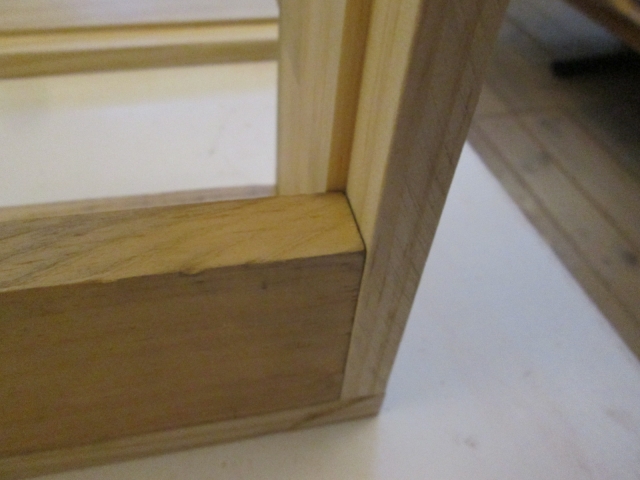
This is the lower front of the locker on the street side.
Image

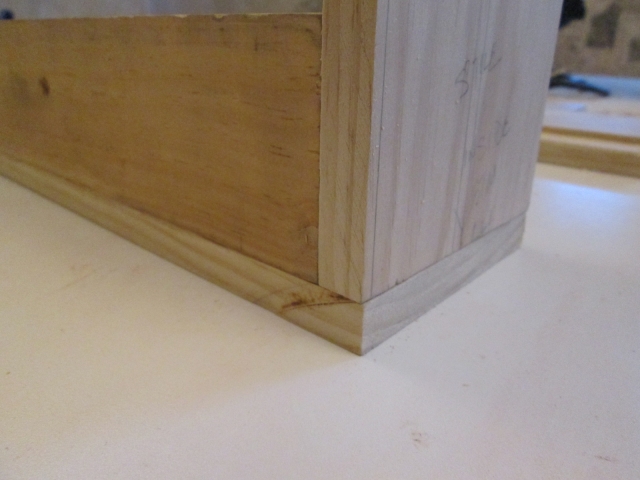
And the same thing looking at the front 3/4 view from the street side.
Image

Tonight (Friday?) I continued with the rabbets in the locker cap. This was slightly more complex because the length of the cap is two pieces mitered together at 10 degrees, and the rabbets needed to be on the inside to receive the side and front panels.

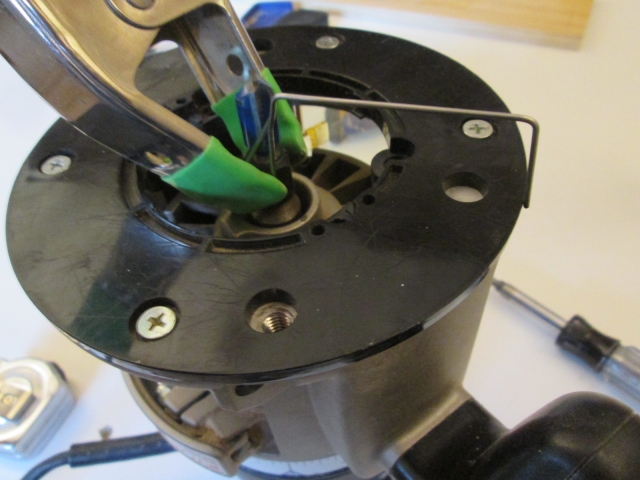
But first I had to pull the router out of the router table and reinstall the shoe. (The router will fit in the table with or w/o the shoe, but I can get the bit a little higher with the shoe off.)

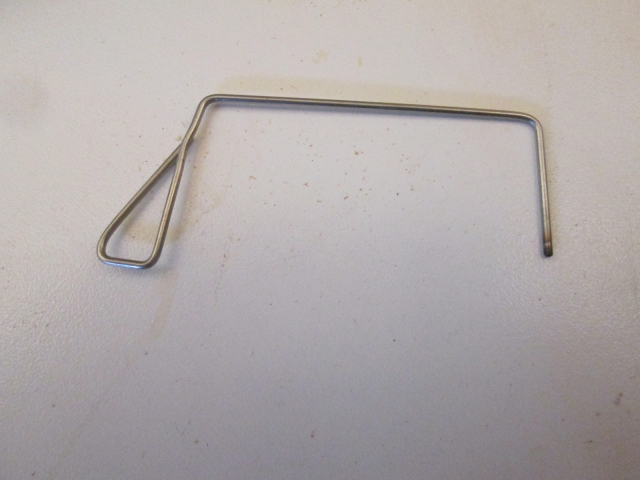
I made an improvement to my centering “feeler gage” technique that I use to make sure the shoe is concentric with the bit. Rather than just spring clamping the wire to the cutter (which isn’t super stable), I bent the wire so that it can be clamped onto the wrench flat of the collet nut so it was much more stable and worked much better.
Image
Image

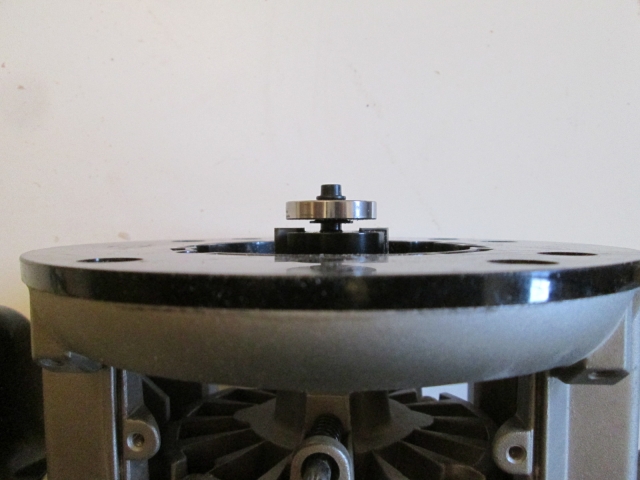
For the side rabbets in the locker cap I used the rabbeting bearing bit. It’s 1-1/4 inch diameter x 1/2 inch tall with a set of bottom bearings of various diameters. By selecting the bearing with the correct difference in diameter and changing the depth of cut, rabbets of various depths and widths can be made.
Image

I started with a bearing that would give a 1/8 deep rabbet, planning to switch to 3/16 inch for the final passes.

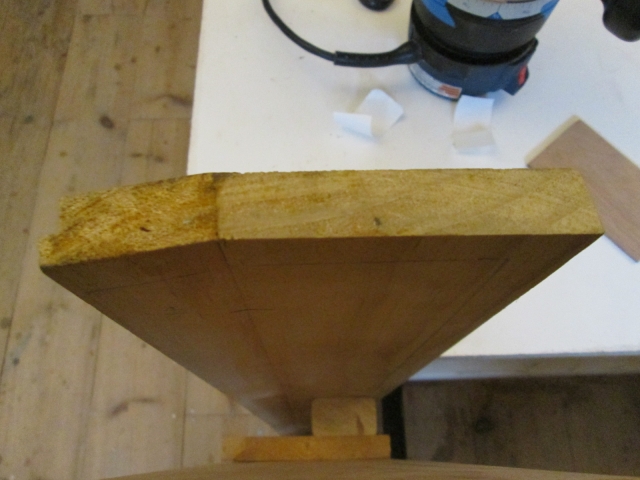
Again, if I had planned better I would have made the rabbets before mitering and joining the pieces that make up the cap. Now I had to get creative. Because the inside of the cap is not flat, I couldn’t run it through the router table or saw.
Image

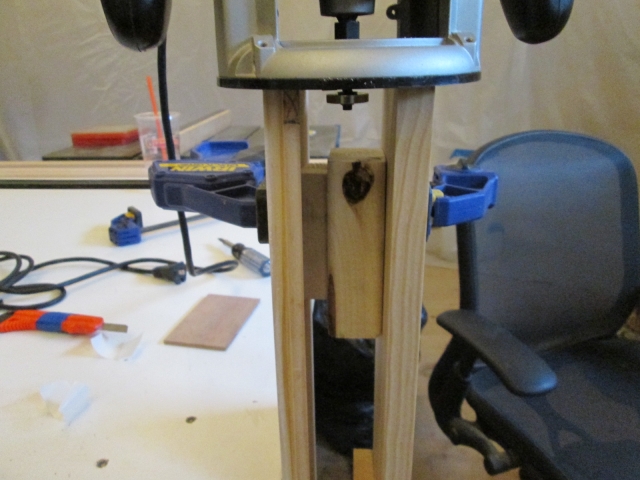
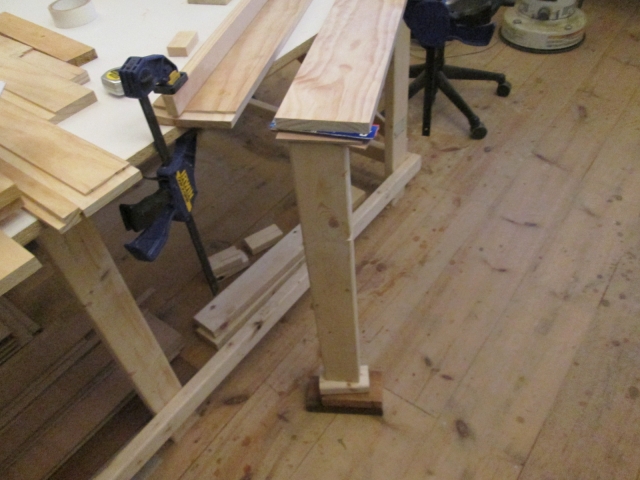
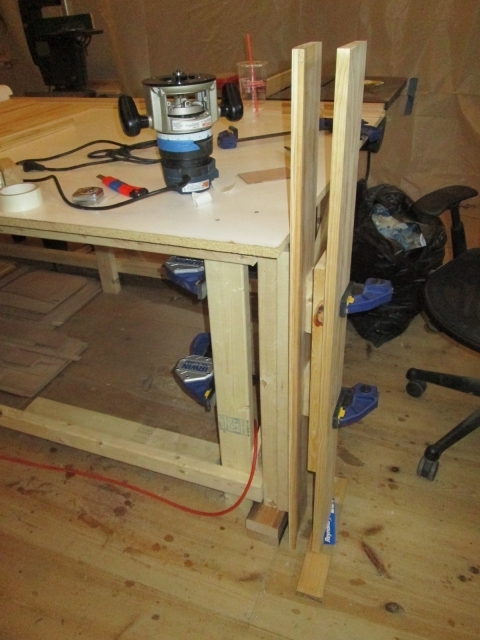
I like to have gravity helping, rather than working against me, so to do the end rabbets I stood the cap on end on the floor next to the leg of the bench; shimmed out for the lip of the table with a couple of 2x4’s propped up off the floor to match the rim boards of the bench; double side taped a couple more blocks to the underside of the cap; spaced with another 1x; and finally shimmed one of the front panel boards (which are shorter) up off the floor to match the height of the cap. All of this was clamped to the table leg.
Image

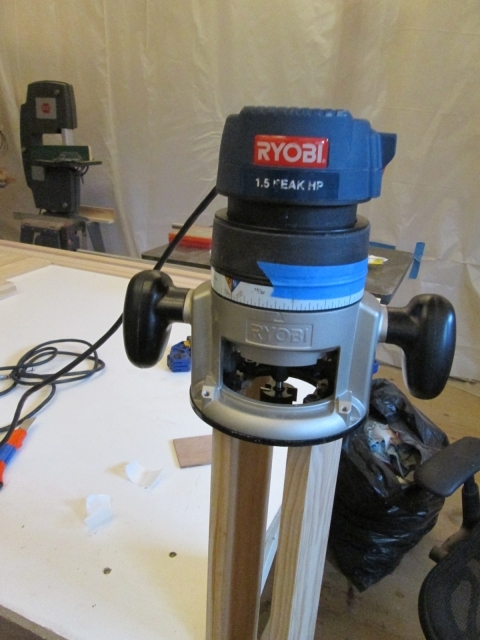
The reason for all of this was to provide a stable base to run the router on to make the end rabbets under the cap. During this “dry” practice test, I found that the boards had a bit of spring in them so I added some more spacer blocks up top and clamped them in.
Image
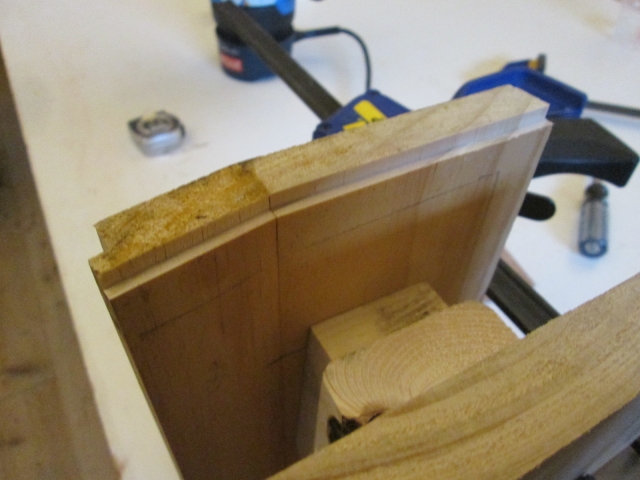
Image

Here you can see the results of the first pass. The soft pine cuts like butter, and the set up time was well worth the effort, as it made the actual cutting process go error free.
Image

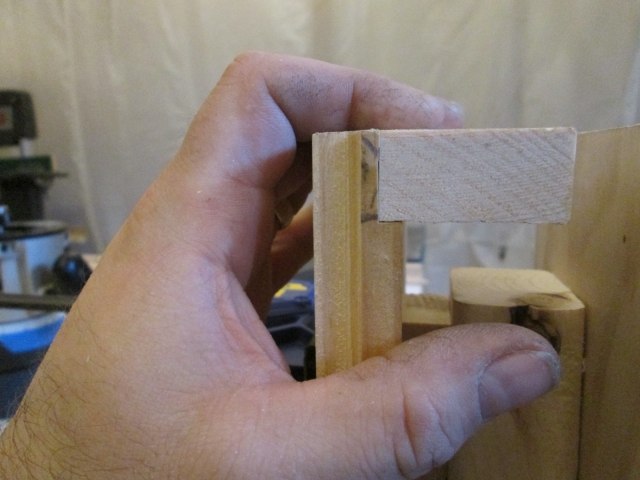
Switched to the 3/16 inch offset, and completed the rabbet in 2 cuts.
Image

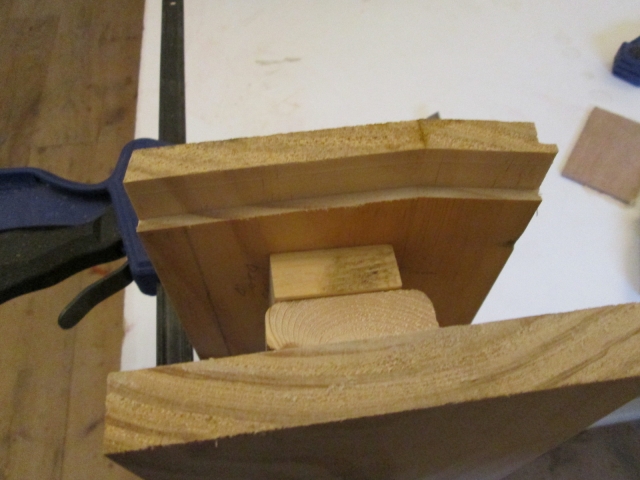
Flipped the board around and was able to finish the other end in just two passes. Image
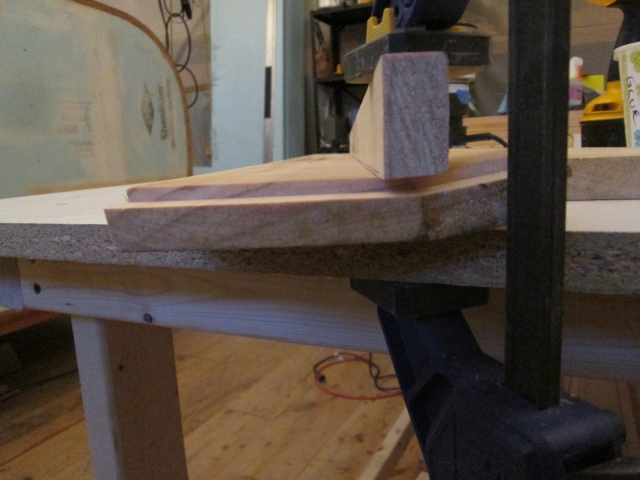
Another set up change to get the underside front of the cap. Again, better planning and I would have waited to rip the bevel on the front edge until after doing the rabbet. No good way to reference the front edge, so I used one of the 5 deg beveled drop pieces (left over from ripping one of the cap sections) as a guide fence. This let the fence piece ride up on the beveled section of the cap and was close enough to the 10 deg included angle to get the job done.
Image

By clamping across the corner of the bench I was able to keep the clamp bars to the rear and out of the path of the router.
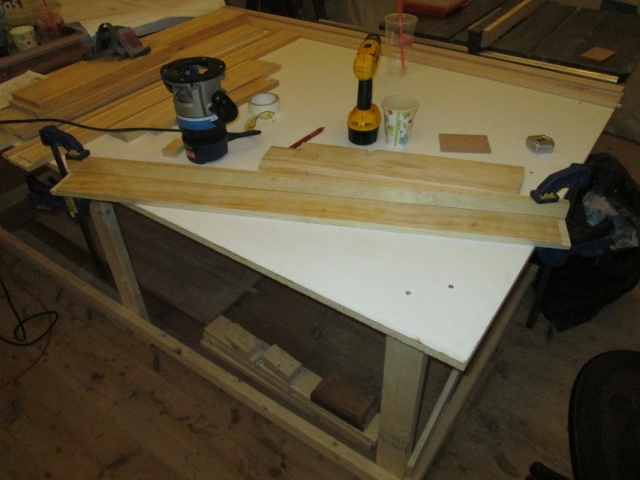
Image

Because this makeshift fence was on edge, allowing it to flex a little in the middle where I couldn’t get a clamp on it, I screwed a small backer block down to keep the router from pushing it out.
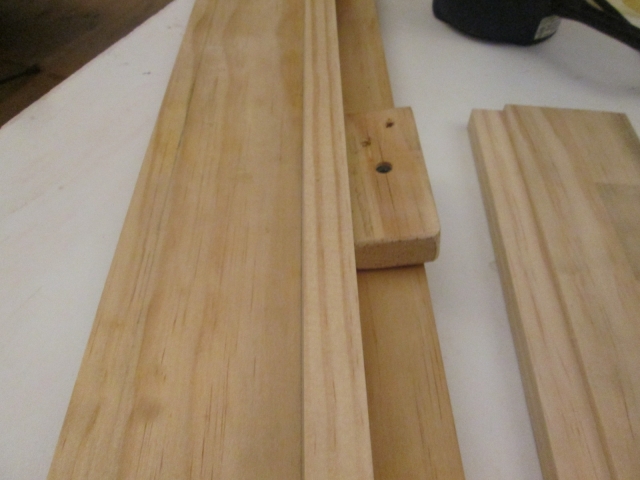
Image

To support the router shoe better I clamped another 1x6 down adjacent to the edge to be cut.
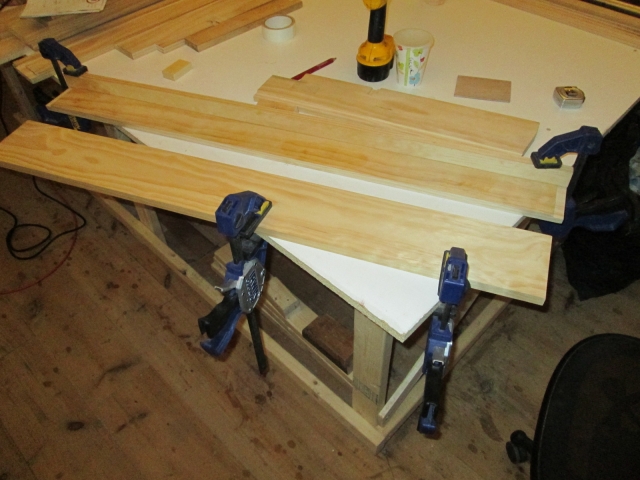
Image

This proved to be too springy where it hung off the table, so I propped it up with various blocks, shims and a piece of 2x4 (I’m sure this is exactly how the most experienced carpenters do it in all of the finer cabinet shops :D ).
Image

Switched to the 3/4 diameter straight cutter and made a couple of passes freehand, taking smaller bites at the full 3/16 inch depth, until reaching the fence for the “final” pass. Actually, I had to make a small adjustment to the fence to account for the slight angle where the front panel will be beveled at the top.
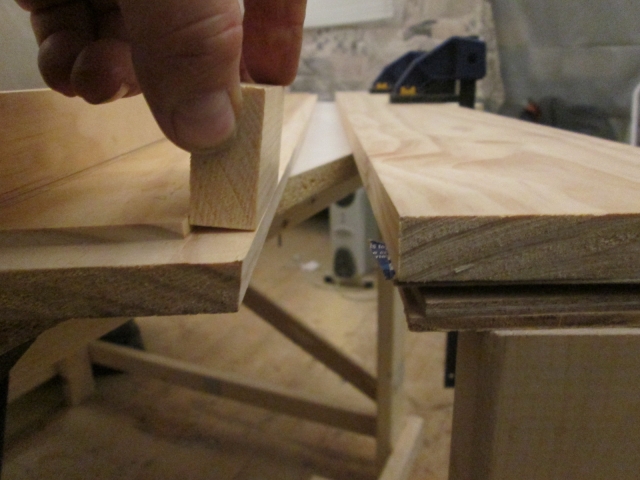
Image

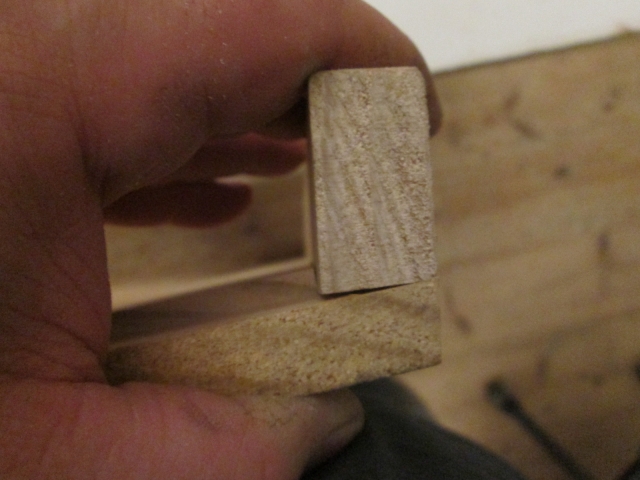
Here is another fit check made using the 5 deg bevel piece, which is closer to the actual 10 deg bevel required.
Image

Did a little clean-up and called it a night. All of that took about 3 hrs and saw me thru to about 7:45pm. :goodnight:
KC
My Build: The Poet Creek Express Hybrid Foamie

Poet Creek Or Bust
Engineering the TLAR way - "That Looks About Right"
TnTTT ORIGINAL 200A LANTERN CLUB = "The 200A Gang"
Green Lantern Corpsmen
User avatar
KCStudly
Donating Member
 
Posts: 9612
Images: 8169
Joined: Mon Feb 06, 2012 10:18 pm
Location: Southeastern CT, USA
Top

Re: The Poet Creek Express - Foamie Hybrid

Postby tony.latham » Sat Apr 12, 2014 9:43 am

KC:

I'm starting to worry. :o

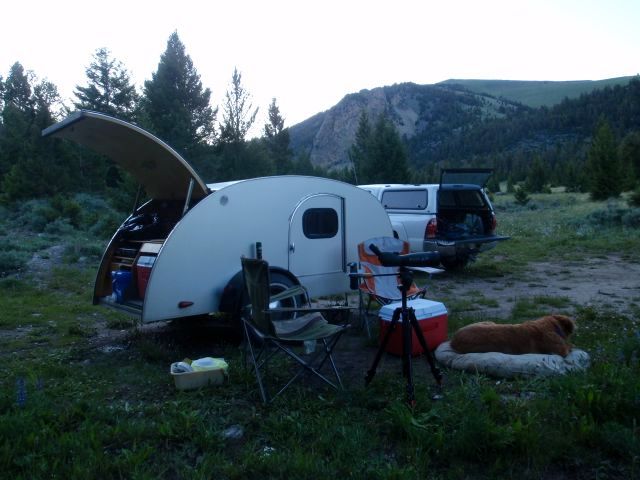
It's green at 4000' here in central Idaho. Looking across the valley and up a thousand feet into the timber at 5,000' the snow's getting scarce. I'm assuming Poet Creek Campground (at the same elevation) has a tad bit more snow than here, but I do know it's melting fast.

Image

I don't really want to see your build thread come to a halt, but jeez; is the Poet Creek Express gonna make it to Poet Creek this season? :NC

Tony
User avatar
tony.latham
Gold Donating Member
 
Posts: 6900
Images: 17
Joined: Mon Jul 08, 2013 4:03 pm
Location: Middle of Idaho on the edge of nowhere
Top

Re: The Poet Creek Express - Foamie Hybrid

Postby KCStudly » Sat Apr 12, 2014 11:31 am

Oh Tony, what a tease of a carrot you dangled there with that pic! ;)

You know it's been at least three years now thinking about going back there and working toward that vision I have; it's become a way of life for me. On one hand I want to live out the vision and complete the tribute, but on the other... well, I don't know what I'd do next if I ever do get there (duh... maybe go camping!!! :? ...or restore my hot rod p/u truck ... or take the boat out).

One issue we have to contend with is the fact that my wife has to put her vacation request in very early, otherwise she might get preempted by those with seniority that get there first. For the last two years of not being ready this has forced her to take two weeks together, and she really would rather spread her time out over a couple of weeks at different parts of the year. It has always been a possibility that I would take two weeks and drive out, that she would fly and I would pick her up in Lewiston. Then we'd camp for a week, I'd drop her back off for the return flight, and drive home. I suppose it would make more sense to look for an airport on the east side of the Magruder, rather than Lewiston to the west. Thing is, she doesn't want to miss out on seeing the country, but she doesn't want to take the time off either.

Not sure what is going to happen this season, but I do know that I am going to continue putting in the hours building it the way I planned it in a logical order. deadlines be damned!
Last edited by KCStudly on Sat Apr 12, 2014 7:53 pm, edited 1 time in total.
KC
My Build: The Poet Creek Express Hybrid Foamie

Poet Creek Or Bust
Engineering the TLAR way - "That Looks About Right"
TnTTT ORIGINAL 200A LANTERN CLUB = "The 200A Gang"
Green Lantern Corpsmen
User avatar
KCStudly
Donating Member
 
Posts: 9612
Images: 8169
Joined: Mon Feb 06, 2012 10:18 pm
Location: Southeastern CT, USA
Top

Re: The Poet Creek Express - Foamie Hybrid

Postby tony.latham » Sat Apr 12, 2014 3:16 pm

"The scenery don't start until you hit the great divide." -Meriwether Lewis to Thomas Jefferson 1806 ;)

If you choose that disjointed trip, look at flying into Missoula -the last I heard commercial flights from Lewiston have been greatly reduced. As you probably know, it's a gorgeous drive down the Lochsa from the Bitterroot Valley. I'm assuming you're thinking about going in from the west side (Grangeville) or maybe you're planning on driving through from Darby? The last time I was on that road, the huckleberries were thick.

Yeah, jobs. They do get in the way, but I had to ask.

I'll just have to check on your build status in between camping trips. 8)

Tony
User avatar
tony.latham
Gold Donating Member
 
Posts: 6900
Images: 17
Joined: Mon Jul 08, 2013 4:03 pm
Location: Middle of Idaho on the edge of nowhere
Top

Re: The Poet Creek Express - Foamie Hybrid

Postby KCStudly » Sat Apr 12, 2014 4:25 pm

Yeah, the plan is to loop around up north to Grangeville, come in on the Red River Road (gorgeous scenery along the river in its own rite!) thru Elk City (checking in at the ranger station there).

The Red River ranger station is no longer manned, but it is a waypoint on the trip. Apparently they maintain an info post there with a vault toilet and "drinking water" in summer. Do you know if you can fill water jugs off of this, or is it just a fountain? Other stations specifically list "potable water", so that has me wondering; I'd rather not haul water any further than necessary. In the seventies we just drank from the creek... nice cold mountain runoff... but they claim there is giardia. We'll boil for dish washing and bathing, and haul for drinking.

I plan to stay at Poet Creek CG for several days (hopefully at least 5, maybe as many as 8) while hiking and exploring the spurs to summits in the Jeep, then take the Magruder Road/Nez Perce Trail/Montana Road the rest of the way back to pavement in Montana, checking out at the Ranger station on West Fork Road near Darby.

I expect the exit trip to take the better part of a full day, so I don't expect to get much farther than that, then its hit the road pedal down to get back home for work (a four letter word :cry: ) in 3 or 4 days.
KC
My Build: The Poet Creek Express Hybrid Foamie

Poet Creek Or Bust
Engineering the TLAR way - "That Looks About Right"
TnTTT ORIGINAL 200A LANTERN CLUB = "The 200A Gang"
Green Lantern Corpsmen
User avatar
KCStudly
Donating Member
 
Posts: 9612
Images: 8169
Joined: Mon Feb 06, 2012 10:18 pm
Location: Southeastern CT, USA
Top

Re: The Poet Creek Express - Foamie Hybrid

Postby tony.latham » Sat Apr 12, 2014 5:28 pm

Giardia is a myth (unless you catch it).

Let's put it this way; I'll drink out of any of those creeks past the ranger station, plus the fountain at the station. I've been doing this for fifty years and have yet to exhibit symptoms. (You might make a phone call to the USFS in Grangeville to see if it's running and been tested - for chloroform.)

You've (obviously) hit a spot with me over giardia. I camp with those that believe it's indigenous to North America and that it reared its ugly head when backpacking became popular in the 60's with people that had been weaned on (and still drinking) chlorinated water. But maybe I'm wrong. I think it's no different than going to Mexico. The locals drink the water and sure as Bargamin Creek, I don't. Here's a good read on it here: http://www.farnorthendurance.com/bustin ... t-giardia/

But if I were you (with your gut biome), I might bring a water filter. :FNP

You won't have to check in or out with the USFS on either end of that long-lonely road. In fact if you do, you might catch a funny look. I may be blowing smoke on the giodosis argument but I know the FS doesn't "flight follow" travelers on the Magruder Road. And there's a couple of good USFS campgrounds on the West Fork as you might know.

Now, git back to work on the PCE.


Tony

p.s. -and if anyone wants to hijack this thread and start a "discussion" about giardia, perhaps we should start a new thread... :stompspam:
User avatar
tony.latham
Gold Donating Member
 
Posts: 6900
Images: 17
Joined: Mon Jul 08, 2013 4:03 pm
Location: Middle of Idaho on the edge of nowhere
Top

Re: The Poet Creek Express - Foamie Hybrid

Postby RandyG » Sat Apr 12, 2014 6:39 pm

Kc, have you had a problem keeping the router bit center on the base? I haven't noticed that before, but would one be able to check it with the wrench on the collet?
Randy
Aircraft fabricator, novice carpenter, electrical apprentice, audio engineer dropout.
Build thread - http://www.tnttt.com/viewtopic.php?f=50&t=54126
User avatar
RandyG
500 Club
 
Posts: 695
Images: 115
Joined: Thu May 10, 2012 6:52 pm
Top

Re: The Poet Creek Express - Foamie Hybrid

Postby KCStudly » Sat Apr 12, 2014 6:52 pm

Thank you for the link. To be fair, anyone who chooses to read the link should also read all of the comments therein. :thumbsup:
KC
My Build: The Poet Creek Express Hybrid Foamie

Poet Creek Or Bust
Engineering the TLAR way - "That Looks About Right"
TnTTT ORIGINAL 200A LANTERN CLUB = "The 200A Gang"
Green Lantern Corpsmen
User avatar
KCStudly
Donating Member
 
Posts: 9612
Images: 8169
Joined: Mon Feb 06, 2012 10:18 pm
Location: Southeastern CT, USA
Top

PreviousNext

Return to Foamies

Who is online

Users browsing this forum: No registered users and 13 guests