#1

Canvas covered foamies (Thrifty Alternatives...)

Moderator: eaglesdare

Re: #1

Postby ghcoe » Tue Aug 25, 2015 8:52 pm

I got lazy and decided to try the bendable drywall trim for the rear hatch radius. I had used metal along the front, but had to cut it every inch for it to bend. I did find that if you place the trim along the edge and let the full length of the radius overhang the radius it will bend slowly with some time. This makes it a lot easier to install because you are not fighting the bend in the edging.

CAM01107s.jpg
Bendable drywall edging
CAM01107s.jpg (121.07 KiB) Viewed 5792 times


CAM01108s.jpg
Bent drywall edging
CAM01108s.jpg (112.79 KiB) Viewed 5792 times


Tomorrows objectives, install the door jamb, do final edging on hatch (two strips), final fairing and paint. If I get this done I should be ready to canvas the outside Thursday :thumbsup: .
George.

Gorrilla Glue, Great Stuff and Gripper. The three G's of foamie construction.

My build viewtopic.php?t=54099
Working with flashing for foamie construction viewtopic.php?f=55&t=60303
Making a hot wire http://tnttt.com/viewtopic.php?f=55&t=55323
User avatar
ghcoe
1000 Club
1000 Club
 
Posts: 1948
Joined: Fri Dec 11, 2009 11:20 pm
Location: SW Idaho

Re: #1

Postby OP827 » Tue Aug 25, 2015 9:48 pm

ghcoe wrote:For anyone that may want to run separate turn signals on their trailers with conventional combined brake/signal wiring.

This is the product you will need, a Vehicle to Vehicle Tail Light Converter http://www.etrailer.com/Accessories-and ... 56196.html . If you are using it for a trailer and not for towing a vehicle you do not need the recommended diodes. I think I will use this one so that I can use the trailer easily between different vehicles.


This sounds great, thanks. Could you please share the schematics details of this setup when you do it. I am thinking of doing the same, but I am behind you with the wiring, so if it works for you, I will do it too :D

Nice progress and I like how you install the cutout wiring channel foam piece back with acrylic caulking. This is much simplier than using a router etc. Great ideas, thanks for sharing!
User avatar
OP827
Donating Member
 
Posts: 1557
Images: 405
Joined: Fri Apr 25, 2014 7:27 pm
Location: Bruce County Ontario

Re: #1

Postby Wolffarmer » Tue Aug 25, 2015 9:53 pm

I have wondered for years why some one does not make a five wire trailer light kit. Just for foreign vehicles.
"these guys must be afraid of the dark"
User avatar
Wolffarmer
Donating Member
 
Posts: 4612
Images: 309
Joined: Wed May 02, 2007 1:32 pm
Location: Idaho Rupert
Top

Postby ghcoe » Tue Aug 25, 2015 10:22 pm

:thumbsup:
Last edited by ghcoe on Tue Aug 25, 2015 11:25 pm, edited 1 time in total.
George.

Gorrilla Glue, Great Stuff and Gripper. The three G's of foamie construction.

My build viewtopic.php?t=54099
Working with flashing for foamie construction viewtopic.php?f=55&t=60303
Making a hot wire http://tnttt.com/viewtopic.php?f=55&t=55323
User avatar
ghcoe
1000 Club
1000 Club
 
Posts: 1948
Joined: Fri Dec 11, 2009 11:20 pm
Location: SW Idaho
Top

Re: #1

Postby ghcoe » Tue Aug 25, 2015 10:22 pm

OP827 wrote:This sounds great, thanks. Could you please share the schematics details of this setup when you do it. I am thinking of doing the same, but I am behind you with the wiring, so if it works for you, I will do it too :D

Nice progress and I like how you install the cutout wiring channel foam piece back with acrylic caulking. This is much simplier than using a router etc. Great ideas, thanks for sharing!


If you hover over the picture you can see the hook up instructions on the unit. Input is left turn/stop, ground, right/turn stop. Output is left turn, stop, right turn. Pretty simple.

Thanks and not problem.
George.

Gorrilla Glue, Great Stuff and Gripper. The three G's of foamie construction.

My build viewtopic.php?t=54099
Working with flashing for foamie construction viewtopic.php?f=55&t=60303
Making a hot wire http://tnttt.com/viewtopic.php?f=55&t=55323
User avatar
ghcoe
1000 Club
1000 Club
 
Posts: 1948
Joined: Fri Dec 11, 2009 11:20 pm
Location: SW Idaho
Top

Re: #1

Postby OP827 » Tue Aug 25, 2015 11:13 pm

Great, thanks! I'll go online shopping for taillights with amber turn signal now :), Cheers!
User avatar
OP827
Donating Member
 
Posts: 1557
Images: 405
Joined: Fri Apr 25, 2014 7:27 pm
Location: Bruce County Ontario
Top

Re: #1

Postby ghcoe » Fri Aug 28, 2015 10:41 pm

Well it's been a busy couple of days....

First I had to get the passenger side door jamb installed. Flashing, beading, drilling, riveting...... :thumbsup:

CAM01111s.jpg
Drilling door jamb
CAM01111s.jpg (83.34 KiB) Viewed 5693 times


CAM01112s.jpg
Rivet door jamb
CAM01112s.jpg (68.71 KiB) Viewed 5693 times


CAM01124s.jpg
Tying in shelves to jamb
CAM01124s.jpg (79.46 KiB) Viewed 5693 times
George.

Gorrilla Glue, Great Stuff and Gripper. The three G's of foamie construction.

My build viewtopic.php?t=54099
Working with flashing for foamie construction viewtopic.php?f=55&t=60303
Making a hot wire http://tnttt.com/viewtopic.php?f=55&t=55323
User avatar
ghcoe
1000 Club
1000 Club
 
Posts: 1948
Joined: Fri Dec 11, 2009 11:20 pm
Location: SW Idaho
Top

Re: #1

Postby ghcoe » Fri Aug 28, 2015 10:48 pm

Next was the wiring channel for the roof vent and center lights. Had to get the vent frame ready for riveting in place. I used caulking as a glue between the roof and the flashing. Rivets will be placed in the frame. I must not of got a picture of this, sorry.

CAM01128s.jpg
Wiring channel for vent and center lights
CAM01128s.jpg (66.8 KiB) Viewed 5693 times


CAM01129s.jpg
Hole drilled for wiring
CAM01129s.jpg (51.37 KiB) Viewed 5693 times
George.

Gorrilla Glue, Great Stuff and Gripper. The three G's of foamie construction.

My build viewtopic.php?t=54099
Working with flashing for foamie construction viewtopic.php?f=55&t=60303
Making a hot wire http://tnttt.com/viewtopic.php?f=55&t=55323
User avatar
ghcoe
1000 Club
1000 Club
 
Posts: 1948
Joined: Fri Dec 11, 2009 11:20 pm
Location: SW Idaho
Top

Re: #1

Postby ghcoe » Fri Aug 28, 2015 11:02 pm

Next was to get the doors faired in. Time to get rid of the flashing....... :twisted:

CAM01114s.jpg
Flashing covered
CAM01114s.jpg (69.96 KiB) Viewed 5689 times


I found that it is easier to add the plaster, sand and once you get it smooth as possible add a coat of Gripper. Once the Gripper is dry it will not sand very easy. That way you are not shooting yourself in the foot by sanding the plaster past what you have already worked. I am thinking it also make a very strong bond.

CAM01115s.jpg
Faring
CAM01115s.jpg (51.92 KiB) Viewed 5689 times


I am pleased with how well the flashing was hidden. :thumbsup:

CAM01122s.jpg
Finished
CAM01122s.jpg (254.67 KiB) Viewed 5689 times
George.

Gorrilla Glue, Great Stuff and Gripper. The three G's of foamie construction.

My build viewtopic.php?t=54099
Working with flashing for foamie construction viewtopic.php?f=55&t=60303
Making a hot wire http://tnttt.com/viewtopic.php?f=55&t=55323
User avatar
ghcoe
1000 Club
1000 Club
 
Posts: 1948
Joined: Fri Dec 11, 2009 11:20 pm
Location: SW Idaho
Top

Re: #1

Postby ghcoe » Fri Aug 28, 2015 11:13 pm

Well it was time to fair the whole body and get ready for some canvas.

CAM01119s.jpg
Fair faring
CAM01119s.jpg (96.42 KiB) Viewed 5685 times


CAM01121s.jpg
Another fair shot
CAM01121s.jpg (87.43 KiB) Viewed 5685 times


CAM01123ss.jpg
That is not fair, oh yes it is
CAM01123ss.jpg (61.48 KiB) Viewed 5685 times
George.

Gorrilla Glue, Great Stuff and Gripper. The three G's of foamie construction.

My build viewtopic.php?t=54099
Working with flashing for foamie construction viewtopic.php?f=55&t=60303
Making a hot wire http://tnttt.com/viewtopic.php?f=55&t=55323
User avatar
ghcoe
1000 Club
1000 Club
 
Posts: 1948
Joined: Fri Dec 11, 2009 11:20 pm
Location: SW Idaho
Top

Re: #1

Postby ghcoe » Fri Aug 28, 2015 11:34 pm

So it was time to canvas. I realized that all my information was from what I have read and everyone has a different way that they tired using different techniques and.........Ahhhhh :? Someone really needs to make a sticky for this one :thumbsup: .

In any case I finally just went for it. I found that the canvas was a bit hard to get to lay right over the front and rear radius. I finally found a 2x4x8 that I placed on top of the roof to extend the roof line past the radiuses. This help a lot to get the canvas to lay right.

CAM01131s.jpg
Canvas
CAM01131s.jpg (98.02 KiB) Viewed 5680 times


Once I got the canvas situated where I wanted it I marked along the top edge for a reference and then flipped the canvas over the top.

CAM01133s.jpg
Canvas marks
CAM01133s.jpg (74.39 KiB) Viewed 5680 times


CAM01135s.jpg
Getting ready
CAM01135s.jpg (72.49 KiB) Viewed 5680 times


I mixed my TBII 3-1 and began to apply the TB to the trailer body and to the back side of the canvas. I kept a water bottle and a small roller with me to help with the smoothing and keeping things wet and workable. This worked quite well. I had a 3 inch brush that I would brush the TBII onto the canvas and body and I would work about 3-4 inches at a time moving the canvas down a little with each sweep.
George.

Gorrilla Glue, Great Stuff and Gripper. The three G's of foamie construction.

My build viewtopic.php?t=54099
Working with flashing for foamie construction viewtopic.php?f=55&t=60303
Making a hot wire http://tnttt.com/viewtopic.php?f=55&t=55323
User avatar
ghcoe
1000 Club
1000 Club
 
Posts: 1948
Joined: Fri Dec 11, 2009 11:20 pm
Location: SW Idaho
Top

Re: #1

Postby ghcoe » Fri Aug 28, 2015 11:49 pm

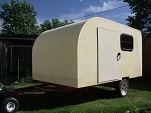
Once I got about half way down I realized this plan was not going to work out for the rest of the canvasing. I had to come up with another plan half way through the play :roll: . Had to work quick because I had TBII drying and the sun was starting to hit the trailer too :x . Looking around I spied a 1x2x8 and rolled the rest of the canvas up onto it 8) . This worked out perfectly in a pinch and will be the way I will do the other side as well as the roof.
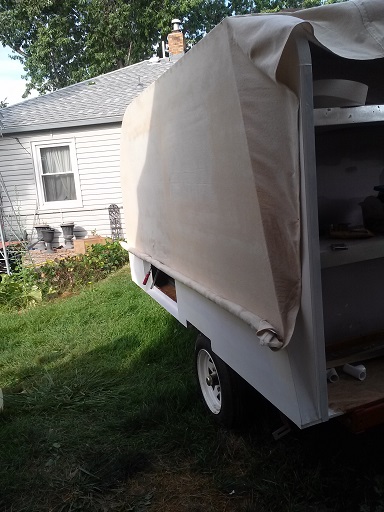
CAM01136s.jpg
Rolled up
CAM01136s.jpg (98.29 KiB) Viewed 5679 times


The rest of the body was pretty much the same system. Paint body with TBII, paint backside of canvas with TBII, unroll canvas, mist canvas with water, smooth out canvas, paint body with TBII, paint backside of canvas with TBII, unroll canvas, mist canvas with water, smooth out canvas, ect. I camped the canvas at the door opening so I did not have to worry about working around a clamp.

CAM01139s.jpg
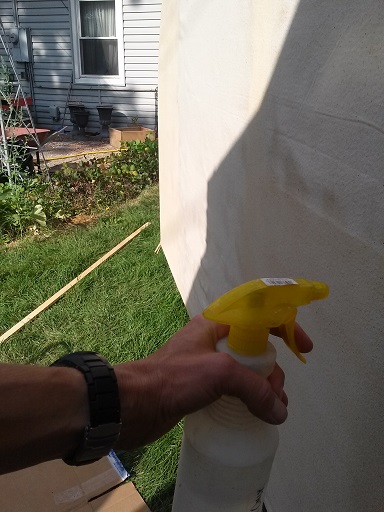
Spray bottle with water
CAM01139s.jpg (93.09 KiB) Viewed 5679 times


A water bottle and a small roller are real handy with the canvasing process. I used the water to keep the canvas damp and the roller to push the canvas into the TBII and smooth everything out.
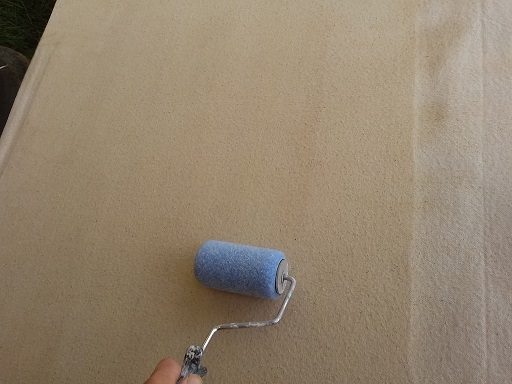
CAM01140s.jpg
Small roller
CAM01140s.jpg (68.13 KiB) Viewed 5679 times
Last edited by ghcoe on Sat Aug 29, 2015 12:06 am, edited 1 time in total.
George.

Gorrilla Glue, Great Stuff and Gripper. The three G's of foamie construction.

My build viewtopic.php?t=54099
Working with flashing for foamie construction viewtopic.php?f=55&t=60303
Making a hot wire http://tnttt.com/viewtopic.php?f=55&t=55323
User avatar
ghcoe
1000 Club
1000 Club
 
Posts: 1948
Joined: Fri Dec 11, 2009 11:20 pm
Location: SW Idaho
Top

Re: #1

Postby ghcoe » Fri Aug 28, 2015 11:54 pm

Here is a shot of the done deal. Once I finished the canvasing I went ahead and used the roller to push the canvas into the TBII. I kept at it till the canvas was nearly dry.

CAM01141s.jpg
Done deal
CAM01141s.jpg (96.46 KiB) Viewed 5679 times
George.

Gorrilla Glue, Great Stuff and Gripper. The three G's of foamie construction.

My build viewtopic.php?t=54099
Working with flashing for foamie construction viewtopic.php?f=55&t=60303
Making a hot wire http://tnttt.com/viewtopic.php?f=55&t=55323
User avatar
ghcoe
1000 Club
1000 Club
 
Posts: 1948
Joined: Fri Dec 11, 2009 11:20 pm
Location: SW Idaho
Top

Re: #1

Postby Wolffarmer » Sat Aug 29, 2015 12:28 am

Great work. Making strong progress.
"these guys must be afraid of the dark"
User avatar
Wolffarmer
Donating Member
 
Posts: 4612
Images: 309
Joined: Wed May 02, 2007 1:32 pm
Location: Idaho Rupert
Top

Re: #1

Postby GPW » Sat Aug 29, 2015 6:29 am

Looking good and you seem to have worked out your own method !!! :thumbsup: 8) :beer:
There’s no place like Foam !
User avatar
GPW
Gold Donating Member
 
Posts: 14912
Images: 546
Joined: Thu Feb 09, 2006 7:58 pm
Location: New Orleans
Top

PreviousNext

Return to Foamies

Who is online

Users browsing this forum: No registered users and 35 guests