#1

Canvas covered foamies (Thrifty Alternatives...)

Moderator: eaglesdare

Re: #1

Postby ghcoe » Sun May 22, 2016 5:29 pm

With each fold I made a "witness mark" so that I could tell if the canvas was staying centered. When I did the roof I had a problem with the canvas shifting to one side and it was sometimes a pain to get it re-centered. With the "witness mark" at each fold it reminds me to check and to easily verify that the canvas is staying centered.

DSCF4246.JPG
Witness mark
DSCF4246.JPG (145.15 KiB) Viewed 30164 times


To go through procedure again. First I mix the TBII 50/50.

DSCF4261.JPG
50/50
DSCF4261.JPG (147.3 KiB) Viewed 30164 times


Next I apply glue to the body. I use a 4" brush for application. I apply glue to the body till I cannot feel the brush "drag" but is a nice smooth "slippery" feeling. I brush on enough glue to the body to lay one fold of the canvas into.

DSCF4256.JPG
Applying glue to hatch
DSCF4256.JPG (142.17 KiB) Viewed 30164 times
George.

Gorrilla Glue, Great Stuff and Gripper. The three G's of foamie construction.

My build viewtopic.php?t=54099
Working with flashing for foamie construction viewtopic.php?f=55&t=60303
Making a hot wire http://tnttt.com/viewtopic.php?f=55&t=55323
User avatar
ghcoe
1000 Club
1000 Club
 
Posts: 1942
Joined: Fri Dec 11, 2009 11:20 pm
Location: SW Idaho

Re: #1

Postby ghcoe » Sun May 22, 2016 5:49 pm

Once I apply the glue to the body I then work on the canvas. I am working with just one fold of the canvas. I make sure to work the glue "into" the weave of the canvas. Making sure that no fiber pockets are left without glue in them. This is fairly easy with the 50/50 glue mix.

DSCF4258.JPG
Working glue into canvas
DSCF4258.JPG (157.25 KiB) Viewed 30162 times


Once I get the canvas totally "filled" with glue I then go back over the body with a second coat of glue. The first coat of glue by now should be a bit tacky. The second coat will go on much easier since the first coat will act like a primer. This will allow a thicker second coat of glue. Again I apply glue till I get the "slippery" feeling when I brush across the surface.

DSCF4256.JPG
Applying second coat of glue to body
DSCF4256.JPG (142.17 KiB) Viewed 30162 times


Once done applying the second coat of glue I then unfold the canvas "two" folds. This allows me to work with just one layer of canvas. Don't worry if you coated the body wider than "one" fold of the canvas, it will not matter. Once unfolded I apply water to the surface of the canvas till I see nice even coverage. I don't use a lot of water just enough to wet the surface. I believe that this starts a "wicking" action and helps to pull the glue up into the canvas. It also helps to "relax" the canvas so that you can roll out the creases. And lastly it also starts to shrink the canvas.

DSCF4253.JPG
Applying water
DSCF4253.JPG (156.27 KiB) Viewed 30162 times
George.

Gorrilla Glue, Great Stuff and Gripper. The three G's of foamie construction.

My build viewtopic.php?t=54099
Working with flashing for foamie construction viewtopic.php?f=55&t=60303
Making a hot wire http://tnttt.com/viewtopic.php?f=55&t=55323
User avatar
ghcoe
1000 Club
1000 Club
 
Posts: 1942
Joined: Fri Dec 11, 2009 11:20 pm
Location: SW Idaho

Re: #1

Postby ghcoe » Sun May 22, 2016 6:16 pm

Once the canvas is "wetted" it is time to "roll" the canvas out. I use a 4" trim roller with just a standard 3/8 nap paint roller. Before I start the rolling I spray water onto the roller to help keep the glue that gets on it from setting. It will also pick up water from the canvas so one application is usually enough. I get quite a few uses with just one roller. I start in the middle of the canvas and work at a 45 degree angle out towards the edges. This helps to "stretch" the canvas "out" to keep it tight and work out wrinkles. Once I rolled it "out" I then I will work on any wrinkles that may have not easily smoothed out. I will hit the wrinkle with some more water wetting it out well. Then I will use the roller and work it out.

DSCF4254.JPG
Rolling
DSCF4254.JPG (157.24 KiB) Viewed 30151 times


I am using Harbor Freight drop cloth canvas right out of the bag for reference. No washing or ironing needed as you can see.

DSCF4249.JPG
Fading
DSCF4249.JPG (139.68 KiB) Viewed 30151 times


Once done rolling the canvas out and working the wrinkles out I fold the canvas back "one" fold and then "slide" the canvas back till I can see about 1" of the canvas that is "filled" by the previous gluing process. Now I know that I am not leaving any "dry" areas in the glue up process and can continue with the repeat of the above method till done.

Since I had already installed the side canvas, which overlaps the edge of the hatch I am canvasing, I have a crease to work with. I find that a pizza cutter works great to help "push" the canvas down into the crease and defines the crease nicely.

DSCF4252.JPG
Pizza
DSCF4252.JPG (158.19 KiB) Viewed 30151 times
George.

Gorrilla Glue, Great Stuff and Gripper. The three G's of foamie construction.

My build viewtopic.php?t=54099
Working with flashing for foamie construction viewtopic.php?f=55&t=60303
Making a hot wire http://tnttt.com/viewtopic.php?f=55&t=55323
User avatar
ghcoe
1000 Club
1000 Club
 
Posts: 1942
Joined: Fri Dec 11, 2009 11:20 pm
Location: SW Idaho
Top

Re: #1

Postby GPW » Mon May 23, 2016 6:38 am

GH, Thanks that’s a great description of the process !!! :thumbsup: 8) :applause:
There’s no place like Foam !
User avatar
GPW
Gold Donating Member
 
Posts: 14911
Images: 546
Joined: Thu Feb 09, 2006 7:58 pm
Location: New Orleans
Top

Re: #1

Postby ghcoe » Sat Jun 04, 2016 3:55 pm

I got a bit of work done before it got hot here. Started the last piece of exterior canvas I have to a apply. Just a small strip along the front bottom edge. This should be finished tonight once it cools down. Also, started to frame the curb side door. Time to start thinking about a color scheme.

DSCF4352.JPG
Making the alignment mark
DSCF4352.JPG (156.04 KiB) Viewed 30033 times


DSCF4353.JPG
Applying canvas
DSCF4353.JPG (154.93 KiB) Viewed 30033 times


DSCF4354.JPG
Applied
DSCF4354.JPG (149.18 KiB) Viewed 30033 times


I finished the hatch last week and was curious how much it weighed. Came in fully canvased, minus tail lights at 24.8 lbs..... :thumbsup:
George.

Gorrilla Glue, Great Stuff and Gripper. The three G's of foamie construction.

My build viewtopic.php?t=54099
Working with flashing for foamie construction viewtopic.php?f=55&t=60303
Making a hot wire http://tnttt.com/viewtopic.php?f=55&t=55323
User avatar
ghcoe
1000 Club
1000 Club
 
Posts: 1942
Joined: Fri Dec 11, 2009 11:20 pm
Location: SW Idaho
Top

Re: #1

Postby GPW » Sat Jun 04, 2016 7:15 pm

Really Nice GH , Thanks !!! :thumbsup: :pictures: 8) Nice covering!!! That Does make a huge difference !!! :thumbsup: ;)
There’s no place like Foam !
User avatar
GPW
Gold Donating Member
 
Posts: 14911
Images: 546
Joined: Thu Feb 09, 2006 7:58 pm
Location: New Orleans
Top

Re: #1

Postby KCStudly » Sat Jun 04, 2016 9:50 pm

+1 Looks great.

I have some vague recollection of you mentioning it before, but I'll ask. Was the extra filler strip at the bottom front because the canvas wasn't long enough?
KC
My Build: The Poet Creek Express Hybrid Foamie

Poet Creek Or Bust
Engineering the TLAR way - "That Looks About Right"
TnTTT ORIGINAL 200A LANTERN CLUB = "The 200A Gang"
Green Lantern Corpsmen
User avatar
KCStudly
Donating Member
 
Posts: 9611
Images: 8169
Joined: Mon Feb 06, 2012 10:18 pm
Location: Southeastern CT, USA
Top

Re: #1

Postby ghcoe » Sat Jun 04, 2016 10:30 pm

KCStudly wrote:+1 Looks great.

I have some vague recollection of you mentioning it before, but I'll ask. Was the extra filler strip at the bottom front because the canvas wasn't long enough?


Yes, I allowed 12" of extra canvas to allow for shrinkage and overlap, still came up a bit short. :roll:
George.

Gorrilla Glue, Great Stuff and Gripper. The three G's of foamie construction.

My build viewtopic.php?t=54099
Working with flashing for foamie construction viewtopic.php?f=55&t=60303
Making a hot wire http://tnttt.com/viewtopic.php?f=55&t=55323
User avatar
ghcoe
1000 Club
1000 Club
 
Posts: 1942
Joined: Fri Dec 11, 2009 11:20 pm
Location: SW Idaho
Top

Re: #1

Postby GPW » Sun Jun 05, 2016 7:19 am

Happens !!! It’s amazing once it starts shrinking it can shrink a LOT and quickly too :o 
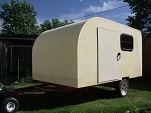
... I saw this personally having watched the FoamStream’s heavy 18oz. canvas shrink 12” plus in length in a 10’ run ... No way to stop it :frightened: We ended up short even with the “allowance", but just lifted the rear facing end and added more canvas underneath(see pic) ... May be something to that idea of pre shrinking ... :roll: :thinking:
None of that really shows unless somebody picky goes looking for them . ( note: and we don’t Care !!! :laughter: )

GH , Nice light hatch !!! :thumbsup: 8) :D
Attachments
DSCF0010.jpg
DSCF0010.jpg (142.94 KiB) Viewed 29994 times
There’s no place like Foam !
User avatar
GPW
Gold Donating Member
 
Posts: 14911
Images: 546
Joined: Thu Feb 09, 2006 7:58 pm
Location: New Orleans
Top

Re: #1

Postby ghcoe » Sun Jun 05, 2016 8:06 am

GPW wrote: May be something to that idea of pre shrinking ... :roll: :thinking:
GH , Nice light hatch !!! :thumbsup: 8) :D


This was a 9 foot run. I figured 12" would be plenty of allowance, it shrunk about 15". I do not apply preshrunk canvas. I think it makes for a tighter skin and helps to pull out wrinkles. Just have to allow for that shrinkage though. Good to know which way the shrinkage is too. It definitely shrinks more one way than the other.

The hatch came in way lighter than I was figuring. It is a bit awkward to move around. I was guessing that it was close to 50 lbs. I was quite surprised, but happy to see it come in so low.
Last edited by ghcoe on Mon Dec 26, 2016 9:09 am, edited 1 time in total.
George.

Gorrilla Glue, Great Stuff and Gripper. The three G's of foamie construction.

My build viewtopic.php?t=54099
Working with flashing for foamie construction viewtopic.php?f=55&t=60303
Making a hot wire http://tnttt.com/viewtopic.php?f=55&t=55323
User avatar
ghcoe
1000 Club
1000 Club
 
Posts: 1942
Joined: Fri Dec 11, 2009 11:20 pm
Location: SW Idaho
Top

Re: #1

Postby GPW » Sun Jun 05, 2016 8:17 am

So Nice and easy to manage ... :thumbsup: 8) May have to secure it from the breeze though ... :thinking:

GH , it was ODD , the canvas didn’t seem to shrink at the starting point , but went Crazy at the other end ... :o :duh: So judging by your and my results , guess it’s safe to say we’d better leave at least 10% or more in extra length for a shrinkage allowance ... :NC Or pre-shrink it ... maybe a trip to the local Washateria with your thirty yards of canvas and a bag full of quarters ... Best of all , you don’t need any soap ... :D

Regardless, your covering job looks FINE !!! :thumbsup: 8) :applause: And we believe extra seams if done straight may look “intentional “ ... ( viz. like “reinforcing strips” ) ... ;) Thing is , nobody else knows what you really intended ... unless you tell them eh ... :roll:
There’s no place like Foam !
User avatar
GPW
Gold Donating Member
 
Posts: 14911
Images: 546
Joined: Thu Feb 09, 2006 7:58 pm
Location: New Orleans
Top

Re: #1

Postby ghcoe » Sun Jun 05, 2016 1:40 pm

This morning I started fairing of the curb side door.

DSCF4355.JPG
Hard edges
DSCF4355.JPG (164.34 KiB) Viewed 29954 times


And installed handles on road side door.

DSCF4357.JPG
Door handles
DSCF4357.JPG (171.35 KiB) Viewed 29954 times


I have found that the road side door is a bit tight along the latching edge :roll: . Not sure how it is going to work once I get the paint applied. I may have to make another door at a later time. But for now I will live with it.

DSCF4360.JPG
Installed
DSCF4360.JPG (168.89 KiB) Viewed 29954 times
George.

Gorrilla Glue, Great Stuff and Gripper. The three G's of foamie construction.

My build viewtopic.php?t=54099
Working with flashing for foamie construction viewtopic.php?f=55&t=60303
Making a hot wire http://tnttt.com/viewtopic.php?f=55&t=55323
User avatar
ghcoe
1000 Club
1000 Club
 
Posts: 1942
Joined: Fri Dec 11, 2009 11:20 pm
Location: SW Idaho
Top

Re: #1

Postby ghcoe » Sun Jun 05, 2016 1:48 pm

I installed flashing in the threshold but was afraid that water would pool if the trailer was uneven from one side or the other. I found a plastic trim piece that has a slight slope to it. Plastic so it will not rot and sloped so water will run out even when the trailer is not even.

DSCF4361.JPG
Threshold piece
DSCF4361.JPG (151.68 KiB) Viewed 29952 times


I used caulking as a glue to hold it in the threshold.....

DSCF4362.JPG
Threshold piece ready for gluing
DSCF4362.JPG (156.98 KiB) Viewed 29952 times


and to seal all the edges to keep it water tight.

DSCF4363.JPG
Installed
DSCF4363.JPG (151.1 KiB) Viewed 29952 times
George.

Gorrilla Glue, Great Stuff and Gripper. The three G's of foamie construction.

My build viewtopic.php?t=54099
Working with flashing for foamie construction viewtopic.php?f=55&t=60303
Making a hot wire http://tnttt.com/viewtopic.php?f=55&t=55323
User avatar
ghcoe
1000 Club
1000 Club
 
Posts: 1942
Joined: Fri Dec 11, 2009 11:20 pm
Location: SW Idaho
Top

Re: #1

Postby ghcoe » Sun Jun 05, 2016 1:52 pm

Made my last wire channels for clearance and porch lights....

DSCF4364.JPG
Wire channel
DSCF4364.JPG (170.01 KiB) Viewed 29949 times


After installing the wire I refilled the channel with caulking. With a little spackle later should be invisible. :thumbsup:
George.

Gorrilla Glue, Great Stuff and Gripper. The three G's of foamie construction.

My build viewtopic.php?t=54099
Working with flashing for foamie construction viewtopic.php?f=55&t=60303
Making a hot wire http://tnttt.com/viewtopic.php?f=55&t=55323
User avatar
ghcoe
1000 Club
1000 Club
 
Posts: 1942
Joined: Fri Dec 11, 2009 11:20 pm
Location: SW Idaho
Top

Re: #1

Postby ghcoe » Sun Jun 05, 2016 2:10 pm

Worked on getting the tail lights ready for installation once paint is applied.

Started by drilling through the center of the junction box to the outside for a pilot hole. This was a small diameter bit.

DSCF4373.JPG
Drilling
DSCF4373.JPG (156.69 KiB) Viewed 29942 times


Once I drilled though both boxes I flipped the hatch over. Then I verified that the holes where in the same spot on each side from bottom and sides of hatch. Lucky me first time and holes were perfect.

DSCF4375.JPG
Pilot hole
DSCF4375.JPG (152.35 KiB) Viewed 29942 times


Then I used a larger drill bit that was the same diameter as the wiring sheathing. I predrilled a piece of wood to use as a drill guide and drilled back through the foam and junction box from the outside. The drill guide keeps the drill from wandering through the foam.

DSCF4374.JPG
Redrilling
DSCF4374.JPG (157.72 KiB) Viewed 29942 times
George.

Gorrilla Glue, Great Stuff and Gripper. The three G's of foamie construction.

My build viewtopic.php?t=54099
Working with flashing for foamie construction viewtopic.php?f=55&t=60303
Making a hot wire http://tnttt.com/viewtopic.php?f=55&t=55323
User avatar
ghcoe
1000 Club
1000 Club
 
Posts: 1942
Joined: Fri Dec 11, 2009 11:20 pm
Location: SW Idaho
Top

PreviousNext

Return to Foamies

Who is online

Users browsing this forum: No registered users and 3 guests