#1

Canvas covered foamies (Thrifty Alternatives...)

Moderator: eaglesdare

Re: #1

Postby ghcoe » Sun Aug 14, 2016 3:34 pm

This weekend was the weekend I have been dreading since I realized I forgot to do one thing. I forgot to coat the underside of the floor with the black stuff. I read horror stories of other people applying the black sticky stuff to the undersides of their trailers. It had to be done as much as I tried to talk myself out of it, this weekend was the weekend of horror........ :worship:

Well it really did not turn out as bad as I thought it was going to be. In fact I never got any sticky stuff on me or my cloths...... :R The worst part was my arm got tired from painting upside down.

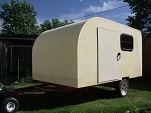
I wanted to raise the body up a bit to add some extra clearance at the wheel wells. I just though the wheel was a bit too close to the well and could smack on a large bump if the trailer was weight down some. So a easy fix was to add 2"x2"s to give me a bit more clearance. To be able to get to all of the floor to paint I had to lift the body off the frame so this was a perfect time for adding the lift too. I lifted the body about 6" above the frame which made it easy to paint and add the 2"x2"s. Still not totally done, but the body is back down on the frame for storage until next weekend. See you then...... :thumbsup:

DSCF4626.JPG
Lifted
DSCF4626.JPG (150.66 KiB) Viewed 11053 times


DSCF4625.JPG
Sticky stuff....
DSCF4625.JPG (153.62 KiB) Viewed 11053 times
George.

Gorrilla Glue, Great Stuff and Gripper. The three G's of foamie construction.

My build viewtopic.php?t=54099
Working with flashing for foamie construction viewtopic.php?f=55&t=60303
Making a hot wire http://tnttt.com/viewtopic.php?f=55&t=55323
User avatar
ghcoe
1000 Club
1000 Club
 
Posts: 1946
Joined: Fri Dec 11, 2009 11:20 pm
Location: SW Idaho

Re: #1

Postby GPW » Mon Aug 15, 2016 6:31 am

Looking Good !!! Even on the bottom !!! :thumbsup: 8)
There’s no place like Foam !
User avatar
GPW
Gold Donating Member
 
Posts: 14912
Images: 546
Joined: Thu Feb 09, 2006 7:58 pm
Location: New Orleans

Re: #1

Postby ghcoe » Wed Aug 31, 2016 7:43 pm

GPW wrote:Looking Good !!! Even on the bottom !!! :thumbsup: 8)


Thanks... :thumbsup:

I had a lot of irons in the fire last weekend and am just now getting some time to update. I got the last of the 2"x2"s bolted onto the floor. Since I lifted it with 2"x2"s I had a unsightly 2"x2" at the back of the galley........

DSCF4627.JPG
Before
DSCF4627.JPG (151.39 KiB) Viewed 10918 times


I used a bit of flashing to hide it .

DSCF4628.JPG
After
DSCF4628.JPG (156.12 KiB) Viewed 10918 times


I ran the wiring along the bottom (no :pictures: ) and installed electrical boxes at key locations. I got started with the battery/electrical/stowage tongue box (no :pictures: )
George.

Gorrilla Glue, Great Stuff and Gripper. The three G's of foamie construction.

My build viewtopic.php?t=54099
Working with flashing for foamie construction viewtopic.php?f=55&t=60303
Making a hot wire http://tnttt.com/viewtopic.php?f=55&t=55323
User avatar
ghcoe
1000 Club
1000 Club
 
Posts: 1946
Joined: Fri Dec 11, 2009 11:20 pm
Location: SW Idaho
Top

Re: #1

Postby ghcoe » Wed Aug 31, 2016 7:50 pm

I also got the new tail lights installed. I still wanted to run LED's so I replaced the filament bulb with some LED lights I had laying around from another project. I found some screws that looked like they would work real well for foamies. They have a larger surface area and a longer pitch than other screws (bottom of :pictures: ). I figured that they may work well in softer materials. :twisted:

DSCF4629.JPG
Tail light
DSCF4629.JPG (150.92 KiB) Viewed 10918 times


I think they are actually for sheet metal, but worked real well in fastening the lights to the foam.

DSCF4630.JPG
Installed
DSCF4630.JPG (156.56 KiB) Viewed 10918 times
:thumbsup:
George.

Gorrilla Glue, Great Stuff and Gripper. The three G's of foamie construction.

My build viewtopic.php?t=54099
Working with flashing for foamie construction viewtopic.php?f=55&t=60303
Making a hot wire http://tnttt.com/viewtopic.php?f=55&t=55323
User avatar
ghcoe
1000 Club
1000 Club
 
Posts: 1946
Joined: Fri Dec 11, 2009 11:20 pm
Location: SW Idaho
Top

Re: #1

Postby GPW » Thu Sep 01, 2016 5:17 am

Really came together nicely ... :thumbsup: 8)
There’s no place like Foam !
User avatar
GPW
Gold Donating Member
 
Posts: 14912
Images: 546
Joined: Thu Feb 09, 2006 7:58 pm
Location: New Orleans
Top

Re: #1

Postby OP827 » Sun Sep 04, 2016 10:37 pm

Very nice work and it must be very light! :thumbsup: Canvas covering result looks just great!
User avatar
OP827
Donating Member
 
Posts: 1556
Images: 405
Joined: Fri Apr 25, 2014 7:27 pm
Location: Bruce County Ontario
Top

Re: #1

Postby ghcoe » Mon Sep 05, 2016 8:57 pm

OP827 wrote:Very nice work and it must be very light! :thumbsup: Canvas covering result looks just great!


Thanks, I am very pleased with how the canvas laid down. I weighed it a few weeks back. At that time with everything that still needed to be installed inside it weighed 480lbs. I still have to make the storage/battery box for the front though. I think is should come in at 500lbs dry weight when all is done.
George.

Gorrilla Glue, Great Stuff and Gripper. The three G's of foamie construction.

My build viewtopic.php?t=54099
Working with flashing for foamie construction viewtopic.php?f=55&t=60303
Making a hot wire http://tnttt.com/viewtopic.php?f=55&t=55323
User avatar
ghcoe
1000 Club
1000 Club
 
Posts: 1946
Joined: Fri Dec 11, 2009 11:20 pm
Location: SW Idaho
Top

Re: #1

Postby ghcoe » Sun Oct 02, 2016 3:34 pm

Wow nearly a month since a update. Well not that much happened till this weekend anyway. A few weeks back I did get the vent installed. Could not find the recommended adhesive so I decided to try some Gorilla Glue adhesive I found in calk gun form. Seemed to work pretty good with a test piece I tried it on so thought I would go ahead and give it a try.

DSCF4639.JPG
Gorilla
DSCF4639.JPG (149.33 KiB) Viewed 10624 times


DSCF4638.JPG
Vent
DSCF4638.JPG (150.32 KiB) Viewed 10624 times


I was going to work on the ceiling canvas Saturday, but realized that I needed to apply Gripper to the walls and ceiling first :roll: . So I applied a coat of Gripper after wiping everything down with alcohol. Since I needed to wait for the paint to dry I worked on the electrical some. I got the fuse box, voltage regulator and battery box installed and working.

DSCF4650.JPG
Electrical
DSCF4650.JPG (147.77 KiB) Viewed 10624 times
Last edited by ghcoe on Sun Oct 02, 2016 10:04 pm, edited 1 time in total.
George.

Gorrilla Glue, Great Stuff and Gripper. The three G's of foamie construction.

My build viewtopic.php?t=54099
Working with flashing for foamie construction viewtopic.php?f=55&t=60303
Making a hot wire http://tnttt.com/viewtopic.php?f=55&t=55323
User avatar
ghcoe
1000 Club
1000 Club
 
Posts: 1946
Joined: Fri Dec 11, 2009 11:20 pm
Location: SW Idaho
Top

Re: #1

Postby ghcoe » Sun Oct 02, 2016 3:59 pm

A few more pictures of the electrics and lights.

DSCF4651.JPG
Close electrical
DSCF4651.JPG (146.85 KiB) Viewed 10618 times


DSCF4646.JPG
Lights on
DSCF4646.JPG (153.3 KiB) Viewed 10618 times


DSCF4646.JPG
Lights on
DSCF4646.JPG (153.3 KiB) Viewed 10618 times
Attachments
DSCF4649.JPG
Light on
DSCF4649.JPG (143.3 KiB) Viewed 10618 times
George.

Gorrilla Glue, Great Stuff and Gripper. The three G's of foamie construction.

My build viewtopic.php?t=54099
Working with flashing for foamie construction viewtopic.php?f=55&t=60303
Making a hot wire http://tnttt.com/viewtopic.php?f=55&t=55323
User avatar
ghcoe
1000 Club
1000 Club
 
Posts: 1946
Joined: Fri Dec 11, 2009 11:20 pm
Location: SW Idaho
Top

Re: #1

Postby ghcoe » Sun Oct 02, 2016 4:17 pm

Sunday I started on the ceiling canvasing. Been thinking how to do this one for some time now.

I rolled up the canvas onto a board. I then rigged up some wood to support the rolled up canvas about 8"-10" below the ceiling.

DSCF4652.JPG
canvas
DSCF4652.JPG (147.18 KiB) Viewed 10614 times


DSCF4653.JPG
Canvas rolled up
DSCF4653.JPG (153.04 KiB) Viewed 10614 times


DSCF4654.JPG
Supported
DSCF4654.JPG (147.46 KiB) Viewed 10614 times
George.

Gorrilla Glue, Great Stuff and Gripper. The three G's of foamie construction.

My build viewtopic.php?t=54099
Working with flashing for foamie construction viewtopic.php?f=55&t=60303
Making a hot wire http://tnttt.com/viewtopic.php?f=55&t=55323
User avatar
ghcoe
1000 Club
1000 Club
 
Posts: 1946
Joined: Fri Dec 11, 2009 11:20 pm
Location: SW Idaho
Top

Re: #1

Postby ghcoe » Sun Oct 02, 2016 4:50 pm

At first I used full strength TBII. My thinking is that it would stick better to the canvas and hold. After the first lay up I thinned it down just enough for the brush to feel like it was gliding across the surface. The full strength glue was just too hard to get to spread. It also seemed to stick better to the canvas. I think that the thinned TBII was able to flow into the canvas better than the full strength. When I started the canvas did not want to stick well and kept falling down. I let the glue dry just a bit and tried again. It started to stick. Not well, but progress :thumbsup: . I wetted the canvas with the spray bottle in a attempt to get it to stick better and pull the glue into the fibers. Not dripping wet, but well wetted. It stuck. :worship:

DSCF4659.JPG
Gluing
DSCF4659.JPG (158.67 KiB) Viewed 10631 times


Once the canvas appeared to be sticking good I pushed the rolled canvas under the stuck canvas so I had access the ceiling again. At this point is where I decided to thin the TBII some. Also, I decided not to try and glue all the way to the wall and leave a 2" section unglued. Just too hard to work in this area. This went better than the first section. I was able to unroll the canvas and position under the area I just glued. Then I would pull out the canvas in the center with my hand and then roll out from center to the edges with my roller.

DSCF4660.JPG
Canvas out of the way
DSCF4660.JPG (147.24 KiB) Viewed 10631 times


DSCF4661.JPG
Moved into place for gluing
DSCF4661.JPG (145.48 KiB) Viewed 10631 times


I still had some issues to address. The first piece was starting to pull away from the edges some. Rolled them back out and though I need something to hold the edges down. Luckily I had some push pins handy and a method was born...... :thinking:
George.

Gorrilla Glue, Great Stuff and Gripper. The three G's of foamie construction.

My build viewtopic.php?t=54099
Working with flashing for foamie construction viewtopic.php?f=55&t=60303
Making a hot wire http://tnttt.com/viewtopic.php?f=55&t=55323
User avatar
ghcoe
1000 Club
1000 Club
 
Posts: 1946
Joined: Fri Dec 11, 2009 11:20 pm
Location: SW Idaho
Top

Re: #1

Postby ghcoe » Sun Oct 02, 2016 5:04 pm

The push pins worked great. I would use them along the edges in the non-glued area. I then was able to roll out the canvas to the glue line and put a pin in and repeat. This allowed the canvas to drape better and not pull down when I adjusted the roll.

DSCF4665.JPG
Push pins
DSCF4665.JPG (152.2 KiB) Viewed 10628 times


DSCF4664.JPG
Canvas draped
DSCF4664.JPG (146.3 KiB) Viewed 10628 times


After this the problem I had was with the curve. This would be the place to preshrink the canvas. As it dries and shrinks it tends to pull away from the ceiling. I kept rolling it about every 5 minutes until I felt it was dried enough. Still had a little bit of canvas that pulled away. I will have to wait to fix that on another day though.

DSCF4668.JPG
Curve
DSCF4668.JPG (144.11 KiB) Viewed 10628 times


I think if I would have continued to roll the canvas down for a few more times it would have been ok. :NC .
George.

Gorrilla Glue, Great Stuff and Gripper. The three G's of foamie construction.

My build viewtopic.php?t=54099
Working with flashing for foamie construction viewtopic.php?f=55&t=60303
Making a hot wire http://tnttt.com/viewtopic.php?f=55&t=55323
User avatar
ghcoe
1000 Club
1000 Club
 
Posts: 1946
Joined: Fri Dec 11, 2009 11:20 pm
Location: SW Idaho
Top

Re: #1

Postby KCStudly » Mon Oct 03, 2016 2:38 pm

As ever, you have used a systematic approach and have achieved excellent results! :thumbsup: :applause:
KC
My Build: The Poet Creek Express Hybrid Foamie

Poet Creek Or Bust
Engineering the TLAR way - "That Looks About Right"
TnTTT ORIGINAL 200A LANTERN CLUB = "The 200A Gang"
Green Lantern Corpsmen
User avatar
KCStudly
Donating Member
 
Posts: 9613
Images: 8169
Joined: Mon Feb 06, 2012 10:18 pm
Location: Southeastern CT, USA
Top

Re: #1

Postby GPW » Mon Oct 03, 2016 4:49 pm

We cheated and used bed sheets inside Foamie #1 , and it was a lot easier than trying to hang a heavy canvas overhead ... ;) The heavy outer canvas does all the sock work really ... inside is just to protect the foam from the “kickers” ... Makes it look nice too ...

We have vowed that on future builds , we’ll do then inside covering on a nice flat table BEFORE assembly ... So much easier ...
There’s no place like Foam !
User avatar
GPW
Gold Donating Member
 
Posts: 14912
Images: 546
Joined: Thu Feb 09, 2006 7:58 pm
Location: New Orleans
Top

Re: #1

Postby ghcoe » Mon Oct 03, 2016 6:02 pm

KCStudly wrote:As ever, you have used a systematic approach and have achieved excellent results! :thumbsup: :applause:


Thanks.

KCStudly wrote:As ever, you have used a systematic approach and have achieved excellent results! :thumbsup: :applause:


I agree. Next foamie will have canvas applied before installation. The only problem I can see is if you have a curve. No way to make kerfs unless you go with the two sheets with kerfs sandwiched in between. Still might be a problem on bigger builds though.
George.

Gorrilla Glue, Great Stuff and Gripper. The three G's of foamie construction.

My build viewtopic.php?t=54099
Working with flashing for foamie construction viewtopic.php?f=55&t=60303
Making a hot wire http://tnttt.com/viewtopic.php?f=55&t=55323
User avatar
ghcoe
1000 Club
1000 Club
 
Posts: 1946
Joined: Fri Dec 11, 2009 11:20 pm
Location: SW Idaho
Top

PreviousNext

Return to Foamies

Who is online

Users browsing this forum: No registered users and 27 guests