Teardrops n Tiny Travel Trailersor t n ttt for short (tnttt.com) |

#1
Moderator: eaglesdare
Re: #1
![]() by S. Heisley » Mon Oct 03, 2016 10:06 pm
by S. Heisley » Mon Oct 03, 2016 10:06 pm
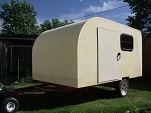
The next foamie? You're going to build another? (This one is looking very good, by the way.)
...Sharon....
I think I can...I THINK I can...I THINK; I CAN! (I think I did it!)
http://www.doityourselfrv.com/handcraft ... g-trailer/
viewtopic.php?f=50&t=27313&start=555
http://www.squidoo.com/painting-a-campi ... ramebuster

I think I can...I THINK I can...I THINK; I CAN! (I think I did it!)
http://www.doityourselfrv.com/handcraft ... g-trailer/
viewtopic.php?f=50&t=27313&start=555
http://www.squidoo.com/painting-a-campi ... ramebuster
-

S. Heisley - Super Lifetime Member
- Posts: 8774
- Images: 495
- Joined: Mon Sep 17, 2007 10:02 am
- Location: No. California
Re: #1
![]() by OP827 » Mon Oct 03, 2016 11:28 pm
by OP827 » Mon Oct 03, 2016 11:28 pm
ghcoe wrote:...
I agree. Next foamie will have canvas applied before installation. The only problem I can see is if you have a curve. No way to make kerfs unless you go with the two sheets with kerfs sandwiched in between. Still might be a problem on bigger builds though.
I was just thinking if you apply canvas while your internal roof piece is cut to size but still flat, then cut your kerfs as you did in your build on the other foam side before you glue two pieces together in a curve, then this should work fine, right?
-

OP827 - Donating Member
- Posts: 1556
- Images: 405
- Joined: Fri Apr 25, 2014 7:27 pm
- Location: Bruce County Ontario
 .
.