Newbie Looking Leaning Towards a Foamie (My Question Thread)

Canvas covered foamies (Thrifty Alternatives...)

Moderator: eaglesdare

Re: Newbie Looking Leaning Towards a Foamie

Postby Mary C » Fri Feb 07, 2014 9:12 pm

KC, I have to harass you and Js a little, like I said i am using the KISS method and ya'll do not bother me a bit I just thought I would harass you two a little. Now I have not thought about where I am going to put the A/C this week, so I will not pay attention to that decision. Js you just plan away but don't get too attached to any one idea I can tell already that you are still planning. I am working on the wood for my Wiley windows. Js, you are doing great :thumbsup: even if only planning!!!!! Take one thing at a time, and keep it fun!!!! :lol: :lol:

Mary C. :lady:

I got my HF sale paper, gotta go study it!!!!!
User avatar
Mary C
1000 Club
1000 Club
 
Posts: 1776
Images: 473
Joined: Mon Oct 15, 2012 6:29 pm
Location: Waco, Georgia

Re: Newbie Looking Leaning Towards a Foamie

Postby jseyfert3 » Fri Feb 07, 2014 9:54 pm

Mary C wrote:KC, I have to harass you and Js a little, like I said i am using the KISS method and ya'll do not bother me a bit I just thought I would harass you two a little. Now I have not thought about where I am going to put the A/C this week, so I will not pay attention to that decision. Js you just plan away but don't get too attached to any one idea I can tell already that you are still planning. I am working on the wood for my Wiley windows. Js, you are doing great :thumbsup: even if only planning!!!!! Take one thing at a time, and keep it fun!!!! :lol: :lol:

Mary C. :lady:

I got my HF sale paper, gotta go study it!!!!!

I know, plans can change quick. I'm just afraid if I think of only one step at a time, I may have to undo that step because I didn't think about running wiring or something. :? :D

Also, I'm not only planning, I am building (slowly) too. You posted on the thread I talked about ruining a bearing and seal, cause I was trying to pack the bearings. Because my HF trailer is assembled, besides bolting on the coupler, fenders, and tires. It's not upside down anymore either, it's upside right and I'm planning on attaching the floor mounting brackets tonight, and getting 1x4's soon to start assembling my sub-floor. :thumbsup:
Image
Trailer - 90% Assembled by jseyfert3, on Flickr
User avatar
jseyfert3
Teardrop Master
 
Posts: 285
Images: 1
Joined: Sun Jan 05, 2014 9:13 am
Location: Peoria, IL, USA

Re: Newbie Looking Leaning Towards a Foamie

Postby jseyfert3 » Sat Feb 08, 2014 1:40 am

I needed to mount my vise, but discovered the mounting bolts where too short for the bench at my house. The only other bolts I had were too long, until my eye fell on some 2x4 scraps laying around. Long bolt problem solved, no new bolts needed. :D
Image
Vise Mount by jseyfert3, on Flickr

After I got that mounted, I made a corner bracket to mount the end cross beam 1x4s, using the vise and a hammer.
Image
Patent Pending Corner Bracket by jseyfert3, on Flickr

That, and a little clearing of the garage is all I feel like doing tonight though, it's popcorn and Star Trek time, then bedtime. :yes:
User avatar
jseyfert3
Teardrop Master
 
Posts: 285
Images: 1
Joined: Sun Jan 05, 2014 9:13 am
Location: Peoria, IL, USA
Top

Re: Newbie Looking Leaning Towards a Foamie

Postby KCStudly » Sat Feb 08, 2014 9:11 am

Nice job on the corner bracket. :thumbsup:

That should work just fine.
KC
My Build: The Poet Creek Express Hybrid Foamie

Poet Creek Or Bust
Engineering the TLAR way - "That Looks About Right"
TnTTT ORIGINAL 200A LANTERN CLUB = "The 200A Gang"
Green Lantern Corpsmen
User avatar
KCStudly
Donating Member
 
Posts: 9613
Images: 8169
Joined: Mon Feb 06, 2012 10:18 pm
Location: Southeastern CT, USA
Top

Re: Newbie Looking Leaning Towards a Foamie

Postby jseyfert3 » Sun Feb 09, 2014 12:39 am

KCStudly wrote:A/C location is always a compromise. I don't plan on having one, but have read all I can so can pass on what I have read.

Up front can create an issue with weather tightness since driving forces rainwater in thru any chink in the "weather proofing armor". Also, some people don't like the cool air drifting down on their heads.

Galley mounted units need careful attention to sealing the area underneath, "the pan", and a means to control drainage. They take up room in the galley and several have had venting/crosstalk/heat soak issues due to improper venting and duct routing.

Some have made adapters that allow them to remove a side door and install the A/C in place of, but they usually give up the use of the door (no bueno).

GPW's Foamstream has a side hatch that will allow him to pop the unit in when needed, but then his is a larger camper and has room for that.

Divorce :thumbdown: d units where the unit sits on the ground next to the camper or on the tongue may have portable or permanent hoses to duct the air to and from, but you will need to hack the thermostat and controls for remote operation, and build the necessary shrouds.

In any case, they have to be mounted high enough that the bedding does not interfere with the ducting.

Oakinteriors is currently working on a rather ingenious install where he made built in ducts between his bulkhead and rear cabinets, and is mounting the unit hanging on a sliding rail under the floor. Travels onboard, but slides into position underneath during camp setup. Don't need it, leave it at home.

Many people don't bother, depending on the climate where they camp.

Look at Aggie79/Tom's Silver Beatle. He uses a Pet Cool unit mounted in the tongue box. Planovet's Little Swiss has his mounted behind the bulkhead. Other build's from Texas seem to have the bugs worked out since A/C is a "must have" for that region.

Hmm. :thinking:

I'm still thinking that mounting it under slung, but with no fancy slide-in/slide-out mechanism may satisfy getting it out of the way since they take up a lot of space in a 5' x 8' TD, but still be a fairly simple (not quite KISS) install. Hardest part is protecting from road debris and ducting, but remote switches and controls are no problem at all. In fact I was planning on modifying the controls with a small microcontroller to tweak operation to my liking and hold a better temp, if possible in such a small, insulated area.

That also means a portable unit connected with hoses is no issue for me, as I do not fear the controls (in fact would be a fun mini-project :D ), but an portable unit needs to be stored somewhere while moving, lifted in and out at least four times per trip, connected and unconnected, etc. I think I'd rather take the weight penalty for always dragging it around if it's both out of the way and no need to mess with it.

What I'm thinking is if I mount it under the floor like the battery, I'd run ducting below the floor, and up into the TD at the foot (by the galley) of the bed, raised so our feet don't freeze. The A/C would pull fresh air in from underneath the TD and cool it, push it into the back of the TD sleeping area, to the front of the bed, where it would enter vents in the "headboard" of the bed, through more ducting to vents in the bottom front of the trailer.

This particular setup also means with rain and no AC required, windows could stay shut but a roof vent pulling air out (with a rain hood), would pull fresh air in the vents at the front in the headboard, right past our faces while we sleep.

Pros of this particular setup: Fairly easy to do, no fancy moving mechanisms required. AC does not need to be loaded/setup every time. Vents near front and the vents for the AC in the rear double as fresh air intakes with a roof vent exhausting air, if AC is not running, which allows fresh air with windows shut for rain/noise, and requires no visible vents on the outside of the TD besides the roof vent, a big plus. Takes up no space inside the TD except for the rear vents (front vents take up no practical space).

Cons: There is custom ductwork of some sort required (one time deal), remote controls (not even really a con for myself with my Arduino microcontroller/minor electronics experience), not easy to access AC unit for cleaning, requires a waterproof/dustproof enclosure to protect from road spray/debris, probably including a panel that can shut while traveling and open to allow condensor coil heat exchange (I wonder how difficult an automatic electronic panel would be, open when AC is in use, close when AC is shut off...). A manually opened panel should not be terribly difficult however.

Ever heard of an AC install like how I'm envisioning it? Need a 3D sketch?

Anyhow, I really have to get off here and GO WORK ON MY TRAILER! Enough planning, planning doesn't actually build. Got enough computer stuff done today, I have Windows installed as a virtual machine on Ubuntu now, I was tired of rebooting my computer into Windows just to work on my Sketchup model then boot back into Ubuntu for everything else. I'm installing Windows updates as I type on my laptop's monitor while Firefox is open on my 21" desktop monitor connected to my laptop (I no longer use a desktop) which is running Ubuntu.
Image
Screenshot from 2014-02-08 23:37:51 by jseyfert3, on Flickr

<Edited because I put evaporator coil and I meant condensor coil.>
Last edited by jseyfert3 on Sun Feb 09, 2014 1:15 am, edited 1 time in total.
User avatar
jseyfert3
Teardrop Master
 
Posts: 285
Images: 1
Joined: Sun Jan 05, 2014 9:13 am
Location: Peoria, IL, USA
Top

Re: Newbie Looking Leaning Towards a Foamie

Postby KCStudly » Sun Feb 09, 2014 1:01 am

Before you make any final decisions on the A/C, I highly recommend that you study up on other peoples successes and failures. There are a lot of threads on A/C. (Use the Google search feature in the header.)

Some of the issues that people before you have had with a total loss system (non-recirculating) is that they do not get the dehumidification benefit, which is a big contributor to comfort level in hot muggy weather. Also, icing of the evaporator and short cycling are common problems with this setup (IIRC).

On the flip side, not having good separation between the condenser and evaporator air flows, and choking off the flow with add on ducting are regular pitfalls that people run into. Study up.

Don't assume that you can pull outside air thru an A/C when it is not running. For some reason that doesn't sound right to me (tho I am certainly far from an expert on this subject). I suppose if the vent feature is a manually selectable mechanical device, then yes; but that is another operator that would need to be "remotified".
KC
My Build: The Poet Creek Express Hybrid Foamie

Poet Creek Or Bust
Engineering the TLAR way - "That Looks About Right"
TnTTT ORIGINAL 200A LANTERN CLUB = "The 200A Gang"
Green Lantern Corpsmen
User avatar
KCStudly
Donating Member
 
Posts: 9613
Images: 8169
Joined: Mon Feb 06, 2012 10:18 pm
Location: Southeastern CT, USA
Top

Re: Newbie Looking Leaning Towards a Foamie

Postby jseyfert3 » Sun Feb 09, 2014 1:45 am

KCStudly wrote:Before you make any final decisions on the A/C, I highly recommend that you study up on other peoples successes and failures. There are a lot of threads on A/C. (Use the Google search feature in the header.)

Some of the issues that people before you have had with a total loss system (non-recirculating) is that they do not get the dehumidification benefit, which is a big contributor to comfort level in hot muggy weather. Also, icing of the evaporator and short cycling are common problems with this setup (IIRC).

On the flip side, not having good separation between the condenser and evaporator air flows, and choking off the flow with add on ducting are regular pitfalls that people run into. Study up.

Don't assume that you can pull outside air thru an A/C when it is not running. For some reason that doesn't sound right to me (tho I am certainly far from an expert on this subject). I suppose if the vent feature is a manually selectable mechanical device, then yes; but that is another operator that would need to be "remotified".

Hmm, there would be at least some dehumidification. I know that's important though, so I will definitely look into that. Seems I read about someone doing a total loss system to allow better dehumidification, his thinking IIRC was that in such a small, well insulated area, it cools down so fast and stays cold so long it doesn't run long enough to remove the humidity. Not only is there initial humidity, but humidity build up from the occupants as well. I can see how fresh air could contribute to icing, due to high humidity of the outside air, however, I fail to see why it would cause short cycling, unless the short cycling was due to the evaporator coil icing. On the flip side, if you do not recall correctly, fresh air is also warmer, so I can see it helping to prevent icing.

Either way, I do need fresh air throughout the night. Hmm...(Mary, that "Hmm" means what follows is definitely not the KISS method. :lol: ). I wonder if I could set up a recirculating A/C with a DIY heat exchanger of some sort to allow waste condenser coil heat to warm some part of the air using a diverter. This would allow the AC to go into dehumidification mode where it dehumidifies without heating or cooling. Then either allow a small amount of fresh air in while running or use vents for fresh breathing air.

Dehumidification actually does have a KISS method though. Use a 1500 W tiny space heater, which is 5100 BTU, which balances the 5000 BTU A/C. 8) This would require 20 A wiring and a 20 A outlet (most State Parks around here have 20 A 120 VAC outlets, IIRC), or two 15 A outlets and two 15 A circuits. Also stays with the KISS methodology as I wanted a heater. Pretty simple to control, have a humidity sensor with microcontroller and when humidity is too high it kicks on both the heater and A/C till the humidity drops, and if it starts getting too hot or cold cause one or the other is "winning", simply shuts that one off till the other "catches up". Not efficient in the least but fairly KISS, IMO for my capabilities.
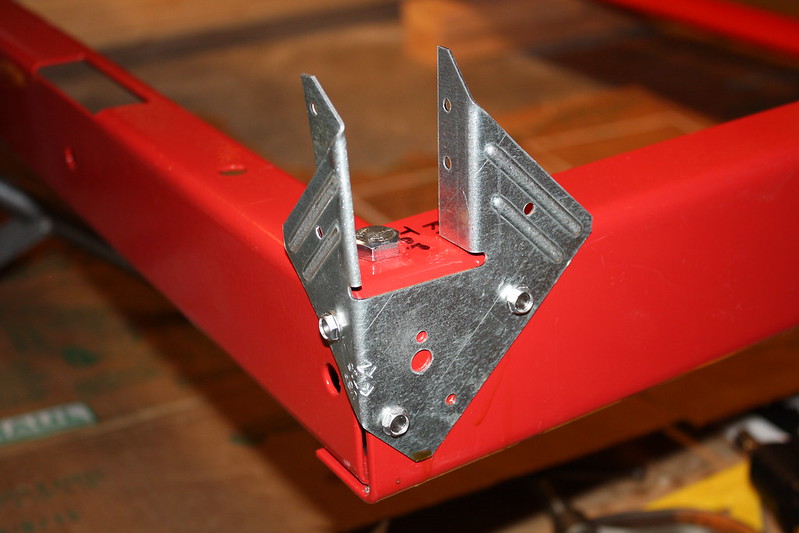
If there was a way to dehumidify and control temp automatically like that, not much harder to add in a small diverter that uses the A/C fans to bring in fresh air every so often for breathing. Not all the time to prevent icing and keep the humidity down, but enough to take out the CO2 and bring in O2.

I understand that it may not sound very KISS, but controlling the humidity automatically seems like the best way to me to help prevent a few problems and make up for the fact the A/C is grossly oversized for such a small, well insulated space. However, before I build, I will most definitely research what already works for people here, as you said. I know that icing, or being cold but muggy would be no fun.

I thought up this dehumidification method of heater balancing A/C while sitting here typing. :thinking:

Anyhow, I did get into the garage before coming back here to reply, check it out. Your idea, beginning implementation. :thumbsup:
Image
First Hurricane Tie Mounted by jseyfert3, on Flickr
User avatar
jseyfert3
Teardrop Master
 
Posts: 285
Images: 1
Joined: Sun Jan 05, 2014 9:13 am
Location: Peoria, IL, USA
Top

Re: Newbie Looking Leaning Towards a Foamie

Postby KCStudly » Sun Feb 09, 2014 10:28 am

The brackets look like they are going to work great for you.

I can't take credit for the idea, tho, I'm sure someone here had the idea first and I just was able to pull it up from the gray area in my head. :D
KC
My Build: The Poet Creek Express Hybrid Foamie

Poet Creek Or Bust
Engineering the TLAR way - "That Looks About Right"
TnTTT ORIGINAL 200A LANTERN CLUB = "The 200A Gang"
Green Lantern Corpsmen
User avatar
KCStudly
Donating Member
 
Posts: 9613
Images: 8169
Joined: Mon Feb 06, 2012 10:18 pm
Location: Southeastern CT, USA
Top

Re: Newbie Looking Leaning Towards a Foamie

Postby Mary C » Sun Feb 09, 2014 11:57 am

I am seriously thinking about just building or finding some type of stand to set the A/C next to the open door of the TD and building some type of cover (a piece of Foam) to set above it to close off the outside air, similar to Eagles A/C set up. I don't plan to use it often but in the south we get high humidity and need the cooling. so for now, I will keep thinking about that to a minimum I still have other things to think about. Gotta go sand some wood..................

Mary C. :lady:
User avatar
Mary C
1000 Club
1000 Club
 
Posts: 1776
Images: 473
Joined: Mon Oct 15, 2012 6:29 pm
Location: Waco, Georgia
Top

Re: Newbie Looking Leaning Towards a Foamie

Postby ParTaxer » Sun Feb 09, 2014 6:29 pm

If you can do without one of the doors when needing A/C, I did just what Mary C is talking about. I cut a piece of mdf to fit the door after the window unit was placed on the low end of the door. Both the A/C unit and the panel are secured from the inside. I only take it along when heat will be intolerable.

Mike W
I have wisdom beyond my years. In fact, I'm nearly senile.
User avatar
ParTaxer
The 300 Club
 
Posts: 391
Images: 32
Joined: Sat Mar 10, 2007 5:37 pm
Location: Louisville, KY
Top

Re: Newbie Looking Leaning Towards a Foamie

Postby jseyfert3 » Mon Feb 10, 2014 12:23 pm

Okay, I needed to post about this, and I see you posted on my build journal already, covering some of my question. I pulled your quote here so that I'm not filling my build journal with questions though. You comment about brackets over the axle was:
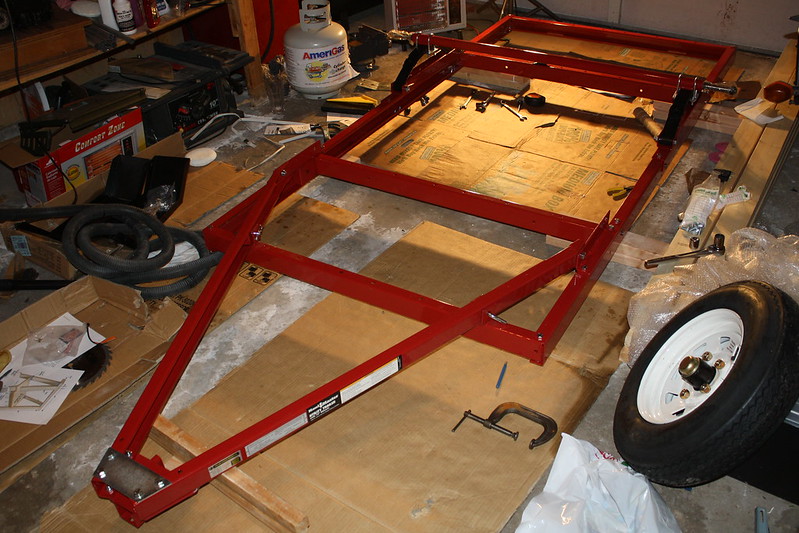
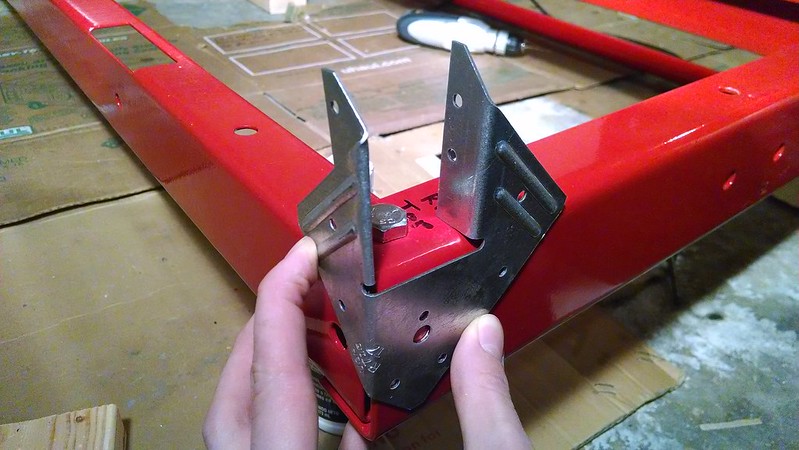
KCStudly wrote:You could leave out the brackets at the axle mount. You have plenty of anchor points with the rest, the wood side rails will tie that xmbr in, and it will be bearing on the steel anyway. IMO, Skip it. :thumbsup:

However, before I saw this, as I was falling asleep last night, I realised I had done something wrong. The brackets I had not mounted almost directly over the axle where to hold another 1x4 to keep them at 18" center to center spacing. Look at these pictures and see if you can tell where I messed that up.
Image
Fender (1) by jseyfert3, on Flickr

Image
Fender (2) by jseyfert3, on Flickr

Yup, that's right. I forgot about the damn tires. :x Didn't help that I didn't have them mounted, if they had been mounted I think the problem would have slammed me in the face while I was measuring. I didn't entirely forget about them, I used the model, determined that the fenders would fit nicely between the 1x4s as planned...when I was planning 2' center to center spacing...

Therefore, I'm left with three options. First, move the brackets around. Second, put in a crossbeam over the axle, screwing it into only the brackets and the floor. This crossbeam would only be able to extend the width of the steel, so it would be a floor support only and would not support the edges and hence the TD, but that probably wouldn't be an issue. Third, put nothing there. I don't like that because that leaves a 3' span, which holds the bottom half of the bed. The bottom half of the bed is not where most of the weight is, but that's still a long gap.

I'm leaning towards option #2, I think the TD itself has plenty of support without the beam, so the beam would be just to support the floor there. It also will be needed to support the battery, which I planned to do an underslung mount just forward of the axle, and possibly my AC, which I'm still considering to mount in the same manner. Do you see any concerns with the beam over the axle just supporting the floor and being one of the battery/AC mounts and not running to the edge, and hence supporting the walls and the 1x4 that runs front to rear? I don't see that being an issue, I just wanted a second opinion.

What did I learn? Keep pushing forward, just make sure you measure when all relavant objects are in place or at least take into account there future presence. Good news is that this is a fairly minor mistake that shouldn't cost any money or much time. :thumbsup:

As a partially related observation now that I popped the fender on to measure, I realized that the outer part of the fender sticks out 7.75" from the edge of my frame, which means the outer edge of the 1x4 that runs front to back will be 9.5" out from the edge of the steel, which means my trailer width will be a mimimum of 5'7.5" width, just slightly wider then the 5'5" I was planning for, but it also means I couldn't shrink it by using say, a full XL bed (7" narrower then a queen), because there is the space of the tire + clearance you have to build either on the inside or outside, unless you aren't running a 1x4 the entire length front to back, which would mean a more complicated build. This is not, however, an issue, just a comment. 5'7.5" is find for the width. However, it also means I have to make sure that a 1x4 covering the upper outside of the fender leaves enough room to mount and remove my tires. I believe that is the case but will measure once I get my bearings and seals and get the hubs assembled and placed on the trailer. Then I will mock up the 1x4 on the edge of the fender and try removing/mounting the tire.
User avatar
jseyfert3
Teardrop Master
 
Posts: 285
Images: 1
Joined: Sun Jan 05, 2014 9:13 am
Location: Peoria, IL, USA
Top

Re: Newbie Looking Leaning Towards a Foamie

Postby Mary C » Mon Feb 10, 2014 2:07 pm

As my mentor would say Did you leave the bolts where the tire would come up and scrub against them?

106806

I put my bolts in from the underside so if I did hit a bump and the tire did bounce up it would not hit the extended bolt and blow the tire. Just a hint.

Mary C. :lady:
User avatar
Mary C
1000 Club
1000 Club
 
Posts: 1776
Images: 473
Joined: Mon Oct 15, 2012 6:29 pm
Location: Waco, Georgia
Top

Re: Newbie Looking Leaning Towards a Foamie

Postby jseyfert3 » Mon Feb 10, 2014 2:20 pm

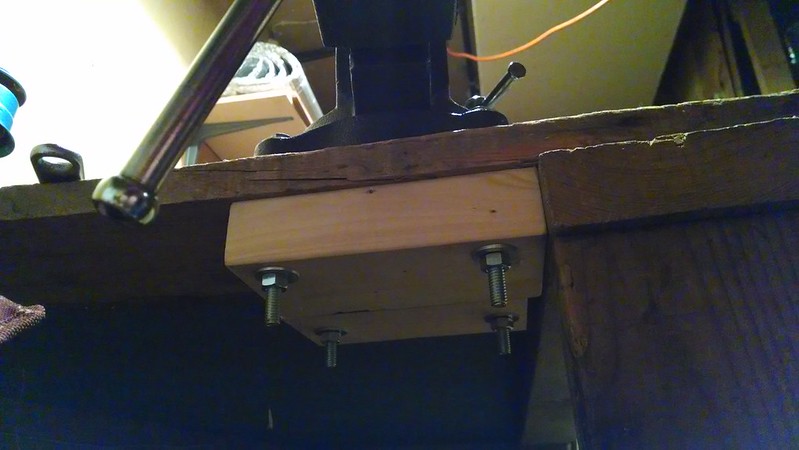
Mary C wrote:As my mentor would say Did you leave the bolts where the tire would come up and scrub against them?

106806

I put my bolts in from the underside so if I did hit a bump and the tire did bounce up it would not hit the extended bolt and blow the tire. Just a hint.

Mary C. :lady:

Thank you Mary, that's a very good point. :thumbsup:

I went out and measured, and there is about at least 3" of space between the top of the tire and the fender, and the bolts stick out a bit more then 1/2". But, the shocks can only compress about 2" before the top of the U-bolts hit the axle mount, which would stop the axle before the tire hit the bolts.

I was thinking that I may just attach the fenders to the floor of the teardrop with bolts in the corners of the flat area, that way the bolts are a long way from the tire, plus the fender brackets put the fender top about 4" off the top of the steel, it can't be more then 3.5" because that's the height of my 1x4's. Without the pointing bolts, I should be able to drop the fender at least an inch from stock to allow it to fit under the floor with 1/2" or so of insulation to prevent condensation on the inside during the winter.
User avatar
jseyfert3
Teardrop Master
 
Posts: 285
Images: 1
Joined: Sun Jan 05, 2014 9:13 am
Location: Peoria, IL, USA
Top

Re: Newbie Looking Leaning Towards a Foamie

Postby KCStudly » Mon Feb 10, 2014 4:19 pm

Slow down a minute and think a little slower.

Let's recap: 1) you have several threads going all at the same time and it is getting confusing. There's nothing wrong, IMO, with asking for help in your build thread. If you don't get an answer, or one that makes sense to you, sure, ask in general or tips (either way, be sure to link them to make it convenient for the reader); 2) you are trying to build your floor flat with the ply supported just above the fenders; and 3) at 18 inches on center you have a xmbr that lands where the fender support and wheel are.

So I am assuming that you will use two (or more) partial pieces of ply to get the 57+ inch width with a seam 3x18=48 inches from the back, landing on one of the xmbrs and you want to extend the xmbrs wider so that the outer wooden rail passes by the outside of the fender.

Why not header behind the fender longitudinally along the frame rail on each side using the same 1x4 (...or was 1x3?), then 'T' the short xmbr into these headers. Like this...
Image

This gives you the option of cutting the outside rail down or out completely in front of the wheel (remember that the wall supports the floor, not the other way around). That way you could change the shape of the wheel arch more to your liking and ditch the little fenders. just be sure to protect the inner fender well... well :roll: ... 'er... well.

BobHenry had a tire cut down by one of those bolts. Maybe he had the larger tires, but don't forget that in the real world there are dynamics involved that you can't measure statically; centripetal tire growth, load and impact deflections, perhaps other factors. I like the idea of moving the fender fasteners away from the tread, but the fewer holes you put in your box, the less likely you are to have water get in and rot. The wheel wells need special attention because they will be constantly abused by sand, pebbles and flung water trying to attack your attempts to seal.
KC
My Build: The Poet Creek Express Hybrid Foamie

Poet Creek Or Bust
Engineering the TLAR way - "That Looks About Right"
TnTTT ORIGINAL 200A LANTERN CLUB = "The 200A Gang"
Green Lantern Corpsmen
User avatar
KCStudly
Donating Member
 
Posts: 9613
Images: 8169
Joined: Mon Feb 06, 2012 10:18 pm
Location: Southeastern CT, USA
Top

Re: Newbie Looking Leaning Towards a Foamie

Postby rowerwet » Mon Feb 10, 2014 4:46 pm

one cheap way to make wheel well liners, cut a plastic 55 gallon drum, with a heat gun you can make it almost any shape you want, and keep it hidden under the trailer.
User avatar
rowerwet
Gold Donating Member
 
Posts: 2075
Images: 521
Joined: Mon Apr 20, 2009 12:52 am
Location: Merrimack River Valley
Top

PreviousNext

Return to Foamies

Who is online

Users browsing this forum: No registered users and 24 guests