Was skyline now Mercury, tear inspired camper for six

Posted:
Thu Jan 16, 2014 7:04 amby rowerwet
alright I admit it, the real reason I'm slogging through the big thrifty thread is so I can build a foamie tear (I already have the name picked out) and make as few mistakes as possible.
last night I started by testing the glue I plan on using to stick foam panels together PL300 made exactly for sticking foam to stuff (per the package)

Don't look for any updates for a while, I have some trailer swapping to do before it is on the road, and plan on building a foamie mouseboat first. It is the wrong time of year for building anyway unless I had a heated garage. (of course with the way this excuse for winter is going I may be building the tear very soon)
If this build goes anything like my last one, I won't have time to take pictures often.

Oh, and the wife thinks I'm about to build her a book shelf right now (only waited three years so far)
Re: now look what you did!
Posted:
Thu Jan 16, 2014 7:30 amby GPW
Row, Good Luck on that !!! We know you won’t have any problems !!!

Any pictures of your progress would be greatly appreciated ...

Re: now look what you did!
Posted:
Thu Jan 16, 2014 11:34 amby Mary C
Row, great I think you will find building a foamie is very different!!! By the way I tried to use the pl300 the glue in the tube. I know it held but it took longer to dry than the others even though it was stickie it did great for a very temp hold But after using up the first tube I found that at the rate i was using it it would take 25 to 30 tubes and That was not thrifty.

I decided that because of the cost I would do better with TBII. I still have two tubes I didn't use. Good luck and build the book shelves keep mama happy!!!!
Mary C.

Re: now look what you did!
Posted:
Fri Jan 17, 2014 5:59 amby rowerwet
tried glueing foam to foam with TBII, and also foam to wood using TBII and PL300.
Then I set up a sample of bed sheet strips and foam using TBII, PL300, and glidden Griper.
Destructive testing happens soon...


Re: now look what you did!
Posted:
Fri Jan 17, 2014 7:10 amby GPW
Speaking of gluing , we found it very handy to use bamboo skewers or chopsticks as “pins" to help align and hold the glued areas... when the glue dries , you just break off the part that sticks out and Bob’s your...
Re: now look what you did!
Posted:
Fri Jan 17, 2014 12:26 pmby rowerwet
the before pictures
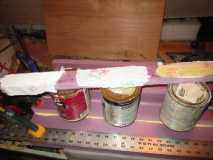
fabric to foam test
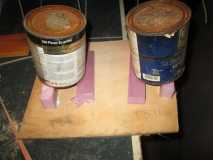
testing the bond to wood
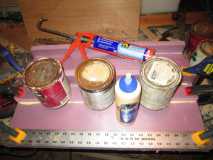
testing edge to face and face to face bonds with PL300 and TBII
the afters will be soon
Re: now look what you did!
Posted:
Fri Jan 17, 2014 5:20 pmby clermont cubby
Row:
Interested in ur foamie mouseboat progress. I'm the guy that built the foamie flats rat. Went kayaking and sailing with it last week.

The rats been a blast.
How are u going to finish the boat? I used TBIII and canvas, but have a small annoying leak. Thinking about applying layer of plywood on outside of foam.
Similar to the way I finished the puddle duck racer. I like both boats but seem to use the Flats Rat more than my PDR.
Larry
Re: now look what you did!
Posted:
Fri Jan 17, 2014 6:27 pmby rowerwet
right now I'm in the hunt for 4x8 foam sheets, almost every blue or orange borg around here has it only in 2x4.
Glad I can talk to you, what thickness foam did you use, and how forgiving is it? I'm giving it to my cousin (13 yrs old, loves to fish) the kids (4 total, ages 13-8) walk all over them on the land and the water, how would the foam bottom treat being walked on sitting half on the beach? (and most importantly, how will it handle my 180 lbs stepping in on the hard)
I want to make it foam, covered with drop cloth canvas and porch and floor paint, the glidden porch paint works great on plywood (the mouse fleet now) and shows no wear after three years mostly outside on my tear.
I'm considering a bottom of ply and sides of 2" foam, I think I might be able to skip the air boxes that way (not sure) but mostly I'm looking at that as I know how a bottom of sureply will take rough use, and I don't know how a bottom of 1/2, 3/4, 1", or 1 1/2" foam would do in the same use. All of them would be coverd in the same drop cloth canvas and (orange) glidden porch paint.
Any insight would be welcome.
thanks, Josh
Ps. if your are on Facebook come say hi! on the mouseboats page Gavin started.
It would be interesting to compare the foamie flats rat to a plywood one, I built a Romana, the boxier version on the Flats rat, I didn't like it due to the weight, but somebody at work really did.
Re: now look what you did!
Posted:
Sat Jan 18, 2014 7:20 amby GPW
For a foam floor , why not use a heavier chipboard for the area to be walked on , it can be waterproofed easily and is quite strong .... sticks to foam like Crazy ... Thrifty ...

Re: now look what you did!
Posted:
Sat Jan 18, 2014 10:39 amby clermont cubby
Row:
Need to get over to the facebook page. Not much activity of yahoo groups. I used 3/4" foam covered with canvas dropcloth and TBIII. Thinking about adding 5.2mm lauan to bottom.
Here is a guy that has built 2-3 of the flats rat and has done a very nice job. click here for link
http://www.warmfly.com/smf/index.php?topic=4762.0He also has built a nifty kayak dolly here
http://www.warmfly.com/smf/index.php?topic=6982.0 he is my kind of builder, thrifty and loves to use recycled materials. He would make a great foamie TD builder.
Row, I built my flats on a strongback to keep everything square. Made thwarts for my framework. Glued and temporarily screwed the foam to the thwarts using drywall screws and pieces of plywood as washers. Once glue has dried removed screws. Covered with canvas and painted. I then built a seat platform that rests on top of the thwarts keeping my fat butt off of the bottom foam hull.

I am going to add external chines and layer of plywood to the bottom like the builder referenced in the warmfly example above. That should add more strength to the boat and maybe eliminate the nagging leak. I sail the boat more than I paddle and it places alot more stress and racking on the flats rat.
Larry
Re: now look what you did!
Posted:
Sat Jan 18, 2014 10:44 amby clermont cubby
Yes GPW. Thats the boat. The mouseboats are extremely easy to build. Out of foam very lightweight. Makes a perfect companion to a foamie TD. You can paddle, sail, and some have added an electric trolling motor.
Larry
Re: now look what you did!
Posted:
Sat Jan 18, 2014 4:19 pmby oakinteriors1
Over on Texaskayakfisherman we all watched this foamy build....Sandy ,Styrofoam 3 panel.
http://www.texaskayakfisherman.com/foru ... 80&start=0And his latest one here...
http://www.texaskayakfisherman.com/foru ... 1&t=181309I go by awoodman on that forum...
Re: now look what you did!
Posted:
Sat Jan 18, 2014 4:42 pmby rowerwet
yup! mouseboats!

6 of my seven built so far. the one furthest to the right in the picture is rather dilapidated when this was taken this june. It was the second mouse I built, the first is the one my daughters, still going strong. I figure most of this is because hers is better taken care of, and because my nephews was an experiment in using the cheapest ply the depot sells... NEVER AGAIN!
BUT DON'T WORRY GPW, this will all be to build knowledge up for my foamie tear this spring
 These
These 
