Page 5 of 13

Re: now look what you did! foamie mouseboat started

PostPosted: Fri Mar 21, 2014 4:40 pm
by clermont cubby
Rower
thanks for update. also interested in final weight, I seem to have a tendency to overbuild everything I touch.

Larry

Re: now look what you did! foamie mouseboat started

PostPosted: Sat Mar 22, 2014 8:58 am
by clermont cubby
Rower:

wonder if using lightweight fiberglass cloth + titebond iii would protect better than canvas. Here is a link about a foam boat built by the "father" of portable boats, Ken Simpson.

http://www.portableboatplans.com/foam-boat.php

Good Luck

Larry

Re: now look what you did! foamie mouseboat started

PostPosted: Sat Mar 22, 2014 9:12 am
by rowerwet
I avoid using fiberglass as much as possible, all of my ply mice only have 2" fg tape on the seams, the rest is just painted. I belonged to a rowing club and each winter we would reglass the bottoms of the boats. this added a lot of weight, a good idea for boats being dragged over rocks, gravel and sand almost daily, by not so strong youth rowers. but unneeded and unwanted in one person boat that is carried to the water to launch. (fiberglass is after all sand, not known for being light weight)
I think I will use fg tape for the keel seam as it will be the one to hit bottom the most, the rest of the hull will just get bed sheet cotton and paint. If the foam/fabric can't take it I will add chipboard to the bottom of the hull to beef it up.

I also recall an article in "messing about in boats" from many years ago where mississispi bob made a boat out of 2" foam but then fiberglassed the whole thing and ended up with a heavy 8' boat. (he considered it a failure) while i like ken simpson, I find his designs lean much more to portable, at the expense of useful.

Re: now look what you did! foamie mouseboat started

PostPosted: Sat Mar 22, 2014 10:02 am
by rowerwet
I also discovered I was wrong about needing to splice foam to get enough width to make the decks on the air boxes. Not so sure I will make them sealed though, as the foam will give me the flotation I want. Instead the decks will have large doors, possibly with fabric hinges. I also plan to make laminated rails using foam to make the inner wale to reinforce the sides of the cockpit and not add much weight.

Re: now look what you did! foamie mouseboat started

PostPosted: Sat Mar 22, 2014 3:20 pm
by rowerwet
got the bottom glued on, took extra care to make sure that keel seam is fully glued. I didn't get any pictures of the process, I was way to busy glueing trying to get it all buttered up and tacked in place before any of the glue set. :shock:
118125
the whole hull is tacked together about every foot and along each bulkhead with drywall screws, the duct tape was just to keep it all in place while I drove screws.
add lightness to the build!
what better way than with foam adhesive?
118126
so far I've just about used the second can of GS up. Still have to put the decks on.

Re: now look what you did! foamie mouseboat started

PostPosted: Sat Mar 22, 2014 5:12 pm
by GPW
Looking really Good now Row ... like a Boat !!! :thumbsup: 8) :beer:

Re: now look what you did! foamie mouseboat started

PostPosted: Sun Mar 30, 2014 5:36 am
by rowerwet
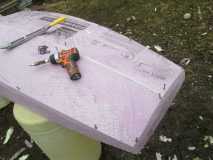
after a half day at work I got back to the foamiemouse, I found the drywall screws work great as clamps and alignment dowels. Sucking the bottom panels down to the sides just fine.
118424
I gave the hull a clean shave around the edges where all the extra glue oozed out. (I probably should have spent more time cleaning up while it was all wet, but didn't have the time then)
118425
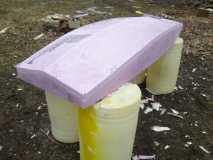
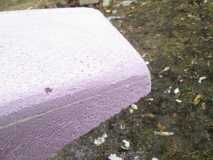
used the shureform to round over all the sharp corners so the fabric will stick down easily
118426
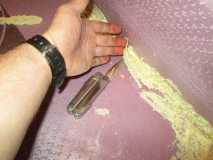
then I tackled the inside seams. next time I'm gonna put duct tape along the edges of each joint to control the glued bead area, it might work.
118427
right after this it started to rain, it was nice not having to worry that the rain could ruin the hull. I took my first mouse out for a paddle at this stage (I wasn't convinced I could build a boat back then) this hull wouldn't need to be protected to go for a paddle, finding ice free water right now could be a challenge.
118429
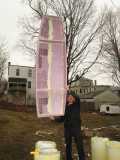
I was trying to balance it on one finger, but there was too much wind

Re: now look what you did! foamie mouseboat started

PostPosted: Sun Mar 30, 2014 5:41 am
by GPW
Now that’s a LIGHT boat ... :o 8) 8) 8)

Re: now look what you did! foamie mouseboat started

PostPosted: Mon Mar 31, 2014 9:14 am
by clermont cubby
Great pic of you balancing foamie. :D :D

Larry

Re: now look what you did! foamie mouseboat started

PostPosted: Wed Apr 02, 2014 10:30 pm
by Mary C
Great build Row, I am excited to watch your build of your mouseboat. I will build one too in the near future, that means maybe next winter. It will give me something to do. It seems like I am finding lots of things to be done on my build so it is going to be a while. You are doing a great job.

Mary C. :lady:

Re: now look what you did! foamie mouseboat started

PostPosted: Thu Apr 03, 2014 6:34 am
by rowerwet
had a slight set back, while removing the glue from the inside I broke a seam near in the bow :( so I decided to try gorilla glue to fix the break and plug all the screw holes. I like great stuff a lot better!
GG is tougher and sticks a lot better, however when I used the shureform to knock the glue down, it would break off and take a chunk of foam with it :( , looks like I'm gonna be using a filler to fill those holes.

Mary, you won't regret building a mouse! most times we use them I get asked if I will sell one. :lol:

Re: now look what you did! foamie mouseboat started

PostPosted: Sun Apr 06, 2014 4:39 am
by GPW
Why remove the glue ? Why not just leave it and just “smush” it down a bit ...? :thinking: Is it just for neatness ?

Re: now look what you did! foamie mouseboat started

PostPosted: Sun Apr 06, 2014 5:24 am
by rowerwet
I want it to be flat on the inside so I can put fabric tapes over the inside seams inside the air boxes, in the cockpit I wanted the seams to look nicer and I need the center seam flat so I can glue down the "chip board" (ended up getting cardboard for matting pictures)
GPW, should I use the mix on the cardboard before I glue it in with TBII or after? after seems better to my mind but not sure.
Also, I tried to get the vinyl spackle, they don't sell it at HD around here, I got some of the lighweight spackle that feels like an empty container, has anybody tried this yet?

another show off picture
Image

Re: now look what you did! foamie mouseboat started

PostPosted: Sun Apr 06, 2014 6:17 am
by GPW
Row, just thinking the cardboard glued down first would hold well on that surface , then the mix would penetrate/seal everything else ... shouldn’t be an adhesion issue done that way ... We need to do some testing on adhesion with the mix coated chipboard vs. the plain board , that glued to foam with TB2 or Gripper ... It would seem (a guess) that once the mix coated surface is Dry and cured , it would be still able to Grab with any glue ... Most glues state the surface should be Clean and Dry , and the mix still leaves a good bit of surface “tooth” so it “should" work fine ... Theoretically :thinking:

And, even a very light skin over all that would probably tie it all together , once painted ... bedsheet ? That may not even be necessary ...the encapsulated cardboard , would be much like a painted plywood ... maybe better ... :thinking:

Re: now look what you did! foamie mouseboat started

PostPosted: Sun Apr 06, 2014 9:21 am
by KCStudly
rowerwet wrote:I got some of the lighweight spackle that feels like an empty container, has anybody tried this yet?


That's the stuff; usually labelled as for ceiling spackle. I've used it a lot on my walls. Sands super easy and is light weight. DAP is a common brand.

My first reaction was that it might not be the best choice for boat building; not at all water proof (in fact it can be smoothed easily with a damp rag); but then the chip board isn't at all water proof either, so as long as it is fully sealed like everything else, I guess it should do the trick!