Paint question and progression

Canvas covered foamies (Thrifty Alternatives...)

Moderator: eaglesdare

Re: Paint question and progression

Postby RogHodge » Sat Aug 30, 2014 9:46 am

Thank you
Question-
What you see is a projected image. The idea is to outline the image and tape, spray, Light to dark, right? But what to 'mark' the outline? I thought sharpie. I can use a light blue or even sliver so bleed through won't be an issue. But will the rusto oil have an issue with the marker, should I use something else?
Help :frightened:
Last edited by RogHodge on Sat Aug 30, 2014 6:25 pm, edited 1 time in total.
For those who would like to have a look I have a build journal and covet your feedback.
http://www.tnttt.com/viewtopic.php?t=33547
User avatar
RogHodge
Teardrop Master
 
Posts: 279
Images: 51
Joined: Mon Jan 05, 2009 12:24 am
Location: El Cajon CA- east of San Diego

Re: Paint question and progression

Postby GPW » Sat Aug 30, 2014 11:07 am

Try it without the outline first , just paint in the spaces, and let it stand as Art vs. “illustration” ... Could look cool ... The secret is to not vary the contrast of the colors too much ... Keep them similar “values” of lightness/darkness and it will look Cool .. if you do want an outline later you can get Pens with Paint in them ... ;)


And if you want some color inspiration there’s about a gazillion examples here to look over http://www.bing.com/images/search?q=wav ... ORM=HDRSC2

And from an artistic standpoint , Less is always More ... KISS !!! Let the viewer’s mind/imagination fill some of it in and it won’t be just a “picture” ... JMHO FWIW

Oh , and if you want some Light outlines in the darker colors , you can use narrow masking tape , which applied first , then painted over, when removed will reveal that nice original color underneath .. Lots of ways to go at it ... :thinking: Have FUN Rog !!! ... That’s really all that counts ... the rest is merely Opinion ... :lol: :lol: :lol:
There’s no place like Foam !
User avatar
GPW
Gold Donating Member
 
Posts: 14911
Images: 546
Joined: Thu Feb 09, 2006 7:58 pm
Location: New Orleans

Re: Paint question and progression

Postby RogHodge » Sat Aug 30, 2014 6:30 pm

Good call, it is not to be a cartoon illustration. I'm attempting to transfer from projected image to some guidelines. It is an 'overhead projector' image that you see. Very subject to being bumped and jostled, and move. And I'd needs to be relatively dark to see the image well.

I am wondering if 'sharpie' will have a negative impact on the paint, as in beading or pealing
For those who would like to have a look I have a build journal and covet your feedback.
http://www.tnttt.com/viewtopic.php?t=33547
User avatar
RogHodge
Teardrop Master
 
Posts: 279
Images: 51
Joined: Mon Jan 05, 2009 12:24 am
Location: El Cajon CA- east of San Diego
Top

Re: Paint question and progression

Postby GPW » Sun Aug 31, 2014 6:09 am

Sharpie has a nasty habit of bleeding through paint ... I’d try Not to use one ... :o
There’s no place like Foam !
User avatar
GPW
Gold Donating Member
 
Posts: 14911
Images: 546
Joined: Thu Feb 09, 2006 7:58 pm
Location: New Orleans
Top

Re: Paint question and progression

Postby RogHodge » Sun Aug 31, 2014 8:39 am

So what do I use?

This thread has descended into the tedious. Oh but one dy... One day the glory of this paint mod will be complete. And that will be truly magical
For those who would like to have a look I have a build journal and covet your feedback.
http://www.tnttt.com/viewtopic.php?t=33547
User avatar
RogHodge
Teardrop Master
 
Posts: 279
Images: 51
Joined: Mon Jan 05, 2009 12:24 am
Location: El Cajon CA- east of San Diego
Top

Re: Paint question and progression

Postby GPW » Sun Aug 31, 2014 9:45 am

QUOTE: “ if you do want an outline later you can get Pens with Paint in them ... “ ... http://www.bing.com/search?q=paint+pens&form=APMCS1
There’s no place like Foam !
User avatar
GPW
Gold Donating Member
 
Posts: 14911
Images: 546
Joined: Thu Feb 09, 2006 7:58 pm
Location: New Orleans
Top

Re: Paint question and progression

Postby atahoekid » Tue Sep 02, 2014 5:45 pm

Rog, that would be an awesome mural. I was planning to do the same Japanese wave that you posted but due to a lack of time and nerve, I opted for a simple two tone paint job. I'd like to see you pull that off... It would be SOOOO COOOOLLL. You'd have the crowd at the beach drooling over that one.
Mel

"Believe in your abilities... Remember amateurs built the ark, professionals built the Titanic"

"Indecision may or may not be my problem" Jimmy Buffet

Image

The Road Foamie Build Thread: viewtopic.php?t=45698
User avatar
atahoekid
Platinum Donating Member
 
Posts: 1773
Images: 158
Joined: Sat Jul 24, 2010 2:49 am
Location: Incline Village, NV
Top

Re: Paint question and progression

Postby JThompson » Wed Sep 03, 2014 7:07 pm

I used a pencil, string and a push pin to mark where I wanted my curves to be.
123870

then I put on paint.. next is the black stripe dividing the two colors. My waves are different on both sides of the trailer. It was difficult to make them exactly the same so I made them radically different. now its called... ART

;)
Do what makes you happy. besides there is always more paint to cover with
* in here, some of my dreams become realities, and some of my realities become dreams* - Willy Wonka
JThompson
Teardrop Advisor
 
Posts: 62
Images: 36
Joined: Sat Feb 22, 2014 10:09 am
Location: North Augusta, SC
Top

Re: Paint question and progression

Postby kayakdlk » Wed Sep 03, 2014 8:07 pm

Get a roll of 4' wide paper and draw it out. Cut it out and then use as a mask on side of trailer. Run thin flexible auto masking tape along the mask. No holes, marks etc on the actual teardrop. You can also use the thin flexible tape and layout on the side . It can be removed and re applied assuming your sides are somewhat smooth. Google painting flames on a vehicle and use the same kinds of techniques (usually thin flexible tape, sometimes a mask)

Good luck, cant wait to see it done

Dan
User avatar
kayakdlk
Platinum Donating Member
 
Posts: 310
Images: 392
Joined: Wed Jun 27, 2012 9:02 pm
Location: Foothills of Colorado
Top

Re: Paint question and progression

Postby KCStudly » Wed Sep 03, 2014 9:55 pm

I think GPW mentioned this before, but if not, you can duplicate a pattern mirror image from one side to the other (if you want) by taping tracing paper, and penciling the outline. Remove the tracing, run a pounce wheel (spiked like a cowboy's spur) along the tracing, then flip the pattern onto the other side. Finally, dab a pounce bag full of chalk (old sock, or the front pocket cut out of a pair of old jeans) along the pattern; the chalk penetrates the holes made by the pounce wheel and marks the pattern on the wall (same way they do a flame paint job).
Last edited by KCStudly on Tue Oct 27, 2015 1:52 pm, edited 1 time in total.
KC
My Build: The Poet Creek Express Hybrid Foamie

Poet Creek Or Bust
Engineering the TLAR way - "That Looks About Right"
TnTTT ORIGINAL 200A LANTERN CLUB = "The 200A Gang"
Green Lantern Corpsmen
User avatar
KCStudly
Donating Member
 
Posts: 9611
Images: 8169
Joined: Mon Feb 06, 2012 10:18 pm
Location: Southeastern CT, USA
Top

Re: Paint question and progression

Postby ghcoe » Fri Dec 05, 2014 9:30 am

Any update on this paint job?
George.

Gorrilla Glue, Great Stuff and Gripper. The three G's of foamie construction.

My build viewtopic.php?t=54099
Working with flashing for foamie construction viewtopic.php?f=55&t=60303
Making a hot wire http://tnttt.com/viewtopic.php?f=55&t=55323
User avatar
ghcoe
1000 Club
1000 Club
 
Posts: 1942
Joined: Fri Dec 11, 2009 11:20 pm
Location: SW Idaho
Top

Re: Paint question and progression

Postby nevadatear » Fri Dec 05, 2014 9:39 am

Samos on here often so he will probably chime in. We camped with then in September and it still looks great from my view
Debbie (with Randy looking over my shoulder)
Our build thread: http://www.tnttt.com/viewtopic.php?t=41295&highlight=monstero
2009 Homebuilt woody, Kenskill inspired 5 wide
ImageImage
User avatar
nevadatear
Silver Donating Member
 
Posts: 2362
Images: 171
Joined: Mon Nov 10, 2008 2:37 pm
Location: No. Nevada
Top

Re: Paint question and progression

Postby Funluvin001 » Mon Oct 26, 2015 5:38 pm

RogHodge wrote:I believe we have a winner

Whoa... OK that's super cool!!! :wine:
Funluvin001
Teardrop Advisor
 
Posts: 55
Images: 145
Joined: Sun Aug 16, 2015 6:40 pm
Location: P.E.I. Canada
Top

Re: Paint question and progression

Postby TimC » Mon Oct 26, 2015 7:10 pm

RogHodge wrote:Ok I'm going with rust-oleum oil based protective enamel. I went with the amateur version. Mostly because of the color choices available. I have one tentative coat on the galley lid now. And remembered why oil paint is such a pain in the butt. Messy stuff.
I'll try to get some pictures up tomorrow, it's already dark. (Outside)
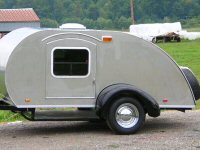
The bulk of the paint will be gloss ''almond" stripes likely "royal blue" unless I get some other inspiration :thinking:
My design idea, for now...


I am pretty late to this paint question, but, after reading your comment about oil paints I agree. When I began painting stuff I often chose oil based as it was "better" according to the salespeople. I don't really know if that was true at the time. Probably not so much today. Anyway, I learned a good way to do cleanup with oil based paints. I have two gallon jugs of paint thinner. After a few years use they are both about 1/2 empty (or 1/2 full). I do my first three rinses with the same thinner jug, #1 let's call it, in an old tin can, pouring the rinse back into that jug and repeating. This cleans most of the pigment out of the brushes (I never use rollers with oil). After the initial three or four rinses and return of that thinner to the first jug I pour a very small amount of clean thinner from jug #2 into the tin can. After this rinse I pour the rinse into jug #1. Same for the next rinse or two, until the rinse is clear after cleaning the brushes. Always pouring the rinses into the first jug. Every now and then I take the undisturbed jug #1 and pour off the top clear liquid. The solids stay on the bottom. If they are stuck I get a new jug and dispose of the old jug at the next paint/hazard waste collection party. After about 20 years I have replaced jug #2, the new, clear stuff, twice. That might tell you I don't paint a lot with oil, but, with the oil painting I do plus cleaning up stains and linseed oil mixes the method has served me well. It proves to be no more work than latex clean-up, I don't use tons of water (water, especially hot water, will ruin the natural bristle brushes I use). I have some Marcus natural bristle (hog hair) brushes I bought 30 years ago.

Hope this helps someone out there that is avoiding oil based paints. Using them seems to make color selection much more broad as the oils always seem a little more alive than the latex versions available.
Tim
Niagara, WI
My First Benroy Teardrop Build Thread - A 5x8 Woodie - http://www.tnttt.com/viewtopic.php?f=50&t=63575
My Second Teardrop (partial) Build Thread - Started August '16 - http://www.tnttt.com/viewtopic.php?f=50&t=66939
#3 My son's Benroy Foamie team build - Started July '20 - http://www.tnttt.com/viewtopic.php?f=50&t=72877

Image
User avatar
TimC
Gold Donating Member
 
Posts: 1369
Images: 732
Joined: Sat May 23, 2015 4:15 am
Location: WI/MI border
Top

Re: Paint question and progression

Postby GPW » Thu Oct 29, 2015 9:47 am

Just as long as they are Foam Compatible !!! :o Just remember , you can put oil over latex (not the best idea) , but you definitely cannot put Latex over oil ... (peels off later) :frightened:
There’s no place like Foam !
User avatar
GPW
Gold Donating Member
 
Posts: 14911
Images: 546
Joined: Thu Feb 09, 2006 7:58 pm
Location: New Orleans
Top

Previous

Return to Foamies

Who is online

Users browsing this forum: No registered users and 5 guests