A canned ham in foam: Built

Canvas covered foamies (Thrifty Alternatives...)

Moderator: eaglesdare

Re: New Build: A canned ham in foam

Postby NMMarauder » Sun Apr 05, 2015 3:31 pm

Make sure you leave enough room in the door opening to allow for the canvas and paint.


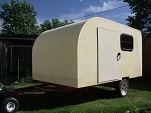
I tried a different approach. It was a bit of a risk but I thought it was worthwhile to try it. Time will tell if it holds up to the elements. As I glued the canvas on the outer wall, I covered the opening with the canvas, then painted on some thinned glue where I needed to cut, then I let it dry and I cut it with a very sharp blade. I cut as close to the edge of the opening as possible. I then used the titebond 2 wood glue to really glue down the edge of the canvas if it wasn't already stuck down. After it is painted it looks like this.

Image

I did this for all window and door openings. I'll keep everyone posted on how it holds up.

Also, I didn't do anything for a door threshold, and am thinking about cutting the bottom of the door, or at least shaving it.


I made my threshold part of my door frame. It is hard to see since it is all painted white. I placed a small piece of scrap wood where the door sits when closed so that the threshold shows up in the picture. I tried to leave enough room for a seal so that the door will smash it when closed. The threshold is just a little more than 1/2 inch tall and it goes all the way around the door frame.
Image
User avatar
NMMarauder
Gold Donating Member
 
Posts: 92
Images: 135
Joined: Sun Feb 16, 2014 6:37 am
Location: Albuquerque, NM

Re: New Build: A canned ham in foam

Postby NMMarauder » Sun Apr 05, 2015 3:59 pm

Hi Ron, I just found your build thread. You are doing a fine job with foam, but I am not surprised, you are a Mechanical engineer. It looks like it is very light and I really like the profile. Cheers and all the best with your build, it is a piece of art.... Oleg


Thank you for the words of encouragement. I've always liked to create things. The engineering degree just means I had a chance to study some things that can be very handy while building. You learn how to calculate forces, how various materials act in certain conditions, how to calculate problems involving heat transfer and how fluids behave in various conditions. Those things are all handy to know but real world experience is just as valuable. My grandfather never learned to read or write because he had to leave school to help support the family when his father died at an early age. But he was a gifted builder and a mechanic. He built hydraulic wood splitters, a truck bed camper, and the house they lived in from scratch. I can't even remember all the cool things he built because I was just a kid. There wasn't a motor on the planet that he couldn't repair. Considering all the advantages I have had, I'm not sure I'm half the engineer he was.

The one thing I did learn from him is that patience and taking a moment to step back and think about your next action before you execute is all important. Take your time, think it out and don't be afraid to do it over if it doesn't turn out to your liking. That was the approach that I saw him take to problem solving. I wish he were still around so I could thank him for that valuable life lesson.
User avatar
NMMarauder
Gold Donating Member
 
Posts: 92
Images: 135
Joined: Sun Feb 16, 2014 6:37 am
Location: Albuquerque, NM

Re: New Build: A canned ham in foam

Postby NMMarauder » Sun Apr 05, 2015 4:09 pm

More progress... I managed to put the canvas on one side. It is much more challenging to canvas something that is vertical than something that is horizontal.

Image

I rolled the canvas up on a long board and then suspended it from the rafters of the garage so that it hung next to the trailer wall. Then I would roll a section of glue, press the canvas on and move down the wall to repeat the process. NEXT time, I think I am not going to let it hang like a sheet. I think that will make things much easier. I'll let you know which one I prefer.

Here is a picture of all the canvas trimmed. It took and entire day to do all the cuts so that the canvas would wrap nicely around the edge. I'll fill in the gap with putty and sand it all smooth before I apply the canvas on the roof. I did this when I wrapped the door and the seams are invisible. I hope I can do the same with these seams.

Image
Last edited by NMMarauder on Sun Apr 05, 2015 8:17 pm, edited 1 time in total.
User avatar
NMMarauder
Gold Donating Member
 
Posts: 92
Images: 135
Joined: Sun Feb 16, 2014 6:37 am
Location: Albuquerque, NM
Top

Re: New Build: A canned ham in foam

Postby ghcoe » Sun Apr 05, 2015 4:45 pm

Looking good...... :thumbsup:

Hope to do some canvasing on mine in the next couple of weeks.
George.

Gorrilla Glue, Great Stuff and Gripper. The three G's of foamie construction.

My build viewtopic.php?t=54099
Working with flashing for foamie construction viewtopic.php?f=55&t=60303
Making a hot wire http://tnttt.com/viewtopic.php?f=55&t=55323
User avatar
ghcoe
1000 Club
1000 Club
 
Posts: 1946
Joined: Fri Dec 11, 2009 11:20 pm
Location: SW Idaho
Top

Re: New Build: A canned ham in foam

Postby KCStudly » Sun Apr 05, 2015 6:05 pm

NMMarauder wrote:...suspended it from the rafters of the garage so that it hung next to the trailer wall.

I was thinking that I would pin the top of the side wall canvas to the roof using bamboo skewers, then flop it all on the roof before working down from the top, but if that doesn't work on my smaller trailer I am definitely stealing this idea. Perhaps screw eyes into the ceiling joists in the loft then cords in a curtain like arrangement to deploy the roll of fabric incrementally.

Which filler did you use to fair the canvas seams?

Your build is looking really good; keep it up! :thumbsup:
KC
My Build: The Poet Creek Express Hybrid Foamie

Poet Creek Or Bust
Engineering the TLAR way - "That Looks About Right"
TnTTT ORIGINAL 200A LANTERN CLUB = "The 200A Gang"
Green Lantern Corpsmen
User avatar
KCStudly
Donating Member
 
Posts: 9613
Images: 8169
Joined: Mon Feb 06, 2012 10:18 pm
Location: Southeastern CT, USA
Top

Re: New Build: A canned ham in foam

Postby OP827 » Sun Apr 05, 2015 7:15 pm

Ron, thanks for sharing your family story. I feel the same about patience. Nice work with the wall canvas. In my build due to space limitations and to make it easier, I am considering glassing all walls flat and then assemble and treat seams with glass tape.
User avatar
OP827
Donating Member
 
Posts: 1556
Images: 405
Joined: Fri Apr 25, 2014 7:27 pm
Location: Bruce County Ontario
Top

Re: New Build: A canned ham in foam

Postby NMMarauder » Thu Apr 09, 2015 8:37 pm

Which filler did you use to fair the canvas seams? - KCStudly


I've been using Durham's Rock Hard Putty. I like that I can mix small amounts and so far it has stuck very well to canvas and wood. Here is a picture of one of the door seams after putty, sanding and paint. I tried to get a light that would make the seam stand out. In normal daylight and unless you were really looking for it, it is practically invisible. See it above the ruler?

Image
User avatar
NMMarauder
Gold Donating Member
 
Posts: 92
Images: 135
Joined: Sun Feb 16, 2014 6:37 am
Location: Albuquerque, NM
Top

Re: New Build: A canned ham in foam

Postby NMMarauder » Thu Apr 09, 2015 8:48 pm

I hung the canvas instead of rolling it up on the beam and it was much easier to work with. I must have taken this picture before I worked with it a little more to get some of the wrinkles out before I started gluing it on the side. Basically I adjusted it so that it hung with less wrinkles and was even flatter. But it wasn't a huge improvement. I might have gotten 50% more of the wrinkles out. You can work out many of the wrinkles as you smooth it towards the edges when you start gluing. There was much less tugging and pulling and smoothing of wrinkles with this method. This is the method I recommend to anyone that is covering with canvas. I'm sure I have seen it done with other posts.

Image

Here is what it looks like after I started cutting out the openings and trimming the edges so that they wrap onto the roof. After it is stuck on and while it is still wet, I like to thin out the glue to a 50/50 mixture and roll it on top and then use a putty knife to really squish the glue through the fabric. It may be totally unnecessary but I just want to make sure the canvas has a solid bond with the foam underneath. That's why the canvas has the color of the titebond 2 wood glue.

Image
User avatar
NMMarauder
Gold Donating Member
 
Posts: 92
Images: 135
Joined: Sun Feb 16, 2014 6:37 am
Location: Albuquerque, NM
Top

Re: New Build: A canned ham in foam

Postby KCStudly » Thu Apr 09, 2015 9:48 pm

Looks really good. :thumbsup:

Thanks for the details.
KC
My Build: The Poet Creek Express Hybrid Foamie

Poet Creek Or Bust
Engineering the TLAR way - "That Looks About Right"
TnTTT ORIGINAL 200A LANTERN CLUB = "The 200A Gang"
Green Lantern Corpsmen
User avatar
KCStudly
Donating Member
 
Posts: 9613
Images: 8169
Joined: Mon Feb 06, 2012 10:18 pm
Location: Southeastern CT, USA
Top

Re: New Build: A canned ham in foam

Postby ghcoe » Thu Apr 09, 2015 9:54 pm

Canvas canoe builders use a stiff brush with the bristles cut short to help work the paint into the canvas.
George.

Gorrilla Glue, Great Stuff and Gripper. The three G's of foamie construction.

My build viewtopic.php?t=54099
Working with flashing for foamie construction viewtopic.php?f=55&t=60303
Making a hot wire http://tnttt.com/viewtopic.php?f=55&t=55323
User avatar
ghcoe
1000 Club
1000 Club
 
Posts: 1946
Joined: Fri Dec 11, 2009 11:20 pm
Location: SW Idaho
Top

Re: New Build: A canned ham in foam

Postby GPW » Fri Apr 10, 2015 6:02 am

Having worked with painted canvas all my life , we always start with a ‘sizing’ , which is a highly thinned “glue" (rabbit skin glue in my case) which encapsulates the canvas fibers and protects them from decomposition from air and water and oils (Rot) ... :thumbsup:
And as we found out , unsized canvas cannot be completely protected (saturated/encapsulated) with normal painting without the sizing . Even modern primers cannot completely protect the canvas fibers without the sizing step ... all well tested ... ;)
There’s no place like Foam !
User avatar
GPW
Gold Donating Member
 
Posts: 14912
Images: 546
Joined: Thu Feb 09, 2006 7:58 pm
Location: New Orleans
Top

Re: New Build: A canned ham in foam

Postby KCStudly » Fri Apr 10, 2015 9:08 am

If I may go a little further with this w/o being considered a highjack, GPW, tell us more about this sizing operation, please. Is this something you do after the canvas is glued on? If not, does it make the canvas stiffer or harder to handle?

It has been said that sizing the canvas, at least at the edges, is a good way to minimize fraying. In fact I think it was you that suggested using water soluble glue for this so that it lays back down easier when doing the final edge gluing.

So what is the "official" recommended canvasing procedure: roll tb2 heavily on surface; smooth canvas out; apply thinned TB2 with a stiff brush or spatula to the flat glued areas; allow to dry; mark and size the edges to be cut with thinned white glue (Elmer's); allow to dry; cut edges; glue edges down with TB2; size edges; allow to dry; primmer and paint?
KC
My Build: The Poet Creek Express Hybrid Foamie

Poet Creek Or Bust
Engineering the TLAR way - "That Looks About Right"
TnTTT ORIGINAL 200A LANTERN CLUB = "The 200A Gang"
Green Lantern Corpsmen
User avatar
KCStudly
Donating Member
 
Posts: 9613
Images: 8169
Joined: Mon Feb 06, 2012 10:18 pm
Location: Southeastern CT, USA
Top

Re: New Build: A canned ham in foam

Postby GPW » Fri Apr 10, 2015 10:41 am

For my purposes over the last 50 + years , I've stretched raw canvas over wooden stretcher strips , Then “sized " the canvas with a very thin hide glue ( or Elmers works too) That also stiffens up the canvas when it dries, allowing for a Primer , and then the painting ..
For more ... http://www.trueart.info/sizing.htm

KC, applied over foam , there is still a need to make sure the canvas is sealed ... so a Thin coat of T2 and water is not a bad idea... ;) :thumbsup: Sizing it before it’s applied , I would think :roll: , might not allow as good adhesion as possible ... but it all doesn’t matter as long as the canvas is applied and stretched in place , because as it dries it will further shrink and tighten up as it dries ... 8)
There’s no place like Foam !
User avatar
GPW
Gold Donating Member
 
Posts: 14912
Images: 546
Joined: Thu Feb 09, 2006 7:58 pm
Location: New Orleans
Top

Re: New Build: A canned ham in foam

Postby KCStudly » Fri Apr 10, 2015 12:29 pm

Okay, did you size your canvas on the little camo camper or foamstream before gluing it down? ...after? or just straight to primer/paint?

I would think that in a covering application (as opposed to a picture frame application) that sizing the canvas first would make it harder to manipulate, no?

Again, sorry if this is a highjack.
KC
My Build: The Poet Creek Express Hybrid Foamie

Poet Creek Or Bust
Engineering the TLAR way - "That Looks About Right"
TnTTT ORIGINAL 200A LANTERN CLUB = "The 200A Gang"
Green Lantern Corpsmen
User avatar
KCStudly
Donating Member
 
Posts: 9613
Images: 8169
Joined: Mon Feb 06, 2012 10:18 pm
Location: Southeastern CT, USA
Top

Re: New Build: A canned ham in foam

Postby GPW » Fri Apr 10, 2015 1:38 pm

Here’s the reality of the situation .... This is one of those things where we can learn from my “lesson” and benefit ... :roll:
No I didn’t size the canvas on the FoamStream . I did on the smaller Foamie #1(Nookery now) . :thumbsup: As you know the FoamStream was built in the Heat of the summer , OUTSIDE , and all by myself.. so I took a few short cuts to get it finished ( the old guy was getting tired out) and that resulted in that little bit on the bottom of the nose splitting and going rotty' :o :frightened: Everything else that was actually glued to foam is perfectly fine ... the little bit left with an airspace behind it (painted but unsized) was the trouble ... At the time , all I had to do was really thin down the primer on the first coat , but didn’t :duh: Although fully primed and painted on both sides , there was still some middle fibers in that thick canvas that weren’t waterproofed ... and that did it ... Sizing would have prevented that .... My bad !!! :roll: Now I have to go back and “do it Right!!!” :oops:
One little mistake , an easy fix in the World of Foamies’ !!! :beer:

Foam may be a Cheaper , more reliable (not to mention LIGHTER) alternative to other materials , but still requires your Best work ... Do it Right first time and you won’t ever have to fix anything ever again ... ;) 8)

Ps. KC , canvas usually comes with a “sizing “ but one to help it retain it’s shape (flatness) and not go all wrinkly .. Not waterproof ... more a “starch” ... Washing it removes that , and pre shrinks the material , all Good if you iron it all flat later and then use it... With no sizing , the better , new ”sizing” (glue) can penetrate and protect ALL the fibers .
There’s no place like Foam !
User avatar
GPW
Gold Donating Member
 
Posts: 14912
Images: 546
Joined: Thu Feb 09, 2006 7:58 pm
Location: New Orleans
Top

PreviousNext

Return to Foamies

Who is online

Users browsing this forum: No registered users and 28 guests