OP287,
I think I will be fine with the dinette. Gary and I have mapped this out - Gary using sketchup - we will have to crouch slightly to get into the seated position but will have plenty of head room in the seated position. - helps that I'm 5'7" and my wife is 5'5" - first time that has been an advantage.
Your 2nd comment re: stability is a major concern. My plan is to attach a curved sheet of ply maybe 2" wide around the interior of the hatch and glued my spars to the top of the piece - will add gussets if needed, but this would require the hatch to rise up above the box a little higher, thus raising the entire profile.
I'm also planning to use 1 1/2" X 2" frame that will sit between the polystyrene wall pieces at the hinge point. These vertical frame pieces will be attached to the spar the hinges the hatch with metal angle brackets. Sound any better???
BEULA - a foam Winter Warrior with aero front
Moderator: eaglesdare
Re: BEULA - a foam Winter Warrior with aero front
![]() by cpowell243 » Wed May 06, 2015 10:14 am
by cpowell243 » Wed May 06, 2015 10:14 am
- cpowell243
- Donating Member
- Posts: 179
- Images: 184
- Joined: Sun Feb 03, 2013 7:24 pm
- Location: Casper, Wyoming
Re: BEULA - a foam Winter Warrior with aero front
![]() by cpowell243 » Wed May 06, 2015 10:24 am
by cpowell243 » Wed May 06, 2015 10:24 am
A view of the first layer of my form looking from the bottom up.
[img]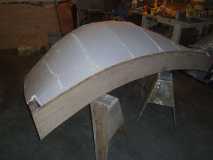 [/img]
Now started adding the 2nd layer to the inside of the first layer. 3" X 3" plywood pieces were used to hold in place while gluing. These will stay put as they will be used to hold exterior aluminum diamond plate in place. Diamond plate will only cover bottom half of the nose and will be attached to the plywood pieces and the toe plate at the bottom of the nose.
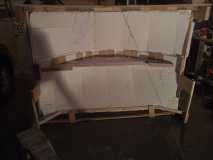
Forgot to mention that also added a piece of 2" polystyrene to the middle to provide additional reinforcement to the weaker styrofoam at the center (the pink piece). This piece will later be used to create and interior storage cabinet.

[img]
Now started adding the 2nd layer to the inside of the first layer. 3" X 3" plywood pieces were used to hold in place while gluing. These will stay put as they will be used to hold exterior aluminum diamond plate in place. Diamond plate will only cover bottom half of the nose and will be attached to the plywood pieces and the toe plate at the bottom of the nose.
Forgot to mention that also added a piece of 2" polystyrene to the middle to provide additional reinforcement to the weaker styrofoam at the center (the pink piece). This piece will later be used to create and interior storage cabinet.
- cpowell243
- Donating Member
- Posts: 179
- Images: 184
- Joined: Sun Feb 03, 2013 7:24 pm
- Location: Casper, Wyoming