Itty Bitty Foamie Teardrop Test Build Thread

Canvas covered foamies (Thrifty Alternatives...)

Moderator: eaglesdare

Re: Itty Bitty Foamie Teardrop Test Build Thread

Postby QueticoBill » Tue Jul 11, 2017 7:05 am

We want pictures!

Congrats for making progress. I too finally started "building" in earnest this past weekend. Good feelings.
QB
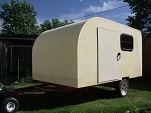
A tear with no name: viewtopic.php?f=50&t=67624
QueticoBill
Silver Donating Member
 
Posts: 1184
Images: 22
Joined: Sun Apr 14, 2013 7:22 am
Location: Clayton NY

Re: Itty Bitty Foamie Teardrop Test Build Thread

Postby amandacreiglow » Wed Jul 12, 2017 12:06 am

Ok, second cutting day down, and my phone survived this time so I can add a couple photos!
Here's my work table... turns out that a ping-pong table is actually the perfect size to measure on and cut off the side of.
Trailer 2-1.JPG
Trailer 2-1.JPG (82.66 KiB) Viewed 1669 times

Here's the tool I used. Definitely not powerful enough to do this kind of work with. It made it slow going, and made for some messy cuts, and I definitely got jealous of the hot wire rigs I've seen. But considering I don't have a ton of these full cuts to do, it's pretty good.
Trailer 2-5.JPG
Trailer 2-5.JPG (98.76 KiB) Viewed 1669 times

And looks like I just get three photos, so here's the fruits of my efforts so far. This is all but one of the foam surfaces. You can see the two side walls peeking out from the back, the vertical front wall with the 45 degree angle on the left. The tall one standing up with the 45 degree able on the top is the top flat piece, and the back hatch is sitting in front.
Trailer 3-3.JPG
Trailer 3-3.JPG (114.16 KiB) Viewed 1669 times

The only piece I have yet to cut is the angled front cap. The reason I'm waiting on that is that, in order to get the whole shell out of four pieces of foam, I have to glue together two off cuts to have a long enough piece for the front cap. I've got they set up and clamped with gripper now. I'm a bit nervous because the cuts aren't perfectly flat, but I'll give it a couple of days.

One unfortunate thing that I noticed today as I was working is that when I walk across the sandwich floor, it's clear the gripper hasn't really adhered the way I was hoping. So it looks like the next step will be to re-do that with a different adhesive and, I think some more consistent weighting. There are some foldable tables that I think will do much better. I'll just need to wait until there's another set of hands available to help me lift them.

The other thing I did on the trailer today was some research into fire prevention. Much as I'm happy to just do my best to not take any fire risks, and have two doors for emergency egress, having a very flammable thing with no firestop that gives off particularly harmful vapors seems like something I'd rather avoid if I can, especially considering I'm planning on making camp fires and I'm far from the least accident prone person in the world. I found a lot of stuff that's either super expensive, or too heavy, or takes too much space or only comes in bulk, or is of questionable efficacy. But I think this is promising: https://www.youtube.com/watch?v=D7SfV1gtL1w. It looks like these "intumescent" paints are generally accepted to work well, to the extent that thicker layers are used to protect structural steel to avoid building collapse. So... pretty good.

The stuff he's using in the video is the only brand I can find in one gallon size, or that doesn't want you to call them for a quote (which will doubtless involve 5 or 55 gallon container discussions). Poking around, I found a site where I can get it for 70 bucks plus shipping, and there are some places around here I can call for pricing to see if it's a better deal. It's not that cheap, and maybe I'm being paranoid, but it seems like a reasonable cost for paranoia-abatement, anyway. :)
User avatar
amandacreiglow
Teardrop Master
 
Posts: 137
Images: 1
Joined: Sat Jun 10, 2017 8:29 am

Re: Itty Bitty Foamie Teardrop Test Build Thread

Postby HMK » Wed Jul 12, 2017 12:29 am

Looks like you're Rockin and Rollin!
User avatar
HMK
Teardrop Master
 
Posts: 222
Joined: Sun Jun 10, 2007 4:30 pm
Top

Re: Itty Bitty Foamie Teardrop Test Build Thread

Postby GPW » Wed Jul 12, 2017 5:16 am

Give the gripper a chance to dry cure … may take a couple weeks …
There’s no place like Foam !
User avatar
GPW
Gold Donating Member
 
Posts: 14911
Images: 546
Joined: Thu Feb 09, 2006 7:58 pm
Location: New Orleans
Top

Re: Itty Bitty Foamie Teardrop Test Build Thread

Postby pchast » Wed Jul 12, 2017 8:34 pm

GPW is right.........

I pulled a 2' x 2' test piece apart after 3 days and there were wet spots in the middle.
pchast
Platinum Donating Member
 
Posts: 2025
Images: 97
Joined: Mon Jan 28, 2013 5:47 pm
Location: Athens, NY
Top

Re: Itty Bitty Foamie Teardrop Test Build Thread

Postby ghcoe » Wed Jul 12, 2017 8:52 pm

amandacreiglow wrote:The other thing I did on the trailer today was some research into fire prevention. Much as I'm happy to just do my best to not take any fire risks, and have two doors for emergency egress, having a very flammable thing with no firestop that gives off particularly harmful vapors seems like something I'd rather avoid if I can, especially considering I'm planning on making camp fires and I'm far from the least accident prone person in the world. :)


I have been wanting to play with this stuff. You might give it a try and see how it works out. Seems a reasonable price. https://www.apidistribution.com/product ... ting-white
George.

Gorrilla Glue, Great Stuff and Gripper. The three G's of foamie construction.

My build viewtopic.php?t=54099
Working with flashing for foamie construction viewtopic.php?f=55&t=60303
Making a hot wire http://tnttt.com/viewtopic.php?f=55&t=55323
User avatar
ghcoe
1000 Club
1000 Club
 
Posts: 1942
Joined: Fri Dec 11, 2009 11:20 pm
Location: SW Idaho
Top

Re: Itty Bitty Foamie Teardrop Test Build Thread

Postby amandacreiglow » Wed Jul 12, 2017 10:46 pm

ghcoe wrote:I have been wanting to play with this stuff. You might give it a try and see how it works out. Seems a reasonable price. https://www.apidistribution.com/product ... ting-white


Huh, that does look interesting... I like a lot of the things the data sheet says. A bit nervous to be the one to take the plunge, but even if it's just a "finishing" coating over everything that gives a little fire resistance, that seems good... shipping's gonna be almost $20, but the product is cheap enough I might be able to just eat that... I'll mull over how adventurous I'm feeling.

I picked up the floor today and was reassured with how solid it feels. It still makes noises when I walk on it, but I think the fact that I was bonding foam to porous wood and the particular noise it's making indicates it's not a drying issue. I think I'm satisfied enough with it for now. If it's still making noises once I have everything assembled, I'll figure out some weight distribution assistance to avoid that. My alignment was ever so slightly off on it, but I don't think unsandably so.

Today's mainly a thinking day, getting exact measurements worked out for the galley and interior and doors so I know exactly where to start cutting in my more detailed work tomorrow. I'm still waiting on the joint for my last structural cuts. But the sandwich floor being finished meant that I could dry fit everything I've got cut out so far, which was satisfying. Tearing my hair out over a stubborn shelf in the galley design? Somewhat less so.

Trailer 4-1.JPG
Trailer 4-1.JPG (122.24 KiB) Viewed 1594 times


Adorable doggo included for scale. :)
User avatar
amandacreiglow
Teardrop Master
 
Posts: 137
Images: 1
Joined: Sat Jun 10, 2017 8:29 am
Top

Re: Itty Bitty Foamie Teardrop Test Build Thread

Postby GPW » Thu Jul 13, 2017 5:25 am

Once everything is in place and has a chance to cure ( and shrink) The whole structure will feel much Tighter… ;) The floor , once mounted to the trailer will feel much more solid … You’re doing Great !!! :thumbsup:
There’s no place like Foam !
User avatar
GPW
Gold Donating Member
 
Posts: 14911
Images: 546
Joined: Thu Feb 09, 2006 7:58 pm
Location: New Orleans
Top

Re: Itty Bitty Foamie Teardrop Test Build Thread

Postby amandacreiglow » Sat Jul 15, 2017 12:43 pm

Ok, there's been a bit more progress but I've gotten sick so it's been a little slow the last few days.

Still waiting on the last panel to glue together... You guys weren't kidding about foam/foam bonds with gripper taking forever to dry. It's been sitting there three days and it's still completely wet! May end up pulling it apart and trying gorilla glue.

Spent some quality time with some graph paper figuring out exactly where I need the shelves and everything to be inside. I'm planning on just running 2x2's across the cabin and then setting 1/4" ply across them. Hopefully this will add some extra structural strength. Here's the sheet I put together to draw from:
Image

And here's the result after spendingn way too much time measuring:
Image

I'll hopefully get it all cut out today, clamp it to the other side and trace it through.

I went ahead and ordered the two gallon bucket (smallest size they had) of the stuff that was suggested above. Excited to do some tests on the off cuts between that, the glidden gripper and the TBII.

Slow and steady! :-)


Sent from my iPhone using Tapatalk
User avatar
amandacreiglow
Teardrop Master
 
Posts: 137
Images: 1
Joined: Sat Jun 10, 2017 8:29 am
Top

Re: Itty Bitty Foamie Teardrop Test Build Thread

Postby KCStudly » Wed Jul 19, 2017 8:09 am

Great progress. :thumbsup:

I keep my respirator in a zip lock bag when not in use; keeps it clean and from absorbing fumes. Also, I get those little sanitizing packets (like the individual hand cleaner wipes they give you at the BBQ joint, only sanitizing) and keep a few in the shop; every couple of uses I disassemble the respirator and clean it thoroughly. Do you know how to do a "self fit test"? Each time you don a respirator you should test for proper fit by blocking the exhaust port with the palm of your hand and exhaling minutely to make sure that the cup part puffs up a little (of course you can blow air out around the seal, but if it puffs up slightly before breaking the seal it will function normally when the vent is not blocked). Then block the filter cartridges and inhale slightly; you should feel the cup suck into your face slightly without feeling air leaks around the seal. I find it easier to do the test with disposable rubber gloves on so air does not leak around my hand trying to cover up the ports.

On wood to foam joints using TB2 I found that I got the best result by rolling on the thinnest coat, making sure not to leave any pools or streaks that tend to form along the edge of the roller. That way there is only enough moisture that the wood can handle; any more and the wood seals up before it can absorb the rest.

I may have mentioned this before, but adding shallow kerfs to the surface of the foam (yes, even on flat surfaces) creates air chimneys or vents that give excess moisture somewhere to go; makes a large area think it is much closer to an edge everywhere, and, IMO doesn't really affect the overall strength or insulating properties that much.

I have used a hot wire cutter on a few things, but, honestly, I don't think it is the solution for eliminating foam dust. The cuts tend to leave a glazed surface that really, IMO, should be sanded to roughen anyway. The best way for clean cuts with very little loss to the material is the steak knife method. Become friends with a nice sharp straight edged steak knife, preferably one that is a little on the stiff side/not too flexible (0.25cts at the thrift store). It doesn't take very long at all to learn to make decent straight plumb cuts using a straight edge. I find long shallow dragging cuts work best; 2 or 3 strokes and you're through 1-1/2 thk foam with virtually no mess and minimal sanding. I like your technique of putting the straight edge on the far side of the cut!

With foam dust the shop vac is your best friend.

:thumbsup:
KC
My Build: The Poet Creek Express Hybrid Foamie

Poet Creek Or Bust
Engineering the TLAR way - "That Looks About Right"
TnTTT ORIGINAL 200A LANTERN CLUB = "The 200A Gang"
Green Lantern Corpsmen
User avatar
KCStudly
Donating Member
 
Posts: 9611
Images: 8169
Joined: Mon Feb 06, 2012 10:18 pm
Location: Southeastern CT, USA
Top

Re: Itty Bitty Foamie Teardrop Test Build Thread

Postby HMK » Sun Jul 23, 2017 9:37 pm

She posted she had been sick. I sure hope she's feeling better. Mom and I got a bug and were puny for a couple of days too. I sure hope she checks in soon, I'm enjoying her build.
User avatar
HMK
Teardrop Master
 
Posts: 222
Joined: Sun Jun 10, 2007 4:30 pm
Top

Re: Itty Bitty Foamie Teardrop Test Build Thread

Postby amandacreiglow » Sat Jul 29, 2017 7:40 pm

Thanks for the well-wishes, HMK.

Had a bug that knocked me entirely out of commission for waaaaay too long. But finally back in fighting form and able to work on the trailer again.

Popped the new filters in to my respirator and made all the difference! Spent a while using the hot rod tool to cut out the doors from the side walls and holes for the spars that will support all the interior stuff, and smelled NOTHING of the fumes. The edges are rough as before, but I think it'll work out all right.

Image
Image
Image

If I feel up to it, I may start working on getting the mattress constructed/cut down. To me, having an innerspring mattress is important to me for it to feel like a "real" bed. So I got a cheap six inch innerspring mattress from Amazon, and will put a 2-inch memory foam topper that I've had for ages. Hopefully should end up pretty comfortable.


Sent from my iPhone using Tapatalk
User avatar
amandacreiglow
Teardrop Master
 
Posts: 137
Images: 1
Joined: Sat Jun 10, 2017 8:29 am
Top

Re: Itty Bitty Foamie Teardrop Test Build Thread

Postby dancam » Mon Jul 31, 2017 11:56 am

Hey, just saw this thread for the first time, looks like fun!
Living in a 7x12 would be pretty cool but building a small one first is a good idea. 4x8 isnt itty bitty though, lol.
I think for something to tow with a car and live in you may consider a 6ft wide by longer, like 15ft.
6ft wide catches less wind while towing, length only really factors in for crosswinds. Its also easier to see around and easier to keep in your lane while driving.
Anyhow it makes a big aerodynamic difference to slightly round all your corners on the outside. Also makes it easier to wrap the canvass around. I somehow completely forgot on mine and am regretting it. A 3/8 or 1/2inch roundover on a hand router would help a lot.
Living in a foamie woukd be nicer than wood i think because of the insulation.

Back to your big one-How big of an engine does the car have? Looks like there were lots of options for it. Aerodynamics is the biggest part for towability with foamies, weight isnt really an issue.
I am part way through my 5x10 pop-up build. Its the same hight as the car lowered and 6.5ft tall inside when raised. The outside upper half is 12ft long but unfortunatly photobucket killed my photos in the build thread.


ImageImage
Sent from my SM-G920W8 using Tapatalk
dancam
500 Club
 
Posts: 586
Joined: Wed Jun 01, 2016 3:27 am
Location: Edmonton Alberta Canada
Top

Re: Itty Bitty Foamie Teardrop Test Build Thread

Postby GPW » Wed Aug 02, 2017 5:53 am

“ I somehow completely forgot on mine and am regretting it. “ WHY ? Foamies are so easy to modify … I had a "trolly top” ( ridge on the FoamStream) , and then decided to cut off … To scaffold up , peel the old canvas back , saw off the offending foam ( handsaw) , then recover the top area with fresh canvas, and prime , less than 3 actual working hours . ( including coffee breaks ) …
Whether a small or large Foamie , it’s still waaaaaaaay easier to modify or repair than anything else … Don’t get caught up with the other Trailer folks . Once they’re done , they’re much more difficult to modify . A Basic Foamie is pretty “organic" and can grow or change at will …
There’s no place like Foam !
User avatar
GPW
Gold Donating Member
 
Posts: 14911
Images: 546
Joined: Thu Feb 09, 2006 7:58 pm
Location: New Orleans
Top

Re: Itty Bitty Foamie Teardrop Test Build Thread

Postby amandacreiglow » Wed Aug 09, 2017 12:20 am

Whew! Finally back at it! Only under the weather to a lesser or greater degree for a month, that's all. :roll:

But anyway, there have been a couple developments. First I finished trimming down the innerspring mattress, and reassembling it with a 1.5" memory foam topper on it. I had to trim down two rows of springs from both the side and the bottom, which was (of course) more challenging than I thought it would be. But it was a part of the process that I got to do inside, in front of the TV with the big annual tournament for the video game I play going in the background, and a dog making herself *ahem* useful.
Trailer 6-1.JPG
Trailer 6-1.JPG (215.41 KiB) Viewed 1218 times


It's definitely a small bed! I think the shortness of it hadn't really sunk in, and I think if I were any shorter than 5'3" it would definitely be a problem, or if I were trying to squeeze another person into the space. But it's just for me, so I think it'll be fine. And when I did a dry run of the layers before assembling it, I almost fell asleep in the living room in the middle of the day, so that seems like a good sign as far as comfort goes!

And then today I was able to get a bit more done, as well. I got the front cap cut, so now all of the structural elements of the foamie are cut down to size and shape, and only need to be modified to run cables and incorporate the wooden additions (for doors, vents, hatches, skylights etc). For this I tried out the other hotwire tool off amazon that I found, and it was... interesting. It cut much cleaner by far, and with far, far less fumes. It didn't melt as much of the material as the hot rod does, either, so it's probably a fair bit more accurate. It can only cut four inches deep, though, so that's a bit limiting. Now that I've used this tool, I definitely see what KCStudly was saying about it leaving the surface potentially too smooth for proper glue adhesion... it leaves a very different surface than the hot rod! Makes for prettier and faster 45 degree angles, though, as you can see.
Trailer 6-2.JPG
Trailer 6-2.JPG (96.37 KiB) Viewed 1218 times


After that, I set about getting the holes cut out for the skylight and the roof vent, which leaves me with pretty much all of the big holes as such cut out of the foam in the trailer, which is relieving. But the big thing is that it left me with spare pieces of foam large enough to be able to do some tests of the different adhesives I'm considering for how I'll be attaching the fabric to the foamie!

The contenders are the Childers Lagging Adhesive that ghcoe found, TBII, and Glidden Gripper.

Trailer 6-3.JPG
Trailer 6-3.JPG (119.39 KiB) Viewed 1218 times


I wanted to test all three both so I can get a sense of what the application process is like, and how well it feels the three of them adhere, comparatively. I also want to be able to run a few flammability tests, as that particular worry would be nice to abate if possible. So... yeah. I was pleasantly (maybe) surprised by how goopy and thick the childers is... even if one of the other two wins out in my opinion, it may still be a good smoothing coating, for which it's also recommended. But we'll see how they fare when they've all dried.

That's it for the day, but finally glad to be moving again. 8)

@duncam Thanks for the advise! I've been following your build as well, when you post updates, though I don't tend to post in a lot of other threads. I really like the whole pop-up concept... helps with the aerodynamics but gives you space to stand inside, but avoids all the low insulation and time consuming set-up pitfalls of regular popups. When I was a kid growing up in Alaska, my family had a super old, super heavy popup that we took all over the place. Some great memories in that. :) Hopefully yours will have some too... with less velcro and invasive mosquitos who find their way in somehow!

My thinking on the second foamie that I'd live in more long term has evolved a bit... as has my idea of how long I'm going to spend in this one. I'm thinking it'll probably be a year or so before The Big One... but that hasn't stopped the obsessive dreaming. I'm thinking that I'm going to make it 6'x10', using one of those standard carry-on utility trailers as a base. That way I can put the door on the back, and use put little legs on the fold-down loading ramp so that it functions as a sort of front porch. For the inside, I'm planning on having one of the walls fold down, and having the bed in there, with the kitchen on the other side, and a large work area (I'm pretty deeply computer-based) in the front. Effectively, it would end up a 10x10 space, which I think would end up feeling quite spacious, but would still be pretty compact to drive with. The tentative name I've got in mind is 'Foamie 2: Fold-down boogaloo'. You know, not that I've thought about it or anything. ;)

Buuuuut that's quite a ways off, yet. Gotta finish this one first! Good luck with yours... looks like it's coming right along! Excited to see it finished. :)
User avatar
amandacreiglow
Teardrop Master
 
Posts: 137
Images: 1
Joined: Sat Jun 10, 2017 8:29 am
Top

PreviousNext

Return to Foamies

Who is online

Users browsing this forum: No registered users and 9 guests